
Streaming Media Tools
Creating High-Quality Streaming Media
Just as television was to radio, webstreaming is to television today. Television, in its infancy, delivered exceptionally poor information with fairly poor quality. Streaming media is much like that today; while the information might be high quality, the quality of the view is compromised because of the delivery medium. Until greater bandwidth is available for the public, a need will always exist for editors that have the ability to edit just for the web.
Vegas is one of the most powerful web-delivery authoring and editing tools available today. Preproduction, however, is equally important as the editing and encoding ability when it comes to creating great streaming media. While many resources are available for great streaming media authoring techniques, I’ve included some tips in this chapter for shooting and producing great media.
Shooting, Editing, and Delivering
Perhaps the most important part of streaming production is knowing more about video than simply knowing how to turn on a camera. Understanding the basics of production is equally important to the flow of the production process and to the quality of the media itself.
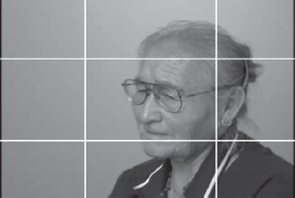
9.1 Rule of thirds applies to broadcast images.
People trained for working directly in broadcast are often the worst at generating quality streaming media shoots. Much of what is known about broadcast shooting is diametrically opposed to shooting good web video. Keep in mind that television is a lean-back experience, in which viewers are laid back, perhaps with a bowl of popcorn in hand, relaxing in some form. Streaming media, or media on a computer, is generally known as a lean-in experience, in which the viewer is close to the computer monitor, leaning in to view a fairly small image. This issue alone forces a completely different perspective for production of media. Of course, with the convergence of television and streaming media close at hand, this issue might well change in the near future. Both REAL and Windows-Media support high-definition streams with surround sound ability, and the quality of these streams is outstanding. For the moment however, more than 80 percent of the world is still on dial-up, so bandwidth will continue to be an issue in the near future.
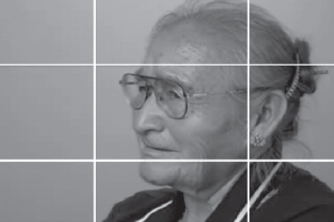
9.2 Streaming media works best using more of the screen space or the Rule of Two Thirds.
Three processes are in the chain of web video production:
• Production
• Editing
• Encoding and delivering
Production
Rule number one for shooting good web video is to always shoot with a tripod. Handheld camera work, regardless of the ability of the cameraperson, simply has too much movement to be encoded well. Redundant information in the frame encodes well, whereas moving media, even if it’s only slight movement, encodes poorly.
Shoot close in. Normally in broadcast-destined footage, shots are based around the rule of thirds. The rule of thirds is simple—divide the viewfinder into a grid that looks like a tic-tac-toe game. Any two points where lines intersect become the focal point of your subject matter, preventing the subject from being in the exact center. With streaming media, however, the message is more important than is the aesthetic of the picture. Clarity and a less informational background is the goal. Shooting for two-thirds imagery means bisecting three lines rather than only two in the framed image.
Be as tight as practical. Limit any background movement. Never shoot in front of moving trees, roads, or other backgrounds where there is movement. In fact, shooting against a backdrop, greenscreen, or bland fixed set is generally best. Keep background information/imagery to its simplest form. This process makes it easier for the encoder to process information.
Don’t forget audio. Audio is even more important in the streaming world than in the broadcast world, and it’s pretty important in the broadcast world. Viewers of streaming media will forgive the poorer video quality of a stream. They generally will not forgive bad audio. Always use lavaliere or boom microphones. Never use the microphone built onto the camera. The proximity of the microphone to the subject is too distant, and the sound is muffled and full of reflections, noise, and ambience, which is difficult to remove. Use Sony Noise Reduction if necessary, and it usually is. Unless the production is being delivered over the Internet or if it’s absolutely live-or-die necessary, audio should be in mono rather than stereo. Aside from phasing issues, stereo audio is more difficult to encode than is mono audio, and the audience can rarely appreciate stereo audio on most computer systems.
Limit or curtail reverb decay times, and cut off bottom- and top-end frequency information with an audio equalizer. This process leaves less information for the encoder to deal with. Normalize or maximize audio to assure that it’s as loud as possible. The encode process works best with highly compressed, loud media. Large dynamic ranges (quiet to very loud) do not encode well. Try to limit dynamic range to 12dB or less.

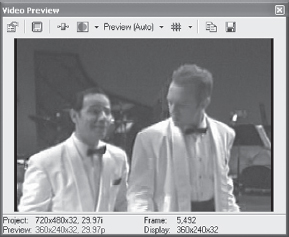
9.3 Well-lit face for streaming. High contrast and a tight shot make for a great stream at any speed. If the background is static, of one or two colors, and contrasted highly against the subject, Windows-Media 9 is capable of delivering even a full-screen stream at 56 Kbps. This image is a 56 Kbps stream projected in a training session. (Photo by R. Grandia.)
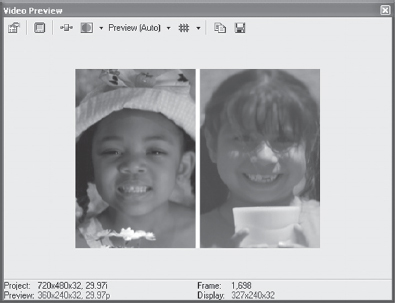
9.4 Using a split screen allows camera angles to be less important and still keeps a two-part conversation visible and clean
Light well. Having great lighting is critical to any web-video production. This issue is true more so than in the broadcast world because encoders have a difficult time distinguishing as many colors as the broadcast equipment does. High contrast and low saturation always work best for web media.
Edit for clarity, content, and cropping in mind. Beautiful panoramic shots are wonderful for demonstrating high-definition TV (HDTV) or for displaying the great outdoors. Such shots are horrible for the web, however. Detail becomes so small as to be invisible. Is that detail really critical to the message that’s being delivered? The message is the most critical consideration, and anything not directly related to the message should not be found in the stream.
In the edit process, if two talking heads are needed, rather than showing the two heads in one frame, consider the CNN-style appearance where each head has its own space, divided by a clean line down the middle. This setup accomplishes two tasks. First, it keeps the background frames redundant. Second, it requires less distance between the heads, so both heads may be cropped in more tightly.
Removing unnecessary information limits what the encoder has to look at. Encoding tools are not capable of separating a few pixels of a reflection on a window from the blowing hair of the subject. To the encoder, it’s all just moving pixels, and nothing is prioritized over anything else. Cropping helps alleviate this concern because cropping allows for less information to be on the screen.
Less saturation is best in streaming media. While the RGB color space allows for millions of colors, keeping colors to a minimum is best because it offers fewer color choices to the encoder. Reduce colors whenever possible. The Hue, Saturation, Luminance (HSL) filter in Vegas is excellent for this concern. Insert the Black Restore filter as well to ensure that black is really black. Gradients of black are difficult for the encoder to compress and difficult for the eye to see in the production stage. This filter, used correctly, flattens out black in the stream.
When editing for streaming media, forget about long, beautiful dissolves and fades. These sorts of transitions do not encode well. Use linear wipes, hard cuts, or other straight-line transitions. Don’t use titles with serifs, but do use clean-cut title fonts and keep them as large as possible. Sometimes no title is necessary if metadata is used to convey text inforaton.
9.5 The broadcast shot allows for more background to set the stage and location of the shot.
9.6 Cropped for the web, this shot is more interesting when viewed from very close up, such as with a computer monitor.
9.7 Streaming media should not have as much background. This example shows a poorly cropped screen. Too much information is in the background, and the subject takes up too little of the viewing space.
Also, in the edit stage, be aware that extreme contrasts are harder to encode, so keep extreme variants in saturation limited. Remember that placing media on the web is about messaging, not brilliant colors and flashy editing.
To summarize:
• Use clear fonts for titles.
• Limit dissolves; use cuts or hard wipes instead.
• Avoid moving paths when possible. Use picture-in-picture or split screens.
• On headshots, crop to half, rather than thirds.
• When you want to deliver to low-band systems, keep audio in a mono setting. For both low- and high-bandwidth delivery, consider using both stereo and mono audio. Does stereo really add value?
• Don’t limit yourself to the standard 4.3 aspect. If your video is about something involving heights for instance, consider scaling the video to be tall and narrow. This process might also use less bandwidth and might allow for better audio or compression. It also might be that the stream quality will suffer, depending on the aspect selected. Either way, do not be afraid to experiment.
• Try a variety of codecs to see what allows for the best look. Perhaps put low bit rate media in one codec and high bit rate media in another codec.
• Try frame rates of 12 fps rather than 15 fps when bandwidth or file size is a concern. For slide and still-type presentations, use even slower rates, such as 5 fps.
• For headshots, try using color key or chroma key tools to create background masks. Then fill in with high-speed, blurred imagery. This process keeps the headshot clean, while causing the eye to focus on the headshot and not the black behind it. It also lends an MTV-type quality to the interview or presentation.
• Impress viewers by embedding metadata into the end or middle of the video files that direct their browser to open at the end, so that they are given other images to view following the video/audio presentation. If you are selling a product, the metadata could potentially send the viewer to a “purchase me” type of page.
Preproduction of audio for web-streaming or Internet distribution is often overlooked in the streaming preparation processes. Oftentimes, videographers intent on placing media on the Internet or an intranet use tools built into the applications that are being used for editing media for the web. If these tools are the only ones available, little can be done to prepare the audio for the web without going through multiple renders and loss of video quality. The processing described in the next paragraphs apply equally to audio only, as well as audio for video.
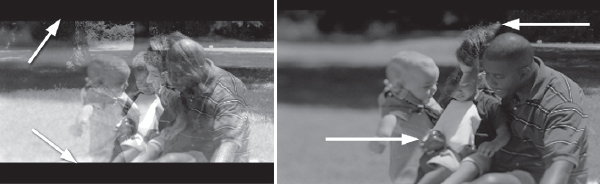
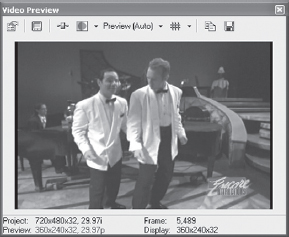
9.8 The image on the left shows a slow fade and letterboxing. The image on the right incorporates a hard wipe and no letterboxing. This image will encode/compress much better.
If third-party editing tools are available, use them to the best advantage possible. Most nonlinear editing packages come bundled with Sony’s XP audio editing software. For this book, I’ve used Sound Forge 7.0, a full version. The tools used in this book, however, are all found in the XP version.
Audio takes a tremendous amount of unnecessary bandwidth in the streaming world. Most computer speakers can’t reproduce sounds of any quality above 10,000 Hz (10 KHz) or below 125 Hz. If unnecessary audio is taken away, it leaves room for more efficient use of both video and audio bandwidth.
All video and audio compression tools use both high- and low-pass filters of some sort. The question is what is the quality of the filters, and where are they cutting? Video tools simply aren’t designed well for most audio processing chores.
How Is Audio Preprocessed for the Web?
First, start by fully rendering your file. If you are working with most audio editors, you’ll want to be sure your file is smaller than 2GB, as current limitations prevent larger WAV files from being opened in audio editing tools on FAT32 drives. Moreover, you probably don’t want to create too large a file, as large files are a bane in streaming media. If you want to save a step in the production process, render your file in an AVI format that is the view size for streaming media, such as 320 × 240 at 15 fps (using square pixels).
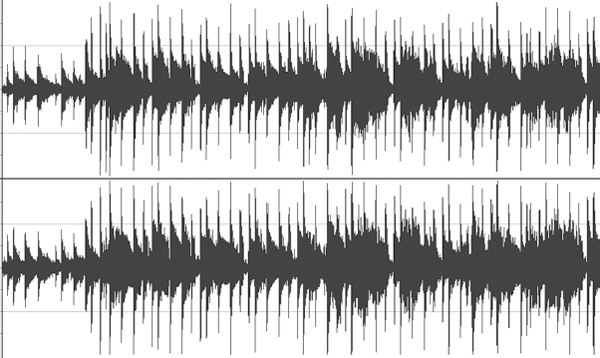
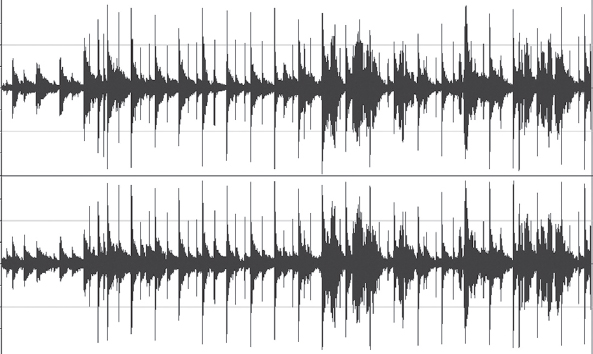
9.9 Notice the dynamic range of audio in the waveform.
9.10 After EQ, the audio waveform contains less transient information because extreme low/bass frequencies and extreme high frequencies have been cut.
Open the rendered file in your audio editor. Notice how the audio dynamic is fairly consistent across the spectrum. This audio has full dynamic range, containing both frequencies that multimedia speakers can’t reproduce and also frequencies that can’t be heard. If it’s a live recording, sounds, such as microphone stand rumble, use up to 100 times as much power to reproduce as the breath in a singer’s voice. Those frequencies use bandwidth/streaming space that can better be used for video or audio enhancement/quality.
Using the graphic, paragraphic, or parametric equalizer in the audio editing tool, locate the high and low roll-off controls. Set the low-pass filter at 10 KHz and the high-pass filter at 100-Hz. These settings will cut off the extreme high-end and low-end audio right from the start. Just this preproduction task alone makes a tremendous difference in how the compression application accepts files for compression.
At this point, it might be advisable to do any final tweaks and enhancements with the audio. If you have any stereo widening, reverb, or ambience adding effects, now is the time to add them. Time delays and long reverbs do not compress well. Care and consideration, therefore, should be used at this point, so that streaming media will sound the best it possibly can on the receiving end. Multimedia speakers have a tendency to have a bump in the 5 KHz region, so if your media is music intensive, it might be advisable to reduce this frequency area by as much as -3dB.
Notice the difference in the audio file’s appearance in Figure 9.11 following the compression change. The waveform has less mass, and the transients become less apparent.
Be sure to have a preview listen to the file before moving on, making certain that the audio is the way you would like it to sound when it is received on the listening end of the stream.
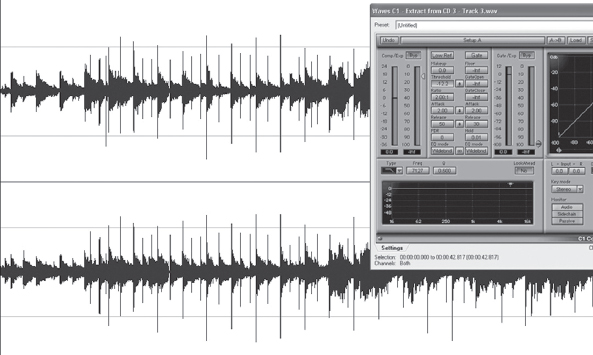
9.11 Use light compression to smooth out waveforms. In this illustration, a 2.1 compressor has been inserted, with compression starting at-12dB.
Often in multimedia creation, particularly dealing with files generated directly in the computer environment, audio levels are not consistent across the project nor are the audio levels at optimum settings. These audio files may still be used and brought to maximum levels by normalizing them to an average level across the median plane. Two approaches to normalizing are used—normalize to peak values of XdB or normalize to an average RMS value. Use a normalization of an average RMS value if you wish to match the apparent overall loudness of a sound file. The Normalize to Value selects the volume to which the sound file will be normalized. As an example, when using peaks, if the peak level is -10dB and the Normalize to setting is set to -3dB, a constant boost of 7dB will be applied to the entire file.
When using RMS levels, normalizing to OdB means boosting the signal so that it has the same apparent loudness as a 0dB square wave. This process usually creates a file that is very loud and often clipped or distorted. Normalizing to values between -12dB and -6dB is recommended.
Normalizing on a peak value allows for more dynamic interplay in the audio file. The file is scanned for its maximum peak value, which is then raised to -.03dB. This process applies equally weighted amplitude across the audio file. Most normalizing functions allow for the introduction of dynamic compression at any stage in the normalization process. Using this tool is advisable as it prevents clipping at all stages, while allowing the normalize tool to bring audio up to maximum levels. This is especially desirable when the sampling frequency or bit rate of audio will be changing. Audio files should always be maximized before converting the format.
After the file has had the extreme low and high frequencies removed, been equalized to the desired sound, and normalized, the file is ready for encoding/compression for streaming formats. If the file is an audio-only file, it is a simple matter to encode to REAL, Microsoft media, or QuickTime formats using the tools built directly into your audio application or using third-party tools. Be aware of the ability to insert command markers or instructional markers into the audio or video file. These command markers can display copyright information, authoring information, HTML redirections, and much more. If the processed audio file is part of a video file, it is an equally simple process to encode the video file for streaming. Reducing the audio content and maximizing the audio volume both make for more encoding bandwidth for the video portion of the file and provide a more efficient use of available bandwidth. These benefits are especially useful when dealing with low-speed connections, such as dial-up service.
Until bandwidth and connections bring broadband to every home and business in the world, and even after that point for purposes of bandwidth and storage, content creators/providers need to learn every trick in the book and invent some new ones in order to keep media files appearing and sounding the best that they can. Audio is generally an afterthought in the video creation/editing world, although that is rapidly changing. Experiment a bit, listen closely, and you’ll be surprised how great audio can really help out a less-than-great visual presentation. Don’t forget metadata can be a great tool for audio-only delivery, as well as a video delivery over the web.
Delivery
Encoding is not much of a challenge if the techniques mentioned earlier are employed in production and editing stages. Vegas, however, offers a number of choices for the encoding/ output side of media.
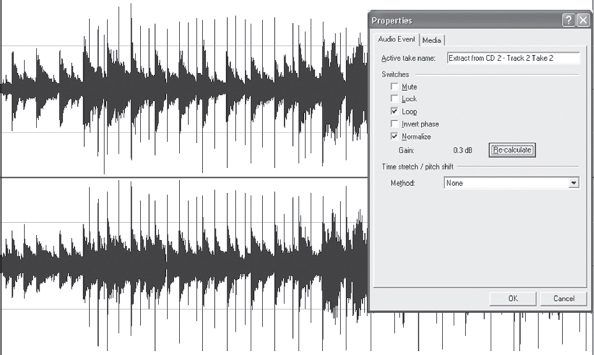
9.12 Normalizing a file to maximize volume.
An exceptionally valuable tool found in Vegas is the ability to encode portions of the timeline for preview, rather than rendering out entire files, encoding, and if dissatisfied, repeating the entire process. Vegas is one of the only tools available today that can encode directly from the timeline, complete with metadata insertions. This Preview from Timeline tool is valuable in that producers are able to see exactly what their media will look like when viewed from the web, directly in the media player of their choice.
![]()
Open the Streaming Project on the accompanying DVD.
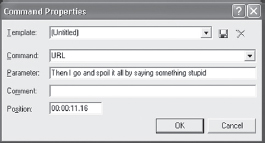
The project file already has three sections of metadata embedded: two text instruction lines and one URL locater line. When viewed in the media player, the text data shows up at the bottom of the screen (in the Windows-Media Player, select VIEW | NOW PLAYING TOOLS | CAPTIONS). Place the cursor on the timeline at the first marker, labeled Insert Command Here. Press C, and a command dialog box will pop up. In the Command dialog box, use the menu and select Text. In the parameter box, type the words, Then I go and spoil it all by saying something stupid.
Select a small section of media on the timeline over the top of the section containing at least one metadata flag. This section will be highlighted in gray (or blue if looping [Q] is enabled). Open the TOOLS | PREVIEW IN PLAYER dialog (Ctrl+Shift+M). In the dialog, choose Windows-Media V9 (*.wmv) for the codec and select 256 Kbps for the streaming bandwidth. Click the Custom button, and in the audio attributes, choose the 48 Kbps, 44 KHz Mono (A/V) CBR setting. Click the Video tab, and in the Format window, choose Windows-Media Video 9.
Now click the Summary tab and note the text boxes that may be filled out. This data is embedded with the file and shows up in the player on the client (viewer) side when the file is streaming. This dialog also provides a great means of data management for later use, as information about the file can be embedded in the file for database searches. Be aware that the last information entered in this dialog carries to the next time the tool is opened, so be certain to check this dialog with each stream.
Click OK in the Custom Template dialog and click OK in the Preview in Player dialog. Vegas will begin to render the file as a WMV file. After the file has rendered, Vegas will automatically call on the Windows-Media Player to open and play the file. If the Captions option is enabled in Windows-Media Player, you’ll see the captions on the bottom of the Windows-Media Player screen. This will show only the selected portions of the timeline. In addition, only a temp file has been written for the streaming file. A full render will still need o be completed for a final output file.
What Is Metadata?
Metadata is what makes streaming reach out and touch someone. Metadata is embedded information in a streaming file that opens secondary browser windows, directs viewers to web pages, provides lyrics or text information to a song or informational media piece, provides advertising opportunities, all from a streaming file. The author of the streaming file places the metadata markers on the timeline, and viewers have a more in-depth experience as a result. Vegas has many metadata authoin tolsfound in the Command key (C).
9.13 Metadata may include song lyrics as displayed text.
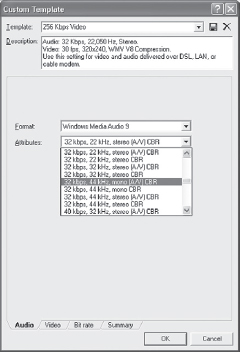
9.14 Streaming audio attributes may be set to user preferences.
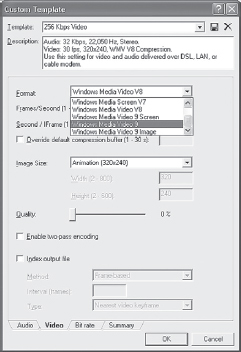
9.15 Select the video codec and other attributes in this dialog.
![]() Tip
Tip
Preview in Player is a powerful tool. Use it to identify trouble spots in the streaming media by previewing high motion/intense color areas. This process helps you determine how the video should be handled. Prerendering trouble spots at various frame rates before rendering a streaming file often helps make high-motion media look more polished. Tight cropping while following motion often helps as well, as it reduces background imagery.
Importing a Spreadsheet
Vegas has the ability to import a scripted spreadsheet. This asset is very important for the content creator who has concerns about complying with Rule 508 Assistive Technology laws. For any government-funded streaming endeavor, these laws almost always must be complied with. Colleges, training facilities, hospitals, corporate environments, and federally subsidized businesses, among others, must comply with these laws.
Vegas’ streaming toolset enables closed caption-text to be embedded in the video or audio stream for hearing-impaired viewers. To do this, start by creating a four-column, tab-delimited spreadsheet in your spreadsheet application of choice and continue the process as follows:
1. In the first column cells, type 00:00:00:00.
2. In each of the second column of cells, type the word text to specify the command format.
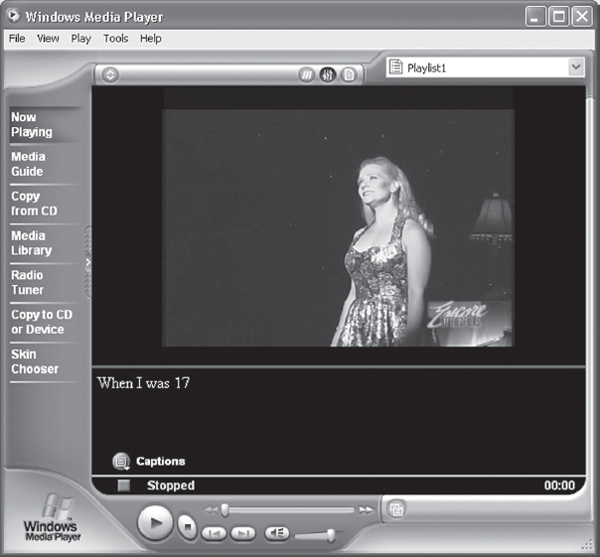
3. In the third column, type the text messages that you wish to be seen, for example, When I was 17.
4. In the fourth column, type marker information that you can use to identify the caption information. For example, they might be called cap 1 or line 1 in the cell.
5. In the last row of cells, leave the third column empty, which will clear the last caption text from the screen of the media player.
6. Select all information on the spreadsheet, or press Ctrl+A in Microsoft Excel. Copy all information.
7. In Vegas, select VIEW | EDIT DETAILS | SHOW | COMMANDS. Right-click in the gray box in the upper-left corner and choose Paste. Vegas will paste the spreadsheet information into the Edit Details window.
8. In the Edit Details window, click the first column, which will sort the captions by line number as named in step 4. Position the cursor where you wish the first caption to occur. Select the first row in the Edit Details window and play the video/audio file by pressing the Spacebar. Press Ctrl+K to drop a marker for the first caption. Repeat for all subsequent captions. Caption markers can be dropped on the fly and moved on the timeline by clicking and holding on the markerand then dragging to the desired position.
![]() Tip
Tip
Be sure Captioning is enabled in Windows-Media Player by selecting VIEW | NOW PLAYING | CAPTIONS. Otherwise captions will not be previewable nor can they be seen in the playback of a rendered file.
After all edits have been made, all metadata inserted, screen markers completed, and various points in the timeline checked for quality, the file is ready to be rendered. Open the FILE | RENDER AS dialog, select the format of media you wish to stream, the bit rate at which to stream, and any summary information you wish to appear. If custom selections, such as variable bit rate (VBR) streaming or custom audio settings, are needed, click the Custom button. This action opens the same dialog shown during the Preview in Player exercise.
The Audio tab opens by default. As mentioned earlier, audio should be kept in mono to provide greater bandwidth for video. The Video tab is next on the menu tabs; settings can be adjusted according to need. Experiment with settings that best suit your requirements.
When you select various bit rates in the Bit rate tab, the file rendered by Vegas will be a multiple bit rate (MBR) file. If only one bit rate is selected (the default), the file is rendered as a constant bit rate or variable bit rate (CBR/VBR) file. Viewers also generally receive a more stable stream with CBR instead of MBR files.
The Summary tab allows for information, such as copyright information and author information, to be embedded with the file. This information shows up in the information bar of a REAL, Windows, or QuickTime media player, and in most third-party media players as well. Other than re-rendering the file, this information is difficult to remove and is a starting point in the concern for digital rights management (DRM).
After the custom selections/setups have been accomplished, you may wish to save the template settings for future use. A menu is available at the top of the Custom Templates dialog. Clicking the cursor in this menu allows you to rename the template, and clicking in the Description field allows you to create a new description of the template. After defining the name and description of the new template, click the icon that resembles a floppy disk, which saves the template for future use. After the template has been saved, the final render can take place.
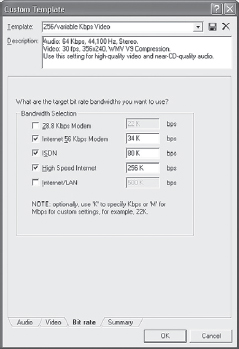
9.16 Checking multiple bit rates creates a multiple bit rate (MBR) file.
Click OK in the Custom Templates dialog, which closes. Define where you want the final rendered file to be saved/rendered to and click the Save button. The render begins. After the render is complete, Vegas provides an option to open the folder in which the rendered file was stored. If you do not wish to see the Open Folder dialog in the future, you can use the check box that Vegas provides to disable this pop-up screen in the future.
The finished file is now ready to be uploaded to a website and streamed. Bear in mind that with REAL and QuickTime media, unique streaming server software is required for streaming, as opposed to download-and-play files. REAL’s new Helix server is capable of serving all three stream formats, in addition to many other formats in the streaming world. A non-commercial free version with a very limited number of streams is available at www.real.com.
Don’t be afraid to use streaming media for more than streaming over the Internet. It’s a great tool for delivering high-quality media on a CD to a potential client. With the ability to burn a high-definition file to a CD and to include a player-installer on the CD for the client, this tool is very powerful in creating workflows between client and editor, while not taking inordinate amounts of time to show the client what the video project looks like.
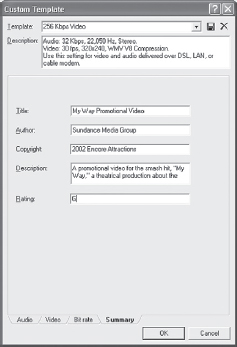
9.17 Use the Summary tab to embed copyright, author, and other information that can be seen in the stream/media player.