2
Have Fun and Keep It Simple
Every child is an artist. The problem is how to remain an artist once he grows up.
~ Pablo Picasso
When I was little, I drew everywhere—on scraps of paper, on my walls, in the night air with my finger. It was magical. Today I keep that spirit of pure joy alive in my sketchbook. This is where I play with paint and create drawings for enjoyment alone. My sketchbook habit is an oasis in my day, a way for me to savor the moment.
Experiment this month by taking your sketchbook with you everywhere you go. In this chapter, I give you suggestions for illuminating your daily life in drawings and paintings that are simple and fun. I show you how to sketch and paint at a café, on the road and at meetings. You will see how to create a journal page a day in many different kinds of ways, and in unexpected places.
All the painting projects in this chapter use only three pigments—my versatile full-spectrum triad. A few well-chosen art supplies make it easy to explore artistically each day. Remember: the world is your best studio.

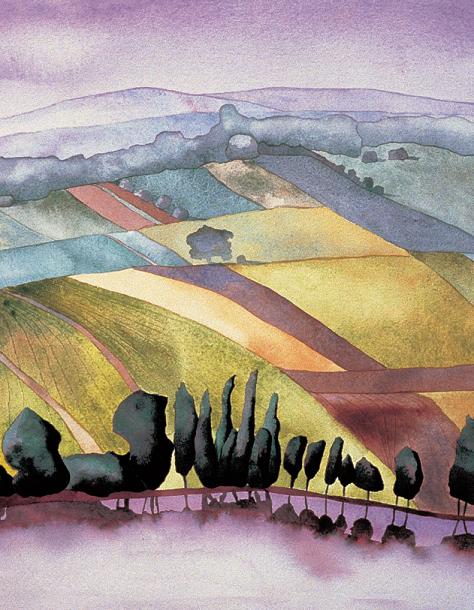
WATER PATTERNS
Watercolor on Arches 140-lb. (300gsm) cold-pressed paper
22" × 30" (56cm × 76cm)
Collection of Carol and Edwin Wright
One Minute Drawings
![]() PAGE-A-DAY IDEA
PAGE-A-DAY IDEA
Prepare Your Journal
Prepare your journal by drawing six little boxes on a page—hand drawing is fine, there is no need for a ruler. Each little box should be roughly 2" × 2" (5cm × 5cm), drawn with a 2B pencil. Now you are ready to fill them in with quick small frame impressions of whatever catches your eye. Those six little empty boxes will inspire you to fill them up!
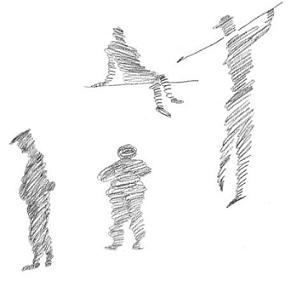
Sketching is fun—especially when doing one minute drawings. Draw a page of little sketches, and leave the editing and erasing out of the picture. Experiment with both the small frame and open page formats to see which enhances your sense of freedom and creativity. When you first begin, time yourself or enlist the aid of a friendly timekeeper. I do a few thirty-second drawings to warm up. You will be surprised by how long a minute seems after that. Let your eyes do the drawing for you. Keep your gaze on the object more than on the paper in front of you. Don’t expect finished drawings. This is the art of the rough sketch. You will get better and better at capturing the essence of a scene or subject in just a short amount of time. Remember, let yourself draw without judging. The art critic is on vacation. Draw quickly and draw often.

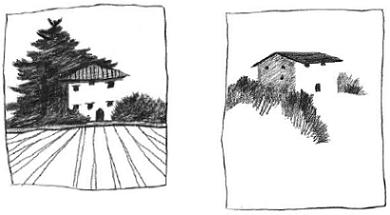
Small Frame Format
These pencil drawings are from a recent trip to Italy, made while traveling on a bus. The small frame format inspired me to fill in the little drawn boxes with details from the scenery outside the window. The small frame format is a marvelous way to freeze-frame a sequential experience. I once drew a page of little one minute drawings of our arrival by ferryboat to a harbor. As we moved, the island and harbor town we were approaching came closer and closer into view, and the composition of sky, island and water changed rapidly. Be sure to make the little boxes on your page first, so you can draw in each one in quick succession.

Try Different Drawing Tools
Take a look at one of my workshop student’s first attempts at one minute drawings. She decided it was reassuring to have the structure of the small frame format. She experimented with several drawing tools—pencil, black felt-tip pen and red ink pen—to see which appealed to her the most.
ONE MINUTE JOURNAL DRAWINGS
Jeanne Henry Pen and pencil on journal paper 8" × 10" (20cm × 25cm)
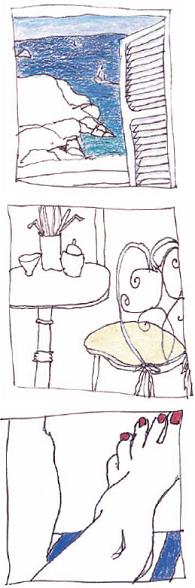
Embellish Your Drawings With Color
Jeanne continued to work in the small frame approach in more one minute drawings. She was so pleased with her efforts that she embellished these with colored pencils. It was a joy to see her drawing confidence increase with her new one minute drawing habit.
ONE MINUTE JOURNAL DRAWINGS IN
COLOR Jeanne Henry Pen and pencil on journal paper 8" × 10" (20cm × 25cm)
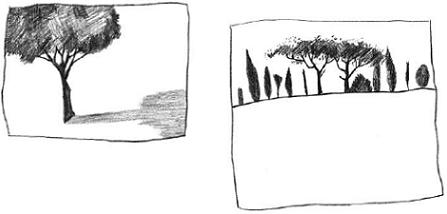
Open Page Format
Scatter quick sketches all over the page, without confining them to drawn borders. Some of your sketches may overlap others. Draw some subjects close up and some from far away. There is no need for perspective consistency in the open page style. It all adds to the fun. Draw for enjoyment! I promise you will never forget the place or subject you stop for just one minute to draw.

Take Your Sketchbook Out for Dinner
These one minute drawings were done in the open page style. I wanted to record each course of a memorable lunch at L’Aubergade Restaurant in the Dordogne region of France. Starting with the first course in the upper left corner, I drew with a Pigma Micron .35mm marker pen in my Aquabee 9" × 12" (23cm × 30cm) journal. I had to draw fast before eating each dish!
Overlap Your Drawings
Gary Hang Lee’s sketchbook on safari to Botswana is filled with open page one minute drawings of wildlife in their natural setting. He doodles with felt-tip pens in a delightful combination of drawings and text. His page is completely covered with quick studies creating a vibrant jungle of images that reflect the richness of his experience. You can almost feel his excitement.
SAFARI SKETCHBOOK DRAWINGS
Gary Hang Lee Pen on journal paper 9" × 12" (23cm × 30cm)
Don’t Bother With Erasing—Who’s Got Time?
I notice that when I let go of trying to make a perfect drawing, I relax and enjoy myself. And, as a result, my sketches are full of life and personality. They become a reflection of the swirl of life around me. In my artistic journals, I want to record rapidly what I see. I especially like to use these three sketching techniques because they encourage no erasures. They release you from the temptation to seek perfection. Try each of these one minute drawing methods. They will help you fill your artistic journal with lively and whimsical interpretations of your day.
Use a pencil and draw without lifting for one minute.
Draw Without Lifting
Pick a subject and draw it without lifting the pencil or pen off the paper. You will crisscross over lines and retrace your steps—that’s fine. Give yourself a pencil with a lot of lead so you don’t run out in midstream. Darken lines by going over them several times to reinforce shapes. As you go over the lines you want to emphasize, your subject will emerge out of the tangle.

Outline in pencil and scribble in the dark areas.
Smudge Shading
Outline your subject with a soft pencil like a 2B. Then scribble in a few lines to indicate dark areas and shadow areas. Use a blending stump to smudge these lines into a blurred gray tone. I have used my finger to smudge on occasion, but a blending stump works much better. You can give a very simple drawing a lot of character with a little shading.
Loop Drawing
I like to draw people in motion using only loops, again without lifting the pencil off the page. Loops are stacked on top of loops to form the shape. These loops give a sense of weight and volume to the figure. Learn to draw people quickly—people like to move. The most interesting people are usually in the act of doing something. Drawing with loops will help you to capture them. These examples were drawn with a 2B pencil.
Smudge with a blending stump to create shaded areas.
Turn One Minute Drawings Into Paintings
“My sketchbook serves me as a cookbook when I am hungry. I open it and the least of my sketches can offer me material for work.”
~Georges Braque
![]() PAGE-A-DAY IDEA
PAGE-A-DAY IDEA
Art Enroute
While enroute—on your daily commute to work, as a passenger in the car on the way to the grocery store, at the airport or on an airplane— make a page of one minute sketches in the small frames format, and one in the open page format. You will be surprised by all the interesting things you notice when you stop to draw what is around you, even in your own neighborhood. When you are done, ask yourself which format most inspires your creativity. Or, perhaps you will enjoy them both, as I do.
One of my secrets is to use one minute drawings to jumpstart myself into opening my journal and start to sketch. I tell myself I am only going to spend one minute per sketch, six on a page—that’s only six minutes of my busy day. The truth is that as soon as I get going, I want to keep on going. Often I am enjoying the process so much that I choose to fiddle with one or more of the drawings to refine them, just for the pleasure of it. Sometimes we have to trick ourselves into having fun.

Gather Reference Material
These pencil drawings were made in my artistic journal as I sat on the ground on top of a windy hill in Les-Baux-de-Provence, France. I drew quickly —not just one minute, but not much more.
VIEW FROM LES BAUX DE
PROVENCE
Watercolor on Arches 300-lb. (640gsm) cold-pressed paper 19" x 24" (48cm x 61cm) Collection of George Fabel
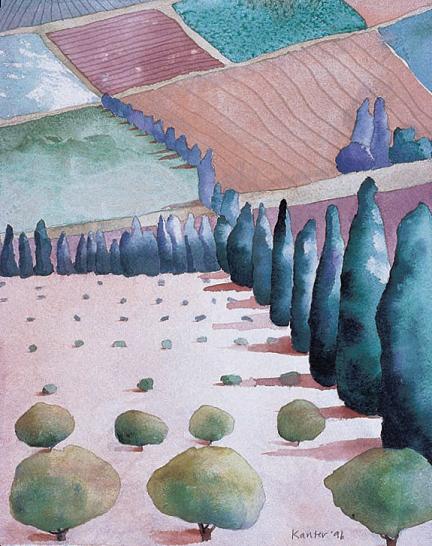
Finished Painting
When I returned to my hotel room later that day, I painted this watercolor in my journal from one of the sketches. Can you see which one I used? I added some dark shadows with a Pigma Micron .35mm pen to the drawing to emphasize the dark shadows under the tall cypress trees. The full-spectrum triad helped me create a beautiful range of bright hues and lively, expressive darks. You can see that there are two more paintings waiting to happen from just a few minutes of sketching.
Look What Just Three Colors Can Do!
![]() PAGE-A-DAY IDEA
PAGE-A-DAY IDEA
The Color Library
Building a color library is a great way to explore the color possibilities of the full-spectrum triad. I call this a color library because, like a library, it is full of many selections. I like knowing what color options are possible, so that later on I can choose the ones I want to use in a painting—just like choosing books from a library. I don’t want to use all the colors possible from a triad in one painting, just as I wouldn’t want to take out all the books in the library at one time. But I love knowing all the choices I have. For that reason it is invaluable to build a color library of each of the four triads. See chapter six for a full explanation of all four triads.
Step 1 Mix a large puddle of Winsor Lemon on your palette. Paint a swatch of pure yellow pigment at the top of the triangle.
Step 2 To the pure yellow puddle, add a tiny bit of Winsor Blue to create a warm, yellow-green hue. Paint that color mix next to the pure yellow.
Step 3 Continue adding tiny additional amounts of Winsor Blue until you mix all the way to pure Winsor Blue, recording each mixture.The more gradations you make, the better you are able to explore the unlimited possibilities of triadic painting.
Step 4 Now try making graduated color mixtures between Winsor Lemon and Permanent Rose.
Step 5 Finally, mix Winsor Blue and Permanent Rose to complete the triangle.

The journal artist’s best friend is the full-spectrum triad. With just three colors you can mix an infinite and expressive range of hues. Simplify your palette and enhance color harmony all at the same time. There simply are no wrong colors because they all relate to each other. The painting projects in this chapter are a perfect way to get acquainted with the full-spectrum triad.
Four Ways to Mix Triads
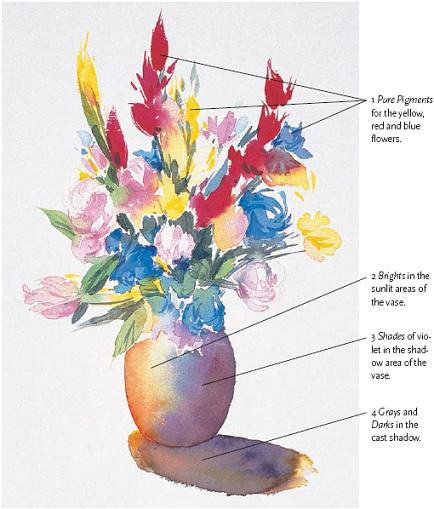
To fully appreciate the potential of the full-spectrum triad, you need to know the four results you can obtain by mixing with color triads: pure pigments, brights, shades, and grays and darks. This understanding is key to adding virtuosity to your color mixing vocabulary.
PEONIES AND FIRE ORCHIDS
Karin Felker Harris Watercolor on Arches 140-lb. (300gsm) cold-pressed paper 10" × 14" (25cm × 36cm)

Winsor Lemon
Pure Pigments
The first way to use the colors in a triad is to paint with pure pigment directly from the tubes. The full-spectrum triad is made up of the three primary colors. Use them unmixed as red, yellow and blue. You may be surprised to see what optically true primary colors look like. They are the basis of the color wheel and, theoretically, all colors can be mixed from them. Be sure you use the pigments I specify so you can experience the complete sweep and scope of the full-spectrum triad. Dilute with water for lighter colors or use a lot of pigment with just a little water for more intensity.
Brights
The second way to use triad pigments is to mix brights. Brights are created by mixing together two of the three pigments in the triad, without the addition of the third. In the full-spectrum triad, these are the secondary and tertiary colors. The exact amount of each pigment in your mixture will determine the color. You can vary the proportions infinitely and, likewise, vary the colors infinitely. You already know how to create brights by building your color library.
Shades
The third way to mix colors with a triad is to create shades. Think of a shady garden in comparison to the same garden in the bright sunshine. You are creating the shaded version of the same color by adding a little bit of the third pigment in the triad. You are really adding the complementary color without having to study a color wheel. This is called graying a color, but it doesn’t mean you have to get mousy grays. It means you have the power to create gorgeous, rich shades with character and nuance. Again, you can vary the proportions infinitely and, likewise, vary the colors infinitely.
Grays and Darks
The fourth way to mix pigments in a triad is to create grays and darks. Mix all three pigments together, in approximately equal proportions, and you will make a gray or dark black. You can vary the color of the dark by adding more of one pigment than the others. For instance, you can mix a reddish dark or bluish dark. I find these richly colored darks to be much more attractive to the eye than a premixed black.The less water and more pigment you use, the darker your mixture will be. Dilute with water to create light grays.
First Paint, Then Draw
![]() PAGE-A-DAY IDEA
PAGE-A-DAY IDEA
Color Notes
Play with the pigments of the full-spectrum triad by creating a page full of beautiful blends. Look out your window and paint swatches of the colors you see. Free yourself from painting shapes; just let yourself go in an exploration of color possibilities. Spray your paper with water first for a loose, wet-in-wet paint application. Look for as many colors as you can and then recreate them in watercolor. If you wish, add pen lines when the paint is dry to describe the view out of your window.
My sketchbook is a jewel box of impressions of the beauty of the world around me. When I want to capture both color and subject quickly, I often use the first paint, then draw method. Usually the watercolorist draws first, then adds color to the shapes in the composition. For the sketchbook artist a great way to work in watercolor is to reverse the usual order. Paint first, then draw afterward. The advantage is that I am sure to get some crucial color notes on my page before the light changes, or I run out of time and have to leave. Adding pen lines to describe the subject on top of the color notes completes the picture in a very short amount of time. Use what you know about color mixing with the full-spectrum triad to get just the colors you want to recreate in your atmospheric underpainting.

Draw Over Your Colors
This page in my artistic journal was created by first painting, then drawing on a 10" × 8" (25cm × 20cm) piece of watercolor paper. I applied watercolor in a loose fashion, trying to mirror the colors of the Parisian street scene in front of me. I didn’t worry about the placement of the colors at all. The aqua blue of the sky, the reds and oranges of the flowers, and the yellow of the awning all appear in my underpainting. I added the drawing after the paint dried, using both fine and ultra fine waterproof felt-tip pens.

First Paint, Then Draw
This painting of the flower market in Nice, France, uses the full-spectrum triad of Winsor Blue (Red Shade), Winsor Lemon and Permanent Rose. Paint the colors you see all over the page without regard to placement or shape of the subject. Mixing all brights gives the painting a warm friendly feel.
SKETCHBOOK PAINTING
Sue Greenbaum Watercolor on Aquabee journal paper 6" × 9" (15cm × 23cm)
![]() PAGE-A-DAY IDEA
PAGE-A-DAY IDEA
Collage the Colors You Love
Do you love the brights? Or do you prefer, as a French friend of mine says, “the colors which have no name”—the shaded, grayed hues? Often you can tell which color palette a person prefers by the clothes they wear. My French friend always dresses in heather-like shades, never bright, primary colors. Another friend always wears brilliant, flowerlike colors—bright fuchsias and reds, brilliant yellow-greens—that are a fine reflection of her vibrant personality. Color choices are a part of the way you see the world, and are reflected in your art. Cut out examples of the colors you are most attracted to from magazines. Collect postcards of artwork, and ¶scraps of fabric with color preferences matching your own. Make a collage in your journal of all you collect. See if you find a pattern to the colors you like. Are they mostly brights? Pure pigments? Shades? Grays and darks? A combination?
Prismatic Painting
![]() PAGE-A-DAY IDEA
PAGE-A-DAY IDEA
Café Art
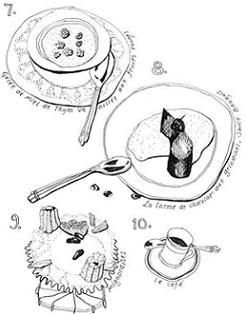
One of my favorite journaling activities is what I call café art. I complete a page in my journal in the time it takes me to finish sipping a drink. I discreetly write, draw and paint my daily journal entry while enjoying a private moment, away from the demands of others. Treat yourself to a café art date each week and take advantage of a perfect page-a-day journal opportunity. Make a prismatic painting of your cup or glass, and learn to mix beautiful rainbow colors with the full-spectrum triad, all at the same time.
Do you remember the first time you looked through a crystal, and brilliant, multicolored fragments of light appeared? When you pass white light through a prism, it disperses into a kaleidoscope of rainbow hues and patterns. This is an example of looking at the ordinary in an extraordinary way. Prismatic painting is my way of bringing the everyday into a different focus and finding beauty in the commonplace.
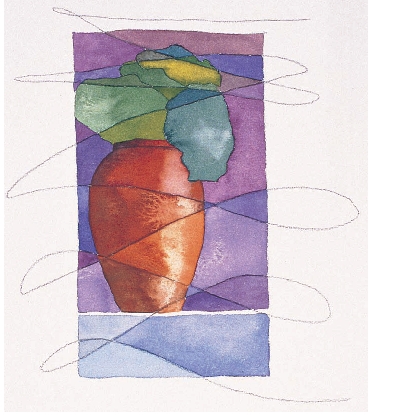
Create Instant Backgrounds Prismatic painting is an inventive way to resolve what to put in the background— always the hardest thing to compose. The background is composed for you by the intersecting scribbled line shapes. A powerful image emerges from a very simple subject.
Demonstration: Create a Prismatic Painting
MATERIALS
Aquabee sketchbook 9" × 12" (23cm × 30cm) or Arches 8" × 10" (20cm × 25cm) paper
Full-spectrum triad pigments Winsor Blue (Red Shade), Winsor Lemon, Permanent Rose
No. 4 round
2B pencil
![]() Try this project while you are sitting in a café, or at your desk at work. Take a few moments for creative replenishment. Your subject matter is right in front of you—your drink cup is perfect. Prismatic painting is a natural way to mix an infinite variety of vibrant colors with the full-spectrum triad. The subject of your painting is much more than a cup. It is a reflection of who you are today, mirrored by your unique choice of colors, gestural lines and drawing.
Try this project while you are sitting in a café, or at your desk at work. Take a few moments for creative replenishment. Your subject matter is right in front of you—your drink cup is perfect. Prismatic painting is a natural way to mix an infinite variety of vibrant colors with the full-spectrum triad. The subject of your painting is much more than a cup. It is a reflection of who you are today, mirrored by your unique choice of colors, gestural lines and drawing.
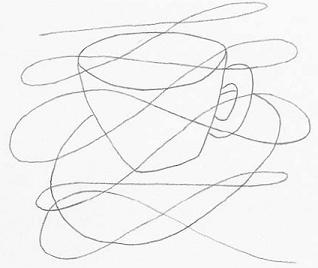
1 Scribble on Top of Your Cup Drawing
Open your journal to a new page (or pull out a piece of watercolor paper, cut to fit your journal). With a 2B pencil, use your one minute drawing skills to create playful, uncomplicated cup and saucer shapes.
Next, scribble a few swooshes, loops, swirls, figure eights or chevrons all over your drawing. Your energy, mood and spirit will carry through your body and into your hand to create lively line patterns. Let yourself go with the flow of the moment. Prismatic shapes will emerge in front of you as the lines intersect with each other. Keep these intersecting shapes large enough by not adding too many lines.

2 Drop in Color
In each prismatic shape, paint a different color, created from the three pigments in the full-spectrum triad. Paint by mixing on the paper. With a no. 4 round, under-paint a prismatic section with a diluted glaze of Winsor Lemon. While the paper is still shiny and wet, drop in Permanent Rose.
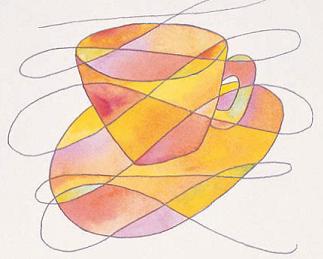
3 Paint Each Shape Uniquely
Paint each prismatic section separately, creating a kaleidoscope of rainbow colors in each one. Try this wet-in-wet technique for beautiful diffused color mixtures. Be sure to let each section dry before painting the one next to it.
Paint Past the Photo
![]() PAGE-A-DAY IDEA
PAGE-A-DAY IDEA
Photo Art
Go through your albums, and select special photos of fond memories. Perhaps you have a photograph of the house where you grew up, or from a recent vacation. Find several that appeal to your eye and speak to your heart. Or, if you like, make a color copy of the photograph in this book, and follow the steps to make your first painting past the photo. Then try your hand at creating one from your own image bank of photographs. Remember: most of the painting is already done for you. All you have to do is soften the edges a few inches beyond the borders of the print.

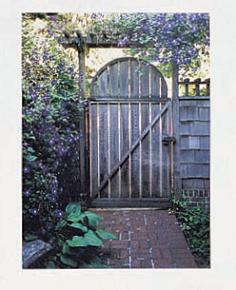
Original Photograph
Soften the hard edges of a photograph by adding an inch or two of watercolor liveliness at the borders.Use your favorite photographs as the starting point for original watercolor paintings. Add, invent, embellish and extend beyond the four edges of the photo using watercolor. Did the camera cut off the giraffe’s head? Paint it in. Do you wish there was a colorful flower garden in front of your house? Take artistic liberties and invent beyond the photo what you would like to see. Transform the frozen reality of a photograph into a living image of your memory and imagination.
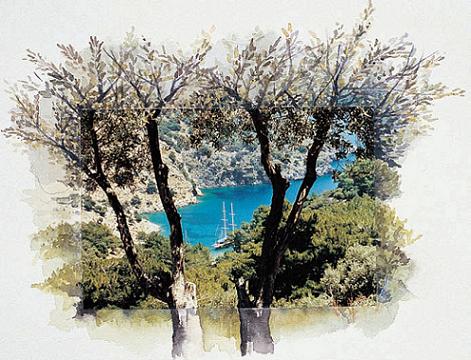
Expand Your Horizons
Look how expansive this scene becomes with the addition of an inch or two of watercolor border. I started with a photograph of the sailboat in Turkey where I taught a painting holiday. I glued the 4" × 6" (10cm × 15cm) photograph to a 10" × 14" (25cm × 36cm) piece of Arches cold-pressed watercolor paper, and painted past all four edges. The finished photo artwork reflects my fond memories so much better than just the photo alone.

Turn a Photo into a Vignette
Artist Ann Smith added the missing tree shapes, stone wall and path to the edges of the photograph. Her watercolor touches at the borders add so much life to this photograph.
PAINTING PAST THE PHOTO
Ann Smith Photograph and watercolor on Arches 140-lb. (300gsm) cold-pressed watercolor paper 8" × 10" (20cm × 26cm)
Original Photograph

Take Artistic Liberties
I used part of two photographs as the basis for this photo painting. I cut out sections from two photographs, matched them at the edges, and glued them onto a piece of watercolor paper. I painted in a bit more of the figures cut off in the photos. That’s me with the black visor hat, listening intently to instructions before playing my first-ever game of bocce ball.

Original Photographs
Demonstration: Paint Past the Photo
MATERIALS
Arches 10" x 14" (25cm x 36cm) 140-lb. (300gsm) cold-pressed paper
Full-spectrum triad pigments Winsor Blue (Red Shade), Winsor Lemon , Permanent Rose
Glue
No.4 round
Photograph or color copy of a photograph
Scissors
2B pencil
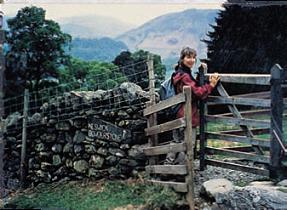
![]() This is a painting of my front gate. Can you see where the photo ends and the painting begins? I loved being able to cut the power line out of the photo in the sky above the trellis. What was a rather pedestrian photograph is now a much more romantic depiction of my old fashioned front yard with the clematis blossoms in their full glory.
This is a painting of my front gate. Can you see where the photo ends and the painting begins? I loved being able to cut the power line out of the photo in the sky above the trellis. What was a rather pedestrian photograph is now a much more romantic depiction of my old fashioned front yard with the clematis blossoms in their full glory.
1 Glue Photo to Watercolor Paper
Glue your photograph to the middle of a piece of Arches cold-pressed watercolor paper, or a page in your artistic journal. Crop the photograph as you wish. If you don’t want to cut or glue your photograph, use a color copy.

2 Draw With a Pencil
With a 2B pencil, lightly draw in a continuation of the photograph to give you a guideline for painting. It helps to draw in the architecture of buildings or, in this case, the fence, to give your finished painting a convincing look.

3 Underpaint at Each Edge
With a no. 4 round, underpaint a pale version of the colors you see at each of the four edges. This will define the outside edges of your painting and give you a color plan to work from. Use the full-spectrum triad for a complete range of color possibilities and perfect color matching.

4 Refer to Your Color Library
Match the shapes and colors at the edges by using all four methods of mixing with triads: pure pigment, brights, shades, and grays and darks. Maintain a loose, vignette quality to your painting at the edges—it will breathe life into the photographic image.
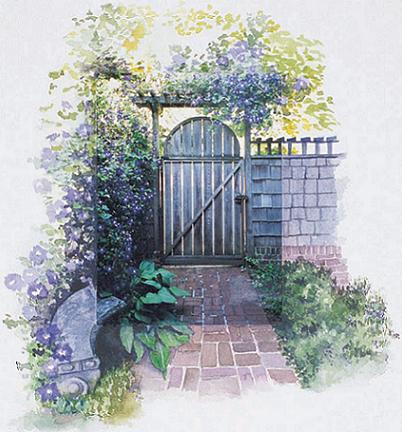
5 Snap It Into Focus With the Darks
This last step really makes the painting sing. Add the darks that you see in the photograph, especially at the edges. Match both the light and the dark colors from the photograph into your painting. This is the way to make sure the transition from the photograph to the painting is smooth. Often it is the addition of the very darkest colors that make the painting snap to life.