
CHAPTER 1
The Macro Recorder and
Code Modules
This book is written for experienced coders. You may have experience in many languages, but not in the Excel (or Office) VBA IDE. We will be writing quite a bit of code as we move along, but before we do that, let's take a quick look at Excel's Macro Recorder and the Visual Basic Development Environment. The Macro Recorder has been a part of Excel for quite a long time, and it's still the best way to get a look at some of the objects that make up the Excel Document Object Model (DOM), and a great way to get the core of your code written for you as you start your development projects.
Macro Security Settings
Excel's default security settings do not allow any macro activity. Before you begin exploring macros in Excel and the Macro Recorder, you will need to tell Excel which security settings to use to control what happens when you open a workbook that contains macros (or one that will contain macros). If you use antivirus software that works with Microsoft Office 2007 and you open a workbook that contains macros, the virus scanner will check the workbook for viruses before opening it.
You can make changes to the macro security settings in the Trust Center:
- Click the Microsoft Office button, which looks like the following:

- Click the Excel Options button, select Trust Center, click the Trust Center Settings button, and finally click the Macro Settings item.
Alternatively, on the Developer ribbon, click the Macro Security button in the Code Group section. (Depending on the network security level at your organization, you may or may not have rights to change these settings).
Note Macro setting changes made in Excel's Macro Settings section apply to Excel only; they do not affect any other Microsoft Office applications.
Table 1-1 lists the Excel macro security settings and explains each setting.
Table 1-1. Macro Security Settings
| Setting | Purpose |
| Disable all macros without notification | Use this setting if you don't trust the source of a workbook containing macros. |
| Disable all macros with notification | This is the default setting. Use it when you want macros to be disabled, but you want to get security alerts if there are macros present. You can decide when to enable those macros. |
| Disable all macros except digitally signed macros | This is the same as the "Disable all macros with notification" option, except that when the macro is digitally signed by a trusted publisher, the macro can run if you have trusted the publisher. |
| Enable all macros (not recommended, potentially dangerous code can run) | Use this setting to allow all macros to run. |
| Trust access to the VBA project object model | This setting is for developers only. |
Caution The "Enable all macros" setting makes your computer vulnerable to potentially malicious code. It is not recommended that you use this setting permanently. For the examples in this book, we use this setting, but it is highly recommended that you choose another option in your production code.
Trusted Publishers
This section lists the currently trusted certificates that can be used by developers to sign documents and add-ins. When you open a digitally signed document, the digital signature appears on your computer as a certificate. The certificate names the VBA project's source, plus additional information about the identity and integrity of that source. A digital signature does not necessarily guarantee the safety of a project, and you must decide whether you trust a project that has been digitally signed. If you know you can always trust macros from a particular source, you can add that macro developer to the list of trusted sources when you open the project.
Trusted Locations
This is where you can define trusted locations. These are folders on your PC or network where files with macros can be stored. Excel will trust any document in a folder designated as trusted and will run any macros in those files.
Caution Be careful when defining trusted locations! Documents in trusted locations can run without being checked by the Trust Center security system. If you add or change a location, make sure the new location is secure.
The Remove Button
If you added a certificate to your list of trusted publishers when you first opened a VBA project signed with that certificate, and later choose not to trust that publisher, you can use the Remove button to remove the certificate from your list of trusted publishers. The next time a project signed with that certificate is opened, the virus protection behavior corresponding to the setting on the Security Level tab will occur.
The Remove button in the Trusted Locations section lets you remove locations from the list in the same manner.
Lowering the Security Level
Before you can begin recording and playing back macros, you must lower the macro security level. By default, all macro activity is disabled.
To temporarily set the security level to enable all macros, do the following:
- On the Developer ribbon, in the Code group, click Macro Security, as shown in Figure 1-1.

Figure 1-1. Code options on the Developer ribbon
- If the Developer tab is not available, do the following to display it:
- Click the Microsoft Office button (shown in the following image).
- Click Excel Options.
- In the Popular category, under "Top options for working with Excel," select the "Show Developer tab in the Ribbon" check box, and then click OK.
- Click the Microsoft Office button (shown in the following image).
- Under Macro Settings, click "Enable all macros (not recommended, potentially dangerous code can run)," and then click OK, as shown in Figure 1-2.
Warning To help prevent potentially dangerous code from running, it is recommended that you return to any of the settings that disable all macros after you finish working with macros.
Once this is done, you can record your macro.
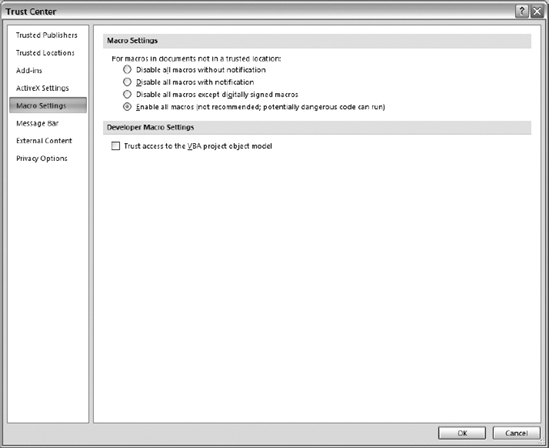
Figure 1-2. Excel Trust Center Macro Settings options
The Visual Basic Development Environment
Open the Developer ribbon and choose Visual Basic to display the Visual Basic Editor (VBE). Figure 1-3 shows the VBE.
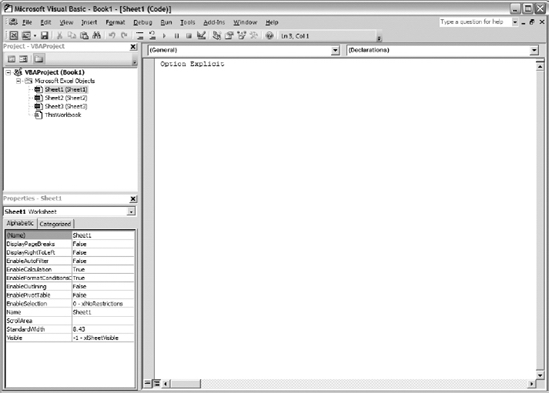
Figure 1-3. Excel's Visual Basic Editor
The default view is divided into three panes: the Project Explorer, the Property Sheet, and the code window.
The Project Explorer (Figure 1-4) lists open projects (workbooks) and the objects they contain. These can include worksheets, the workbook itself, standard code modules, class modules, and any UserForms in the project.
Objects are stored in folders representing their function. In Figure 1-4, you can see the worksheet objects in the Microsoft Excel Objects folder. Code is placed in its own folder, as are UserForms.
At the top of the Project Explorer pane is a toolbar that provides access to view code, view the selected object (choosing this command with Sheet1 selected will bring you to the Excel window with Sheet1 active), and toggle the folder view on or off. Toggling the folders off lists all of the objects together in one list regardless of type of object, as in Figure 1-5.
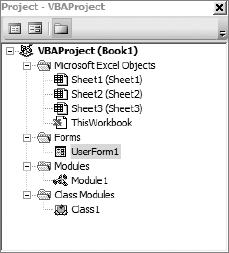
Figure 1-4. Excel objects grouped by object (with Toggle Folders on)
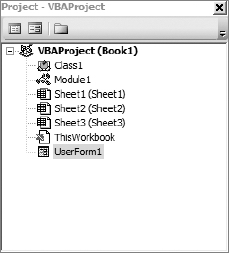
Figure 1-5. Excel objects with Toggle Folders off
The Property Sheet lists properties for the currently selected object in the Project Explorer, and will look very familiar to those VB 6.0 coders among us. Figure 1-6 shows an example of the Property Sheet for an Excel worksheet.
Use the code window to write, display, and edit Visual Basic code. You can open as many code windows as you have modules, so you can easily view the code in different forms or modules, and copy and paste between them.
You can open a code window from
- The Project window, by selecting a form or module and choosing the View Code button
- A UserForm window, by double-clicking a control or form, choosing Code from the View menu, or pressing F7
You can drag selected text to
- A different location in the current code window
- Another code window
- The Immediate and Watch windows
- The Recycle Bin
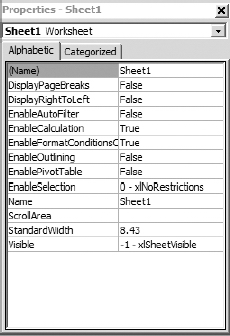
Figure 1-6. VBA Property Sheet
The code window shown in Figure 1-7 will look very familiar to those with VB 6.0 experience.
Figure 1-7. The VBA code window
At the top of the code window are two drop-down lists. On the left is the Object box, where any objects associated with the current selection are listed. On the right is the Procedure/Events box, where all methods and events for the currently selected object are displayed.
With Sheet1 selected in the Project Explorer, choose Worksheet from the Object box in the code pane. The default method for the worksheet object, Worksheet_SelectionChange, is inserted into the code window. Open the Procedure/Events box to see other methods and events available to you, as shown in Figure 1-8.
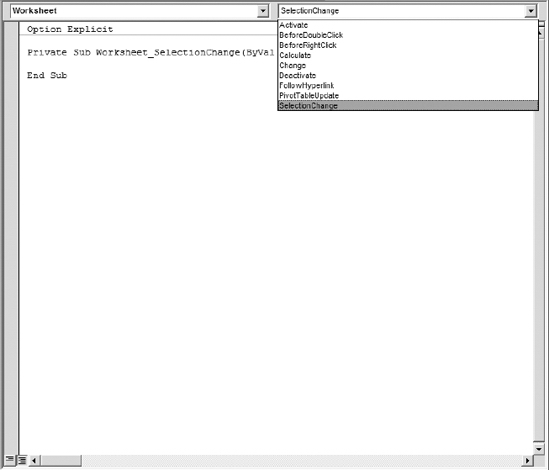
Figure 1-8. The code pane with the procedure list open
In the bottom-left corner of the code pane are two command buttons that determine how your procedures are displayed: Full Module View and Procedure View (shown in Figure 1-9).
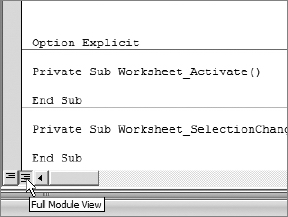
Figure 1-9. Full Module view
By default, Excel shows all procedures in a module (Full Module View). Clicking the Procedure View button (Figure 1-10) filters out all code except the procedure in which the cursor is located.
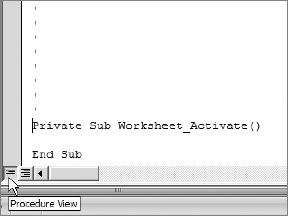
Figure 1-10. Procedure view
Immediately above the vertical scroll bar is the split bar, shown in Figure 1-11. Dragging this bar down splits the code window into two horizontal panes. Each pane can be scrolled separately, allowing viewing of two sections of a module at once. The information that appears in the Object box and Procedure/Events box applies to the code in the pane that has the focus. Dragging the bar to the top or the bottom of the window or double-clicking the bar restores the pane to its original single-pane view.
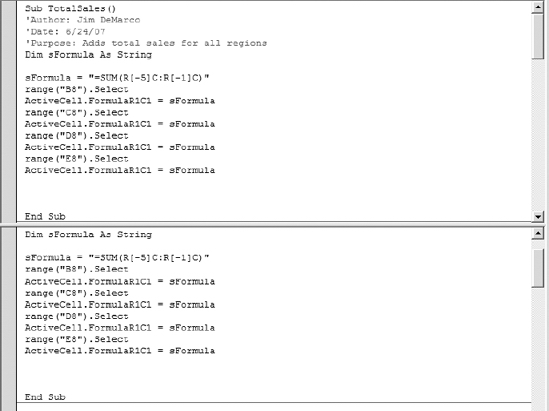
Figure 1-11. Code window with split panes
In addition to these items, there are a few other windows to help you write and test your code: the Immediate window, the Locals window, and the Watch window.
The Immediate Window
The Immediate window (Figure 1-12) allows you to do the following:
- Type or paste a line of code and press Enter to run it
- Copy and paste the code from the Immediate window into the code window, but not save code in the Immediate window
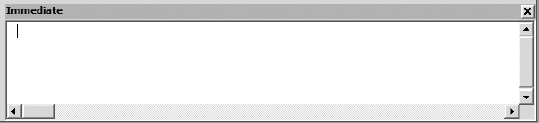
Figure 1-12. The Immediate window
The Immediate window can be dragged and positioned anywhere on your screen unless you have made it a dockable window from the Docking tab of the Options dialog box.
You can close the window by clicking the Close box. If the Close box is not visible, double-click the Title bar to make the Close box visible, and then click it.
Note In break mode, a statement in the Immediate window is executed in the context that is displayed in the Procedure box. For example, if you type Print variablename, your output will be the value of variablename. This is the same as if the Print method had occurred in the procedure you were executing.
The Locals Window
The Locals window (Figure 1-13) automatically displays all of the declared variables in the current procedure and their values.
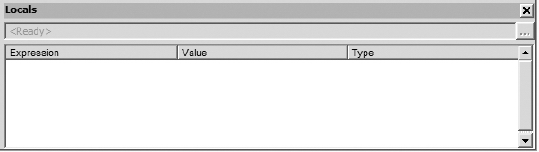
Figure 1-13. The Locals window
When the Locals window is visible, it is automatically updated every time there is a change from run to break mode, and when you navigate in the stack display, as shown in Figure 1-14.
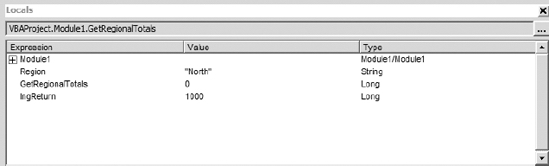
Figure 1-14. The Locals window shows function values.
You can use the Locals window to do the following:
- Resize the column headers by dragging the border right or left.
- Close the window by clicking the Close box. If the Close box is not visible, double-click the Title bar to make the Close box visible, and then click it.
The Locals window is made up of the following components. These window elements allow you to open the call stack and see the actual values of your variable as they are processed.
Call Stack button: Opens the Call Stack dialog box, which lists the procedures in the call stack. The call stack lists all the functions that are currently being executed. Figure 1-15 shows that the
GetRegionalTotalsfunction is being run from within theGetTotalsfunction. The function on top is called by the function below it.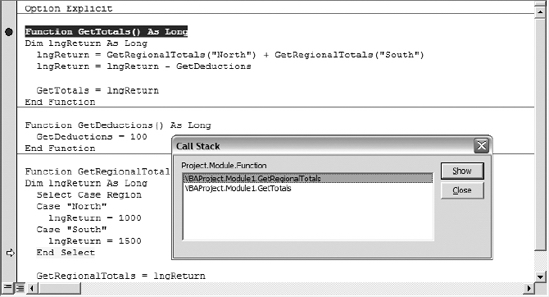
Figure 1-15. The call stack
The Locals window shows the following items in its columns:
Expression: Lists the name of the variables. The first variable in the list is a special module variable that can be expanded to display all module-level variables in the current module. This data is read-only.
Value: Lists the value of the variable. When you click a value in the Value column, the cursor changes to an I-beam. You can edit a value here to alter your code execution.
Note All numeric variables must have a value. String variables can have an empty value.
Type: Lists the variable type (read-only).
The Watch Window
The Watch window (Figure 1-16) appears automatically when watch expressions are defined in the project (Figure 1-17).
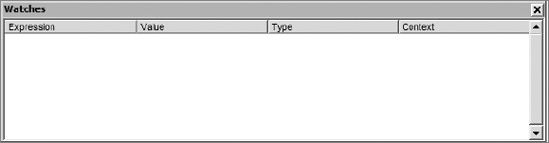
Figure 1-16. The Watch window
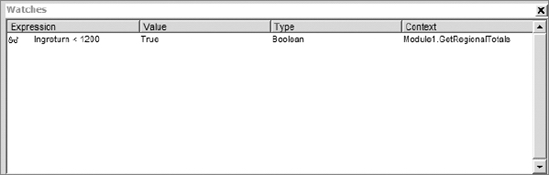
Figure 1-17. The Watch window takes action when values meet certain criteria.
You can use the Watch window to do the following:
- Change the size of a column header, by dragging its border to the right to make it larger or to the left to make it smaller
- Drag a selected variable to the Immediate window or the Watch window
Close the window by clicking the Close box. If the Close box is not visible, double-click the Title bar to make the Close box visible, and then click it.
Watch Window Elements
The Watch window list box columns display information about your watched expressions.
Expression: Stores a conditional phrase defined by the developer to evaluate the value of the watched variable. For example, if you wanted to know when a string variable named
sCitywas equal toNew York, you would enter an expression ofsCity = "New York".Value: Lists the value of the expression at the time of entering break mode. You can edit a value here to alter code execution.
Type: Lists the expression type.
Context: Lists the context of the watch expression.
You can close the window by clicking the Close box. If the Close box is not visible, double-click the Title bar to make the Close box visible, and then click it.
Recording a Macro
In an Excel workbook, open the Developer ribbon and choose the Record Macro command to display the Record Macro dialog box, shown in Figure 1-18. The Record Macro dialog will display. The dialog box shows the default macro name, allows you to assign a shortcut key, lets you choose where to store the macro, and provides a text field where you can enter text describing the macro's function.
By default, Excel 2007 stores macros in the current workbook. If you want your macros to be available to any workbook, you can choose Personal Macro Workbook from the "Store macro in" drop-down list.
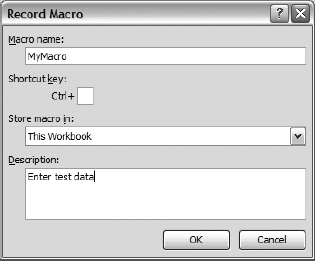
Figure 1-18. The Record Macro dialog box
- In the Macro name text box, enter a name for your macro: MyMacro.
- Add a shortcut key if you like.
- From the "Store macro in" drop-down, choose This Workbook.
- Add descriptive text if you like.
- Click OK.
- Enter the data shown in Figure 1-19.
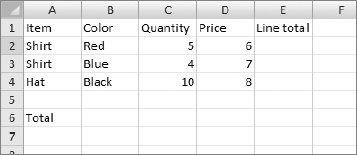
Figure 1-19. Recording data entry
- Choose the Stop Recording command from the Developer ribbon.
Let's take a look at the code Excel 2007 created for us. To open the Visual Basic Editor (VBE), choose the Visual Basic command from the Developer ribbon or use the Alt+F11 shortcut key combination.
A new standard code module named Module1 has been inserted in your project. Open Module1 by double-clicking the Modules folder, and then click Module1 to view the Macro Recorder–generated code. Listing 1-1 shows the code the Macro Recorder generated for us.
Listing 1-1. Macro Recorder–Generated Code
Sub MyMacro()

'

' MyMacro Macro

' Enter test data

'


'

    Range("A1").Select

    ActiveCell.FormulaR1C1 = "Item"

    Range("B1").Select

    ActiveCell.FormulaR1C1 = "Color"

    Range("C1").Select

    ActiveCell.FormulaR1C1 = "Quantity"

    Range("D1").Select

    ActiveCell.FormulaR1C1 = "Price"

    Range("E1").Select

    ActiveCell.FormulaR1C1 = "Line total"

    Range("A2").Select

    ActiveCell.FormulaR1C1 = "Shirt"

    Range("B2").Select

    ActiveCell.FormulaR1C1 = "Red"

    Range("C2").Select

    ActiveCell.FormulaR1C1 = "5"

    Range("D2").Select

    ActiveCell.FormulaR1C1 = "6"


    Range("A3").Select

    ActiveCell.FormulaR1C1 = "Shirt"

    Range("B3").Select

    ActiveCell.FormulaR1C1 = "Blue"

    Range("C3").Select

    ActiveCell.FormulaR1C1 = "4"

    Range("D3").Select

    ActiveCell.FormulaR1C1 = "7"

    Range("A4").Select

    ActiveCell.FormulaR1C1 = "Hat"

    Range("B4").Select

    ActiveCell.FormulaR1C1 = "Black"

    Range("C4").Select

    ActiveCell.FormulaR1C1 = "10"

    Range("D4").Select

    ActiveCell.FormulaR1C1 = "8"

    Range("A6").Select

    ActiveCell.FormulaR1C1 = "Total"

    Range("A7").Select

End Sub
Excel 2007 has created a subroutine for us, and we can see each cell we selected and the data we entered into each. One interesting thing to notice is Excel's choice of the FormulaR1C1 property to assign the data to the Range object (cell A1 in the second line of code generated), ActiveCell.FormulaR1C1 = "Item". We did not enter any formulas, and yet Excel uses a property used to reference a formula. As you're coding, you'll most likely assign a value to a cell or range by using the Range object's Value property, and use the FormulaR1C1 property to insert formulas.
- Change the line
ActiveCell.FormulaR1C1 = "Item"toActiveCell.Value = "Item", and then delete all of the data from the worksheet. Run the MyMacro macro. - Click the Macros command from the Developer ribbon.
- Choose MyMacro from the Macro dialog box.
- Click Run.
Cell A1 contains the word Item as its value as it did in the previous example. The Value property is a bit more intuitive to use when typing code.
Let's create two more quick macros, one to format our data table and one to add formulas, to get a look at the code Excel creates.
Formatting the Table
- Select the Record Macro command.
- Name the macro FormatTable and click OK. (You cannot use spaces or special characters in your macro names.)
- Select cells A1:E1 using the mouse, and apply bold formatting to them.
- Select cell A6 and apply bold formatting.
- Choose the Stop Recording command from the Developer ribbon.
The code Excel generates is very straightforward:
Sub FormatTable()

'

' FormatTable Macro

' Formats the table

'


'

    Range("A1:E1").Select

    Selection.Font.Bold = True

    Range("A6").Select

    Selection.Font.Bold = True

End Sub
We select the range containing our data. Each Selection object's Font property has a Bold property that is set to True.
Adding Totals
- Select the Record Macro command.
- Name the macro AddTotals and click OK.
- Select cell C6, choose the AutoSum command, and then press Enter (AutoSum can be found on the Home ribbon or the Formulas ribbon, as shown in Figure 1-20).
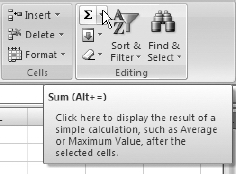
Figure 1-20. The AutoSum button on the Home ribbon
- Select cell E2 and choose the AutoSum command. Press Enter.
- Copy the contents of cell E2 to cells E3:E4. Press Enter.
- Select cell E6 and choose the AutoSum command. Press Enter.
- Choose the Stop Recording command from the Developer ribbon.
Taking a look at the code, notice that Excel uses the FormulaR1C1 property of the ActiveCell object, and this time it makes sense because we are entering formulas. One thing to note is that, depending on how you copy the formula from cell E2 to the rest of the column in step 5, Excel will create different lines of code.
Same Task, Different Code
If you use the fill handle and Ctrl-drag the contents into the range E3:E4, the code Excel generates might look like this:
Range("C6").Select

ActiveCell.FormulaR1C1 = "=SUM(R[-4]C:R[-1]C)"

Range("E2").Select

ActiveCell.FormulaR1C1 = "=SUM(RC[-2]:RC[-1])"

Range("E2").Select


'Used fill handle to copy formula to E3:E4

Selection.AutoFill Destination:=Range("E2:E4"), Type:=xlFillDefault

Range("E2:E4").Select

Range("E6").Select

ActiveCell.FormulaR1C1 = "=SUM(R[-4]C:R[-1]C)"

Range("E7").Select
If you select cell E2 and choose the Copy command, select the range E3:E4, and then choose the Paste command, Excel will generate this code:
Range("C6").Select

ActiveCell.FormulaR1C1 = "=SUM(R[-4]C:R[-1]C)"

Range("E2").Select

ActiveCell.FormulaR1C1 = "=SUM(RC[-2]:RC[-1])"

Range("E2").Select


'Used Copy command to copy formula to E3:E4

Selection.Copy

Range("E3:E4").Select

ActiveSheet.Paste

Application.CutCopyMode = False

Range("E6").Select

ActiveCell.FormulaR1C1 = "=SUM(R[-4]C:R[-1]C)"

Range("E7").Select
The code is identical up until the second Range("E2").Select command. In the first example, the fill method of copying was used, and we see Excel's AutoFill method invoked.
The AutoFill method takes two arguments, the range to fill (including the source range) and the type of fill to apply. The Type argument takes a value whose data type is xlAutoFillType enumeration. These correspond to the Series dialog and can contain the values listed in Table 1-2. These values can be combined by using the And operator (as in xlFillSeries And xlFillFormats).
Table 1-2 xlAutoFillType Enumerations
The copy-and-paste method is very straightforward:
- Select the range to be copied:
Range("E2").Select. - Choose the copy command:
Selection.Copy. - Select the destination range:
Range("E3:E4").Select. - Choose the Paste command:
ActiveSheet.Paste.
Another interesting line of code is: ActiveCell.FormulaR1C1 = "=SUM(R[-4]C:R[-1]C)". The default cell or range reference behavior in the Macro Recorder is to use R1C1 notation. This provides you with row and column offsets from the active cell. It can be useful in situations where you must calculate cell addresses to be used in your formulas.
R1C1 notation uses the R value to show the row offset from the active cell and the C value to show the column offset from the active cell. The offset value is enclosed in brackets; it can be a negative number to show rows or columns with a lesser value than the active cell row or column, or a positive number to show rows or columns with a greater value than the active cell. If the reference is to the same row or column as the active cell, there is no value entered—only the letter R or C.
In the preceding example, the first call to the SUM function refers to the range R[−4]C:R[−1]C. This is interpreted as a range starting four rows above the active cell (C6) in the same column and ending in the cell one row above the active cell in the same column.
You may be used to seeing the SUM function used with direct cell references like =SUM(A1:A4), especially if you're entering formulas directly on a worksheet. If you are adding a total to cell A5, this is a direct way to get the total of that range. But what if you need to add a total value for a number of columns across a row under your data range through VBA code? Using R1C1 notation, the formula =SUM(R[-4]C:R[-1]C) will always refer to rows 1 through 4 in the same column as the active cell (where the active cell is located in row 5).
As you've seen, the VBE is where Excel's Macro Recorder stores the code it creates, and it's where you will create and save the code you use in your daily tasks as well as in this book's examples.
Writing a Macro in the VBE
In this example, you'll create a macro by typing code directly in the VBE.
Open the file 1-MacroExample01.xlsx (shown in Figure 1-21), and open the VBE.
Note You will find all the example files and source code for this book at www.apress.com in the Downloads section of this book's home page.
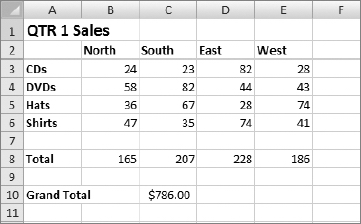
Figure 1-21. Sales data for the first quarter of the year
We see tour sales for the fictitious band "VBA," which are received quarterly by their management office and need to be totaled. Using R1C1 notation, we'll create one subroutine that will total these numbers, and since it is a relative reference to the cells, we'll see that we only need to create one formula.
First, we'll add a standard code module to the project. In the VBE (Alt+F11 from an Excel workbook), in the Project Explorer section (top-left pane), choose the top-level item, named VBAProject (1-MacroExample01.xlsx), right-click it, and choose Insert ![]() Module, as shown in Figure 1-22.
Module, as shown in Figure 1-22.
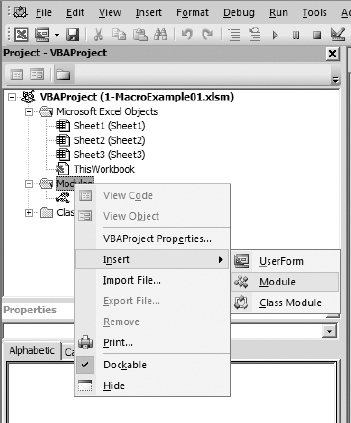
Figure 1-22. Inserting a standard code module (shortcut menu)
The Project Explorer shows our new module, named Module1 by default, as shown in Figure 1-23.
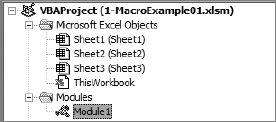
Figure 1-23. New standard code module added
More Macro Security
In the code pane, create a new empty subroutine called TotalSales, as shown in Listing 1-2, and save the file.
Listing 1-2. Empty TotalSales Subroutine
Sub TotalSales()


End Sub
The prompt shown in Figure 1-24 will appear.
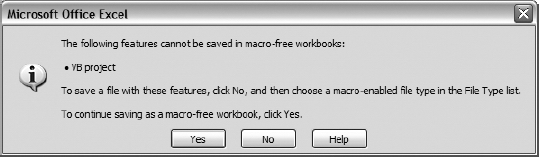
Figure 1-24. Macro-free workbook warning
The file you opened has an extension of .xlsx, which is the default file format for any new Excel workbook. This format is not macro-enabled and cannot be macro-enabled. To use macros in Excel 2007, you must choose a macro-enabled format from the list of file types in the Save As dialog box.
Choose No from this dialog to display the Save As dialog box. In the "Save as type" drop-down list, choose Excel Macro-Enabled Workbook (*.xlsm), as shown in Figure 1-25, and click OK.
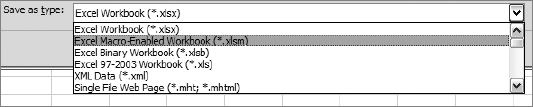
Figure 1-25. Selecting a macro-enabled file type (*.xlsm)
Other macro-enabled file types available are listed in Table 1-3.
Table 1-3. Macro-Enabled File Types
| File Type | Extension |
| Macro-enabled template | *.xltm |
| Macro-enabled add-in | *.xlam |
| Non-XML Excel binary workbook | *.xlsb |
Our TotalSales method will create a formula to insert in the first cell in the Totals section (B8). That formula will be reused in the rest of the cells in the Totals row on the worksheet.
Let's determine the R1C1 coordinates of our formula. Once that's done, we'll assign that to a variable so we don't have to type it multiple times or copy and paste it.
The first cell in the Totals row is cell B8. On the worksheet, put the cursor in cell B8. For illustrative purposes, arrow key up until the cursor is in B3 (the first cell in the data range for that column), counting rows as you move. Of course, it's much simpler to just subtract the row numbers (8 – 3 = 5 in this case). Now we have our starting row, R[−5], five rows above our formula's cell location. Since we're working in the same column as our formula, the column reference will be C. This gives us the starting cell in our formula range of R[−5]C. Use the same technique to determine the last cell location (I've used the cell above the formula even though it does not contain any data; this is how Excel's AutoSum command works). Our finished range reference is R[−5]C:R[−1]C.
Add a string variable to hold the formula:
Dim sFormula As String
Once we've done this, we can assign the variable to each cell in the Totals data row individually.
The finished TotalSales code should look like Listing 1-3.
Listing 1-3. Completed TotalSales Macro
Sub TotalSales()

'Author: Jim DeMarco

'Date: 6/24/07

'Purpose: Adds total sales for all regions

Dim sFormula As String


sFormula = "=SUM(R[-5]C:R[-1]C)"

Range("B8").Select

ActiveCell.FormulaR1C1 = sFormula

Range("C8").Select

ActiveCell.FormulaR1C1 = sFormula

Range("D8").Select

ActiveCell.FormulaR1C1 = sFormula

Range("E8").Select

ActiveCell.FormulaR1C1 = sFormula


End Sub
As you can see, we created the formula once, assigned it to the sFormula variable, and then selected each target cell and inserted the formula. Of course, this is not the most efficient method we can use to achieve this.
Using Excel's Range object, we can walk through the cells in a given range and set the formula. Add a second subroutine to Module1 as follows:
Sub TotalSales2()

'Author: Jim DeMarco

'Date: 6/24/07

'Purpose: Adds total sales for all regions by looping through cells in a range

Dim sFormula As String

Dim cell As Range


sFormula = "=SUM(R[-5]C:R[-1]C)"

For Each cell In Range("B8:E8")

    cell.FormulaR1C1 = sFormula

Next cell


End Sub
We've added a variable called cell which is of type Range. You'll recall that a range in Excel can be anything from one to multiple cells. We then walk through the range B8:E8 using a For...Each statement, visiting each cell in the referenced range. This is much more concise, easier to read, and easier to maintain. Of course, like in the first example it also assumes you know the addresses of the cells in the range to receive the formula.
Let's look at one last example that, while not completely dynamic, will show you a method whereby you could easily adapt it to determine the locations for your formula.
Add one more subroutine to Module1:
Sub TotalSales3()

'Author: Jim DeMarco

'Date: 6/24/07

'Purpose: Adds total sales for all regions by moving across columms

Dim sFormula As String

Dim i As Integer


sFormula = "=SUM(R[-5]C:R[-1]C)"

For i = 2 To 5

    Cells(8, i).Select

    ActiveCell.FormulaR1C1 = sFormula

Next i


End Sub
This time we're using a counter variable, i, to loop through columns 2 through 5. We select each cell in turn and apply the formula to it. Using this method, it becomes apparent that if we can use code to determine our start and end points for the For loop, we can very easily create a dynamic method of adding our formula to a variable number of columns or rows.
The Object Browser
The Object Browser, shown in Figure 1-26, is displayed by choosing View ![]() Object Browser or by pressing the F2 function key. It displays the classes, properties, methods, events, and constants available from any object libraries, and it also shows the procedures in your project. You can also use it to find and use custom objects you create.
Object Browser or by pressing the F2 function key. It displays the classes, properties, methods, events, and constants available from any object libraries, and it also shows the procedures in your project. You can also use it to find and use custom objects you create.
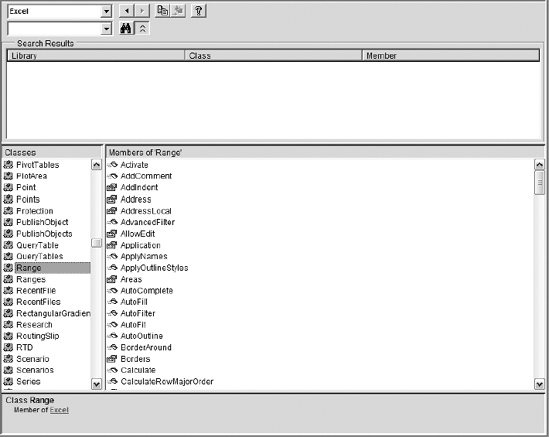
Figure 1-26. The Object Browser
Object Browser Window Elements
The Object Browser window contains window elements that enable you to search for a method or property within an object library and to get information about the selected method or property.
Project/Library Box: The Project/Library box displays the currently referenced libraries for the active project (Figure 1-27). Libraries can be added in the Tools
References dialog box. The <All Libraries> selection allows all of the libraries to be displayed at one time.
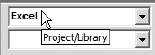
Figure 1-27. The Library drop-down list box
Search Text box: This text box contains the string that you want to use in your search. You can type a string or choose the string you want from the drop-down list. The Search Text box contains the last four search strings that you entered until you close the project. You can also use the standard Visual Basic wildcards when typing a string. You can search for a whole word by using the Find Whole Word Only command from the shortcut menu.
Go Back button: This allows you to go back to the previous selection in the Classes and "Members of" lists. Each time you click it, you move back one selection.

Go Forward button: This allows you to repeat your original selections in the Classes and "Members of" lists each time you click it.

Copy to Clipboard button: This copies the current selection in the "Members of" list or the Details pane text to the clipboard.

View Definition button: This moves the cursor to the place in the code window where the selection in the "Members of" list or the Classes list is defined.
Help button: This displays the online help topic for the item selected in the Classes or "Members of" list. You can also press F1 to access this.
Search button: This searches the libraries for the class, property, method, event, or constant that matches the string you typed in the Search Text box. The result of the search is shown in the Search Results pane.
Show/Hide Search Results button: This opens or hides the Search Results pane.
Search Results list: This list displays the library, class, and member that matches the items that contain your search string.
Classes list: This list displays all of the available classes in the library or project selected in the Project/Library box.
"Members of" list: This list displays the elements of the class selected in the Classes pane by group and then alphabetically within each group.
Details pane: This pane shows the definition of the class member. The Details pane (Figure 1-28) contains a hypertext link to the class or library to which the element belongs. Some members have hypertext links to their parent class. For example, if the text in the Details pane states that TextBox1 is declared as a text box type, clicking text box takes you to the
TextBoxclass. You can copy or drag text from the Details pane to the code window.
Figure 1-28. The Details pane
Split bar: This splits the panes so that you can adjust their size. There are split bars between the following:
- The Classes box and the "Members of" box
- The Search Results list and the Classes and "Members of" boxes
- The Classes and "Members of" boxes and the Details pane
Standard Code Modules
A standard module is a code module containing only procedure (Sub or Function), type, and data declarations and definitions. Module-level declarations and definitions in a standard module are public by default. In earlier versions of Visual Basic, a standard module was referred to as a code module.
Whenever a new macro is created in an Excel session, a standard module is inserted into the workbook to hold the macro. Any additional macros created in that session will also be inserted into this standard module. Once the workbook is closed and reopened, Excel will create a new standard module if the Macro Recorder is invoked.
Note You will have to copy and paste your code if you want to keep it in one place or provide a specific location for your code.
Standard modules are inserted into your project by choosing Insert ![]() Module or by right-clicking an object in the Project Explorer and choosing Insert
Module or by right-clicking an object in the Project Explorer and choosing Insert ![]() Module from the pop-up menu.
Module from the pop-up menu.
Subprocedures
A subprocedure (also called subroutine) is a procedure that performs a task within a program, but does not return a value. A subroutine begins with a Sub statement and ends with an End Sub statement. Any version of the TotalSales code you wrote previously is an example of a subroutine.
Sub TotalSales3()

'Author: Jim DeMarco

'Date: 6/24/07

'Purpose: Adds total sales for all regions by moving across columms

Dim sFormula As String

Dim i As Integer


sFormula = "=SUM(R[-5]C:R[-1]C)"

For i = 2 To 5

    Cells(8, i).Select

    ActiveCell.FormulaR1C1 = sFormula

Next i


End Sub
Functions
A function is a procedure that performs a task within a program and returns a value. A function begins with a Function statement and ends with an End Function statement. Functions (and subroutines) can receive arguments passed in from calling procedures or passed in directly.
The following is a function that returns the total for a range passed in to the function as an argument. We pass in the range reference to make the code flexible enough to reuse on any range that needs to be totaled.
Function GetSalesTotal(RangeToTotal As Range) As Currency

'Author: Jim DeMarco

'Date: 6/24/07

'Purpose: Returns value of sales total

Dim currReturn As Currency

Dim cell As Range

Dim temp As Currency


    For Each cell In RangeToTotal

        temp = temp + cell.Value

    Next cell


    currReturn = temp

    GetSalesTotal = currReturn


End Function
To use the function, we can create a subroutine or function to call it. The following adds a label and inserts the total next to it on the worksheet:
Sub AddSalesTotal()

'Author: Jim DeMarco

'Date: 6/24/07

'Purpose: Places value of sales total on worksheet


    With Range("A10")

        .Value = "Grand Total"

        .Font.Bold = True

    End With


    Range("C10").Value = GetSalesTotal(range("B8:E8"))


End Sub
Type Statements
Type statements are used at module level to define a user-defined data type containing one or more elements. In the following example, we define Employee as a data type and then use it in a subroutine, setting values and displaying them.
Type Employee

    ID As Long

    Name As String

    Title As String

    Phone As String

End Type


Sub SetEmployee()

Dim empMyEmployee As Employee

    empMyEmployee.ID = 123456

    empMyEmployee.Name = "John Doe"

    MsgBox empMyEmployee.ID & " " & empMyEmployee.Name

End Sub
Class Modules
If you've done any amount of VBA or VB coding, you have more than likely used objects in your code. Any time you've gone out to a database and retrieved records using ADO, you may have declared and instantiated a variable like this:
Dim rs As ADODB.Recordset

Set rs = New ADODB.Recordset
Some of the examples you've seen thus far have also used some of Excel's built-in objects, like the Selection object, which has a Font property, or the Range object, which has many properties and methods you can use in your code.
Using Excel's VBE, you can create your own objects that contain custom properties and methods that you define. You do this by creating classes in class modules. Here's the definition of an object (from Microsoft's ASP.NET forums at http://forums.asp.net/p/1117506/1933142.aspx):
Class: The formal definition of an object. The class acts as the template from which an instance of an object is created at run time. The class defines the properties of the object and the methods used to control the object's behaviour.
In a standard code module, public functions and subroutines you create can be called from anywhere in your code simply by referencing the procedure. Code in a class module must be explicitly instantiated, as in the preceding ADO Recordset example. Until an object is instantiated in this manner, its methods and properties are not available to your code.
Another difference is that standard code modules can contain any number of related or unrelated procedures (although best practices dictate that code in a given module should be related to specific functionality, reality tells us that this is not always the case, and there is no enforcement of this practice within a standard code module). Code in a class module by definition defines the methods, properties, and events for objects that you create from a class. These methods, properties, and events are all directly related to the object, and their inner workings do not need to be known to implement or use the object. The term used to define this relationship to the object is encapsulation.
Encapsulation can be defined as the capability of an object to conceal its inner workings from client code or other objects. It is one of the fundamental principles of object-oriented programming (OOP). If an object has clearly defined properties and methods, it will be easily reusable and will require limited (if any) documentation. When we look at the ADO recordset object, we can easily understand what its Open or AddNew methods do for us with no concern for how they provide their services. Your objects will be as well defined as any of the Visual Basic objects, and therefore easy for you or anyone else to implement in their applications.
Class modules contain only code—there is no visual interface. Classes you create in Excel VBA are easily portable to other VBA applications, and can be placed into Visual Basic 5 or 6 code with no (or minimal) modifications and compiled into ActiveX DLLs or EXEs. This allows your objects to be used in applications outside of Excel.
Use of classes allows for the design of robust, reusable objects. It requires more forethought and planning, but you receive the benefits of code that is usually more reliable and easier to maintain.
Class modules are inserted into your project by choosing Insert ![]() Class Module or by right-clicking an object in the Project Explorer and choosing Insert
Class Module or by right-clicking an object in the Project Explorer and choosing Insert ![]() Class Module from the pop-up menu.
Class Module from the pop-up menu.
Sample Class and Usage
Let's re-create the Employee user-defined data type that we looked at in a previous example as an object. Custom data types are a great way to store more than one related value for an item, but they have a few shortcomings. They don't do any validation, they cannot perform actions (methods or functions), and they cannot by themselves trigger events. Classes allow you to do all of these.
The cEmployee Class
Let's take a quick look at the Employee data type from our previous example:
Type Employee

    ID As Long

    Name As String

    Title As String

    Phone As String

End Type
The first thing we will do is create properties for each value type. In Visual Basic 5/6.0 and VBA, you must create methods for getting and setting the values of a property. These are known as Property Let and Property Get methods. A third method is available if your property will return or set an object. This is known as the Property Set method, and it works in a similar manner to the Property Let method.
- In a new workbook open the VBE and insert a class module (choose Insert Class Module).
- In the Property Sheet, rename the class module cEmployee.
- In the code pane, enter the following code:
Dim m_lngID As Long

Dim m_sName As String

Dim m_sTitle As String

Dim m_sPhoneNumber As String
These module-level variables will contain the values for our object.
- Next, enter the
Property LetandGetfunctions for each property:
Property Get ID() As Long

    ID = m_lngID

End Property


Property Let ID(newID As Long)

    m_lngID = newID

End Property


Property Get Name() As String

    Name = m_sName

End Property


Property Let Name(newName As String)

    m_sName = newName

End Property


Property Get Title() As String

    Title = m_sTitle

End Property


Property Let Title(newTitle As String)

    m_sTitle = newTitle

End Property


Property Get PhoneNumber() As String

    PhoneNumber = m_sPhoneNumber

End Property


Property Let PhoneNumber(newPhoneNumber As String)

    m_sPhoneNumber = newPhoneNumber

End Property
Note that the module-level variables are used within each
Property LetorGetmethod, and are either being returned (Get) or assigned a value (Let).Property Get ID() As Long
ID = m_lngID
End Property
Property Let ID(newID As Long)
m_lngID = newID
End PropertyAnother advantage class modules give us is the ability to initialize the values of the module-level variables when an object is instantiated from the class.
- Choose Class from the Object box in the code pane, as shown in Figure 1-29.
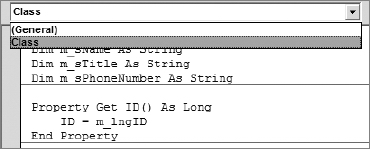
Figure 1-29. Selecting Class from the VBA code window Object box
- The VBE inserts the
Class_Initializemethod for you. Add code to set the default values for theEmployeeclass, as shown in Listing 1-4.Listing 1-4. Class Initialization Code—Here It's Set to Nonsense Values Useful in Determining What Properties Have or Have Not Been Set.
Private Sub Class_Initialize()

    m_lngID = 0

    m_sName = "NOG"

    m_sTitle = "NOG"

    m_sPhoneNumber = "0000000000"

End Sub
There are two methods included with each class module, the Class_Initialize and the Class_Terminate methods. It's always a good idea to initialize your values so that any clients of your class have a value to work with.
The Initialize method is a great place to set default values, to open any data sources or files your class may need, or to perform any other setup that your object may need to do its job.
The Terminate method, although not always used, is important because it gives you a place to clean up any data connections or recordsets (or any other objects your class may use) and close any files you've opened.
Using the cEmployee Class
We can test our cEmployee class using the Immediate window in the VBE:
- Open the Immediate window by choosing View Immediate Window or by pressing the Ctrl+G key combination.
- In the Immediate window, type - Set emp = New cEmployee, and press Enter.
- Type - ?emp.Name and press Enter.
Your screen should look like Figure 1-30.
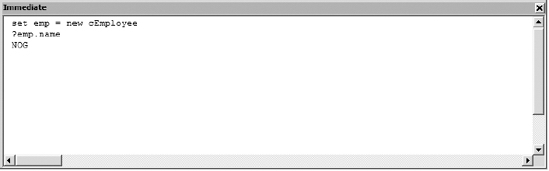
Figure 1-30. Instantiating the cEmployee object in the Immediate window. Property values have not been set yet.
We've returned our nonsense value from the class initialization code. Now let's assign values to our properties. Type the following commands into the Immediate window, pressing Enter after each. The first group of commands will set the cEmployee object's properties and the second will retrieve and display them.
emp.ID = 15

emp.Name = "John Doe"

emp.Title = "Analyst"

emp.PhoneNumber = "8885555555"

?emp.name

?emp.ID

?emp.title

?emp.phonenumber

set emp = Nothing
Your Immediate window should look like Figure 1-31.
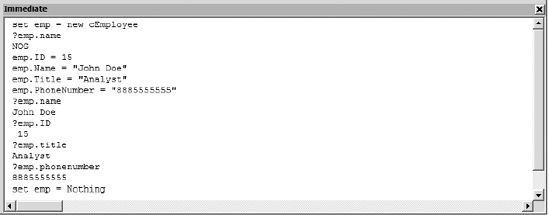
Figure 1-31. cEmployee object with property values set and returned
Let's take a look at what's going on here. The first line of code instantiates (or creates) the employee object:
Set emp = New cEmployee
When that object is created, the Class_Initialize method fires and the default values are set. As mentioned earlier, this is where you would set up any activities or objects your class needs to have in place.
Next, a quick check of the Name property is done to see that it is holding your default value—in this case the nonsense value NOG.
The next four lines set all of the properties of the Employee object with real values:
emp.ID = 15

emp.Name = "John Doe"

emp.Title = "Analyst"

emp.PhoneNumber = "8885555555"
Each time you pressed the Enter key, the Property Let method fired for each property and assigned the value you passed in to the module-level variable for each property. Then you typed in commands to show that the cEmployee object was indeed storing the values entered previously.
?emp.name

John Doe

?emp.ID

 15

?emp.title

Analyst

?emp.phonenumber

8885555555
Each time you pressed the Enter key, the Property Get method fired and retrieved the value currently stored in the module-level variable for each property.
The final line of code removes the object from memory. Any attempt to write or retrieve a value after the object is destroyed will result in an error.
set emp = Nothing
When the object is set to Nothing, any code placed in the Class_Terminate method will run. As previously noted, this is where you will perform any necessary cleanup before the object is destroyed.
The Class-y Way of Thinking
Our cEmployee class, while extremely simple in content and functionality, does serve the purpose of showing some of the benefits of writing class-based code.
Let's assume for a moment that we had written validation and formatting code into the Property Lets and Gets of the class, as well as some business rules; or that we had added methods to export the employee data to a delimited string or set of XML tags for import into an external system. It would be very easy for us to export the class module for use in someone else's Excel project, or an Access database or even a Word document.
The key to successfully implementing classes is to keep the code as generic as possible. Of course, if you are creating a class for one specific task, this is an acceptable exception to the rule, but in general, keeping code generic provides great reuse opportunities.
Classes also provide an excellent example of self-documentation via IntelliSense. Anytime you reference an object variable in your code and type the . operator, you'll see a complete list of the object's functionality (just like the built-in VBA objects, such as ADO) as shown in Figure 1-32.
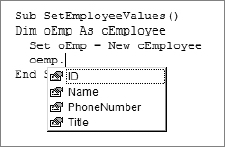
Figure 1-32. Class objects provide documentation via IntelliSense.
We will focus heavily on classes and object-oriented development as we move on in this text. The ease of maintenance and high probability of reuse are well worth the extra planning required to build applications using these techniques. Once you are comfortable with these concepts, there really won't be much additional thought or planning required. It will be your natural process to work in an OOP fashion.
UserForms
Excel provides us with UserForms as a means to provide a user interface (UI) to our Excel applications. UserForms are similar to Access or Visual Basic forms. They are containers for input and display controls. Both the forms and controls have properties, methods, and events that we can code against. Excel names new forms UserForm1, UserForm2, and so on, as they are added. They can be renamed as needed.
UserForms are inserted into your project by choosing Insert ![]() UserForm or by right-clicking an object in the Project Explorer and choosing Insert
UserForm or by right-clicking an object in the Project Explorer and choosing Insert ![]() UserForm from the pop-up menu, as shown in Figure 1-33.
UserForm from the pop-up menu, as shown in Figure 1-33.
Figure 1-33. A new UserForm inserted in the VBE
When a new UserForm is inserted, the Toolbox window is also displayed. The Toolbox identifies the different controls that you can add to your forms.
Note If the Toolbox is not displayed, click View ![]() Toolbox to display it.
Toolbox to display it.
The Toolbox (Figure 1-34) is customizable. The following are some of the customization options you have:
- Adding pages to the Toolbox
- Moving controls from one page to another
- Renaming pages
- Adding other controls, including ActiveX controls, to the Toolbox
- Copying customized controls from the form into the Toolbox
Tip The OK and Cancel buttons are special cases of a command button. If you add OK and Cancel templates to the Toolbox, you can quickly add them to other forms.
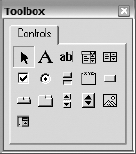
Figure 1-34. The Toolbox window
Toolbox Window Elements
The Toolbox window contains the following controls:
Select Objects: This is the only item in the Toolbox that doesn't draw a control. When you select it, you can only resize or move a control that has already been placed on a form.
Label: This displays text that the user cannot change, such as a form heading.
TextBox: This allows entry or modification of text.
ComboBox: The ComboBox is a combination list box and text box. Users can either choose an item from the list or enter a value in the text box.
ListBox: This is used to display a list of items from which the user can choose. The list can be scrolled if it has more items than can be displayed at one time.
CheckBox: This creates a box that the user can click to select or deselect an item or to show a true or false value.
OptionButton: This displays multiple choices from which the user can choose only one.
ToggleButton: This button is used for toggling on and off.
Frame: This is a graphical or functional grouping for controls. To group controls, draw the frame first, and then place option buttons or check box controls inside the frame.
CommandButton: This creates a button the user can click to carry out a command.
TabStrip: This allows you to define multiple pages for the same area of a window or dialog box in your application.
MultiPage: This presents multiple screens of information as a single set.
ScrollBar: This provides a tool for quickly navigating through a long list of items or a large amount of information. It is also useful for indicating the current position on a scale, or as an input device or indicator of speed or quantity.
SpinButton: This is used in conjunction with another control to increment and decrement numbers. It can also be used to scroll back and forth through a range of values or a list of items.
Image: This displays an image from a graphics file on your form.
RefEdit: This allows the user to type or click and drag range references into its text area. It is similar to Excel's
Set Print Areainput function.
Figure 1-35 shows an example of an Excel 2007 UserForm.
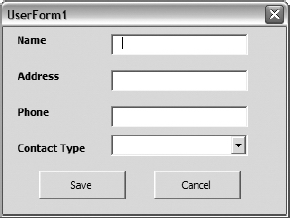
Figure 1-35. Sample UserForm with controls added
Object-Oriented Programming: An Overview
I decided early on in the process of writing this book that I would concentrate my efforts on providing guidance in the creation of class-based solutions to Excel VBA coding problems where possible. I have found through programming in Access, VB 6, and then VB.NET that using OOP techniques has helped me visualize my applications more clearly, helped me to better organize my code, and has been invaluable in making my code easier to maintain. Standard code modules and procedural programming allow us to write code anywhere we like. Although programmers always try to group related code in the same well-named module, it's not always possible and not always done. Using objects, you will find that you always create functionality related to the object and that there's really no room for unrelated code. Imagine you're creating the cEmployee class shown earlier. You'd never think of adding a Part Number property or a CalculateHorsepower method in an Employee class. The object defines its interface. These are words to live by. Classes initially built for Access applications were moved to VB 6 with little or no modification (and the reverse is also true). The same is true of bringing those classes into Excel applications. Of course, the .NET world with its new syntax changes that, but the concepts still apply (which helps to make a more effective transition to the .NET environment). That said, the classes provided in this book should work in almost any Microsoft Office environment (prerequisites and differences in component or Office versions notwithstanding). That's the beauty of using class-based code. Objects are defined as an instance of a class. Objects have properties (nouns) and methods (verbs), and can fire events. Each object instance holds its own values for its properties (private instance variables). Objects are responsible for providing a certain behavior (or functionality), and they can collaborate with other objects to perform their tasks. Classes hide their inner workings so we can simply bring an existing class into a project and begin using the functionality it provides. This is known as encapsulation, and is one of the fundamental concepts of OOP. A FileReader class may have the ability to open and parse an XML file and return various nodes to me through its interface. I do not need to concern myself with the details of how it accomplishes this. I call the GetNodes method and I've got the nodes I need to work with. Another basic concept to OOP is polymorphism. Polymorphism is the ability of objects of different types to respond to calls to methods with the same name. Imagine creating a cEmployee class and a PurchaseOrder class that both make database calls. Each class can contain a SaveData method. Each will perform its function differently, yet the functionality for each is the same. We don't need to know how either one does its job, which brings us back to . . . encapsulation!
OOP purists would tell you that this is an incomplete implementation of polymorphism, and they would be correct. True polymorphism should also include the ability to overload methods. This means that an object can have more than one implementation of a method. For example, my aforementioned SaveData method could have multiple footprints within the same class:
Sub SaveData(Name As String, ID As Long)

'code here

End Sub


Sub SaveData(Name As String, ID As Long, Title As String, Photo As Object)

'code here

End Sub
The two SaveData methods take different arguments and are valid in a development environment that supports polymorphism, such as Visual Studio .NET. VBA does not support polymorphism, but you can program in Visual Studio .NET and use those components in your Excel applications. We'll explore that later.
OOP: Is It Worth the Extra Effort?
Of course it is. For the effort of making it through the slight learning curve, you will reap the benefits of object-oriented development. When you let objects do your work, your UI code will be much cleaner. Your business logic will reside in objects, and the UI will send data to and from them. Your data layer will be compartmentalized and reusable between applications. Any workflow can be stored in classes and used in any application that needs it. You'll develop code libraries that will provide easy access to your object-based functionality. How do you transport this functionality from application to application? Simply import the class!
If you create a lot of Excel applications, you may even find yourself building a reusable framework from which you can create new applications that will already contain your base functionality.
Summary
In Chapter 1, you looked at the Excel 2007 Macro Recorder and learned how to use it to let Excel generate code for you. This is useful when learning the Excel 2007 object model, and it can also be used to generate base code that you can then edit to suit your purpose.
You worked with the Excel Visual Basic Editor (VBE), where you created macros to enter and format data. The VBE is similar to the VB 6 code editor, and includes many of the same tools for debugging your code, such the Immediate window, the Locals window, and the Watch window. You were introduced to Excel's Object Browser, which contains tools that let you examine the libraries in your project and investigate an object's methods and properties.
You also looked at standard code modules. Standard code modules contain subroutines, functions, and type statements. You saw how to build your own subroutines to perform tasks and learned that subroutines do not return a value. When you need a routine to return a value, you create functions. Functions can also perform tasks just like subroutines. Type statements allow you to create complex custom data types, such as the Employee type created in this chapter. Types are similar to classes but without the ability to contain code within their data elements.
You then explored class modules. Class modules allow you to create custom objects. These objects can contain properties and methods to perform any task the object needs.
Finally, you looked at the Excel 2007 UserForm object and its Toolbox. UserForms allow you to create data entry forms and data display screens from within the Excel VBE. The Toolbox contains many common controls that you can use on the UserForm, including text boxes, combo boxes, and command buttons. It's similar to the Toolbox in Microsoft Access.
You are equipped with a very powerful set of development tools in Excel 2007. In Chapter 2, we are going to look at the many ways to bring data in and out of an Excel 2007 workbook project.