
CHAPTER 3
Using XML in Excel 2007
The XML file format was introduced with Excel 2003 (XML support was introduced in Excel 2000). Excel 2007 has new XML file formats. The *.xlsx format represents a workbook that does not and cannot contain macros. The *.xlsm format represents a workbook that can or does contain macros. This separation is a security enhancement that lets the user know in advance of opening a document that there may be code inside. Remember the "This document may contain harmful code" warnings in previous Microsoft Office versions? With these, you would not be aware of the possibility of code until you opened the file. Now, your users will know in advance if they are opening a workbook containing code.
The Excel XML format is compatible with Microsoft Office 2003, Office XP, and Office 2000 with the addition of a file format converter patch, available from Microsoft Office Online and Microsoft Update. Users of Office 2003, Office XP, and Office 2000 can open, edit, and save files using the new Excel XML format.
By providing the XML file format, Microsoft has given us the ability to create Excel files (and Word and PowerPoint files as well) on machines that do not have these applications installed. Navigating the Excel DOM, some of which we worked with in the previous chapter, is no longer the only method to access Excel data and/or create Excel files.
XML also gives us the advantage of using XSL to transform external XML to Excel format and from Excel format to many other formats.
Importing XML in Excel 2007
Importing XML data into an Excel workbook is a fairly straightforward process. The Workbook object has a method called XmlImport that does the work for us.
Open a new workbook and save it with an .xlsm format file extension. Open the VBE, add a standard module, and create a new function named GetXMLData():
Sub GetXMLData()

  ActiveWorkbook.XmlImport URL:=

    "C:projectsExcelcds.xml", ImportMap:=

    Nothing, Overwrite:=True, Destination:=Range("$A$1")

End Sub
Caution Be sure to adjust the file path to reflect your location for the XML file.
The ActiveWorkbook object is actually a property of the Application object that returns a Workbook object type, and therefore contains all the properties and methods of the Workbook object.
Figure 3-1 shows the ActiveWorkbook object as it appears in the Visual Basic Object Browser. Figure 3-2 shows the Workbook object and its properties and methods. The ActiveWorkbook object has all the properties and methods of the Workbook object.
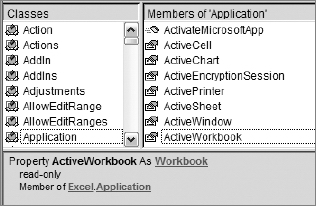
Figure 3-1. ActiveWorkbook property of Application object
If you try double-clicking the ActiveWorkbook property, you will not find any properties or methods associated with it in the Object Browser. Click the Workbook link in the description section of the Object Browser, however, and you will see the Workbook object's properties and methods listed, as shown in Figure 3-2. Since a reference to the ActiveWorkbook is actually returning a Workbook, you can access all of these properties and methods.
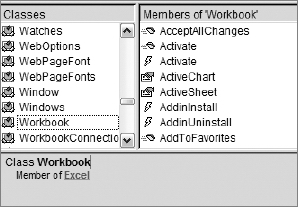
Figure 3-2. Workbook object and class members
I'll present you with a quick example to show that the two objects contain the same class members. Following are two screenshots. Figure 3-3 contains the Immediate window showing IntelliSense for the Workbook object, and Figure 3-4 shows IntelliSense for the ActiveWorkbook object.

Figure 3-3. IntelliSense for Workbook object

Figure 3-4. IntelliSense for ActiveWorkbook object
So if you find yourself examining an object in the Object Browser and you don't see any class members, check to see if it's a property of another object and look at that object's class members.
Before we run the code, let's take a look at the XmlImport function and see what it does (see Figure 3-5).

Figure 3-5. XmlImport function arguments
The XmlImport function takes four arguments, as shown in Table 3-1.
Table 3-1. XmlImport Function Argument Descriptions
| Name | Required (Y/N) | Data Type | Description |
URL |
Y | String |
Path to an XML data file. |
ImportMap |
Y | XMLMap |
The XML map to apply when importing the file. |
Overwrite |
N | Variant |
Specifies whether or not to overwrite data that has been mapped to the schema map specified in the ImportMap parameter. Set to True to overwrite the data or False to append the new data to the existing data. |
Destination |
N | Variant |
Specifies the top-left cell of the range that will display the data. |
The XmlImport function returns a value of type XIXmlImportResult, which is an enum showing the success or failure of the call. Figure 3-6 shows the available options displayed in the Object Browser window.
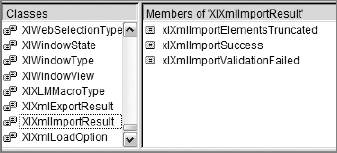
Figure 3-6. XIXmlImportResult members
Let's run our GetXMLData procedure and see what we get.
If no schema exists for this data, Excel will create one for you, as shown in Figure 3-7.
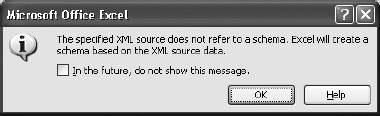
Figure 3-7. XML Schema dialog box
Excel refers to these schemas as XML maps. Click the check box so you won't see this message any longer, and let the import continue. When the import is finished, the data should look like that in Figure 3-8.
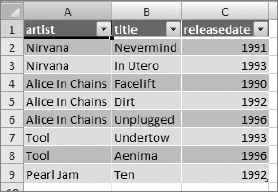
Figure 3-8. Imported XML file
Our call to XmlImport sets the arguments like this:
ActiveWorkbook.XmlImport URL:= _

  "C:projectsExcelcds.xml", ImportMap:=

  Nothing, Overwrite:=True, Destination:=Range("$A$1")
The URL argument is pointing to a file named cds.xml, which contains discography information. The ImportMap argument is set to Nothing for now because we do not have an existing schema for this data. We are setting Overwrite to True to overwrite any existing data, and the Destination range is setting cell A1 as the target for the start of our data range.
If we try to rerun this code as is, we will generate an error, as shown in Figure 3-9.

Figure 3-9. XML map error
This is due to the fact that the first time we ran the code, Excel created a map for us and bound our data table to it. To view that map, right-click anywhere in the data range and choose XML ![]() XML Source (Figures 3-10 and 3-11).
XML Source (Figures 3-10 and 3-11).
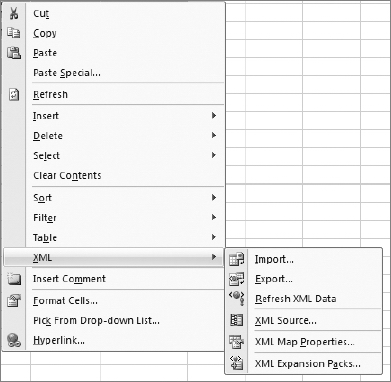
Figure 3-10. XML menu
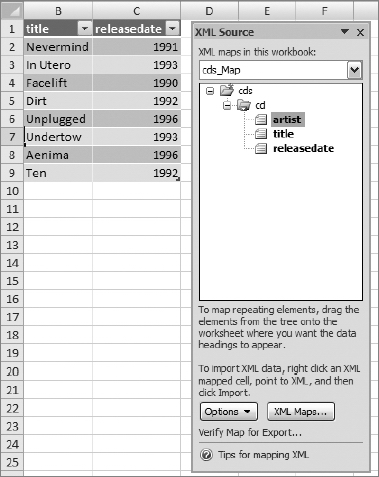
Figure 3-11. The XML Source window
Figure 3-11 shows the XML Source window with the artist element selected. Selecting an element in the XML Source window selects the associated (or mapped) data range. Above the XML map is a drop-down list that contains all of the XML maps in the currently active workbook. The XML map in this project is called cds_Map.
The second time the code is run, we run into trouble because Excel automatically creates a new map for the data that is mapped to destination cell A1. Excel will not allow you to bind your data to more than one XML map. If you change the destination cell, the procedure runs fine, however. So how do we refresh our data if a source file is updated?
The XMLMaps collection has a DataBinding property that has a Refresh method. Using this method, we can read in any changes to the XML file that our data range is mapped to.
Before we begin, let's copy our GetXMLData function into a standard code module in a new workbook and save it. Run the GetXMLData macro from the Developer ribbon.
Open the cds.xml file and add a new title to the list by adding the following set of nodes at the top of the XML file:
<cd>

  <artist>Nirvana</artist>

  <title>Greatest Hits</title>

  <releasedate>2000</releasedate>

</cd>
Save the file. Add the following function to the standard module:
Sub RefreshXML()

    Range("A1").Select

    ActiveWorkbook.XmlMaps("cds_Map").DataBinding.Refresh

End Sub
Run the code by pressing the F5 key with the insertion point inside the RefreshXML subroutine. The data range is expanded to include the new data, as shown in Figure 3-12.
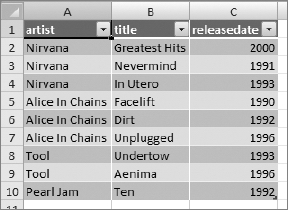
Figure 3-12. XML data refreshed
Remove the new set of nodes and run the RefreshXML method again, and the table will be resized to display only the data from the XML file.
Excel 2007 provides other methods to remove and load XML map settings. The DataBinding.ClearSettings method unbinds the data in a range from the XML file.
ActiveWorkbook.XmlMaps("cds_Map").DataBinding.ClearSettings
The DataBindings.LoadSettings method takes the file path or URL as an argument to load the mapping from the specified XML file.
ActiveWorkbook.XmlMaps("cds_Map").DataBinding.LoadSettings

  "C:projectsExcelcds.xml"
Appending XML Data
Both the Excel Workbook object and the XmlMaps collection contain methods for appending or overwriting XML data in a workbook. The Workbook.XmlImport method and the Xmlmaps. Import method provide functionality to do either. Both methods take Overwrite arguments, which when set to False will append data to any existing data. The XmlImport method, however, will not append data when Overwrite is set to False if the optional Destination argument is used. In this case, nothing will happen (the append is cancelled).
We're going to append data from another XML file containing more discography information that we've received. We'll use the ActiveWorkbook's XmlImport method to do the append. Add a function to a standard module and name it AppendXMLData. The code looks like this:
Sub AppendXMLData()

Dim map As XmlMap

  Set map = ActiveWorkbook.XmlMaps("cds_Map")

  ActiveWorkbook.XmlImport URL:=

    "C:projectsExcelcds02.xml", ImportMap:=

    map, Overwrite:=False

End Sub
Run the AppendXMLData() method on the same worksheet that you imported the original XML discography information on. The data should look like that shown in Figure 3-13.
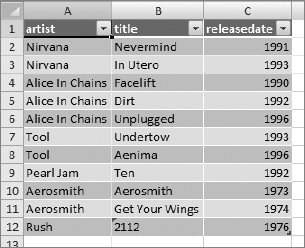
Figure 3-13. XML data appended
Using the XmlMaps collection's Import method, the same call might look like this:
Sub AppendXMLIntoExistingMap()

Dim sNewData As String

  sNewData = "C:projectsExcelcds02.xml"


  ActiveWorkbook.XmlMaps("cds_Map").Import sNewData, False

End Sub
The Overwrite argument is set to False, causing the data to be appended to the end of your data range. Set it to True to write over the data.
Sub ImportXMLIntoExistingMap()

Dim sNewData As String

  sNewData = "C:projectsExcelcds.xml"


  ActiveWorkbook.XmlMaps("cds_Map").Import sNewData, True

End Sub
Saving XML Data
Saving your data back to the existing XML file or a new file is as simple as a call to the Workbook object's SaveAsXMLData method. The SaveAsXMLData method takes two arguments, the file name to save to and the XML map object to retrieve the file schema from. Figure 3-14 shows the SaveAsXMLData method displayed in the Visual Basic Immediate window with its arguments shown via IntelliSense.

Figure 3-14. SaveAsXMLData method
Add a new procedure to the standard module you've been working with, and name it SaveXML.
Sub SaveXML()

Dim ExportMap As XmlMap

  Set ExportMap = ActiveWorkbook.XmlMaps("cds_Map")


  If ExportMap.IsExportable Then

    ActiveWorkbook.SaveAsXMLData

      "C:projectsExcelcds_XML_out.xml", ExportMap

  Else

    MsgBox ExportMap.Name & " cannot be used to export XML"

  End If

End Sub
Before persisting your data, it's a good idea to ensure that the XML is exportable. The XMLMaps collection contains a read-only IsExportable method that returns True if any lists that refer to the map are exportable. A map is not exportable if an invalid value for an element is present or if required fields are not supplied.
Run the SaveXML macro from the Macros dialog box, accessible from the Developer ribbon. Figure 3-15 shows the XML generated by the SaveXML subroutine.
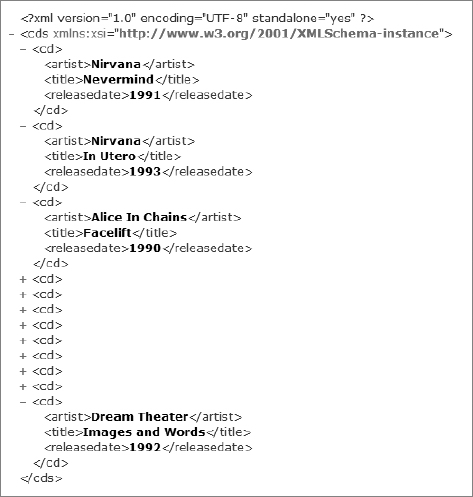
Figure 3-15. Exported XML file
When saving an XML map to a file, Excel adds the processing instructions. Our original file was very basic and did not include them (of course, there's no harm in including them).
Building an XML Data Class
Now that we've got an idea of what XML data services Excel provides us, let's build a class that will give us an easy-to-use interface to this functionality. Before we begin, though, let's think about what we'd like our class to do:
- We want it to bring in data from various XML data sources.
- We want the ability to refresh the data in case the source file is updated (either manually or through an automated process).
- We want to append data from another file that conforms to the same XML schema.
- We want to be able to clear and reset the data bindings.
- We want to be able to persist the data back to the original file or to a new file.
Those are some basic functions we'd expect from this object, but what else might a class of this type do for us?
- Check for the existence of XML maps?
- Enumerate XML maps?
- Rename an XML map?
- Add or delete XML maps?
Open a new workbook and add a new class module in the VBE. Name the class cXML.
Before we do any importing of XML data, it's a good idea to see if a map exists for our data. Add a new public property and call it HasMaps. Normally, I would add a module-level variable to hold the contents of this property, but the HasMaps property will be read-only. Creating a module-level variable presents us with the option of accessing that variable directly in our code. I'm suggesting leaving it out to prevent that possibility.
Add the following code to the HasMaps property:
Public Property Get HasMaps() As Boolean

Dim blnReturn As Boolean


  blnReturn = ActiveWorkbook.XmlMaps.Count >= 1

  HasMaps = blnReturn

End Property
My preference is to keep my code as concise as possible without sacrificing readability. I'm using one line of code in place of an If...Else block. The long form, if you prefer it, looks like this.
Dim blnReturn As Boolean


  If ActiveWorkbook.XmlMaps.Count >= 1 Then

    blnReturn = True

  Else

    blnReturn = False

  End If


  HasMaps = blnReturn
Add a property to store the name of the XML file to import plus a few additional setup properties:
Public Property Get XMLSourceFile() As String

  XMLSourceFile = m_sXMLSourceFile

End Property


Public Property Let XMLSourceFile(newXMLSourceFile As String)

  m_sXMLSourceFile = newXMLSourceFile

End Property


Public Property Get DataRange() As Excel.Range

  Set DataRange = m_oRange

End Property


Public Property Set DataRange(newRange As Excel.Range)

  Set m_oRange = newRange

End Property


Property Get Overwrite() As Boolean

  Overwrite = m_blnOverwrite

End Property


Property Let Overwrite(newOverwrite As Boolean)

  m_blnOverwrite = newOverwrite

End Property


Public Property Get MapName() As String

  MapName = m_sMapName

End Property
We've added a property to store and retrieve the DataRange into which we'll put our data (remember, it's the top-left cell reference in the range). We've also added an overwrite flag and a read-only property to retrieve the name of the XML map for this object.
The module-level declarations section should now look like this:
Dim m_sXMLSourceFile As String

Dim m_blnOverwrite As Boolean

Dim m_oRange As Excel.Range

Dim m_sMapName As String
Now let's start getting some work done. We are going to build, import, append, refresh, and save functions for our XML data. The first step is to get data from the XML file into the worksheet. We have a few scenarios in which to put data on our worksheet:
- Bringing in data from an XML file
- Overwriting existing XML data with a file that shares the same schema
- Appending XML data to our existing XML data
We'll start out by building a function that gives a developer who might be using this class in a project the ability to bring in new data (thereby creating an XML map) and a function to add additional data to previously imported XML data (or overwrite it if desired). These will be declared as private functions within the class. We will create a wrapper method to let our code make the decision as to which process we are calling. We'll also add a method to provide a direct call to an append function.
In the cXML class module, add a private method named GetNewXMLData. The code for this method will look very familiar:
Private Function GetNewXMLData()

  ActiveWorkbook.XmlImport m_sXMLSourceFile, Nothing, m_blnOverwrite, m_oRange

  m_sMapName = ActiveWorkbook.XmlMaps(ActiveWorkbook.XmlMaps.Count).Name

End Function
We are making the same call to the XmlImport method of the ActiveWorkbook object as we did in the examples that we created in standard code modules—but rather than directly setting its arguments, we are referring to the internal variables of our cXML class.
The GetNewXMLData method is actually doing two jobs for us. The first, of course, is getting the data into our worksheet. Remember that a call to the XmlImport method brings in data and creates an XML map. The second line of code in this method is setting our class's MapName property for us:
m_sMapName = ActiveWorkbook.XmlMaps(ActiveWorkbook.XmlMaps.Count).Name
This will come in handy when we need to add data or overwrite the current set of data. By checking the XmlMaps.Count property, we can get the latest addition to the collection that was added by the XmlImport method.
Now we'll add a second private function that will append or overwrite data for an existing XML map. Add a new private function and name it GetXMLForExistingMap. Add the following code:
Private Function GetXMLForExistingMap(DoOverwrite As Boolean)

  ActiveWorkbook.XmlMaps(m_sMapName).Import m_sXMLSourceFile, DoOverwrite

End Function
This function takes one argument, which is used to flag whether we want to append or overwrite our existing data. The single line of code should again be familiar. We are using the XmlMaps collection's Import method to get our data. Notice that we're using the internal m_sMapName variable to determine which XML map the data corresponds to.
Now let's add that wrapper method and let our class decide how to handle the data retrieval. Add a public function to the cXML class and name it GetXMLData. Add the following code:
Public Function GetXMLData(Optional DoOverwrite As Boolean = True)

  If (m_sMapName = "") Or (Not Me.HasMaps) Then

    GetNewXMLData

  Else

  'must set XMLSourceFile Property before appending if necessary

    GetXMLForExistingMap DoOverwrite

  End If

End Function
The GetXMLData method has one optional argument, which is used to set an overwrite flag for the incoming data. This argument has a default value of True, remaining consistent with Excel's built-in object interfaces.
The code begins with branching logic to determine whether our object already contains a reference to an XML map or whether the workbook does not contain any XML maps.
Once that's determined, the code will either bring in new data and create an XML map via the private GetNewXMLData function or it will call GetXMLForExistingMap, where, depending on how the overwrite flag is set, it will either append or overwrite the data in the existing mapping. The second branch also contains a comment noting that the XMLSourceFile property should be set before calling this function to perform an append.
Before we create client code to test this, remember that the original GetXMLData function that we wrote in our standard module in a previous example generated an error if it was run two times in a row (against a data table that was already mapped). We are going correct that error in our cXML class. Our private GetNewXMLData method is almost identical to that original code. This was done this way to show the relationship of the standard code to the class code.
We can use the XPath property of the Range object to determine if our destination cell (which is set when we instantiate our cXML object) already belongs to a mapping. If it belongs to a mapping, we'll perform a data refresh using the XmlMaps collection; if not, we'll import the data and create a new XML map. We are also going to validate the import using the XlXmlImportResult data type as the return value of our XmlImport call.
The first thing we need to do is return the name of the destination range's map if it has one. Add the following private function to the cXML class:
Private Function CurrentMapName() As String

Dim strReturn As String

  On Error GoTo Err_Handle

  If Me.HasMaps Then

    strReturn = m_oRange.XPath.map.Name

  Else

     strReturn = ""

  End If


Exit_Function:

  CurrentMapName = strReturn

  Exit Function

Err_Handle:

'not in a cell in the mapped table - treat as new mapping

  strReturn = ""

  Resume Exit_Function

End Function
This code first checks to see if the workbook has any XML maps. If it does, it returns the map name for the class's destination range. If not, it returns an empty string. The error handler is there in case the destination range is set to a location outside an XML-mapped area. It returns an empty string in that case, and treats it like a new mapping.
Now we'll modify the private method, GetNewXMLData, to use CurrentMapName and to give us a return value on our import. And while we're at it, we'll add a result output to GetXMLForExistingMap, and finally, the GetXMLData method will respond to those results with a message to the user. The finished code for all three methods looks like this:
Private Function GetNewXMLData() As XlXmlImportResult

Dim sCurrMap As String

Dim result As XlXmlImportResult

'check to see if data range is already bound to a map

  sCurrMap = CurrentMapName

  If sCurrMap = "" Then

    result = ActiveWorkbook.XmlImport(m_sXMLSourceFile, Nothing,

              m_blnOverwrite, m_oRange)

    m_sMapName = ActiveWorkbook.XmlMaps(ActiveWorkbook.XmlMaps.Count).Name

  Else

    m_sMapName = sCurrMap

    ActiveWorkbook.XmlMaps(m_sMapName).DataBinding.Refresh

    result = xlXmlImportSuccess

  End If


  GetNewXMLData = result

End Function


Private Function GetXMLForExistingMap(DoOverwrite As Boolean) As XlXmlImportResult

'calling this function to append data requires

                              setting the XMLSourceFile Property

Dim result As XlXmlImportResult

  result = ActiveWorkbook.XmlMaps(m_sMapName).Import(m_sXMLSourceFile, DoOverwrite)


  GetXMLForExistingMap = result

End Function


Public Function GetXMLData(Optional DoOverwrite As Boolean = True)

Dim result As XlXmlImportResult

  If (m_sMapName = "") Or (Not Me.HasMaps) Then

    result = GetNewXMLData

  Else

  'must set XMLSourceFile Property before appending if necessary

    result = GetXMLForExistingMap(DoOverwrite)

  End If


  Select Case result

  Case xlXmlImportSuccess

    MsgBox "XML data import complete"

  Case xlXmlImportValidationFailed

    MsgBox "Invalid document could not be processed"

  Case xlXmlImportElementsTruncated

    MsgBox "Data too large. Some data was truncated"

  End Select

End Function
Let's create some client code to test our cXML class out as we build it.
Add a standard module to the workbook, and declare a module-level variable:
Dim oEmpDept As cXML
Add a new procedure and name it GetEmpDept. Add the following code:
Note Be sure to change the file path to where you have the XML file stored.
Public Sub GetEmpDept()

  Set oEmpDept = New cXML


  oEmpDept.XMLSourceFile =

    "C:Chapter 3EmpDept.xml"

  Set oEmpDept.DataRange = Sheets(1).Range("A1")

  oEmpDept.GetXMLData

End Sub
Before running the client code, save your work. We are going to import some test data, and then we'll close the workbook without saving to remove the data and XML maps between each test. This is an easy way to reset the project without deleting worksheets and XML maps between tests.
Our data file contains a listing of Adventure Works employees and their department and job information. Since the object is just being instantiated here and its MapName property is empty, the code will fall into the first branch of the If statement and call the GetNewXMLData method.
Run the GetEmpDept procedure. Figure 3-16 shows the last few rows of the imported XML data.
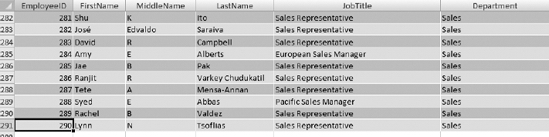
Figure 3-16. Last few rows of Adventure Works employee XML file
Run the GetEmpDept procedure once again. This time, the data is just refreshed. If you need to see the proof, put a breakpoint in the GetEmpDept procedure before you run it the second time. Figure 3-17 shows the code in break mode when being run a second time. Figure 3-18 shows the code falling into the Else statement and calling the RefreshXML method instead when the XML map already exists.
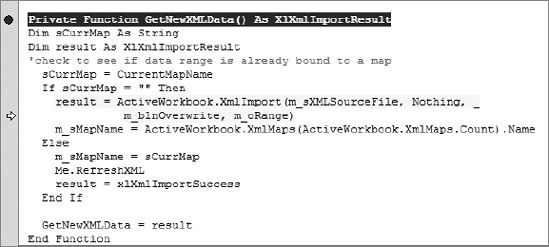
Figure 3-17. First time importing EmpDept.xml

Figure 3-18. Second time importing EmpDept.xml
Close the file without saving it, and then reopen it. Let's append some data contained in another XML file that conforms to the same XML schema. In the same standard module, add another method and name it GetAdditionalEmpDeptInfo.
Public Sub GetAdditionalEmpDeptInfo()

'appends data from files sent in from field offices.

  If oEmpDept Is Nothing Then

    Set oEmpDept = New cXML

  End If


  oEmpDept.XMLSourceFile =

    "C:Chapter 3EmpDeptAdd.xml"

  Set oEmpDept.DataRange = Sheets(1).Range("A1")

  oEmpDept.GetXMLData False

End Sub
Save the file after adding this code.
This function might be used to append data from files you receive on a regular basis. Run the GetEmpDept macro once again. Open the Macro dialog and run the GetAdditionalEmpDeptInfo subroutine to append the new data.
Let's take a look at what this code is doing. First we check to see that we have created an oEmpDept object, and if not, create one. Then we set the XMLSourceFile property to the location of the file containing the additional XML data (otherwise, we'll just append the same data to our list). Once that's done, we call the GetXMLData method again, but this time we pass in the Overwrite flag with a value of False to tell the method to append the data.
Remember to not save the file after importing the data so that you can easily reset the file. Figure 3-19 shows the new XML data appended to our existing worksheet.

Figure 3-19. New rows appended to Adventure Works employee information
There may be a case where you do not want to change the XMLSourceFile property but still need to append data. Let's create a method in our class that allows us to point to the data file directly.
First reset the file by closing without saving. Then reopen the file.
In the cXML class, add a method called AppendFromFile. We'll pass in the file name as an argument and use the XmlMaps collection's Import method to append the data. The finished method will look like this:
Public Function AppendFromFile(FileName As String)

'calling this function to append data will not modify the XMLSourceFile Property

  ActiveWorkbook.XmlMaps(m_sMapName).Import FileName, False

End Function
Once again, this line of code is identical to the code in our earlier experiments, with the exception of calling on the class's internal variable for the XML map name. We can quickly test this method. Add a new subroutine to the standard module called AppendEmpDeptInfo. Add the following code:
Public Sub AppendEmpDeptInfo()

'sample routine to get additional XML data w/o modifying XMLSourceFile Property

  oEmpDept.AppendFromFile

    "C:Chapter 3EmpDeptAdd.xml"

End Sub
Run the GetEmpDept macro to get the initial data on the worksheet. Then run the AppendEmpDeptInfo procedure from the Macro dialog box. The result is identical, but the XMLSourceFile property was not modified.
In case the contents of the file you're reading will be updated from time to time by external sources, the XmlMaps collection has the ability to refresh the data source.
Add a new method to the cXML class called RefreshXML. Here is the code for the RefreshXML method:
Public Function RefreshXML()

    ActiveWorkbook.XmlMaps(m_sMapName).DataBinding.Refresh

End Function
Now that we have our XML data in a worksheet, we can modify it or add records. We need to add one last bit of functionality to our class: the ability to save the data back to XML. Reset your project by closing without saving and reopening it.
Add a new method to the cXML class called SaveToFile. The finished SaveToFile method will look like this:
Public Function SaveToFile(Optional SaveAsFileName As String = "FileNotSet")

'if no SaveAsFileName is provided the current XMLSourceFile will be overwritten

Dim ExportMap As XmlMap


  If SaveAsFileName = "FileNotSet" Then

    SaveAsFileName = m_sXMLSourceFile

  End If


    Set ExportMap = ActiveWorkbook.XmlMaps(m_sMapName)

    If ExportMap.IsExportable Then

      ActiveWorkbook.SaveAsXMLData SaveAsFileName, ExportMap

    Else

      MsgBox ExportMap.Name & " cannot be used to export XML"

    End If

End Function
We've included an optional argument for the file name of the saved document and passed in a default nonsense value. If we want to save the data back to the file from which it came, we simply call the method with no argument. The code will use whatever file is stored in the XMLSourceFile property. If we want to write the data out to a new file, we pass in the new file name. As in our original example, we're checking to ensure the map is exportable, and then we're calling the ActiveWorkbook object's SaveAsXMLData method.
A Final Test
There is one last test to perform that will show just how using objects can compartmentalize your code and provide easy-to-reuse functionality. In our HR workbook, we will create two objects from the cXML class. Each will store its own mappings and property settings.
The following code shows the contents of the standard module containing the client code for using the cXML class:
Dim oEmpDept As cXML

Dim oHREmployees As cXML

'


Sub GetHREmployees()

  Set oHREmployees = New cXML


oHREmployees.XMLSourceFile =

 "C:Chapter 3HREmployees.xml"

Set oHREmployees.DataRange = Sheets(1).Range("A1")

oHREmployees.GetXMLData

End Sub


Public Sub GetEmpDept()

  Set oEmpDept = New cXML


  oEmpDept.XMLSourceFile =

    "C:Chapter 3EmpDept.xml"

  Set oEmpDept.DataRange = Sheets(2).Range("A1")

  oEmpDept.GetXMLData

End Sub


Public Sub GetAdditionalEmpDeptInfo()

'appends data from files sent in from field offices.

  If oEmpDept Is Nothing Then

    Set oEmpDept = New cXML

  End If


oEmpDept.XMLSourceFile =

    "C:Chapter 3EmpDeptAdd.xml"

Set oEmpDept.DataRange = Sheets(2).Range("A1")

oEmpDept.GetXMLData False

End Sub


Public Sub AppendEmpDeptInfo()

'sample routine to get additional XML data w/o modifying XMLSourceFile Property

  oEmpDept.AppendFromFile _

    "C:Chapter 3EmpDeptAdd.xml"

End Sub


Public Sub RefreshEmps()

 oEmpDept.RefreshXML

End Sub


Public Sub RefreshHR()

  oHREmployees.RefreshXML

End Sub


Public Sub SaveEmps()

  oEmpDept.SaveToFile

End Sub


Public Sub SaveEmpsNewFile()

  oEmpDept.SaveToFile

            "C:Chapter 3EmpDeptAddNEW.xml"

End Sub


Sub Cleanup()

  Set oEmpDept = Nothing

  Set oHREmployees = Nothing

End Sub
To test the code, save the workbook, and then do the following:
- With Sheet1 active, run the GetEmpDept macro (shows Adventure Works employee department information).
- With Sheet 2 active, run the GetHREmployees macro (shows employee personal information).
- With any sheet active, run the GetAdditionalEmpDeptInfo or AppendEmpDeptInfo macro to append new data to the end of the data on Sheet1. The
oEmpDeptvariable knows where the data lives in the workbook due to the internal XML mapping. - Open the
HREmployees.xmlfile in any text editor and modify a data element, and then save the file. - Run the RefreshHR macro.
- When the code has finished running, run the Cleanup macro to destroy both objects.
As you can see, we have simultaneous objects of the same type performing similar activities, but each monitoring and controlling its own set of values.
Adding a Custom Ribbon to Your Workbook
Excel 2007 has a whole new XML file format that adds a lot of flexibility to your projects. One neat thing you can do is add a custom ribbon to call your code and to hide the standard Excel ribbons from your users. Before we delve into the mechanism, behind this technique a bit of background on the new file format is in order.
Inside the Excel 2007 XML File Format
Excel 2007 builds on its history of XML support with a new file format called the Office Open XML format. This new format improves file and data management, data recovery, and interoperability. Any application that supports XML can access and work with information in an Excel 2007 workbook. This means it is now possible to work with your Excel data in systems outside of Microsoft Office products as long as they provide XML support.
Additionally, security concerns are reduced, since you now have your Excel data in what is essentially a text file. This allows data to pass through firewalls without difficulty.
The new XML file format is based on the compressed ZIP file format specification. Each ZIP container is made up of numerous XML files containing what Microsoft refers to as "parts." While most parts are XML files describing workbook data, metadata, and document information, non-XML files like binary files representing images or OLE objects may also be included in the ZIP file. There are also relationship parts that describe the relationships between parts, thus providing the structure for the workbook file. The parts are the content of the workbook and the relationships detail how the content parts fit together.
Figure 3-20 shows the Open XML format's file container.
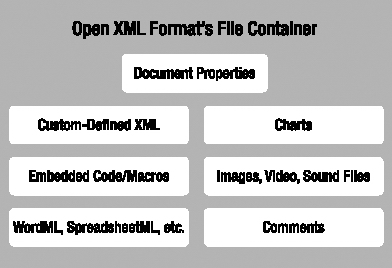
Figure 3-20. Open XML format's file container
Viewing the XML
To see what's inside an Excel document, you must change the extension to *.zip.
In the Downloads section for this book on the Apress web site, find the file Chapter 3NwindEmps.xlsx, rename it NwindEmps.zip, and copy it to a folder on your PC called unzippedExcelfiles (you'll have to create the folder first). This file contains Northwind employee information that was typed or pasted in (not imported).
Even though we could open the files directly from the ZIP file, we will create a folder into which we'll extract the contents of the ZIP file. Be sure keep "Use folder names" checked in the options list. Figure 3-21 shows the Extract function in WinZip.
You can see the file structure associated with Office documents clearly once the files are extracted (see Figure 3-22). I've created a folder named unzippedExcelfiles to store them in.
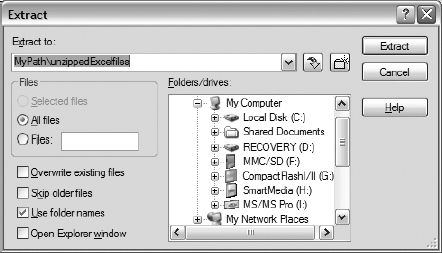
Figure 3-21. Check "Use folder names" in the Extract dialog.
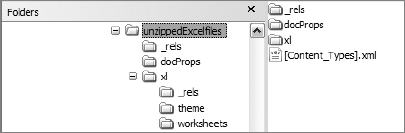
Figure 3-22. Excel's XML file structure
The _rels Folder
The _rels folder is the first place you should look to see what your Excel file is made of. The _rels folder contains a file named .rels. This file contains the top-level relationships. In your file, they should look like Figure 3-23.

Figure 3-23. .rels file contents
This file contains three relationship items. Table 3-2 describes the relationship attributes.
Table 3-2. Relationship Attributes
| Attribute | Description |
Id |
Any string (must be unique in the .rels file) |
Type |
The type of the relationship |
Target |
The folder and file that contain the target of the relationship (this is also a part) |
Following is a list of the many types of relationships that can be found in an Office document:
- http://schemas.microsoft.com/office/2006/relationships/officeDocument
- http://schemas.microsoft.com/office/2006/relationships/vbaProject
- http://schemas.microsoft.com/office/2006/relationships/userXmlData
- http://schemas.microsoft.com/office/2006/relationships/styleSheet
- http://schemas.microsoft.com/office/2006/relationships/hyperlink
- http://schemas.microsoft.com/office/2006/relationships/comments
- http://schemas.microsoft.com/office/2006/relationships/oleObject
- http://schemas.microsoft.com/office/2006/relationships/e1Object
- http://schemas.microsoft.com/office/2006/relationships/e2Object
- http://schemas.microsoft.com/office/2006/relationships/image
- http://schemas.microsoft.com/office/2006/relationships/sound
- http://schemas.microsoft.com/office/2006/relationships/movie
- http://schemas.microsoft.com/office/2006/relationships/slide
- http://schemas.microsoft.com/office/2006/relationships/layout
- http://schemas.microsoft.com/office/2006/relationships/notesslide
- http://schemas.microsoft.com/office/2006/relationships/slidemaster
- http://schemas.microsoft.com/office/2006/relationships/glossaryDoc
- http://schemas.microsoft.com/office/2006/relationships/chart
- http://schemas.microsoft.com/office/2006/relationships/activeXControl
- http://schemas.microsoft.com/office/2006/relationships/cfChunk
- http://schemas.microsoft.com/office/2006/relationships/dataStoreItem
- http://schemas.microsoft.com/office/2005/relationships/diagram
- http://schemas.microsoft.com/office/2006/relationships/embeddedFont
- http://schemas.microsoft.com/office/2006/relationships/embeddedMetroObject
- http://schemas.microsoft.com/office/2005/relationships/diagramData
- http://schemas.microsoft.com/office/2005/relationships/diagramStyle
- http://schemas.microsoft.com/office/2005/relationships/diagramColorTrans
- http://schemas.microsoft.com/office/2005/relationships/diagramDefinition
- http://schemas.microsoft.com/package/2005/02/md/core-properties
- http://schemas.microsoft.com/office/2006/relationships/docPropsApp
- http://schemas.microsoft.com/office/2006/relationships/docPropsCustom
- http://schemas.microsoft.com/office/2006/relationships/glossaryDoc
- http://schemas.microsoft.com/ office/2006/relationships/documentThumbnail
The relationship in our XML file with an ID attribute of rId1 and a Type of http://schemas.microsoft.com/office/2006/relationships/officeDocument is the main document part. Since we're working in Excel, this translates to an Excel workbook (as defined by the target of this relationship item, xl/workbook.xml). If we were working with PowerPoint, this would be a presentation, and if we were working in Word, it would be a document.
The Application Folder
The next folder to explore is the application folder, whose name will reflect the program used to create the file. Ours is named xl (for Excel), as displayed in Figure 3-24. The application folder contains application-specific document files. Some of these files are found in their own folder, but the root contains the workbook part and the sharedStrings (data) part.
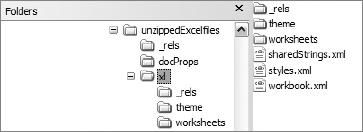
Figure 3-24. xl folder contents
The [Content_Types].xml File
Another file of interest is the [Content_Types].xml file found in the root folder we created (unzippedExcelfiles). It lists the content types for the other parts included in the Excel file package. Content types are the types of parts that can be included in a package. Following is a list of the content types that can be found in an Office document:
application/vnd.ms-excel.12application/x-fontapplication/vnd.ms-excel.addin.12application/xmlapplication/vnd.ms-excel.template.12audio/mp3application/vnd.ms-excel.binary.12audio/aiffapplication/vnd.ms-excel.macroEnabled.12audio/basicapplication/vnd.ms-excel.macroEnabledTemplate.12audio/midiapplication/vnd.ms-office.activeX+xmlaudio/x-ms-waxapplication/vnd.ms-office.chartaudio/x-ms-wmaapplication/vnd.ms-office.vbaProjectimage/bmpapplication/vnd.ms.powerpoint.template.macroEnabled.12application/x-fontapplication/vnd.ms-powerpoint.image/gifapplication/vnd.ms-powerpoint.macroEnabled.12image/jpegapplication/vnd.ms-powerpoint.main.12+xmlimage/pngapplication/vnd.ms-powerpoint.presentation.12image/tiffapplication/vnd.ms-powerpoint.template.12video/aviapplication/vnd.ms-powerpoint.show.12image/xbmapplication/vnd.ms-powerpoint.show.macroEnabled.12image/x-iconapplication/vnd.ms-word.document.12video/mpegapplication/vnd.ms-word.document.macroEnabled.12video/mpgapplication/vnd.ms-word.document.macroEnabled.main+xmlvideo/x-ivfapplication/vnd.ms-word.document.main+xmlvideo/x-ms-asfapplication/vnd.ms-word.template.12application/vnd.ms-word.template.macroEnabled.12application/vnd.ms-word.template.macroEnabled.main+xmlapplication/vnd.ms-word.fontTable+xmlvideo/x-ms-asf-pluginapplication/vnd.ms-word.listDefs+xmlvideo/x-ms-wmapplication/vnd.ms-word.settings+xmlvideo/x-ms-wmvapplication/vnd.ms-word.styles+xmlvideo/x-ms-wmxapplication/vnd.ms-word.subDoc+xmlvideo/x-ms-wvxapplication/vnd.ms-word.template.main+xmlapplication/vnd.ms-metro.core-properties+xmlaudio/mpegurlapplication/vnd.ms-metro.relationships+xmlaudio/wav
This folder contains files listing document properties, similar to what you see when you click the Office button and select Prepare ![]() Properties. The
Properties. The docProps folder contains at a minimum a file named app.xml and a file named core.xml. These files contain meta-information about your Excel file, such as the creator name, and modified and creation dates.
Relationships
An Excel 2007 document is made of parts. These parts are "joined" together via relationships as defined in the various XML files we've seen. The connection between a data table and the worksheet it resides in is defined by a relationship.
Our root folder contains a _rels folder that contains a .rels file. This file defines relationships between our document properties files, app.xml and core.xml, and the xl/workbook.xml file. The xl folder itself contains a _rels folder that has a relationship file, workbook.xml.rels. This file defines the relationships of the workbook, data, and formatting parts. Figure 3-25 shows an example of the workbook.xml.rels file.
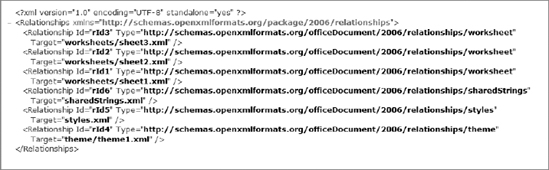
Figure 3-25. Contents of the workbook.xml.rels file
From the Downloads section of this book's page on the Apress web site, copy the file named NwindEmps01.xlsx to a local folder and rename it to NwindEmps.zip. This file contains the same Northwind employee information as NwindEmps.xlsx, but this data was imported from the Northwind Access database. Note the additional files reflecting the imported data when we open it. I've opened the file using WinZip, as shown in Figure 3-26.
Before we look at these new files, let's check the [Content_Types].xml file (shown in Figure 3-27). Remember that this shows us all the various types of content we'll find in our Excel project.
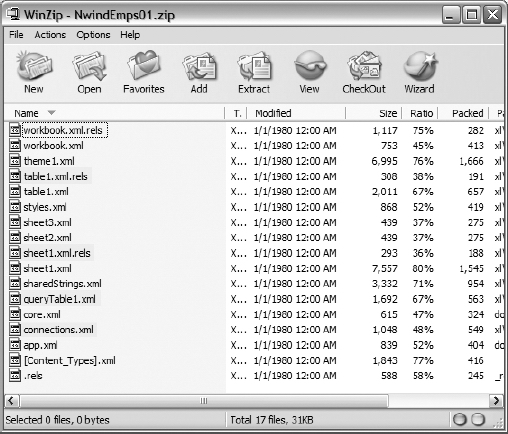
Figure 3-26. Additional XML files with imported data highlighted
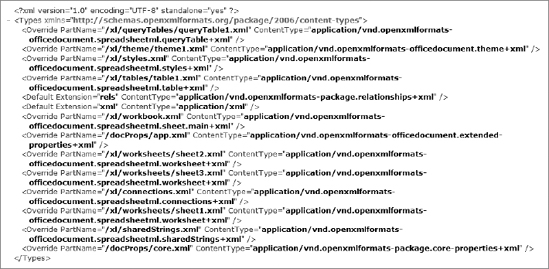
Figure 3-27. New parts in [Content_Types].xml (other parts omitted for clarity)
New parts are listed for the query table, table, and connections that we know from the previous chapter are associated with a workbook containing imported data. The contents of the xlconnections.xml file in Figure 3-28 should look very familiar to you by now.
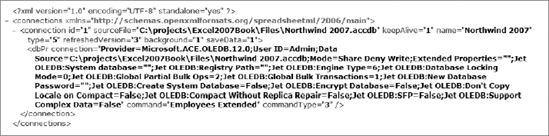
Figure 3-28. Connections.xml contents
It's the same connect string we used in the code we generated and that Excel generated for us with the Macro Recorder. The id attribute tells us this is connection 1 (in this case, the only connection in the file). The sourceFile attribute tells us where the data came from. The last two attributes of the connection node refer to the ADO Command object and the CommandType.
The xlqueryTablesqueryTable1.xml file displayed in Figure 3-29 shows the relationship between the connection and the query table object. The queryTable node has a connectionId attribute of 1, referring to the OLE DB connection we just looked at. Then there are some formatting attributes, followed by a list of field names with queryTableField IDs and tableColumnIds linking the query table to an Excel table (or range).
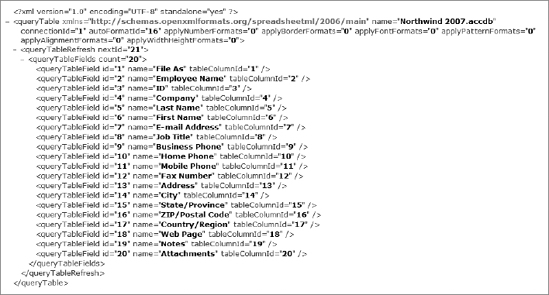
Figure 3-29. queryTable1.xml contents
We find that there's a new folder in our structure called tables. In this folder is a file named Table1.xml (shown in Figure 3-30). Table1.xml looks very similar to queryTables1.xml. It has the same field mapping information, but also contains information about the range name (Table_Northwind_2007.accdb), cell locations for the data, what data is autofiltered, and whether a totals row is shown.
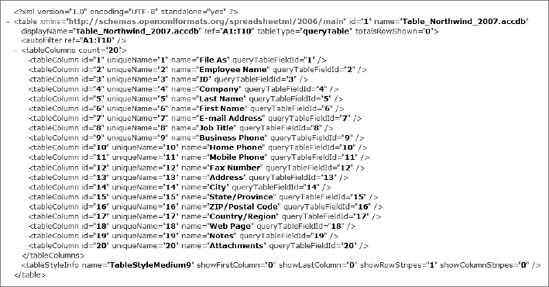
Figure 3-30. Table1.xml contents
There is also table style information in the last node of the file. So how are the queryTable and Table1.xml files associated? In the tables folder is a subfolder named _rels. This folder contains a file named table1.xml.rels (the full path to the file is xl able\_res. table1.xml.rels). The contents of table1.xml.rels is shown in Figure 3-31.

Figure 3-31. table1.xml.rels contents
As you can see, the tables folder's Relationship element is referring to the relationships/queryTable content item in its Type attribute with a target of the queryTable1.xml file.
Adding a Ribbon to Run Your Custom Macros
So that was quite a bit to take in just to add a ribbon to a project, right? It's really just important background information that will be helpful as you do more and more work with Excel (or other Office products).
Next, let's add a ribbon to our XML data project. We're going to add a ribbon that contains one tab with four groups: one for adding new data, one for appending data, one for refreshing data, and one for saving data.
To do so, we will create a ribbon extensibility customization file with one tab, four groups, and seven buttons. We'll specify a callback event in the buttons to call each macro we've created in the document. Then we will modify the contents of the macro-enabled document container file to point to the ribbon extensibility customization file.
- Save your
XML_Class.xlsmfile asXML_Class_Ribbon.xlsm. - Open the VBE.
- In the VBE, double-click ThisWorkbook to open the code window.
- Type the following VBA subroutines, and then close the VBE:
Sub GetEmpDataBtn(ByVal ControlID As IRibbonControl)

   Call GetEmpDept

End Sub


Sub AppendEmpDataBtn(ByVal ControlID As IRibbonControl)

   Call AppendEmpDeptInfo

End Sub


Sub GetHRDataBtn(ByVal ControlID As IRibbonControl)

   Call GetHREmployees

End Sub


Sub RefreshEmpDataBtn(ByVal ControlID As IRibbonControl)

   Call RefreshEmps

End Sub


Sub RefreshHRDataBtn(ByVal ControlID As IRibbonControl)

   Call RefreshHR

End Sub


Sub SaveEmpBtn(ByVal ControlID As IRibbonControl)

   Call SaveEmps

End Sub


Sub SaveEmpNewFileBtn(ByVal ControlID As IRibbonControl)

   Call SaveEmpsNewFile

End Sub
These procedures will be mapped to the controls on the custom ribbon via an XML configuration file.
Save the workbook and close it.
Creating the XML File That Contains the Markup to Modify the UI
- Create a folder called
customUI. - Open a new file in the text editor of your choice, and save it as
customUI.xmlin thecustomUIfolder. - Add the following code to the
customUI.xmlfile:
<customUI xmlns="http://schemas.microsoft.com/office/2006/01/customui">

   <ribbon startFromScratch="true">

      <tabs>

         <tab id="DataFunctions" label="XML Data Functions">

            <group id="NewDataControls" label="New Data">

               <button id="Button1" size="large" label="Get Emps Dept"

                                 onAction="ThisWorkbook.GetEmpDataBtn" />

               <button id="Button2" size="large" label="Get HR Info"

                                onAction="ThisWorkbook.GetHRDataBtn" />

            </group>


            <group id="AppendDataControls" label="Append Data">

               <button id="Button3" size="large" label="Append Emps Dept"

                                 onAction="ThisWorkbook.AppendEmpDataB tn" />

            </group>


            <group id="RefreshDataControls" label="Refresh Data">

               <button id="Button4" size="large" label="Refresh Emp Dept"

                               onAction="ThisWorkbook.RefreshEmpDataBtn" />

               <button id="Button5" size="large" label="Refresh HR Info"

                                onAction="ThisWorkbook.RefreshHRDataBtn" />

            </group>


            <group id="SaveDataControls" label="Save Data">

               <button id="Button6" size="large" label="Save Emp Dept"

                                    onAction="ThisWorkbook.SaveEmpBtn" />

               <button id="Button7" size="large" label="Save Emp Dept As"

                               onAction="ThisWorkbook.SaveEmpNewFileBtn" />

            </group>


         </tab>

      </tabs>

   </ribbon>

</customUI> - Save the file.
This XML defines the XML Data Functions tab and its four groups. Within each group, note the reference to each macro we just created in the ThisWorkbook module in our Excel project.
Next, we will modify some of the files contained in the macro-enabled Excel file that we just created.
- Change the extension of
XML_Class_Ribbon.xlsmto.zip, and double-click the file to open it. - Add the customization file to the ZIP container by dragging the
customUIfolder from its location to the ZIP file. - Extract the
.relsfile to a local folder. A_relsfolder containing the.relsfile is copied to your folder. (If only the file appears, use your ZIP tool's extract function rather than dragging the file from the ZIP window.) - Open the
.relsfile and add the following line between the lastRelationshiptag and theRelationshipstag, as shown in Listing 3-1. This creates a relationship between the workbook file and the customization file.Listing 3-1.. Adding the CustomUI Relationship to the .rels. File
<Relationships

  xmlns="http://schemas.openxmlformats.org/package/2006/relationships">

    <Relationship Id="rId3" Type="http://schemas.openxmlformats.org/

      officeDocument/2006/relationships/extended-properties"

      Target="docProps/app.xml" />

    <Relationship Id="rId2" Type="http://schemas.openxmlformats.org

      /package/2006/relationships/metadata/core-properties"

      Target="docProps/core.xml" />

    <Relationship Id="rId1" Type="http://schemas.openxmlformats.org

      /officeDocument/2006/relationships/officeDocument"

      Target="xl/workbook.xml" />

    <Relationship Id="someID" Type="http://schemas.microsoft.com/office/

      2006/relationships/ui/extensibility" Target="customUI/customUI.xml" />

</Relationships> - Close and save the file.
- Add the
_relsfolder back to the container file by dragging it from its location, overwriting the existing file. - Rename the workbook file back to its original name.
- Open the workbook and notice that the Ribbon UI now displays your XML data functions.
- Click the buttons to check that the functionality is there and working (shown in Figure 3-32).
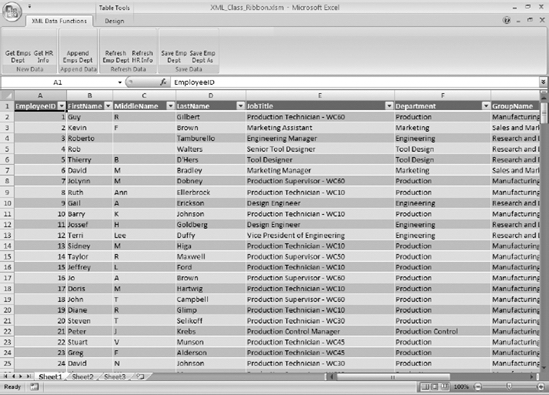
Figure 3-32. A custom ribbon added using an XML configuration file
Summary
In this chapter, we explored the various methods of bringing XML data in and out of Excel. We also took an excursion into the new Office Open XML file format. While it looks complicated at first glance, remember that it is all about relationships between parts. Once that's understood, you'll be able to explore its many possibilities.
Finally, we added a custom user interface by modifying the underlying ZIP file format in Excel 2007. By adding a customUI XML file describing the ribbon we wanted to add, and by adding a relationship reference to one of Excel's built-in configuration files, we were able to very simply add a custom ribbon.
Very powerful stuff indeed.