
CHAPTER 4
UserForms
As skilled as we developers are at laying out a UI, when working with spreadsheets we find our options may be a bit limited. Depending on what data is being entered, you may find your users scrolling off the screen to the right or bottom of an Excel worksheet window.
UserForms in Excel 2007 allow you to create easy-to-use data entry screens for your users. They can be used to display summary data or data from any data source. They provide us with the tools we need to create "wizard" applications or simple data entry forms.
Creating a Simple Data Entry Form
Let's create a form for quick data entry for a call center doing a one-minute customer contact. The user's task is to call the customer and find out if they've heard of "the Widget" and whether they're interested in finding out more about the product. If the customer is interested, the user will mark that on the form as well so sales can follow up.
Note The example files and source code for this book are available to readers at www.apress.com in the Downloads section of this book's home page.
Designing the Form
From the sample files for this book, open the workbook named UserForm.xlsm. This file contains the Customer Survey database shown in Figure 4-1. Our custom form will collect and save its data to this table.

Figure 4-1. The Customer Survey database
Open the VBE, and add a UserForm to the project. You can do this by choosing Insert ![]() UserForm, or you can right-click in the Project Explorer window and choose Insert
UserForm, or you can right-click in the Project Explorer window and choose Insert ![]() UserForm, as shown in Figure 4-2.
UserForm, as shown in Figure 4-2.
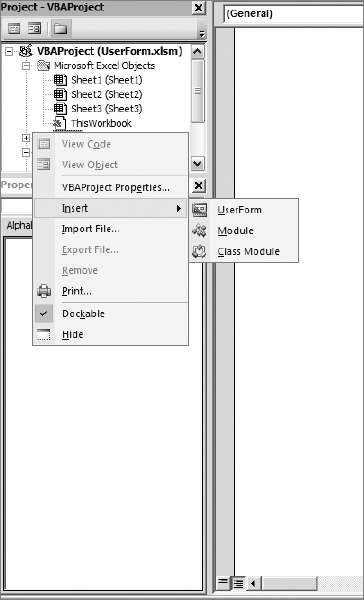
Figure 4-2. Adding a UserForm to the project
A new empty UserForm named UserForm1 is added to the project, as shown in Figure 4-3.
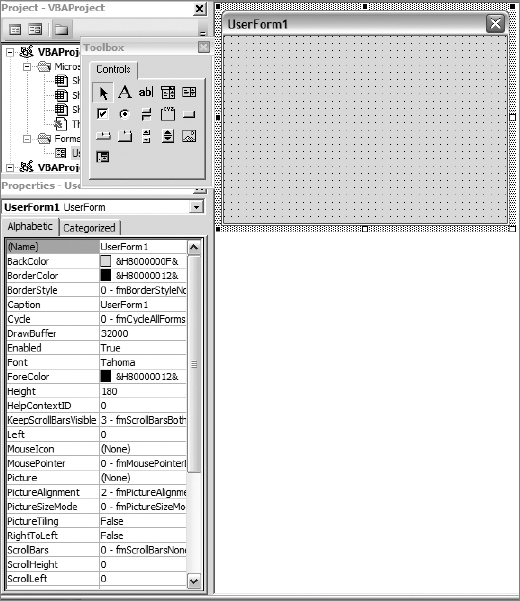
Figure 4-3. New UserForm with Toolbox and Property Sheet displayed
Along with the UserForm, you'll see the Toolbox window, which contains a palette of controls to use, and the UserForm Property Sheet, where you can rename your form and modify various settings.
The Toolbox controls are described in Table 4-1.
UserForm Toolbox Controls
Table 4-1. UserForm Toolbox Objects
On UserForm1, add the controls and enter the property settings listed in Table 4-2.
Table 4-2. UserForm1 Settings and Controls
The finished form should look like Figure 4-4.
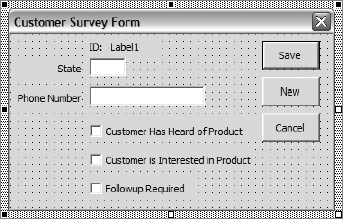
Figure 4-4. UserForm with controls placed
As you can see, we're designing a very simple data collection tool. We're going to write a record to the database that is stored on Sheet1 in the UserForm workbook, and we want to do some validation of the data before we save.
Before we begin, we need to think about a couple of functions we might need and how to approach our code design. First, our form needs to know which worksheet to save the data to (in this case, Sheet1 contains our database). It also needs to know the next available ID number and the location of the next available row to place the data when we save the data.
A function that can tell us where the next available row in a worksheet is might be useful in another project as well. Remember the cExcelUtils class we started in Chapter 2? Let's put our function in that class and export it so we can reuse it in other projects.
Open the last project you worked on in Chapter 2, DataAccessSample06.xlsm, and then open the VBE. In the Project Explorer, right-click the cExcelUtils class icon and choose Export File from the shortcut menu, as shown in Figure 4-5.
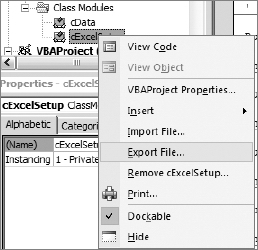
Figure 4-5. Exporting a module
Choose your location and save the *.cls file. Once that's done, you can close the DataAccessSample06.xlsm workbook. Right-click anywhere in the Project Explorer in the UserForm.xlsm project, and choose Import File, as shown in Figure 4-6. Navigate to where you just saved the cExcelUtils.cls file and choose the Open command.
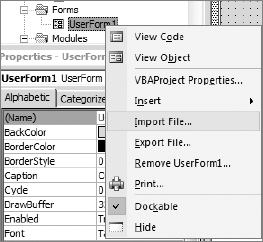
Figure 4-6. Importing a module
The cExcelUtils class is now a part of your project. Open the cExcelUtils class in the VBE and add the following method. The FindEmptyRow function returns a Long Integer containing the row number of the next available row on a worksheet.
Function FindEmptyRow(ws As Worksheet) As Long

Dim lngReturn As Long


  lngReturn = ws.Cells(Rows.Count, 1).End(xlUp).Offset(1, 0).Row

  FindEmptyRow = lngReturn

End Function
This simple bit of code uses the Range object's End property to find the last cell in the region and offsets it by 1. We're passing in a worksheet as an argument so the function will return the next open row in the passed worksheet.
The Working Class
Next we're going to build a class to hold the values for each customer survey. This class will also store the location of the database worksheet and it will perform a data save to the database.
In the VBE, add a new class module and name it cCustSurvey. Add the following module-level variables to hold the various properties:
Private m_lngID As Long

Private m_strState As String

Private m_strPhone As String

Private m_blnHeardOfProduct As Boolean

Private m_blnWantsProduct As Boolean

Private m_blnFollowup As Boolean

Private m_xlWksht As Worksheet

Private m_oXL As cExcelUtils
The first six items are simply the data we'll enter on our UserForm plus the ID field that we'll generate from the database worksheet. The m_xlWksht variable will hold the location of the database worksheet, which we'll need for a couple of things. The m_oXL variable is how we'll determine where to put any new data.
Let's add the data properties first, and then we'll get into adding some functionality to the class. Add the following properties to the cCustSurvey class module:
Property Get ID() As Long

  ID = m_lngID

End Property


Property Get State() As String

  State = m_strState

End Property


Property Let State(newState As String)

  m_strState = newState

End Property


Property Get PhoneNumber() As String

  PhoneNumber = m_strPhone

End Property


Property Let PhoneNumber(newPhoneNumber As String)

  m_strPhone = newPhoneNumber

End Property


Property Get HeardOfProduct() As Boolean

HeardOfProduct = m_blnHeardOfProduct

End Property


Property Let HeardOfProduct(newHeardOf As Boolean)

  m_blnHeardOfProduct = newHeardOf

End Property


Property Get WantsProduct() As Boolean

  WantsProduct = m_blnWantsProduct

End Property


Property Let WantsProduct(newWants As Boolean)

  m_blnWantsProduct = newWants

End Property


Property Get Followup() As Boolean

  Followup = m_blnFollowup

End Property


Property Let Followup(newFollowup As Boolean)

  m_blnFollowup = newFollowup

End Property

Property Get DBWorkSheet() As Worksheet

  Set DBWorkSheet = m_xlWksht

End Property


Property Set DBWorkSheet(newSheet As Worksheet)

  Set m_xlWksht = newSheet

End Property
Notice that our ID property has no Property Let method, so it's read-only. The ID will be pulled from the database as it's needed. Everything else is rather generic until we get to our DBWorksheet property. This is where we are storing the worksheet that contains our database and must be set before the class can work.
We're going to add a GetNextID method to find the last row, grab the value from the first column, and then increment it by 1. This function will set the ID property's internal variable so we can retrieve it from the class once it's set.
Add the following code to the cCustSurvey class module:
Public Function GetNextID() As Long

Dim lngReturn As Long

  lngReturn = m_xlWksht.Cells(Rows.Count, 1).End(xlUp).Value + 1

  m_lngID = lngReturn ' set the ID property

  GetNextID = lngReturn

End Function
This code is very similar to the FindEmptyRow method in the cExcelUtils class, but it's returning a cell value instead of a row number.
Next, add initialization and cleanup code:
Private Sub Class_Initialize()

  Set m_oXL = New cExcelUtils

End Sub


Private Sub Class_Terminate()

  Set m_oXL = Nothing

End Sub
Tip As mentioned in previous chapters, the Class_Initialize method is a great place to set up any internal objects used by your custom classes, and the Terminate method is the place to clean these objects up when you're finished using your class.
Now let's make this class do some work. First let's add some validation code. We cannot save the record if the State and PhoneNumber properties do not contain data. Add a new function called ValidateData and type in the following code:
Public Function ValidateData() As Boolean

Dim blnReturn As Boolean

  If (Len(Me.PhoneNumber & "") * Len(Me.State & "")) = 0 Then

    blnReturn = False

  Else

    blnReturn = True

  End If


  ValidateData = blnReturn

End Function
By multiplying the lengths of the text values State and PhoneNumber, we can determine whether one is missing, because the math will always return 0 if we're multiplying by 0.
Create a new function named Save that returns a success flag. This function needs to know the row number of the next available row for data entry; it needs to know what sheet that row is on; and if there are no errors, it must return a Boolean True value.
Here is the code for the Save method:
Public Function Save() As Boolean

Dim lngNewRowNum As Long

Dim blnReturn As Boolean


  If m_xlWksht Is Nothing Then

    blnReturn = False

    GoTo Exit_Function

  End If


  lngNewRowNum = m_oXL.FindEmptyRow(m_xlWksht)


  With m_xlWksht

    .Cells(lngNewRowNum, 1).Value = Me.ID

    .Cells(lngNewRowNum, 2).Value = Me.State

    .Cells(lngNewRowNum, 3).Value = Me.PhoneNumber

    .Cells(lngNewRowNum, 4).Value = Me.HeardOfProduct

    .Cells(lngNewRowNum, 5).Value = Me.WantsProduct

    .Cells(lngNewRowNum, 6).Value = Me.Followup

  End With


  If Err.Number = 0 Then

    blnReturn = True

  End If


Exit_Function:

  Save = blnReturn

  Exit Function

End Function
The first thing we're doing is checking to make sure our worksheet object still exists.
If m_xlWksht Is Nothing Then 'double check that we still have a valid object

  blnReturn = False

  GoTo Exit_Function

End If
If it doesn't, we return a False value and exit the function.
Next we get our empty row location from our cExcelUtils object:
lngNewRowNum = m_oXL.FindEmptyRow(m_xlWksht)
Then we use the m_xlWksht variable that contains the database worksheet and populate each column in the row with data from our class properties:
With m_xlWksht

  .Cells(lngNewRowNum, 1).Value = Me.ID

  .Cells(lngNewRowNum, 2).Value = Me.State

  .Cells(lngNewRowNum, 3).Value = Me.PhoneNumber

  .Cells(lngNewRowNum, 4).Value = Me.HeardOfProduct

  .Cells(lngNewRowNum, 5).Value = Me.WantsProduct

  .Cells(lngNewRowNum, 6).Value = Me.Followup

End With
Finally, we check that we have not received any errors, set the success flag to True, and then exit the function:
If Err.Number = 0 Then

  blnReturn = True

End If


Exit_Function:

  Save = blnReturn

  Exit Function
That's it for the cCustSurvey class. We've just built a class to hold our input values from the UserForm. It will find the next ID value for any new records and it will save the data to the worksheet we pass into the class in the next free row.
Coding the UserForm
We just created a class to handle our data and modified our Excel Utility class to help the cCustSurvey class. Let's put cCustSurvey to work by coding it into our UserForm.
Open the Customer Survey form (UserForm1). Open the code view by clicking the View Code button on the Project Explorer toolbar, as shown in Figure 4-7.
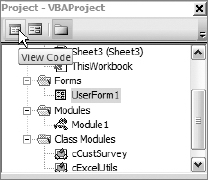
Figure 4-7. The View Code button displays the code window for UserForm1 (selected).
Add the following module-level variables in the UserForm code window:
Private m_oCustSurvey As cCustSurvey

Private m_blnSaved As Boolean
The m_oCustSurvey variable will do most of the work for us, and the m_blnSaved variable will store the return value from the m_oCustSurvey object's Save method.
Now let's put our initialization and cleanup code in place. Add the following code to the UserForm's UserForm_Initialize and UserForm_Terminate events:
Private Sub UserForm_Initialize()

  Set m_oCustSurvey = New cCustSurvey

  Set m_oCustSurvey.DBWorkSheet = Sheets("Sheet1")

  m_oCustSurvey.GetNextID

  lblID.Caption = m_oCustSurvey.ID

  m_blnSaved = False

  ClearForm

End Sub


Private Sub UserForm_Terminate()

  Set m_oCustSurvey = Nothing

End Sub
When the form is initialized, we're instantiating our cCustSurvey object. Then we're setting the DBWorksheet property. This is a very important step. This value must be stored right away so the class can determine the next valid ID and so it knows where to store the data it collects. Then we get the next available ID number and display it in a label. We then initialize our save success flag to False, and call a function to clear the form.
The ClearForm procedure does nothing more than blank out the text input fields and set the check boxes values to False (or not checked).
Private Sub ClearForm()

  Me.txtPhone.Value = ""

  Me.txtState.Value = ""

  Me.chkHeard.Value = False

  Me.chkInterested.Value = False

  Me.chkFollowup.Value = False

End Sub
Our form has three command buttons: one to save the data entered (Save), one to clear the form and add a new record (New), and one to cancel the data entry operation and close the form without saving the data (Cancel).
The Save button should perform a few functions for us:
- Sending the data to the
cCustSurveyclass - Validating the data and returning a message if the data is not valid
- Saving the data if valid and returning a message if the save is successful
- Cleaning up the form after the save and resetting the saved flag
Here is the code for the Save button:
Private Sub cmdSave_Click()

  With m_oCustSurvey

    .State = txtState.Text

    .PhoneNumber = txtPhone.Text

    .HeardOfProduct = chkHeard.Value

    .WantsProduct = chkInterested.Value

    .Followup = chkFollowup.Value

  End With


  If Not m_oCustSurvey.ValidateData Then

    MsgBox "State and Phone Number required", vbOKOnly, "Cannot Save"

    Exit Sub

  Else

    m_blnSaved = m_oCustSurvey.Save

  End If


  DoAfterSave m_blnSaved

End Sub
The first section of the code is sending the values to the class. In the real world, our class would perform some input validations (such as validating that we entered a phone number using the correct format).
With m_oCustSurvey

  .State = txtState.Text

  .PhoneNumber = txtPhone.Text

  .HeardOfProduct = chkHeard.Value

  .WantsProduct = chkInterested.Value

  .Followup = chkFollowup.Value

End With
The second section of the code is calling the m_oCustSurvey.ValidateData method and displaying a message if both text fields do not contain data. If the data is present, the m_oCustSurvey.Save method is called.
Finally, we're calling a function called DoAfterSave to perform our cleanup. We're passing in our success flag so that this method will be the one calling out any messages to the user.
Private Sub DoAfterSave(success As Boolean)

  If success Then

    ClearForm

    lblID.Caption = m_oCustSurvey.GetNextID

    MsgBox "Record Saved"

  Else

    MsgBox "Could not save record"

  End If


  m_blnSaved = False 'resetting flag

End Sub
Our cleanup code clears the form, gets the next available ID number from the database, and sends the user a success (or failure) message.
The New command button has the job of clearing the form and getting a new ID from the database. Before it does that, it must check the text fields to see if they have any data entered. The code for the New command button follows:
Private Sub cmdNew_Click()

'sets form up for a new record

Dim iAnswer As Integer

'check that current record is saved (if any)

  If Not m_blnSaved Then 'see if any text data is entered that is not saved

    If (Len(Me.txtPhone.Value & "") + Len(Me.txtState.Value & "")) <> 0 Then

      iAnswer = MsgBox("There is unsaved data. Do you want to continue?", _

                  vbYesNo, "Unsaved Data")

      If iAnswer = vbYes Then

        ClearForm

      End If

    Else

      ClearForm

    End If

  End If

End Sub
We're using the following line of code to determine whether we have data in one of our two text input fields:
If (Len(Me.txtPhone.Value & "") + Len(Me.txtState.Value & "")) <> 0 Then
Once again, we use the Len function to help us make this determination. If the length of both strings summed together is greater than 0, then at least one of the fields contains data. If the result is True, then we prompt the user as to whether they want to continue with the new record and throw out the existing data.
The Cancel command button has a very simple job: clearing the form and closing it. Here is the code for the Cancel button:
Private Sub cmdCancel_Click()

  ClearForm

  Unload UserForm1

End Sub
The last step is to create a procedure in a standard module to launch our Customer Survey form. In the VBE, add a new standard code module and create a new subroutine named ShowForm. Add the following line of code to the procedure.
Sub ShowForm()

  UserForm1.Show

End Sub
If you renamed your UserForm object, use that name in place of UserForm1. Let's run our form and enter some data. In Excel, run the ShowForm macro, as shown in Figure 4-8.
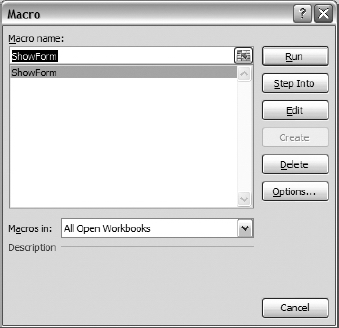
Figure 4-8. Running the ShowForm macro
The Customer Survey form displays. The ID displayed is 103, and as you can see in Figure 4-9, the last entry in the table is 102. Also note that row 5 is the next row available for data.
Let's check our code. Enter NY in the State text box, but leave the phone number field blank, and then click the Save button.
Figure 4-10 shows that our cCustSurvey's ValidateData method finds that neither piece of required data is present, and returns a message to our client code in the UserForm. Click OK and enter a phone number, and then check one or more of the check boxes. Click Save.
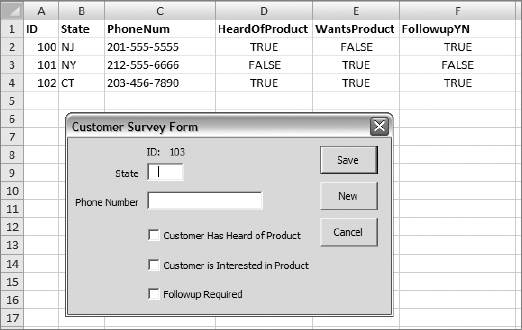
Figure 4-9. The UserForm showing the next ID available
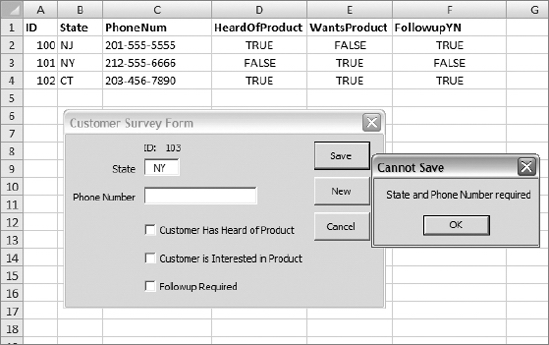
Figure 4-10. cCustSurvey class validation result
The success message, shown in Figure 4-11, is displayed to the user, and row 5 now contains the data we entered on our UserForm. Notice that the ID label has been updated to show the ID for the next record.
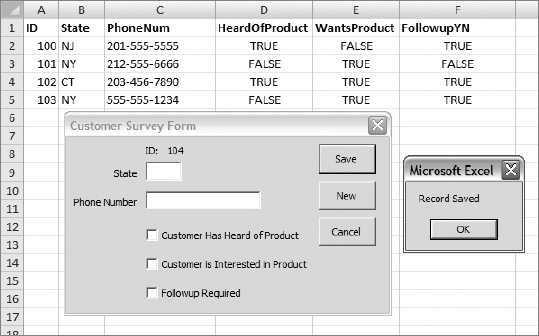
Figure 4-11. Success message and new record displayed
Let's test the New button before we move on to a more advanced UserForm. Clicking the New button with a blank or empty screen does nothing. If check boxes are checked but the text fields are empty, it will clear the screen without a prompt (this is because only the text fields are required). Enter a state and/or phone number and click the New button, and you'll receive a warning that the data has not been saved (as shown in Figure 4-12).

Figure 4-12. Warning the user about unsaved data
Clicking No returns the user to the form without making any changes. Clicking Yes will clear the form for new entry.
We made a useful addition to our cExcelUtils class. Let's export that file (overwriting the existing copy) so we can use that new functionality in other projects.
- In the VBE Project Explorer, right-click any item in the project tree.
- Choose Export File, as shown in Figure 4-13.
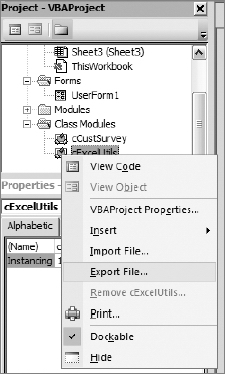
Figure 4-13. Exporting a module
- Navigate to wherever you store your
*.clsfiles, and savecExcelUtils.cls.
Creating Wizard-Style Data Entry UserForms
Wizard-style entry is a fairly common technique used to help users enter data in long or complex forms. Wizards allow you to break your data into related sections, allowing you to guide the user through an orderly data entry process.
From the sample files for this book, open the file named HRWizard.xlsm. This file consists of two worksheets. The employee database worksheet, named EmpData, is shown in Figure 4-14.

Figure 4-14. The HRWizard.xlsm EmpData database worksheet
The second worksheet, ListMgr, contains various lists we'll be using when we create our wizard data entry form. Figure 4-15 shows the ListMgr worksheet.
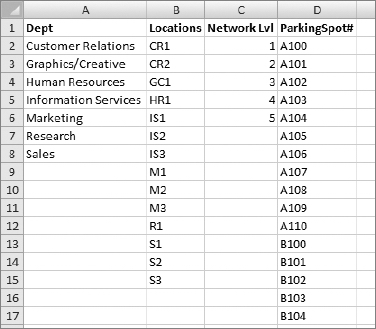
Figure 4-15. The ListMgr worksheet contains list data for the wizard UserForm.
For reference, any column on the EmpData worksheet that references a list has a blue color-coded column heading. Our EmpData worksheet data is divided into four sections: Personal, Address, Equipment, and Access, as shown in Figures 4-16 through 4-19.
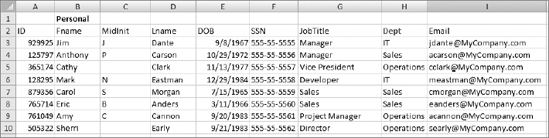
Figure 4-16. Employee personal information
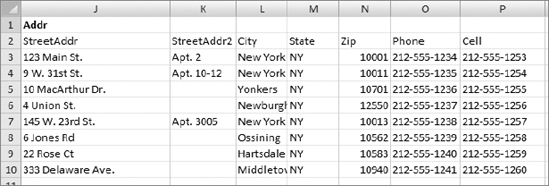
Figure 4-17. Employee address information
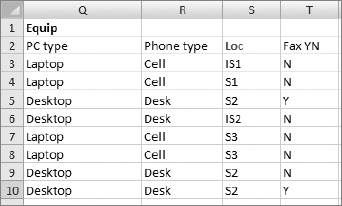
Figure 4-18. Employee equipment information
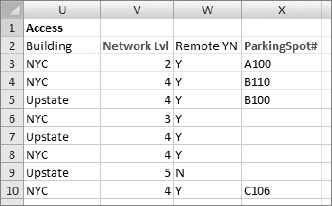
Figure 4-19. Employee access information
Our wizard UserForm will walk the user through entering this information for new employees. In turn, each piece of information will be forwarded to the appropriate department for processing.
Laying Out the Wizard Form
- Open the VBE and add a new UserForm.
- Set the form's height to 320 and its width to 332.
- Rename the form to HRWizard.
- Add a Label to the top of the form, set its caption property to MyCompany - HR Wizard, and set the font to a large size like 18 pt. This will be the main heading for our form.
- Add a MultiPage control to the form.
- Set its Height property to 216 and its Width property to 270.
- Center it on the form, leaving room at the bottom.
Your form in Design view should look something like Figure 4-20.

Figure 4-20. Initial layout for HRWizard UserForm
Since we have four data collection sections, we need to add two additional pages to our MultiPage control.
- Right-click either of the tabs at the top of the MultiPage control to display the shortcut menu.
- Select New Page from the shortcut menu, as shown in Figure 4-21.
- Repeat this one more time.
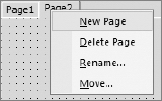
Figure 4-21. Inserting a new page in the MultiPage control
Your UserForm in Design view should look like Figure 4-22.

Figure 4-22. UserForm after adding two new pages
Adding Controls to the Form
The following sections will explain how to add the various controls to your form.
The Personal Information Page
Add controls to Page1 of the MultiPage control as listed in Table 4-3. These will correspond to the personal information column headings on the EmpData worksheet.
Table 4-3. HRWizard UserForm Controls
Resize the MultiPage control so there is room on the bottom of the UserForm for two command buttons (side by side) on the left side of the form and two command buttons (side by side) on the right side of the form. Table 4-4 lists the settings for these controls.
Table 4-4. Command Button Settings
| Item/Property | Value |
| CommandButton | — |
| Name: | cmdPrevious |
| Caption: | <<< |
| CommandButton | — |
| Name: | cmdNext |
| Caption: | >>> |
| CommandButton | — |
| Name: | cmdSave |
| Caption: | Save |
| CommandButton | — |
| Name: | cmdCancel |
| Caption: | Cancel |
The UserForm should now look something like Figure 4-23 in Design view.
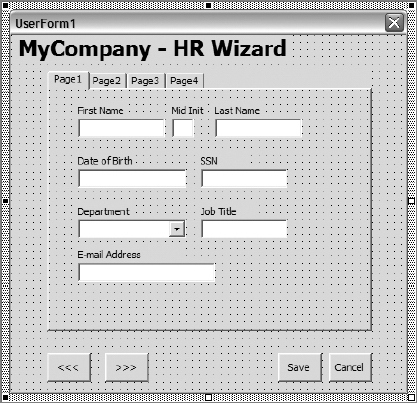
Figure 4-23. Personal information data entry page
The Address Information Page
Add the controls listed in Table 4-5 to Page2 of the MultiPage control. These will correspond to the address information column headings on the EmpData worksheet.
Table 4-5. Address Tab Control Settings
Page2 in Design view should look similar to Figure 4-24.
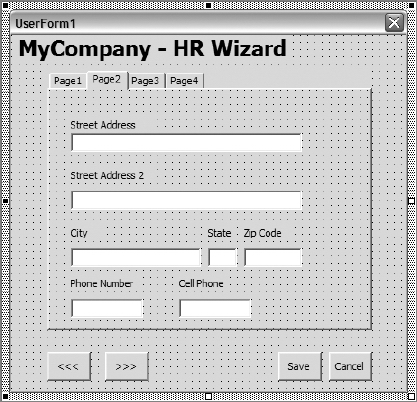
Figure 4-24. Address information data entry on Page2
The Equipment Information Page
Add the controls listed in Table 4-6 to Page3 of the MultiPage control. These will correspond to the equipment information column headings on the EmpData worksheet.
Table 4-6. Equipment Tab Control Settings
| Item/Property | Value |
| Frame | — |
| Name: | fraPCType |
| Caption: | Computer Type |
| OptionButton | — |
| Name: | optDesktop |
| Caption: | Desktop |
| OptionButton | — |
| Name: | optLaptop |
| Caption: | Laptop |
| Frame | — |
| Name: | fraPhoneType |
| Caption: | Phone Type |
| OptionButton | — |
| Name: | optStandard |
| Caption: | Standard |
| OptionButton | — |
| Name: | optCell |
| Caption: | Cell Phone |
| Label | — |
| Caption: | Location |
| ComboBox | — |
| Name: | cboLocation |
| CheckBox | — |
| Name: | chkFaxYN |
| Caption: | Fax Machine Y/N |
Page3 in Design view will look something like Figure 4-25.

Figure 4-25. Equipment information data entry on Page3
The Access Information Page
Add the controls listed in Table 4-7 to Page4 of the MultiPage control. These will correspond to the access information column headings on the EmpData worksheet.
Table 4-7. Access Tab Control Settings
Page4 in Design view should look similar to Figure 4-26.

Figure 4-26. Access level information data entry on Page4
That's it for visual UI design. Next, we're going to design some classes to make this form work. At first glance, you might think having one class tied to the data record will suffice, but we are going to break up the functional areas when we define our classes, and we'll design a class or two to help us define our wizard steps. At the end of the process, we'll have a flexible wizard application that will give us the ability to change the order of the steps very easily and even make adding a step fairly simple.
HRWizard Classes
Since some of the employee information we are collecting will be passed on to other departments for processing, we'll place the data from each screen in its own class. We're also going to need a class to monitor the steps in the wizard. We might also consider a class to help us populate those lists that use data from our ListMgr worksheet. Table 4-8 lists each class and describes some of its functionality.
Table 4-8. HRWizard Application Class Modules
| Class | Description |
cPerson |
Holds all personal information for the new record |
cAddress |
Holds all address information for the new record |
cEquipment |
Holds all equipment information for the new record |
cAccess |
Holds all access information for the new record |
cStep |
Holds configuration values for each step of the wizard |
cStepMgr |
Controls the operation of the wizard and manages a collection of cStep objects |
cListMgr |
Controls the lists that will populate the combo boxes on the UserForm |
cHRData |
Transfers data to the database from the business objects; sends data from the database to the business objects |
The HRWizard Business Objects
We'll begin by designing our business objects. These classes will store the data for each object (person, address, equipment, and access level) and will contain any business rules for each object.
Add a new class module to the project and name it cPerson. Add three more class modules, naming them cAddress, cEquipment, and cAccess. Our cPerson object will contain one each of cAddress, cEquipment, and cAccess objects. To keep them in sync, we'll add an ID property to each of our four business object classes.
In each class, add the following module-level declaration:
Private m_lngID As Long
Then add the Property Get and Let in each class:
Public Property Get ID() As Long

  ID = m_lngID

End Property


Public Property Let ID(newID As Long)

  m_lngID = newID

End Property
Save your work, and let's concentrate on our cPerson class. Each class essentially mirrors its input screen from our earlier UI design. Add the following module-level variable declarations to the cPerson class:
Private m_sFName As String

Private m_sMidInit As String

Private m_sLName As String

Private m_dtDOB As Date

Private m_sSSN As String

Private m_sJobTitle As String

Private m_sDepartment As String

Private m_sEmail As String

Private m_oAddress As cAddress

Private m_oEquipment As cEquipment

Private m_oAccess As cAccess
Notice that in addition to the data inputs from our screen design, we've included objects to hold the address, equipment, and access information.
The first thing we'll do here is initialize our cPerson class and set some default values. In the Class_Initialize event, add the following code:
Private Sub Class_Initialize()

  m_lngID = RandomNumber(100000, 999999)

  Set m_oAddress = New cAddress

  Set m_oEquipment = New cEquipment

  Set m_oAccess = New cAccess

  SetObjectIDs

End Sub
We're setting our private ID variable, m_lngID, to a random six-digit value, and initializing our private business object variables. We then call a private function that sets the ID values of all four of our business objects to the same value, SetObjectIDs. Add the following code to the cPerson class to generate the random number and synchronize the ID field:
Private Function RandomNumber(upper As Long, lower As Long) As Long

'generates a random number between upper & lower

  Randomize

  RandomNumber = Int((upper - lower + 1) * Rnd + lower)

End Function


Private Sub SetObjectIDs()

  m_oAddress.ID = m_lngID

  m_oEquipment.ID = m_lngID

  m_oAccess.ID = m_lngID

End Sub
We'll also add a call to this procedure in our ID Property Let function. This way, if we manually assign a value to the ID field, all the business objects will get the new value. The finished ID Property Let will look like this:
Public Property Let ID(newID As Long)

  m_lngID = newID

  SetObjectIDs 'keep all objects in sync with the same ID

End Property
The remainder of the cPerson class is very straightforward. Finish the cPerson class by adding the following code:
Property Get FName() As String

  FName = m_sFName

End Property


Property Let FName(newFName As String)

  m_sFName = newFName

End Property


Property Get MidInit() As String

  MidInit = m_sMidInit

End Property


Property Let MidInit(newMidInit As String)

  m_sMidInit = newMidInit

End Property


Property Get LName() As String

  LName = m_sLName

End Property


Property Let LName(newLName As String)

  m_sLName = newLName

End Property


Property Get DOB() As Date

  DOB = m_dtDOB

End Property


Property Let DOB(newDOB As Date)

  m_dtDOB = newDOB

End Property


Property Get SSN() As String

  SSN = m_sSSN

End Property


Property Let SSN(newSSN As String)

  m_sSSN = newSSN

End Property


Property Get JobTitle() As String

  JobTitle = m_sJobTitle

End Property

Property Let JobTitle(newJobTitle As String)

  m_sJobTitle = newJobTitle

End Property


Property Get Department() As String

  Department = m_sDepartment

End Property


Property Let Department(newDepartment As String)

  m_sDepartment = newDepartment

End Property


Property Get Email() As String

  Email = m_sEmail

End Property


Property Let Email(newEmail As String)

  m_sEmail = newEmail

End Property


Property Get Address() As cAddress

  Set Address = m_oAddress

End Property


Property Set Address(newAddress As cAddress)

  Set m_oAddress = newAddress

End Property


Property Get Equipment() As cEquipment

  Set Equipment = m_oEquipment

End Property


Property Set Equipment(newEquipment As cEquipment)

  Set m_oEquipment = newEquipment

End Property


Property Get Access() As cAccess

  Set Access = m_oAccess

End Property


Property Set Access(newAccess As cAccess)

  Set m_oAccess = newAccess

End Property
We've added the remaining Person data elements to our class, as well as three object properties using Property Get/Set statements. We may also want to add a property that returns the employee's full name. Add the read-only FullName property to cPerson:
Property Get FullName() As String

Dim sReturn As String

Dim blnMidInit As Boolean

  blnMidInit = Len(m_sMidInit & "") > 0


  If blnMidInit Then

    sReturn = m_sFName & " " & m_sMidInit & " " & m_sLName

  Else

    sReturn = m_sFName & " " & m_sLName

  End If


  FullName = sReturn

End Property
That's all we need for our cPerson class. Now we'll fill in our cAddress, cEquipment, and cAccess objects. Then we'll start putting our wizard application together. These classes are mapped directly to the screen elements from our HRWizard UserForm. The entirety of their code is shown in Listings 4-1 through 4-3.
Listing 4-1. The cAddress Class
Private m_lngID As Long

Private m_sStreetAddress As String

Private m_sStreeAddress2 As String

Private m_sCity As String

Private m_sState As String

Private m_sZipCode As String

Private m_sPhoneNumber As String

Private m_sCellPhone As String

'


Public Property Get ID() As Long

  ID = m_lngID

End Property


Public Property Let ID(newID As Long)

  m_lngID = newID

End Property


Public Property Get StreetAddress() As String

  StreetAddress = m_sStreetAddress

End Property


Public Property Let StreetAddress(newAddress As String)

  m_sStreetAddress = newAddress

End Property

Public Property Get StreetAddress2() As String

  StreetAddress2 = m_sStreeAddress2

End Property


Public Property Let StreetAddress2(newAddress2 As String)

  m_sStreeAddress2 = newAddress2

End Property


Public Property Get City() As String

  City = m_sCity

End Property


Public Property Let City(newCity As String)

  m_sCity = newCity

End Property


Public Property Get State() As String

  State = m_sState

End Property


Public Property Let State(newState As String)

  m_sState = newState

End Property


Public Property Get ZipCode() As String

  ZipCode = m_sZipCode

End Property


Public Property Let ZipCode(newZipCode As String)

  m_sZipCode = newZipCode

End Property


Public Property Get PhoneNumber() As String

  PhoneNumber = m_sPhoneNumber

End Property


Public Property Let PhoneNumber(newPhoneNumber As String)

  m_sPhoneNumber = newPhoneNumber

End Property


Public Property Get CellPhone() As String

  CellPhone = m_sCellPhone

End Property


Public Property Let CellPhone(newCellPhone As String)

  m_sCellPhone = newCellPhone

End Property
Listing 4-2. The cEquipment Class
Private m_lngID As Long

Private m_sPCType As String

Private m_sPhoneType As String

Private m_sLocation As String

Private m_sFaxYN As String

'


Public Property Get ID() As Long

  ID = m_lngID

End Property


Public Property Let ID(newID As Long)

  m_lngID = newID

End Property


Public Property Get PCType() As String

  PCType = m_sPCType

End Property


Public Property Let PCType(newPCType As String)

  m_sPCType = newPCType

End Property


Public Property Get PhoneType() As String

  PhoneType = m_sPhoneType

End Property


Public Property Let PhoneType(newPhoneType As String)

  m_sPhoneType = newPhoneType

End Property


Public Property Get Location() As String

  Location = m_sLocation

End Property


Public Property Let Location(newLocation As String)

  m_sLocation = newLocation

End Property


Public Property Get FaxYN() As String

  FaxYN = m_sFaxYN

End Property


Public Property Let FaxYN(newFaxYN As String)

  m_sFaxYN = newFaxYN

End Property
Listing 4-3. The cAccess Class
Private m_lngID As Long

Private m_sBuilding As String

Private m_iNetworkLevel As Integer

Private m_sRemoteYN As String

Private m_sParkingSpot As String

'


Public Property Get ID() As Long

  ID = m_lngID

End Property


Public Property Let ID(newID As Long)

  m_lngID = newID

End Property


Public Property Get Building() As String

  Building = m_sBuilding

End Property


Public Property Let Building(newBuilding As String)

  m_sBuilding = newBuilding

End Property


Public Property Get NetworkLevel() As Integer

  NetworkLevel = m_iNetworkLevel

End Property


Public Property Let NetworkLevel(newNetworkLevel As Integer)

  m_iNetworkLevel = newNetworkLevel

End Property


Public Property Get RemoteYN() As String

  RemoteYN = m_sRemoteYN

End Property


Public Property Let RemoteYN(newRemoteYN As String)

  m_sRemoteYN = newRemoteYN

End Property


Public Property Get ParkingSpot() As String

  ParkingSpot = m_sParkingSpot

End Property


Public Property Let ParkingSpot(newParkingSpot As String)

  m_sParkingSpot = newParkingSpot

End Property
Managing Lists
Some of the data inputs on our HRWizard UserForm are being displayed to the user via ComboBox controls. The HRWizard data file contains a worksheet named ListMgr that contains the data for each list. The data is stored in named ranges on the ListMgr worksheet.
Our cListManager class will contain functions that let us populate our combo boxes from these named ranges. We'll also add a method to bind a list to a VBA Collection object. This concept could easily be expanded to include lists gathered from any data source (like XML) or an ADO or DAO recordset.
Insert a new class module and name it cListManager. Add these two methods to the class:
Public Sub BindListToRange(ListRangeName As String, TheCombo As MSForms.ComboBox)

  TheCombo.RowSource = ListRangeName

End Sub


Public Sub BindListToCollection(TheCollection As Collection,

                                  TheCombo As MSForms.ComboBox)

Dim iNumItems As Integer

Dim i As Integer

  iNumItems = TheCollection.Count

  For i = 1 To iNumItems

    TheCombo.AddItem TheCollection(i)

  Next i

End Sub
The BindListToRange method takes a Range name string value and a ComboBox object, and sets the ComboBox's RowSource property to the named range. The BindListToCollection method simply loops through a collection and calls the ComboBox's AddItem method.
The Data Class
Our data class is named cHRData. This class is being designed specifically for our HRWizard application, and will be closely coupled with our cPerson object and our EmpData worksheet. Insert a new class module and name it cHRData. Add the following module-level variables, one property, and one method:
Private m_oWorksheet As Worksheet

Private m_lngNewRowNum As Long

Private m_oEmployee As cPerson

Private m_oXL As cExcelUtils

'


Public Property Get Worksheet() As Worksheet

  Set Worksheet = m_oWorksheet

End Property


Public Property Set Worksheet(newWorksheet As Worksheet)

  Set m_oWorksheet = newWorksheet

End Property


Public Function SaveEmployee(Employee As cPerson) As Boolean

Dim blnReturn As Boolean


  If m_oWorksheet Is Nothing Then

    GoTo Exit_Function

  End If


  m_lngNewRowNum = m_oXL.FindEmptyRow(m_oWorksheet)

  Set m_oEmployee = Employee


  SaveEmpData

  SaveAddressData

  SaveEquipmentData

  SaveAccessData


Exit_Function:

  SaveEmployee = blnReturn

  Exit Function

End Function
Add the following class initialization and cleanup code:
Private Sub Class_Initialize()

  Set m_oXL = New cExcelUtils

End Sub


Private Sub Class_Terminate()

  Set m_oXL = Nothing

End Sub
The Worksheet property lets us define where the data will be stored in our workbook. The SaveEmployee method does a few things for us when we pass in a cPerson object:
Public Function SaveEmployee(Employee As cPerson) As Boolean
It checks to see that the Worksheet property has been set so we know where to save our data:
If m_oWorksheet Is Nothing Then

  GoTo Exit_Function

End If
It finds the first empty row using the cExcelUtils object:
m_lngNewRowNum = m_oXL.FindEmptyRow(m_oWorksheet)
Then we assign the cPerson object we passed in to the method to a private module-level cPerson object that will be used in various save functions:
Set m_oEmployee = Employee
Lastly, it fires a few save functions, one for each data object:
SaveEmpData

SaveAddressData

SaveEquipmentData

SaveAccessData
The Save methods simply transfer the data values stored in the cPerson object (and its internal data objects) to a cell on the EmpData worksheet. Add the following Save methods to the cHRData class module:
Private Sub SaveEmpData()

  With m_oWorksheet

    .Cells(m_lngNewRowNum, 1).Value = m_oEmployee.ID

    .Cells(m_lngNewRowNum, 2).Value = m_oEmployee.FName

    .Cells(m_lngNewRowNum, 3).Value = m_oEmployee.MidInit

    .Cells(m_lngNewRowNum, 4).Value = m_oEmployee.LName

    .Cells(m_lngNewRowNum, 5).Value = m_oEmployee.DOB

    .Cells(m_lngNewRowNum, 6).Value = m_oEmployee.SSN

    .Cells(m_lngNewRowNum, 7).Value = m_oEmployee.JobTitle

    .Cells(m_lngNewRowNum, 8).Value = m_oEmployee.Department

    .Cells(m_lngNewRowNum, 9).Value = m_oEmployee.Email

  End With

End Sub


Private Sub SaveAddressData()

  With m_oWorksheet

    .Cells(m_lngNewRowNum, 10).Value = m_oEmployee.Address.StreetAddress

    .Cells(m_lngNewRowNum, 11).Value = m_oEmployee.Address.StreetAddress2

    .Cells(m_lngNewRowNum, 12).Value = m_oEmployee.Address.City

    .Cells(m_lngNewRowNum, 13).Value = m_oEmployee.Address.State

    .Cells(m_lngNewRowNum, 14).Value = m_oEmployee.Address.ZipCode

    .Cells(m_lngNewRowNum, 15).Value = m_oEmployee.Address.PhoneNumber

    .Cells(m_lngNewRowNum, 16).Value = m_oEmployee.Address.CellPhone

  End With

End Sub


Private Sub SaveEquipmentData()

  With m_oWorksheet

    .Cells(m_lngNewRowNum, 17).Value = m_oEmployee.Equipment.PCType

    .Cells(m_lngNewRowNum, 18).Value = m_oEmployee.Equipment.PhoneType

    .Cells(m_lngNewRowNum, 19).Value = m_oEmployee.Equipment.Location

    .Cells(m_lngNewRowNum, 20).Value = m_oEmployee.Equipment.FaxYN

  End With

End Sub

Private Sub SaveAccessData()

  With m_oWorksheet

    .Cells(m_lngNewRowNum, 21).Value = m_oEmployee.Access.Building

    .Cells(m_lngNewRowNum, 22).Value = m_oEmployee.Access.NetworkLevel

    .Cells(m_lngNewRowNum, 23).Value = m_oEmployee.Access.RemoteYN

    .Cells(m_lngNewRowNum, 24).Value = m_oEmployee.Access.ParkingSpot

  End With

End Sub
Notice the syntax used to retrieve the cPerson object's internal Address, Equipment, and Access object data:
m_oEmployee.Address.StreetAddress

m_oEmployee.Equipment.PCType

m_oEmployee.Access.Building
Using an object within an object gives you the flexibility of categorizing information within your objects. Anyone familiar with object-relational database technologies, such as InterSystems Cache (www.intersystems.com), may recognize this type of syntax.
Note Object-oriented databases use objects rather than tables to represent data. If you're interested in object-oriented programming techniques and haven't checked out this technology, I highly recommend you do. InterSystems offers a free single-user download on its web site. Also, the online resource Wikipedia has a good article on the subject at http://en.wikipedia.org/wiki/Object_database.
Managing the Wizard
We'll build two classes to help us manage our wizard application. The first is a very simple class that will hold configuration data for each step. Then we'll create a class that will hold a collection of these "wizard step" objects. This class will manage the operation of the wizard process for us.
Insert a new class module and name it cStep. Add the following code:
Private m_iOrder As Integer

Private m_iPage As Integer

Private m_sCaption As String


Public Property Get Order() As Integer

  Order = m_iOrder

End Property


Public Property Let Order(newOrder As Integer)

  m_iOrder = newOrder

End Property

Public Property Get Page() As Integer

  Page = m_iPage

End Property


Public Property Let Page(newPage As Integer)

  m_iPage = newPage

End Property


Public Property Get Caption() As String

  Caption = m_sCaption

End Property


Public Property Let Caption(newCaption As String)

  m_sCaption = newCaption

End Property
The HRWizard.xlms workbook contains a worksheet named UFormConfig. This worksheet holds information about each step in the wizard. This is where we can change the order of the steps or insert a new step. This class will hold that information for us. How will it do that when it (apparently) only holds information on one step?
Table 4-9 lists the cStep class's properties and describes them.
| Property | Description |
Order |
Holds the step's place in the wizard process's order |
Page |
Holds the page number corresponding to a page in the MultiPage control |
Caption |
The text to display on the currently active Page control |
We are now going to design a class to manage the steps in the wizard. In that class, we'll create a collection of cStep objects that we'll use to keep track of where we are in the process and how many steps we have.
Insert a new class module and name it cStepManager. Add the following module-level variable declarations:
Dim m_oStep As cStep

Dim m_iNumSettings As Integer

Dim m_iNumSteps As Integer

Dim m_iCurrentPage As Integer

Dim m_iPreviousPage As Integer

Dim m_iNextPage As Integer

Dim WithEvents m_oPreviousButton As MSForms.CommandButton

Dim WithEvents m_oNextButton As MSForms.CommandButton

Dim m_oWorksheet As Worksheet
We have a cStep object, m_oStep, that we'll be using to populate a collection of steps for the wizard, followed by a few Integer variables. These tell us how many steps we have and how many properties each step has, and they track the current, next, and previous steps based on where in the wizard the user might be.
We then have a couple variables that are set to the MSForms.CommandButton object type. These are declared WithEvents. We are going to let our cStepManager class maintain the state of these buttons. The WithEvents declaration lets us trap their Click event and act on it inside of our class. We will use the Click event to determine whether the button should be enabled based on where the user is in the wizard process.
Add the following properties to cStepManager:
Public Property Get NumberOfSettings() As Integer

  NumberOfSettings = m_iNumSettings

End Property


Public Property Let NumberOfSettings(newNum As Integer)

  m_iNumSettings = newNum

End Property


'Worksheet Property: Gets/Sets the sheet containing the step information

Public Property Get Worksheet() As Worksheet

  Set Worksheet = m_oWorksheet

End Property


Public Property Set Worksheet(newWorksheet As Worksheet)

  Set m_oWorksheet = newWorksheet

End Property


Public Property Get CurrentPage() As Integer

  CurrentPage = m_iCurrentPage

End Property


Public Property Let CurrentPage(newPage As Integer)

  m_iCurrentPage = newPage

End Property


Public Property Get PreviousPage() As Integer

    PreviousPage = m_iCurrentPage - 1

End Property


Public Property Get NextPage() As Integer

    NextPage = m_iCurrentPage + 1

End Property


Public Property Set PreviousButton(newPreviousBtn As MSForms.CommandButton)

  Set m_oPreviousButton = newPreviousBtn

End Property

Public Property Set NextButton(newNextBtn As MSForms.CommandButton)

  Set m_oNextButton = newNextBtn

End Property
Table 4-10 lists the cStepManager class's properties and describes them.
Table 4-10. cStepManager Properties
| Property | Description |
NumberOfSettings |
Contains the number of columns in our step configuration worksheet, UFormConfig |
Worksheet |
Tells the class where to find the information for each step of the wizard |
CurrentPage |
Stores the value of the current step in the wizard |
PreviousPage |
Calculated based on the CurrentPage property; returns the value of the preceding step in the wizard |
NextPage |
Calculated based on the CurrentPage property; returns the value of the next step in the wizard |
PreviousButton |
Stores a pointer to the button on the UserForm that will navigate to the preceding step in the wizard |
NextButton |
Stores a pointer to the button on the UserForm that will navigate to the next step in the wizard |
We need to add one more property to our class. This read-only property will contain the collection of cStep objects that hold the information on each step of the wizard.
The PageSettings property will store this collection for us. It returns a Collection object that we will use in the client code behind our HRWizard UserForm.
The code for the PageSettings property looks like this:
Public Property Get PageSettings() As Collection

Dim colReturn As Collection

Dim numrows As Integer

Dim row As Integer

Dim col As Integer

Dim sKey As String

  Set colReturn = New Collection


  numrows = m_oWorksheet.Cells(Rows.Count, 1).End(xlUp).row

  For row = 2 To numrows

    Set m_oStep = New cStep

    For col = 1 To m_iNumSettings

    Select Case col

    Case 1

      m_oStep.Order = m_oWorksheet.Cells(row, col).Value

      sKey = CStr(m_oStep.Order)

    Case 2

      m_oStep.Page = m_oWorksheet.Cells(row, col).Value

    Case 3

      m_oStep.Caption = m_oWorksheet.Cells(row, col).Value

    End Select

    Next col

    colReturn.Add m_oStep, sKey

  Next row


  m_iNumSteps = colReturn.Count

  Set PageSettings = colReturn

End Property
The first thing we're doing is getting the number of rows in the used area on the worksheet:
numrows = m_oWorksheet.Cells(Rows.Count, 1).End(xlUp).Row
Note Although Excel's Worksheet object has a Rows.Count method, we cannot use that here (m_oWorksheet.Rows.Count). That would return the total number of rows in the worksheet, which would not only give us an incorrect value, but would also overflow our Integer variable.
Next we're using the number-of-used-rows value just returned in a loop that will populate the collection of cStep objects. Let's look at that code:
For row = 2 To numrows

  Set m_oStep = New cStep

  For col = 1 To m_iNumSettings

  Select Case col

  Case 1

    m_oStep.Order = m_oWorksheet.Cells(row, col).Value

    sKey = CStr(m_oStep.Order)

  Case 2

    m_oStep.Page = m_oWorksheet.Cells(row, col).Value

  Case 3

    m_oStep.Caption = m_oWorksheet.Cells(row, col).Value

  End Select

  Next col

  colReturn.Add m_oStep, sKey

Next row
The first thing we do is instantiate a new cStep object. Then we move into an inner loop to walk through the columns on the configuration worksheet, and assign them to the corresponding property in the internal cStep object. The m_iNumSettings value will have already been set via the NumberOfSettings property before this code is run.
Finally, we add the cStep object to our internal collection, colReturn, passing in the Order value as the key in the collection.
Note It is important to note the first line of code inside the outer loop, Set m_oStep = New cStep. If this is omitted, you will end up with four identical cStep objects in your collection (all containing the data from the last configuration item read from the worksheet). This is because the m_oStep object reference is still active, so every call to it modifies any existing instances. By using the New keyword, you create a new, separate instance of the object.
The last thing we're doing is setting the internal m_iNumSteps variable that is used to track our Previous and Next CommandButton availability, and finally we're returning the collection:
m_iNumSteps = colReturn.Count

Set PageSettings = colReturn
Now we will turn our attention to our PreviousButton and NextButton properties. You'll recall that our internal variables for these properties were declared WithEvents. When you declare an object WithEvents, you have access to that object's event code via the VB code window's Object box, as shown in Figure 4-27.
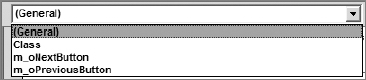
Figure 4-27. The Object box lists objects declared WithEvents.
Select m_oNextButton and m_oPreviousButton from the Object box to insert their event-handler stubs into the class module. Add the following code to each:
Private Sub m_oNextButton_Click()

    m_oNextButton.Enabled = Me.NextPage <> m_iNumSteps + 1

    m_oPreviousButton.Enabled = Me.PreviousPage <> 0

End Sub


Private Sub m_oPreviousButton_Click()

    m_oPreviousButton.Enabled = Me.PreviousPage <> 0

    m_oNextButton.Enabled = Me.NextPage <> m_iNumSteps + 1

End Sub
This code controls whether each button is enabled based on the value of the NextPage or PreviousPage properties of our cStepManager class. We'll add one more method to initialize the buttons when the class is first created in client code:
Public Sub HandleControls()

    m_oPreviousButton.Enabled = Me.PreviousPage <> 0

    m_oNextButton.Enabled = Me.NextPage <> m_iNumSteps + 1

End Sub
We've created a fair amount of code here, all stored in objects across many class modules. By compartmentalizing our functionality, we've made our job of maintaining this code very easy. If we need to bind lists to data sources we may not be currently handling, it is trivial to add a new method to the cListManger class. If we need to add a screen to our process, we design a new page on the MultiPage control, create a new class to store that screen's information, and add a row to our configuration table.
Your Class Modules folder in the Project Explorer should look like Figure 4-28 after all the classes have been added and coded.
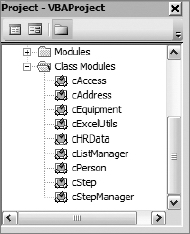
Figure 4-28. HRWizard class module list
Coding the HRWizard UserForm
Now that we've done all the hard work, let's plug our objects into our HRWizard UserForm and put those objects to work.
Open the code window for the HRWizard UserForm. Add the following module-level variable declarations:
Dim m_oEmployee As cPerson

Dim m_oLM As cListManager

Dim m_oWizard As cStepManager

Dim m_colSteps As Collection
Although we created nine separate class modules to run our application, many are used internally by the classes listed in our declaration section. We'll be using the cPerson class to collect the data for a new employee; the cListManager to populate our various combo boxes on the HRWizard UserForm; and the cStepManager to determine which screen to show when and in what order, and to control the availability of the navigation command buttons. Finally, we are using a standard VBA Collection object. This will be used to store the cStepManager object's PageSettings collection.
Initializing the Application
In our HRWizard UserForm's Initialize event, we will initialize our custom objects and add code to set up the wizard, lists, and display form.
Add the following code to the UserForm_Initialize event:
Private Sub UserForm_Initialize()

  Set m_oEmployee = New cPerson

  Set m_oLM = New cListManager

  Set m_oWizard = New cStepManager


  InitWizard

  InitLists

  InitForm

End Sub
Now we'll create the three Init functions. These will set up our wizard, list manager, and UserForm objects.
Initializing the Wizard
Add a new subroutine to the UserForm code window and name it InitWizard. Add the following code:
Private Sub InitWizard()

  With m_oWizard

    Set .Worksheet = Sheets("UFormConfig")

    .NumberOfSettings = 3

    Set m_colSteps = .PageSettings

    Set .PreviousButton = Me.cmdPrevious

    Set .NextButton = Me.cmdNext

    .CurrentPage = MultiPage1.Value + 1

  End With

End Sub
This simple procedure does the following:
- Tells the
cStepManagerobject where to find the configuration data
Set .Worksheet = Sheets("UFormConfig") - Tells the
cStepManagerobject how many columns to retrieve data from
.NumberOfSettings = 3 - Puts the page settings into a collection
Set m_colSteps = .PageSettings - Sets the navigation buttons
Set .PreviousButton = Me.cmdPrevious

Set .NextButton = Me.cmdNext - Sets the current page
.CurrentPage = MultiPage1.Value + 1
We are using the MultiPage control's Value property plus 1 to set the CurrentPage property because the MultiPage control's Page collection is zero-based. (Normally, collections are one-based, and I'm not sure why this collection is different, but that's the way it is.)
The cStepManager object must be set up before we initialize the form because the form will use the PageSettings collection to set itself up.
Initializing the Combo Boxes
The next step is to bind our combo boxes to their respective lists. The lists are stored on the ListMgr worksheet.
Add a new subroutine and name it InitLists. Add the following code:
Private Sub InitLists()

  With m_oLM

    .BindListToRange "Departments", Me.cboDept

    .BindListToRange "Locations", Me.cboLocation

    .BindListToRange "NetworkLvl", Me.cboNetworkLvl

    .BindListToRange "ParkingSpot", Me.cboParkingSpot

    .BindListToRange "YN", Me.cboRemoteAccess

  End With

End Sub
Again, this is very simple code that calls the cListManager object's BindListToRange method for each list in the application.
Initializing the Form
Our final step in setting up the application is to initialize the UserForm itself. Create a new subroutine named InitForm. Add the following code:
Private Sub InitForm()

Dim iFirstPage As Integer

Dim i As Integer

Dim iPageCount As Integer


  iFirstPage = m_colSteps("1").Order - 1

  Me.MultiPage1.Value = iFirstPage

  Me.MultiPage1.Pages((m_colSteps("1").Page) - 1).Caption = m_colSteps("1").Caption

  m_oWizard.HandleControls

  iPageCount = MultiPage1.Pages.Count

  For i = 1 To iPageCount - 1

    MultiPage1.Pages(i).Visible = False

  Next

End Sub
Here we are setting our MultiPage control's Value property to the PageSetting collection's (m_colSteps) item (whose key value is 1), and setting its caption:
iFirstPage = m_colSteps("1").Order - 1

Me.MultiPage1.Value = iFirstPage

Me.MultiPage1.Pages((m_colSteps("1").Page) - 1).Caption = m_colSteps("1").Caption
Remember that we passed in the value of the Order property as the key. This makes it very easy for us to determine which page to move to. When setting a MultiPage control's Value property, you are activating the page with a corresponding value. In this case, the value is 1.
Then we are calling the m_oWizard object's HandleControls method to initialize the navigation buttons to their correct settings:
m_oWizard.HandleControls
Next, we hide all the pages except the first page:
iPageCount = MultiPage1.Pages.Count

For i = 1 To iPageCount - 1

  MultiPage1.Pages(i).Visible = False

Next
Remember that the MultiPage control's Page collection is zero-based, so by starting our loop counter at 1, we keep that page visible.
At this point, you should be able to run the form.
- In the VBE, double-click the form in the Project Explorer window.
- Click the Run button on the Standard toolbar or press the F5 function key, as shown in Figure 4-29.
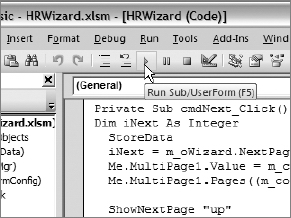
Figure 4-29. The Run Sub/UserForm toolbar button
Notice in Figure 4-30 that the caption appears in the tab handle and the Previous command button is disabled.
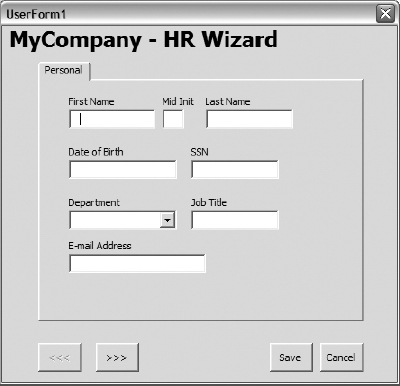
Figure 4-30. Initialized HRWizard UserForm
A look at the Department combo box in Figure 4-31 shows us our list manager did indeed bind the combo box to the
Departments named range.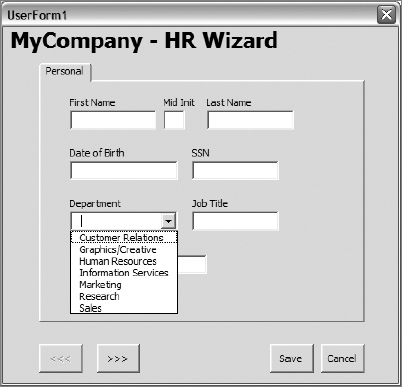
Figure 4-31. Department combo box bound to named range
- Stop running the form by clicking the X button.
Our navigation buttons have the task of moving us from step to step in our wizard application. But they also need the ability to put the data from each screen into its place in the UserForm's cPerson object.
Add the following code to the cmdNext_Click event:
Private Sub cmdNext_Click()

Dim iNext As Integer

  StoreData

  iNext = m_oWizard.NextPage

  Me.MultiPage1.Value = m_colSteps(CStr(iNext)).Order - 1

  Me.MultiPage1.Pages((m_colSteps(CStr(iNext)).Page) - 1).Caption =

                                                  m_colSteps(CStr(iNext)).Caption

  ShowNextPage "up"

End Sub
The first thing we need to do before we move to the next step in the wizard is retain the values entered on the current form. The StoreData method determines which step the user is on and calls the correct store method based on that location, as shown in Listing 4-4.
Listing 4-4. The StoreData Method Calls the Correct Method for Each Step in the Wizard.
Private Sub StoreData()

  Select Case m_oWizard.CurrentPage

  Case 1

    StorePerson

  Case 2

    StoreAddress

  Case 3

    StoreEquipment

  Case 4

    StoreAccess

  End Select

End Sub
The code for the store method follows:
Private Sub StorePerson()

  With m_oEmployee

    .FName = Me.txtFname.Value

    .MidInit = Me.txtMidInit.Value

    .LName = Me.txtLname.Value

    If Len(Me.txtDOB.Value & "") > 0 Then

      .DOB = Me.txtDOB.Value

    End If

    .SSN = Me.txtSSN.Value

    .Department = Me.cboDept.Text

    .JobTitle = Me.txtJobTitle.Value

    .Email = Me.txtEmail.Value

  End With

End Sub


Private Sub StoreAddress()

   With m_oEmployee.Address

    .StreetAddress = Me.txtStreedAddr.Value

    .StreetAddress2 = Me.txtStreetAddr2.Value

    .City = Me.txtCity.Value

    .State = Me.txtState.Value

    .ZipCode = Me.txtZip.Value

    .PhoneNumber = Me.txtPhone.Value

    .CellPhone = Me.txtCell.Value

   End With

End Sub


Private Sub StoreEquipment()

Dim opt As MSForms.OptionButton

  With m_oEmployee.Equipment

    For Each opt In Me.fraPCType.Controls

      If opt.Value = True Then

        .PCType = opt.Caption

        Exit For

      End If

    Next


    For Each opt In Me.fraPhoneType.Controls

      If opt.Value = True Then

        .PhoneType = opt.Caption

        Exit For

      End If

    Next


    .Location = Me.cboLocation.Text


    If Me.chkFaxYN = True Then

      .FaxYN = "Y"

    Else

      .FaxYN = "N"

    End If

  End With

End Sub

Private Sub StoreAccess()

Dim opt As MSForms.OptionButton


  With m_oEmployee.Access

    If Len(Me.cboNetworkLvl.Text & "") > 0 Then

      .NetworkLevel = CInt(Me.cboNetworkLvl.Text)

    End If

    .ParkingSpot = Me.cboParkingSpot.Text

    .RemoteYN = Me.cboRemoteAccess.Text

    For Each opt In Me.fraBuilding.Controls

      If opt.Value = True Then

        .Building = opt.Caption

        Exit For

      End If

    Next

  End With

End Sub
This code simply takes the data from the screen and holds it in the corresponding object within cPerson.
Next, we determine what the next page should be (remember that the MultiPage Pages collection is zero-based, so we're subtracting 1 from our Order property to get the value of the next page).
iNext = m_oWizard.NextPage

Me.MultiPage1.Value = m_colSteps(CStr(iNext)).Order - 1

Me.MultiPage1.Pages((m_colSteps(CStr(iNext)).Page) - 1).Caption =

                                                m_colSteps(CStr(iNext)).Caption
Then we call the ShowNextPage method, telling it which way we want to move:
ShowNextPage "up"
The ShowNextPage method looks like this:
Private Sub ShowNextPage(Direction As String)

Dim iCurrPage As Integer

Dim iUpDown As Integer

  iCurrPage = MultiPage1.Value

  If LCase(Direction) = "up" Then

    iUpDown = 1

  Else

    iUpDown = −1

  End If

  MultiPage1.Pages(iCurrPage + iUpDown).Visible = True

  MultiPage1.Pages(iCurrPage).Visible = False

End Sub
This method simply looks at the value of our CurrentPage property and adds or subtracts 1 based upon the Direction argument that is passed into the method.
The cmdPrevious button's Click event looks very similar:
Private Sub cmdPrevious_Click()

Dim iPrevious As Integer

  StoreData

  iPrevious = m_oWizard.PreviousPage

  Me.MultiPage1.Value = m_colSteps(CStr(iPrevious)).Order - 1

  Me.MultiPage1.Pages((m_colSteps(CStr(iPrevious)).Page) - 1).Caption =

                                              m_colSteps(CStr(iPrevious)).Caption

  ShowNextPage "down"

End Sub
The only difference is that we are passing the keyword down to the ShowNextPage method so that we move the user in the proper direction.
Let's add one last event handler to assist us with our navigation. Whenever we change pages on a MultiPage control, the control's Change event fires. We'll use that event to grab the value of the current page and store it in our m_oWizard object's CurrentPage property.
Add the following code to the MultiPage1 control's Change event:
Private Sub MultiPage1_Change()

  m_oWizard.CurrentPage = MultiPage1.Value + 1

End Sub
Now that we have our navigation working, let's give it a try:
- With the UserForm open in Design view, click the Run button on the Standard toolbar or press the F5 key.
- Once the form is open, click the Next Button to move to the second step in our wizard, as defined on our configuration worksheet. This should be the Address screen. Notice that both navigation buttons are now enabled, as shown in Figure 4-32.
- Click the Previous button to navigate back to the Personal screen, and the Previous button will no longer be active.
- Click the Next button until you are at the last screen as defined on our configuration worksheet. This should be the Network Access screen. The Next button will no longer be enabled, as shown in Figure 4-33.
- Stop the form by clicking the X button.
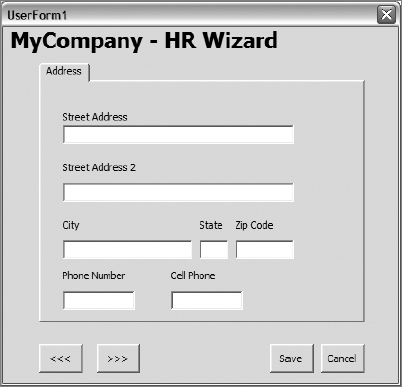
Figure 4-32. Both navigation buttons are enabled.
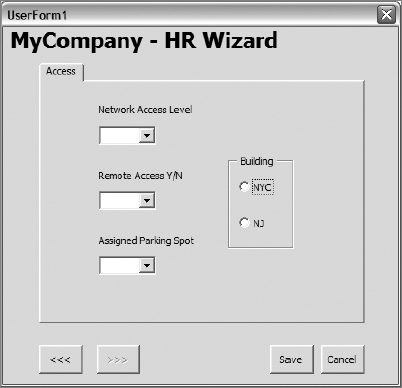
Figure 4-33. The Next button is disabled on the last screen in the wizard.
Saving the Employee Record
We've done a lot of work so far, and we've got some pretty neat functionality provided to our UserForm from our custom objects. The only thing missing is saving the data to the EmpData worksheet.
Normally, we might create a subroutine, name it something like SaveData(), and call it from our cmdSave_Click event—but our cHRData class already has a SaveEmployee method. We can call that directly from cmdSave_Click with no need to create a save function on our form.
Insert the following code in the cmdSave_Click event:
Private Sub cmdSave_Click()

Dim oHRData As cHRData


  Set oHRData.Worksheet = Sheets("EmpData")

  oHRData.SaveEmployee m_oEmployee


  Set oHRData = Nothing

End Sub
After setting the Worksheet property so that our cHRData object knows where to save the data, we call the SaveEmployee method, passing in our m_oEmployee object, which contains all the data to save.
Cleaning Up
We've almost got a complete application finished. Let's finish off by adding code to our Cancel button and putting some cleanup code in our form's Terminate event.
Add the following line of code to the cmdCancel button's Click event:
Private Sub cmdCancel_Click()

  Unload Me

End Sub
This single line of code simply unloads the form without saving any values.
Now we'll clean up the objects used by our HRWizard UserForm. Add the following to the UserForm_Terminate event handler:
Private Sub UserForm_Terminate()

  Set m_oEmployee = Nothing

  Set m_oLM = Nothing

  Set m_oWizard = Nothing

End Sub
Now let's add a simple function to our project to open the Wizard form. In the VBE, add a standard module. Add the following method to the standard module:
Sub StartWizard()

  HRWizard.Show

End Sub
This single line of code will display the UserForm when it is run.
Testing the HRWizard Application
It's time to take our wizard for a test ride. Let's enter some data into each screen of the wizard and save it to the EmpData worksheet.
From the Excel workbook, run the StartWizard subroutine from the Macro dialog box, as shown in Figure 4-34.
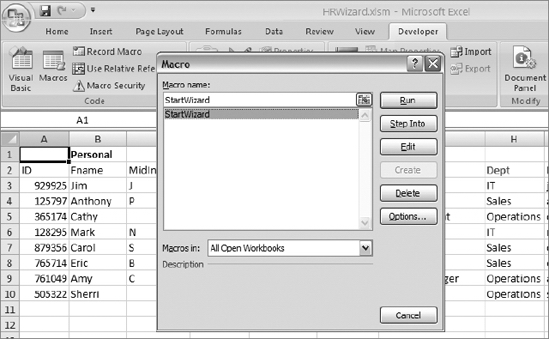
Figure 4-34. Running the StartWizard macro
Figures 4-35 to 4-39 show some sample input values and the saved data on the EmpData worksheet.
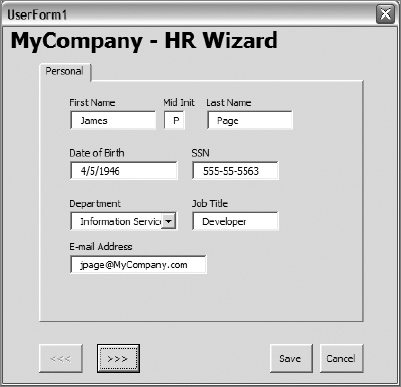
Figure 4-35. Personal information added
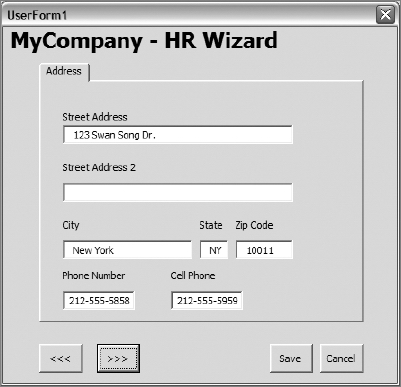
Figure 4-36. Address information added
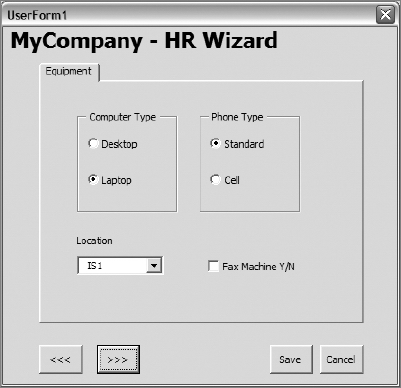
Figure 4-37. Equipment information added
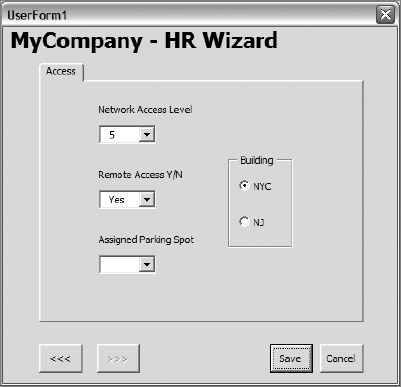
Figure 4-38. Access level information added

Figure 4-39. New employee data added to table
Summary
This chapter has explored UserForms in Excel 2007. UserForms allow developers to provide a clean, easy-to-navigate data entry or retrieval experience to users. When users are entering data into a large or unwieldy spreadsheet, we can provide a logical user experience by creating applications with UserForms.
Form design is quick and easy using the controls provided in the UserForm Toolbox. Although both of the samples in this chapter used only one UserForm each, you can place as many as you need in your applications.
We used a somewhat nonstandard technique for adding functionality to our UserForms by wrapping our code in custom objects in class modules.
The code behind our form is much cleaner than if we had coded directly behind the form. How many module-level variables did we declare in our form's code-behind? Only four. How many might we have used if we had coded our functionality right on the form? Certainly more than four.
Even if using classes gave us nothing more than better-organized code, I'd say it would be worth the effort. And yes, it's a bit more effort than just dropping code in any standard module and trying to manage it. But we actually get more than organization. By wrapping our functionality in classes, we have the opportunity to give more thought to our code, and in some cases develop classes we can use in other projects.