
9 Rehabbing Running Injuries
Use This Self-Guided Approach to Assess and Treat Running Injuries.
Ideally, after absorbing all the information in the preceding pages, you’ll never get injured from running ever again or need a do-it-yourself guide. But stuff happens. Whether you find yourself reading this book because of the limitations of your insurance benefits, the high cost of clinical care, or because your local docs and PTs couldn’t fix you up, the following self-guided rehabilitation approaches to common running injuries will come in handy.
Earlier in the book, I described how proper training methods promote the adaptations in physical infrastructure you need to be injury-free and reach peak fitness. In this chapter, you’ll learn how things can go wrong with your body’s repair mechanisms when you overtrain or suffer faulty joint mechanics and alignment issues.
The Anatomy of a Running Injury
Unless you fall down and break something, most of the injuries you’re likely to suffer from running are overuse injuries related to the repetitive stress of running itself. Think about it: As you run, the joint mechanics are virtually the same for every step, with only minor variations in muscle and tendon function due to the pitch of the road. When joints function in the same limited motion mile after mile, there is a great potential for the stress to bear down on the “weak links” in your musculoskeletal system. Unlike sports with more variation in movement patterns, such as tennis, basketball, or volleyball, where the stress is spread over different joints and muscles, running long distances can easily overload the same muscles, tendons, ligaments, or fascia in very characteristic locations.
The soft-tissue structures most commonly injured in runners include: the plantar fascia, (the thick band of connective tissue on the bottom of the foot that supports the arch); the Achilles tendons (where the calf muscles insert to the heel bone); the tendon-bone interface along the inside edge of the lower leg bone or tibia (causing shin splints); the hamstring muscles and their tendons in back of the thigh; and the iliotibial band (the broad band of fascia on the outside of the thigh extending from the pelvis to the lateral side of the knee).
TISSUE OVERLOAD AND THE REPAIR PROCESS
Every workout creates “micro-trauma” to the soft tissues and bones that make up the musculoskeletal system. Composed of structures primarily made of collagen, the body’s soft-tissue system includes tendons, fascia, and ligaments. The bones that make up the skeletal system are made mostly of calcium.
After a workout, if a proper interval of recovery and rest is provided (typically 48 hours between challenging workouts), your body will repair the micro-trauma suffered under the stress of the workout and become stronger than it was before. Soft-tissue structures subject to stress are shored up by specialized cells that lay down more collagen fibers to strengthen the tissue. However, if you don’t back off your training, allow recovery, or change your mechanics, the repair process eventually stalls. Instead of being rebuilt even stronger, your tissues are sabotaged by the relentless stress and by excess scar tissue (which creates additional dysfunction). This can lead to out-and-out tissue failure, such as a ruptured tendon, ligament, or fascia.
For bones, the process is similar. The body employs specialized cells to deposit more bone matrix in the most-stressed areas. Relentless training that shorts recovery can lead to stress fractures and even complete fractures.
With a proper training program and adequate recovery, the natural repair process—known as supercompensation—will gradually harden the body over time and enable you to work harder in the future. Gradually is the operative word here. To achieve injury-free, peak performance, you have to be patient. You can’t push Mother Nature too hard. The safest way to gradually ramp up after an injury is through the walk/run protocol (see “Walk/Run Protocol: To Safely Start Running after an Injury, Go for a Walk,” on page 166), which is featured in the injury rehabilitation grids in this chapter.
Two Causes of Overuse Injuries: Overtraining and Mechanical Imperfections
1. Overtraining: Turning Micro-trauma into Macro-trauma
You get injured when your workouts are too intense for your current fitness level or if you do too many challenging workouts in a short period of time without enough rest, or you do the same kind of workouts for more than 8 weeks at a time. The resulting micro-trauma doesn’t have time to heal, so it progresses into a “macro-trauma.” At that point, it’s official: You are injured!
2. Mechanical: Watch Out for Leg-Length Discrepancies
If a wheel is out of alignment on your car, you’re going to wear out a tire on one side faster than the other. The same thing goes for your body. An injury on one side only is a red flag, because a symmetrical body is subject to the same stresses on both sides. So if you have a mechanical flaw or asymmetry—you’re bowlegged, have knock-knees, are an overpronator, have one particularly weak muscle group, or—the big one—have one leg longer than the other, you may find yourself injured regardless of whether you train perfectly or not. It may not show up for years or decades. But with enough mileage and age, with the repetitive nature of running, even small imperfections in your mechanics eventually will overstress some parts of your body until they break down.
To find the mechanical flaw that’s causing the problem, you have to be a detective.
A good place to start is leg-length discrepancy. After 30 years of examining injured runners, I’ve found that the most common cause of unilateral injury and the vast majority of ALL running injuries is that one leg is either structurally longer or functionally longer than the other.
As noted previously, “structural” leg-length inequality may be created when either the thigh bone or shin bone of one leg is longer than the one on the other side. But this is rare. More common is “functional” leg-length discrepancy, caused by a torqued or rotated pelvis, in which one of the two large ilium bones that make up the pelvis is rotated and stuck either forward or backward. A forward-rotated ilium on one side in relation to the other will make that leg function as longer, while a backward-rotated ilium would draw the leg up and make it function like a short leg. Injuries can occur on the long or short leg.
The leg-length inequality will cause one of the two legs to function differently in an effort to even up the pelvis, so the spine will be held straight and the head in a level, neutral position. On the long leg, the arch of the foot is likely to be collapsed into greater pronation in an attempt to shorten that leg; on the short leg, the arch of the foot will be supinated (held up in a higher arch) in an attempt to make that leg function longer in order to make both legs function the same.
The self-assessment in chapter 6 will help you determine whether the cause of your injury is a leg-length discrepancy. The stretching and strengthening programs in chapters 7 and 8 will address some causes of functional leg-length discrepancy and may even correct it. If that doesn’t help you resolve this common dysfunction, visit a PT who has experience dealing with this issue.
Evaluation of Running Injuries
When running becomes painful, diagnosing the injured structure is easy because our bodies break down in very characteristic patterns. Finding the cause of your injury is not easy, however, because the mechanical problems behind the injury are often very distant from the pain. If you’re going to try to cure your own injury, you have to act like a physical therapist and start with a careful assessment of the history of both the current injury and your past injury patterns.
To flush out the mechanical cause of the injury, PTs will test strength, flexibility, and alignment. We look for the telltale signs of asymmetries, such as differences in joint alignment and function during standing, walking, and running.
For instance: When one leg is longer than the other, the foot of the long leg will usually be angled to the outside (i.e., externally rotated) because it becomes the easiest way to walk, as opposed to travelling over the toes. The arch on the long side will also be lower as the foot flattens out (pronates) to lower the pelvis on that side in an effort to even out the two legs and keep the spine straight and head level.
We also look for variation in callus formation from one foot to the other. Most often, the foot on the long side will show more callus on the inside edge of the big toe and/or ball of the foot. This is an indication that, while walking and running, you are pushing off more on the inner edge of the long-leg foot because it is more pronated than the short-side foot in an attempt to equalize leg length. In older and high-mileage runners, we even see bony changes on one side or the other that indicate one foot is functioning differently than the other, implicating a likely leg-length inequality. For instance, if the bunion (an enlarged first-toe knuckle) is present on one foot and not the other, this indicates a long leg. Once we determine whether the issue is structural or functional, we try to simultaneously treat the injury site and fix the mechanical cause as we progress through the rehab program.
Summary: Overuse injuries represent a failure of the body’s normal housekeeping functions. After weeks, or in some cases months, of laying down scar tissue in an attempt to heal the micro-trauma caused by faulty mechanics and/or your excessive workouts, the scar tissue actually becomes part of the problem as the body’s repair system ultimately fails. With overuse injuries, pain is the last component of the injury to show itself and with rest and intervention, the first aspect of the injury to disappear. When the pain abates, it does not mean the injured tissue has healed. Once the pain is gone, soft-tissue injuries still have a long way to go before they are fully resolved.
Self-Guided Treatment for Running Injuries Starts with the PRICE Protocol
Like everyone else, PTs love easy-to-remember acronyms that simplify the complex. That goes for the first phase of treatment for overuse injuries, which was historically guided by the RICE protocol—Rest, Ice, Compression, and Elevation. At Forster Physical Therapy, we added a P to the protocol for “protect.” Injured runners must pay the PRICE of an injury by first Protecting the injured structure against further damage.
P FOR PROTECT AND PREVENT PAIN.
The first task in the rehab process is to protect the injured area from further damage. This is accomplished with the use of more supportive shoes, bracing, wrapping for daily activities, or correcting your joint mechanics/running technique, if you can run without pain. For some injuries, inserting heel lifts or orthotic devices in the shoes will limit or eliminate stress on the injured structure.
R FOR REST.
Above all, the critical first step in the rehabilitation process is to avoid any activity that causes pain. After all, you don’t want to make the injury worse. Think about the way a cut on your skin heals; after a scrape or laceration, a scab forms. If you leave it alone, in 5 days the scab falls off and the skin underneath is healed. However, if in 3 days you catch the scab on your clothing and cause it to bleed again, it’s now going to be 7 days until the injury has healed. The same goes for running injuries. Continuing to do activities that cause pain will prolong the length of the healing process.
Similarly, if you purposely pick at a scab to see if the skin underneath has healed and cause it to bleed again, you increase the time it takes to heal completely. The same is true for running injuries; if you go out for even a short run to “test” whether your injury has healed and re-create the pain, you will extend the life of that injury. Instead of a hard, crusty scab, your injured internal connective tissues heal by laying down more collagen, and this scarring needs to mature to become a functional “patch” that returns the resiliency to that tissue. This takes time. Like a broken bone, there is a 6-week healing cycle for soft tissues as well.
I FOR ICE.
The application of ice is critical to address the inflammation, swelling, spasm, and pain that result when tissues are injured. In both acute and chronic overuse injuries, inflammation and pain cause the surrounding muscles to tighten, in an attempt to limit movement and more damage. Ice helps because it constricts blood vessels and sets in motion a series of events to halt and reverse the swelling and limits the collateral tissue death caused when the pressure from the swelling cuts off the circulation to otherwise healthy tissue.
In some parts of the body, the swelling may not be evident, but make no mistake, there is always inflammation and collection of fluids in the tissues surrounding injury. These inhibit muscle function, result in weakness and loss of flexibility, and become a major obstacle to your fastest possible return to running.
Note: A clinical treatment program uses therapeutic ultrasound, electrical stimulation, and icing to address the pain and inflammation. Of these, it’s important that your self-guided rehab includes liberal use of icing, whether you think it helps or not. If you want your injury to resolve as fast as possible, icing three times per day with ice cubes and water in a bag (gel packs are not effective) is imperative. Injured runners who religiously ice throughout the rehab program heal more quickly.
C FOR COMPRESSION.
Compression refers to the applying of pressure on the tissues at injury sites with wraps, sleeves, or braces, and is important in managing acute and chronic overuse injuries. When tissues become damaged, dysfunctional with scar tissue, and chronically inflamed, cells migrate to the area to clean up and then repair the injury. That sounds great, but there’s a downside—swelling (also called edema), which is the body’s attempt to maintain a fluid balance inside and outside the blood vessels by moving fluid out of them and into the injured area. Because swelling exerts excessive pressure on adjacent blood vessels, cutting off circulation and damaging otherwise healthy cells close to the injury, it must be controlled to limit the dysfunction and hasten recovery time.
The solution: Reduce swelling with frequent icing and compression, which work individually, but better together. Ice constricts blood vessels and sucks fluids out of the tissues, while compression physically squeezes the fluids out of the tissues, to be reabsorbed by blood and lymph vessels. The compressive forces should always funnel fluids back toward the heart.
E FOR ELEVATION.
Swelling can also be reduced by elevating the injured body part above the heart. That reduces fluid pooling and tissue pressure at the injury site by draining it back into the circulatory system. Lie down and elevate your leg above your trunk, preferably while icing with compression, to negate gravity’s effect on the escaped fluids. If lying down isn’t possible, sit with your leg propped at hip level.
SELF-GUIDED REHABILITATION: GETTING ACTIVE
Gentle mobility exercises in the pain-free range of motion are used to maintain and improve soft-tissue extensibility and help create a more functional scarring of the healing tissue while not aggravating the injury.
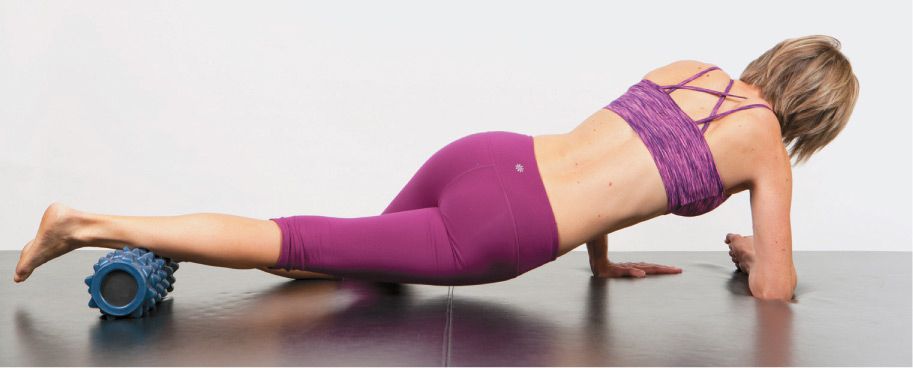
Once the pain is controlled, specific cross-fiber friction massage techniques are performed to break up dysfunctional scarring that has resulted from the body’s repeated attempts to heal the injured tissue over time. You can accomplish this goal to some degree with use of a foam roller (see “Foam-Roller Protocol for Recovery, Injury Prevention, and Rehab” on page 172).
Once pain during simple daily activities and active range of motion exercise has abated completely, more aggressive stretching exercises are used to improve range of motion and start to address longer-term flexibility issues that may have contributed to your injury in the first place. Also, isometric strength exercises are performed to begin restrengthening the muscles surrounding the injury. However, all these exercises must be done without producing pain at the injury site. If you have pain during the exercises, adjust your position and/or limit the intervals of that exercise to eliminate it. Likewise, if you have more pain after the rehab exercises, you are doing them too aggressively and need to adjust accordingly. Only after the pain disappears during all of your activities of daily living (walking, squatting, pivoting, transfers from chair to standing or standing to bed, etc.) can more aggressive strength and flexibility exercises begin along with low-intensity cross-training workouts such as riding a stationary bike, running in water, or doing elliptical workouts. Although these workouts are important to maintain or reestablish aerobic conditioning before getting back to sports training, they, too, have to be pain-free or you risk setting yourself back in the rehab process. It’s not acceptable if there is pain at the beginning of the exercise and then it disappears. There should be no pain during or after rehab exercises.
The return to running must be carefully orchestrated. Once the injury has healed completely, pay close attention to regaining full flexibility and strength in the joints surrounding the injury site as well as correcting the mechanical cause of the injury.
HOW TO USE THE INJURY REHABILITATION MATRICES TO REHABILITATE YOUR RUNNING INJURIES
The Injury Rehabilitation Matrixes in this chapter will direct you through the appropriate steps in the rehab process for your level of injury. To get started, read the left-hand column to find your “level of pain and dysfunction.” By rating your symptoms during the activity listed, you can determine the extent and severity of your injury and set yourself on a path to recovery. You need to be honest with yourself about the pain you experience during the listed activities, and if in doubt, be conservative and begin at the highest level that describes your limitations. Once you have determined your level of pain and dysfunction (e.g., 1, 2, 3, or 4), follow across the grid horizontally from left to right, perform all the rehab tasks as prescribed, and follow the directives for a healthy resolution of your injury and avoid the frustrating injury-reinjury cycle! If you are diligent, you can be back to pain-free training in 3 to 6 weeks.
Achilles Tendonitis: Anatomy and Function of the Achilles Tendon
The Achilles tendon is one of the most robust tendons in the body, and for good reason: Three relatively large and extremely strong muscles in the calf (the gastrocnemius, soleus, and plantaris) all attach to the back of the heel bone (calcaneus) via the Achilles, and the forces they generate during running and jumping are immense, among the biggest in the body.
That’s why, despite the Achilles’ robustness, it is still at risk for injury, and it behooves you not to abuse it with poor training habits, but rather protect it with regular stretching and calf strengthening. The fact is, all injuries to the Achilles hold the risk of complete tendon rupture—which Los Angeles Lakers fans witnessed firsthand in May 2013 when player Kobe Bryant suddenly was lost for the playoffs along with his team’s hopes. As his untimely collapse on the hardwood demonstrated, the Achilles tendon sometimes suffers spontaneous rupture with no history of previous injury or pain. But more often, those huge forces manifest themselves much earlier with telltale pain.
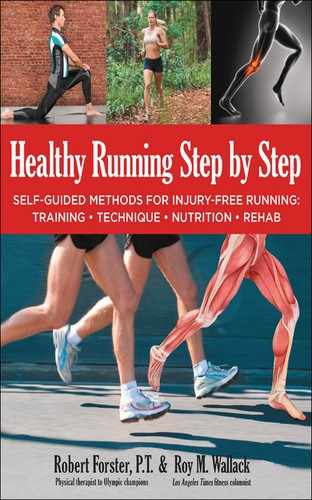
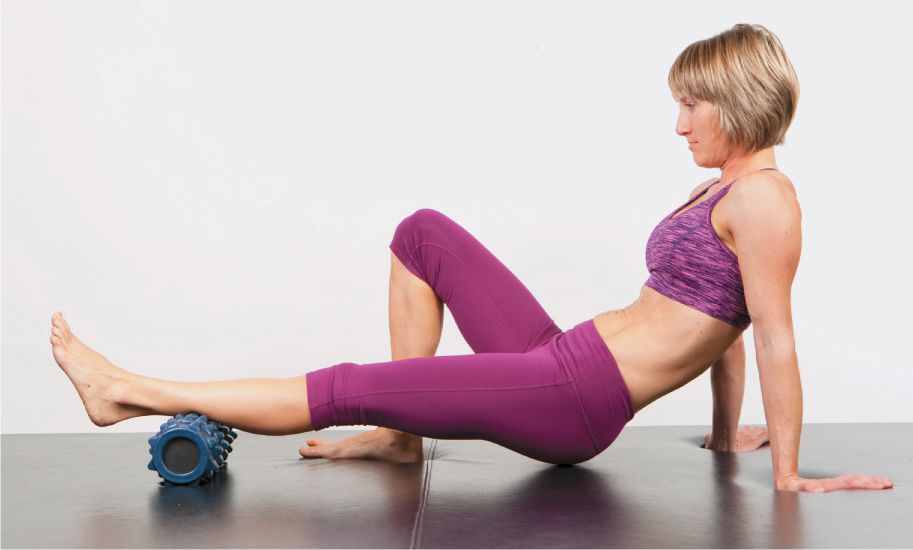
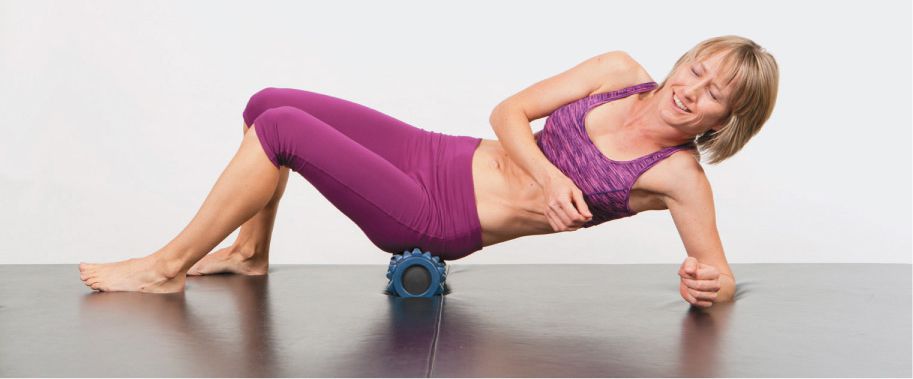
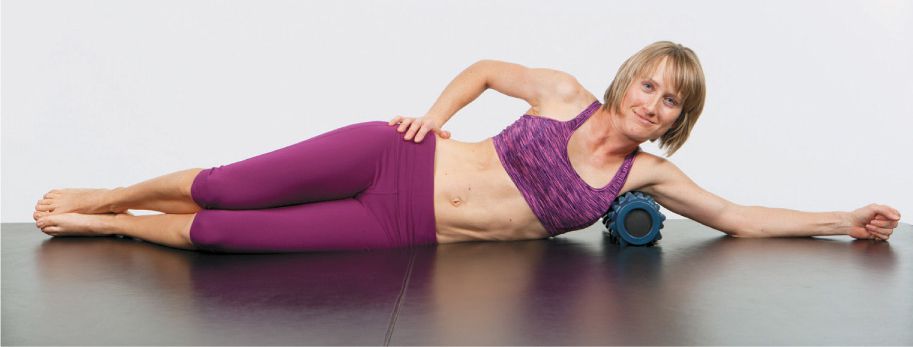
FOAM-ROLLER PROTOCOL FOR RECOVERY, INJURY PREVENTION, AND REHAB
Too effective and too inexpensive not to use, the prosaic foam roller both heals and supercharges!
It doesn’t look like much—a cylinder of dense, closed-cell foam a couple of feet (61 cm) long and generally around 5 inches (12.5 cm) in diameter. (The fancy one pictured here is called the Rumble Roller with foam knobs.) But the simple, cheap foam roller is one of the most effective do-it-yourself recovery and injury-prevention tools an athlete can use. We sports PTs like to say that all work is futile if you don’t get recovery. Well, the foam roller can give you recovery and a lot more—self-myofascial release, self-massaging, self-joint mobilization, and even postural alignment improvement. For all those reasons, even if you’re not injured, regular use of it will enhance your performance.
A foam roller works by using your own body weight to give you many of the same benefits of sports massage, including the ability to restore sore, kinked-up, tight post-workout muscles, tendons, and fascia to their normal tone; speed their recovery by increasing blood flow, circulation, and range of motion; and prevent future injuries by breaking down soft tissue adhesions and scar tissue. The body-weight pressure on the semi-hard roller surface can have a dramatic impact under the surface of your skin. As you roll on, for example, your thigh, the weight of your body flattens and spreads out the muscle and tendon fibers and breaks up adhesions between them, as if it’s ironing-out the wrinkled infrastructure and whisking away kinks and any junk that could become irritations and anchor points for future injuries. At the same time, it “milks” waste products from the muscles and the capillary beds in and around them.
Foam rollers can help lessen the pain of many injuries, such as IT band syndrome and shin splints. You can target almost any muscle group with it. Here are some basic rules for using a foam roller most effectively.
1. Always stretch before rolling.
2. Maintain three points of contact with the ground and area on the roller.
3. Use your bodyweight to apply pressure to sore spots.
4. Roll from distal to proximal (bottom of limb to top).
5. To increase the pressure on the targeted tissue, simply apply more of your body weight to the roller.
6. Find a painful spot and spend more time until it releases and the pain dissipates. If the pain increases over a 10-second period, it means that you are putting too much pressure on the tissues. Decrease some of the pressure on this spot and try to roll it out again.
When you have completed foam rolling, you should feel better, not worse (rollers should never cause bruising). Also, avoid applying direct pressure to boney prominences. Use ice to assist improvement in recovery and injury rehab.
FOAM ROLLER POSITIONS—LOWER BODY
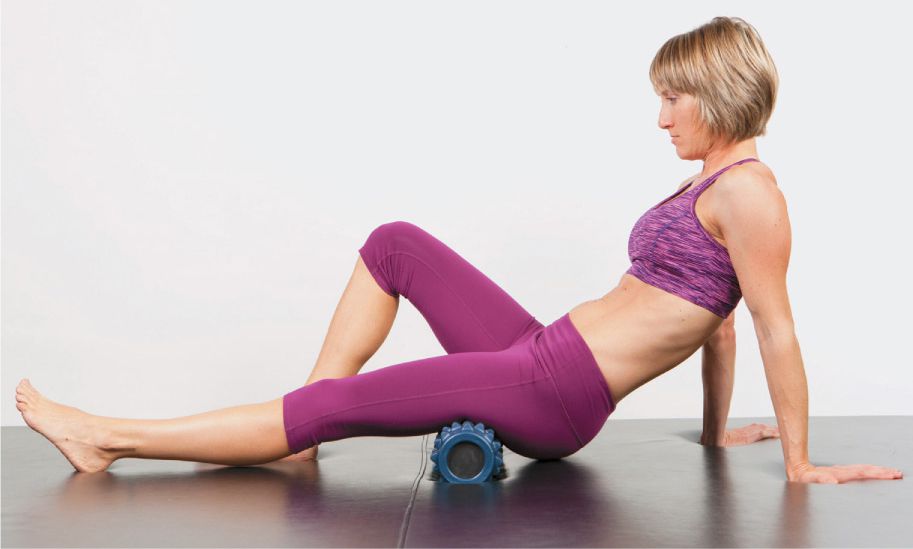
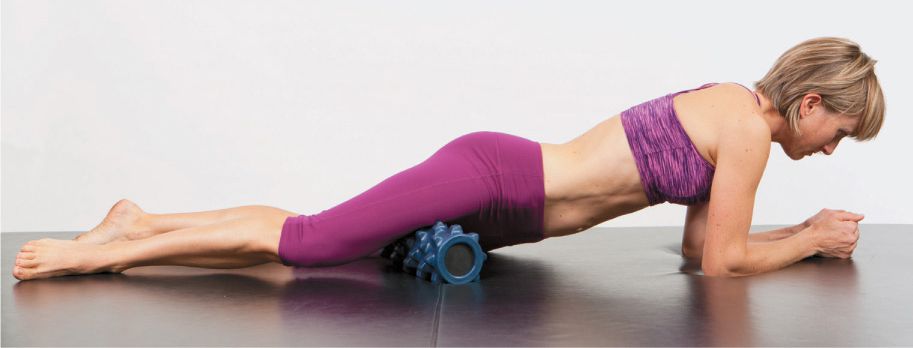
Hamstrings: Balancing on your hands with your hamstrings resting on the roller, roll from the bones at the bottom of the pelvis to the knee. To completely work the entire hamstring complex, experiment with your feet turned in, out, and pointing toward the ceiling. To increase loading, stack one leg on top of the other.
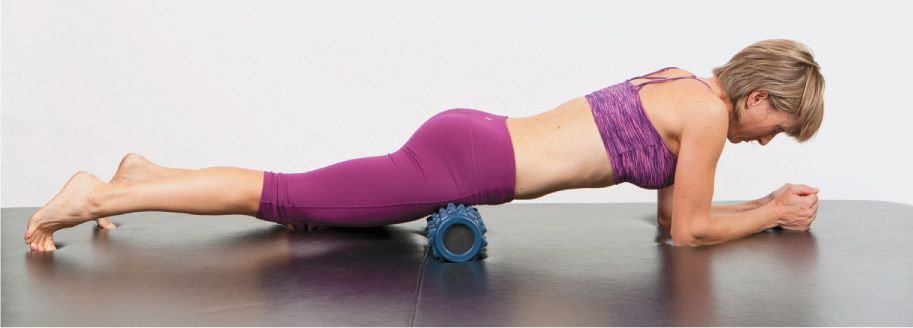
Calves: Balancing on your hands with your calves resting on the roller, roll from ankle to knee. Try it with your leg turned in, out, and pointing toward the ceiling.
Piriformis: Sit on the foam roller, pivot your hips so that your weight is on your left buttock, and then roll forward and backward over your piriformis muscle.
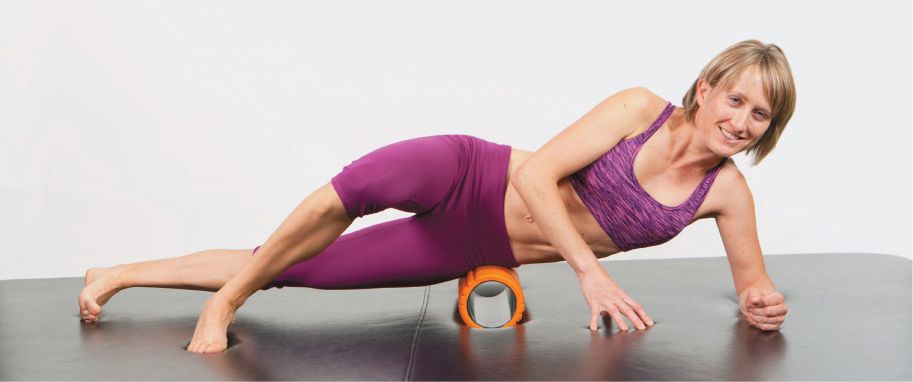
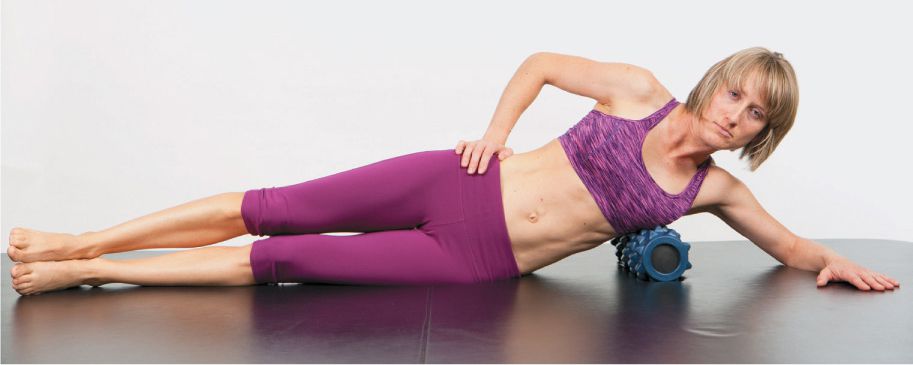
Gluteus medius and minimus: Lie on your side with the roller above the boney spot of your hip and below the pelvic crest, balancing your upper body weight by placing your elbow and hand on the floor. With your top leg in front of you for stability, rock your pelvis backward until you find the sore spot, and then roll forward and backward as well as upward and downward.

Quadriceps: Lying face-down with the roller on your thigh, roll from just above the knee up to your hip, using your forearms for balance. Try this with the thighs both internally and externally rotated. To do so, just shift the position of your pelvis to the right and then left.
Hip flexors: Balance on your forearms with the roller positioned on the top of a thigh just below your pelvis. To get all portions of the small hip flexor muscles, shift the position of your pelvis, stacking the opposite leg on top to increase loading.
Adductors: With one of your inner thighs resting on the roller, and positioned at a 60-degree angle to the leg, roll from the top of your inner thigh to just above the knee. Balance on your forearms.
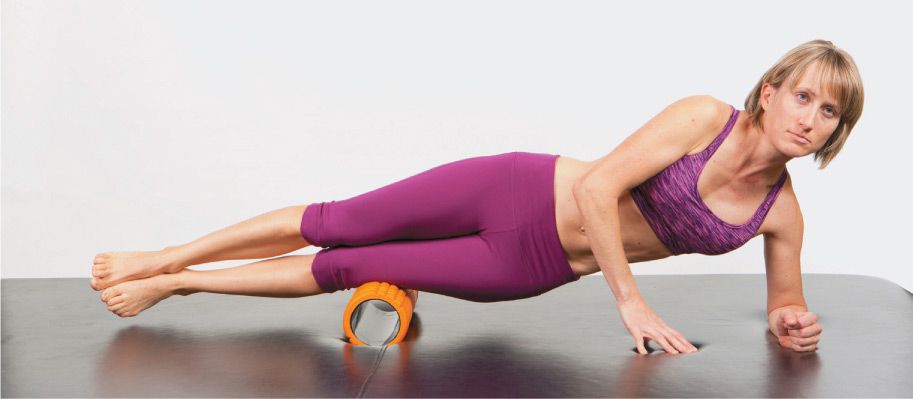
IT band: Lying on your side with the roller positioned just below the bony spot on your hip, roll all the way down the outer aspect of your leg to your knee. Stack the opposite leg on top to increase loading.
Anterior tibilialis: Place the front of one shin on the foam roller, starting just below your knee. Roll from your upper shin to just above your ankle.
FOAM ROLLER POSITIONS—UPPER BODY
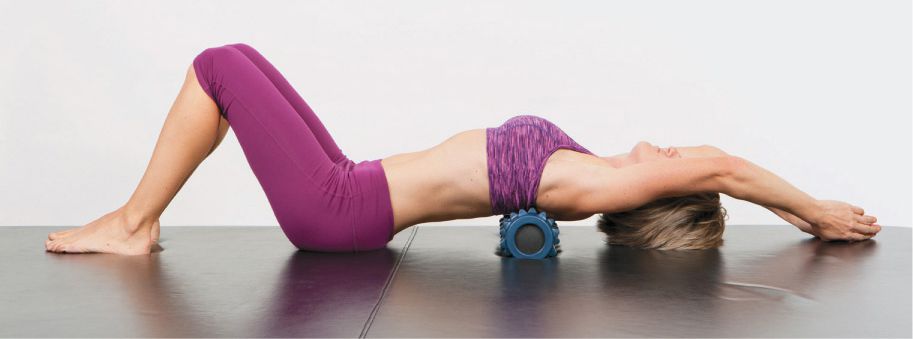
Thoracic mobilization: Start with the foam roller horizontal to your body and positioned at the top of your shoulder blades. With your fingers interlocked above your head and neck and elbows pushed inward so that they almost touch together, roll from the top of your shoulder blades to the low back and back again.
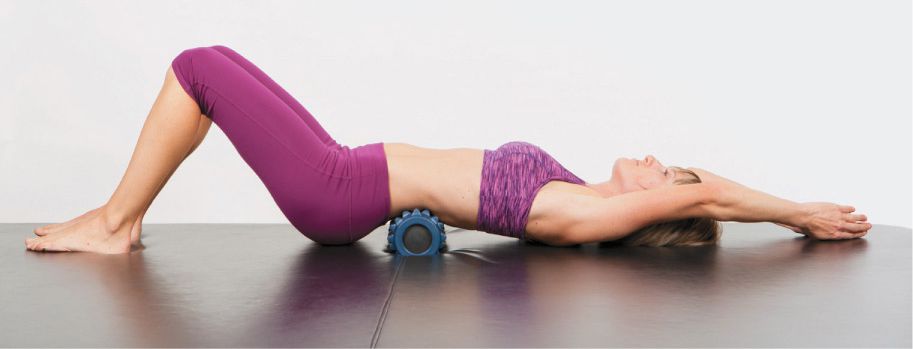
Low back distraction: Position the roller horizontally at the bottom of your spine above the sacrum and the two bony bumps. Have your knees bent up, and your feet, head, and upper back on the floor. Move your body downward so the roller moves up your back and then return to the starting position. Repeat twice only.
Latissimus dorsi: Lie on a horizontally positioned foam roll at your shoulder blade. Roll up and down to your armpit and just below your shoulder blade.
Teres major and infraspinatus: Position the foam roller at armpit level. Roll backward onto the outside of the shoulder blade and then up and down in a small range. Be very cautious if you have a history of shoulder dislocations. Once you find the sore spot, roll forward and backward over this spot.
To understand why the Achilles is particularly vulnerable to the stress of running, a short physiology lesson is in order. During flat-land, steady-state running, the calf muscles perform an “eccentric” contraction—that is, they lengthen in a controlled release of their contraction on the landing to stabilize the foot and slow down the forward progression of your body weight as the shin bone moves over the foot. Add the push-off that comes with acceleration or an uphill grade, and the calf now additionally performs a “concentric” contraction, which contracts and shortens the muscle.
The Achilles, being attached to the calf’s three prime movers, is not only worked the entire time, but worked at G forces several times your body weight. Sure, it’s designed to handle it—during a toe raise exercise, in which the calf muscles contract concentrically, an average untrained man can do it with 200 pounds on his shoulders and a well-trained man with more than 400 pounds. But that’s a lot of stress on the Achilles and its constituent parts. Like other tendons in the body (but not all), the Achilles is encased in a sheath called a paratenon that produces a lubricating fluid designed to prevent friction. Heavy, excess movement and underlubrication (from poor warm-up, dehydration, or pure overuse) ramp up that friction, which you’ll feel as pain.
HOW YOU FEEL THE PAIN
There are three different conditions of Achilles tendon dysfunction—Achilles tendonitis, Achilles paratenonitis, and Achilles tendonosis—and you feel similar pain signatures from each one. But with careful observation and palpation (what PTs call poking people and asking, “Does that hurt?”), we can make an exact diagnosis.
1. Achilles Tendonitis
The Achilles tendon, like all tendons, is composed of collagen fibers that are constantly reacting to the stress of the forces created during activities of daily life and exercise. In normal use, the body has no problem keeping up with the repair needs of fibers that get damaged (microtears) from the stresses of walking, running, and jumping. Achilles tendonitis occurs when the volume and intensity of these activities creates a stress load that outpaces the body’s ability to repair the microdamaged fibers. Chronic inflammation results; pain soon follows.
Achilles tendonitis pain is provoked by high-exertion activities such as sprinting, running up hills, and jumping, but more moderate activities such as walking up stairs or even just walking will cause pain if you let it progress. Stiffness in the tendon may be present in the morning and after periods of inactivity. There may be increased soreness at the end of the day; often the pain is worse when you’re barefoot and lessened when wearing a shoe with a slight heel.
You’ll know it’s Achilles tendonitis when the Achilles tendon is tender when you pinch it between your finger and thumb. Maybe, under close inspection, it’s minimally swollen.
2. Achilles Paratenonitis (Sheath Inflammation)
Achilles paratenonitis is caused by an inflamed tendon that irritates the sheath (paratenon) as the tendon slides back and forth with muscle contractions. The pain associated with this condition is often exquisite and easy to recognize. It hurts when you perform any movements of the ankle, including simple range-of-motion exercises. Also, the whole length of the tendon is swollen and enlarged from the end of the calf muscle to the heel bone (as opposed to a bulbous swelling midtendon, as you will read about below) and acutely tender to relatively light palpation (finger pressing). In extreme cases, there exists an audible “crepitus” noise that feels like there is sand between the tendon and its sheath. This indicates that a scar is forming between these two structures in reaction to inflammation of the tendon fibers.
3. Achilles Tendonosis
When the body’s repair mechanisms fail to maintain the health of the tendon and the repair process fails, the inner substance of the tendon breaks down. This is a tendonosis, which appears as a firm, bulbous nodule about the size of a pea somewhere in the middle of the length of the Achilles tendon. Even after the acute swelling and pain go away, this nodule persists and creates more of an ache during and after activities. The nodule represents scar tissue surrounding the area of damaged collagen. If left untreated, it becomes the weak spot, vulnerable to complete rupture.
Note: Don’t confuse tendonosis with heel bursitis (calcaneal bursitis), a condition characterized by pain and swelling at the back of the heel bone. It may be associated with inflammation of the Achilles tendon, but is a more recalcitrant condition that typically requires a comprehensive clinical approach to resolve. If you observe a swollen or enlarged bump at the back of the heel bone in one or both of your feet, you’ll have to come in and see a guy like me for an evaluation.
THE CAUSE OF THE INJURY
Unless you hurt yourself by running too many hills, Achilles injuries in runners are almost always related to overpronation. Overpronation is defined by the degree the heel bone (calcaneus) angles inward toward the midline of the body during the stance or weight-bearing phase of the running gait. (See “What Is Overpronation?” on page 36.) Whether overpronation occurs in both feet due to inherent anatomy issues or only in the foot of the long leg (in an attempt to collapse that arch and “shorten” the long leg to match the short leg), an overpronated foot creates problems for the Achilles tendon in two ways:
First, the excessive inward inclination of the heel associated with overpronation creates an odd angle of pull for the Achilles at its attachment on the heel bone. Second, the corresponding instability of a pronated foot makes the calf muscle work extra hard to create stability.
As I mentioned earlier, the calf muscles function both concentrically and eccentrically during running. Of the two types of contractions, the eccentric (lengthening) contraction puts the most stress on the Achilles tendon. During the landing, the calf muscles work via the Achilles tendon in an eccentric contraction to slow down the forward progression of the shin bone, then switch to a concentric contraction to stabilize the foot and ankle and create the force needed to push off the ground. Overpronators have a problem because their heel bones remain too far tilted inward, meaning that the foot and ankle are less stabilized and too flexible when it comes time to push off.
These two factors, a too-tilted heel bone and an unstable/too-flexible foot, cause the Achilles to struggle to pull up on the back of the heel bone and generate the right force needed for a good push-off.
REHABILITATION OF ACHILLES INJURIES
Rehabilitation of Achilles tendon injuries, like all injuries, is guided by the PRICE acronym previously outlined. As we like to say in PT land, “You must pay the PRICE of your injury to get better quickly and avoid chronic problems in the injury-reinjury cycle.” Here, I’ll apply the PRICE protocol specifically to rehabbing Achilles problems:
P for PROTECT: Because calf muscles and Achilles tendons are active almost all the time in daily life, take care of them by wearing shoes with good arch support, a sturdy heel counter, and a heel rise (which reduces the Achilles’ need to stretch when you land during a running or walking step). When the Achilles tendon is injured, we advocate the elimination of barefoot activities, flat-soled shoes, and recommend heel lifts.
R for REST: Limit all activities of daily living and workouts that provoke any pain. Even if the pain minimizes after the tendon warms up with use, it doesn’t mean the damage being done is minimized. To allow the body to begin to repair the damage, spare the tendon from further stress by replacing running with cross-training activities (e.g., stationary bike or elliptical machine) that cause no pain during or after the workout. Then begin slow running, per the walk/run protocol (see “Walk/Run Protocol: To Safely Start Running After an Injury, Go for a Walk” on page 166).
I for ICE: To control runaway inflammation and swelling, apply ice three to five times per day for 20 minutes. By controlling inflammation, you prevent Achilles tendonitis from becoming paratenonitis or tendonosis. You will also limit the amount of scar tissue that forms and shorten your recovery.
C for COMPRESSION: It is difficult to apply effective compression on the Achilles tendon because there’s a risk of a wrap or strap irritating the sheath even more. Apply ice with compression three times per day.
E for ELEVATION: Elevating your leg above your hips or (better yet) above your heart is an effective strategy to control and reduce swelling in the Achilles. When done simultaneously with ice, it is even more beneficial.
SUMMARY
The first goal of Achilles tendon injury rehab is to control the early inflammation and swelling with the strategies of the PRICE protocol. This limits the loss of range of motion, muscle weakness, and scar tissue formation that will lengthen your rehabilitation program.
Secondary goals include regaining full range of motion, eliminating scar tissue, and restrengthening the calf muscles that assist them during running.
As with all running injuries, a key is correcting your running gait mechanics, which will limit pronation and stress on the Achilles. If your Achilles issues are unilateral (on one side only), it strongly implicates a leg-length discrepancy that needs to be solved.
Finally, after the pain is gone, the stronger your calf muscles get, the less stress will be placed on the Achilles. Strengthen the calf to its full capacity with toe raises, with a gradual increase up to 1.5 times your body weight in your hands or on your shoulders. Proper running shoes and a scientific approach to your training that includes all the principles of Periodization will help minimize your chances of reinjury.
The use of heel lifts in your shoes, or wearing a shoe with more heel height, will take a significant amount of stress off the Achilles tendon by reducing the stretch on the Achilles when you walk or run. Heel lifts of 1/8 to 1/4 inch (3 to 6 mm) can be purchased at better national brand pharmacies. They must be worn in both shoes.
LEVEL 4 Pain with walking and active range of motion of the ankle. Also, pain and stiffness after sitting. | |
LENGTH OF ACTIVE REHAB IN EACH LEVEL | 2 weeks, then move to Level 3 rehab. |
ACTIVITY ALLOWED | • No running for 6 weeks, then begin Walk/Run Protocol (page 166). • 15 to 30 minutes of deep-water running or stationary cycling if not painful. |
FOLLOW PRICE (PROTECT, REST, ICE, COMPRESSION, ELEVATE) | P: Insert 1/4-inch (6 mm) heel lifts in both shoes. Wear all the time. No bare feet. |
STATIC STRETCHING | • All stretches in chapter 7 3x/day. Focus on Standing Calf Stretch and Standing Calf Stretch with Bent Leg (pages 131–132). • Use foam roller on calf muscle 2x-3x/day (page 173). |
ACTIVE RANGE OF MOTION | Warm up with active range of motion plantar flexion/dorsi flexion (like pushing on a gas pedal and bringing your foot back up), 3 sets of 20 reps, 2x/day. Do pain-free range of motion only. (This is used as a warm-up before the other exercises.) |
LIGHT RESISTANCE | • Perform Runner’s Dozen strength exercises (page 150). • Rubberband plantar flexion (page 192), 3 sets of 20 reps 2x/day (if no pain). |
MODERATE RESISTANCE | If no pain, do double-legged toe raises (page 187), 3 sets of 20 reps 2x/day with no additional weight. |
WEIGHTED EXERCISE | No additional weights. |
WALK/RUN | No running for 6 weeks, then begin Walk/Run Protocol. No walking for exercise. |
LEVEL OF PAIN AND DYSFUNCTION | LEVEL 3 Considerable pain with walking or running. Pain-free active range of motion. |
LENGTH OF ACTIVE REHAB IN EACH LEVEL | 2 weeks, then move to Level 2 rehab. |
ACTIVITY ALLOWED | • No running for 4 weeks, then begin Walk/Run Protocol (page 166). • 30 minutes of deep-water running, stationary bike, or elliptical machine every other day for 10 minutes/week. |
FOLLOW PRICE (PROTECT, REST, ICE, COMPRESSION, ELEVATE) | P: Insert 1/4-inch (6 mm) heel lifts in both shoes. Wear all the time. No bare feet. |
STATIC STRETCHING | • All stretches in chapter 7 3x/day. Focus on Standing Calf Stretch and Standing Calf Stretch with Bent Leg (pages 131–132). • Use foam roller on calf muscle 2x-3x/day (page 173). |
ACTIVE RANGE OF MOTION | Warm up with active range of motion plantar flexion/dorsi flexion (like pushing on a gas pedal and bringing your foot back up), 3 sets of 20 reps, 2x/day. Do pain-free range of motion only. (This is used as a warm-up before the other exercises.) |
LIGHT RESISTANCE | Rubberband plantar flexion (page 192), 3 sets of 20 reps 2x/day (if no pain). |
MODERATE RESISTANCE | If no pain, do double-legged toe raises (page 187), 3 sets of 20 reps 2x/day with no additional weight. Progress to single-legged toe raises, 2 sets of 20 reps 2x/day. |
WEIGHTED EXERCISE | No additional weights. |
WALK/RUN | No running for 4 weeks, then begin Walk/Run Protocol. No walking for exercise. |
LEVEL OF PAIN AND DYSFUNCTION | LEVEL 2 Pain during or after running. Pain during or after hill running. |
LENGTH OF ACTIVE REHAB IN EACH LEVEL | 2 weeks, then move to Level 1 rehab. |
ACTIVITY ALLOWED | • No running for 2 weeks. • 30 minutes of deep-water running, stationary bike, or elliptical every other day for 10 minutes/week. |
FOLLOW PRICE (PROTECT, REST, ICE, COMPRESSION, ELEVATE) | P: Insert 1/4-inch (6 mm) heel lifts in both shoes. Wear all the time. No bare feet. |
STATIC STRETCHING | • All stretches in chapter 7 3x/day. Focus on Standing Calf Stretch and Standing Calf Stretch with Bent Leg (pages 131–132). • Use foam roller on calf muscle 2x-3x/day (page 173). |
ACTIVE RANGE OF MOTION | Warm up with active range of motion plantar flexion/dorsi flexion (like pushing on a gas pedal and bringing your foot back up), 3 sets of 20 reps, 2x/day. Do pain-free range of motion only. (This is used as a warm-up before the other exercises.) |
LIGHT RESISTANCE | Rubberband plantar flexion (page 192), 3 sets of 20 reps 2x/day (if no pain). |
MODERATE RESISTANCE | If no pain, do double-legged toe raises (page 187), 3 sets of 20 reps 2x/day with no additional weight. Progress to single-legged toe raises, 2 sets of 20 reps 2x/day. |
WEIGHTED EXERCISE | Toe raises with 10 lbs in each hand, 2 sets of 20 reps 3x/week. |
WALK/RUN | After 2 weeks of rehab, return to running per Walk/Run Protocol. |
LEVEL OF PAIN AND DYSFUNCTION | LEVEL 1 Pain only after running or speed work and hills. |
LENGTH OF ACTIVE REHAB IN EACH LEVEL | 3 weeks of rehab and reduced mileage. |
ACTIVITY ALLOWED | • Continue cross-training as above. Flat nonaccelatory running only. • Cut daily running mileage by half. No speed work or hills. |
FOLLOW PRICE (PROTECT, REST, ICE, COMPRESSION, ELEVATE) | P: Insert 1/4-inch (6 mm) heel lifts in both shoes. Wear all the time. No bare feet. |
STATIC STRETCHING | • Use foam roller on calf muscle (page 173). • Always stretch before and after every workout (Chapter 7). |
ACTIVE RANGE OF MOTION | Warm up with active range of motion plantar flexion/dorsi flexion (like pushing on a gas pedal and bringing your foot back up), 3 sets of 20 reps, 2x/day. Do pain-free range of motion only. (This is used as a warm-up before the other exercises.) |
LIGHT RESISTANCE | Rubberband plantar flexion (page 192), 3 sets of 20 reps 2x/day (if no pain). |
MODERATE RESISTANCE | If no pain, do double-legged toe raises (page 187), 3 sets of 20 reps 2x/day with no additional weight. Progress to single-legged toe raises, 2 sets of 20 reps 2x/day. |
WEIGHTED EXERCISE | Add 10 to 15 lbs on shoulders, up to 1/2 your body weight; 2 sets of 20 reps 3x/week. |
WALK/RUN | After 2 weeks of rehab, build mileage by 10% to 15% per week. No speed work or hills for 6 weeks. |
Shin Splints: Anatomy and Function
The term shin splints is a catchall phrase that refers to nearly all pain in the lower leg except calf and Achilles tendon injuries. There are two types: anterior shin splints and medial shin splints.
Anterior shin splints appear as pain in the fleshy muscle in the front of the lower leg. Although this injury is common when runners first begin running after a layoff, it is rarely serious or persistent.
Medial shin splints (technically termed a periostitis), which appear on the inside border of the lower leg bone (tibia), are much worse. They occur from overpronation when you run too far too soon, straining tendons that attach to the tibia and pulling the periosteum, the paper-thin tissue covering of all bones, away from the shin bone.
A quick anatomy lesson may help explain what’s happening here: Muscles deep in the back of the calf function to slow down the forward progression of the tibia over the foot in the stance phase of running. The tendons of these deep flexor muscles attach either directly to the medial border of the tibia or indirectly by way of tether-like structures. When they fatigue they begin to function poorly, the tendons become inflamed (tendonitis), and they pull the periosteum covering away from the bone and create acute pain (periostitis).
HOW YOU FEEL THE PAIN
Typically, shin-splint pain will first appear at the end of long runs or after extended efforts. Soon, the pain will appear earlier in the workout and sometimes abate as you warm up, only to return toward the end of the workout. As time goes on, the pain will spill over into walking and standing during activities of daily living. Occasionally, runners will pull up (stop due to pain) during workouts and racing with a complete fracture of the tibia.
HOW THE INJURY HAPPENS
The most common mechanical running error is overstriding. By definition, when you overstride you take too few steps per minute; therefore, your foot spends too much time in contact with the ground during each step. If you are an overpronator, this extended period on the ground (what we call the stance phase) allows the foot to pronate to a greater degree than it otherwise would with quicker steps. The result is that the deep flexor muscles of the calf remain engaged for just a few milliseconds too long each step. Mile after mile, this fatigues the muscles. As they begin to operate dysfunctionally, their tendons become damaged, and as they lose their elastic properties, they pull the periosteum off the bone.
REHABILITATION TECHNIQUES
In addition to treating the inflammation in the bones and the tendons with regular icing, it is imperative to break up the scar tissue and build up the muscles deep in the calf with foam roller work while progressing through the stretching and strengthening program, which is outlined in the Self-Diagnosis and Rehabilitation Matrix on pages 184–185.
However, the single most important factor for the resolution of this injury and to prevent reinjury is to increase your running cadence (i.e., increase the number of steps you take per minute). More steps per minute reduce the amount of time the muscles in the calf have to work each step and limit their load by limiting the degree of pronation. In addition, a light self-grip wrap around the shin bone will provide a compression force to help the periosteum readhere to the tibia bone.
If the pain is bilateral (i.e., in both legs), then the causative factors in the development of the shin splints are both overpronation and overstriding. If the pain is unilateral, then it is likely the painful side is the long leg, which is overpronating in an effort to even out your leg lengths during weight bearing. (See pages 98–100 to evaluate for a leg-length discrepancy.) This will have to be corrected to resolve the shin splint along with an increase in running cadence.
LEVEL 4 • Pain on inside of shin at rest or with walking that causes you to limp. • Pain and limping after long runs and speed work. • Pain with walking after long periods on your feet or at the end of the day. | |
LENGTH OF ACTIVE REHAB IN EACH LEVEL | 2 weeks, then move to Level 3 rehab. |
ACTIVITY ALLOWED | • No running for 6 weeks, then begin Walk/Run Protocol (page 166). • 15 to 30 minutes of deep-water running or stationary cycling (if not painful). |
FOLLOW PRICE (PROTECT, REST, ICE, COMPRESSION, ELEVATE) | P: Use self-grip tape to wrap shin or properly fit shin sleeve when weight bearing. No walking on bare feet. Wear supportive shoes in all daily activities. |
STATIC STRETCHING | • All stretches in chapter 7 3x/day. Focus on Standing Calf Stretch and Standing Calf Stretch with Bent Leg (pages 131–132). • Use foam roller on calf muscles (page 173). |
LIGHT RESISTANCE | • Runner’s Dozen strength exercises (page 150). • Rubber-band plantar flexion/dorsi flexion inversion/eversion, 3 sets of 20 reps 2x/day (page 192). • Toe curls, 5 reps 2x/day (page 183). |
MODERATE RESISTANCE | • Double-legged toe raises (page 187) with body weight, 3 sets of 20 reps 2x/day (if no pain). • No additional weight. |
WEIGHTED EXERCISE | No additional weight. |
WALK/RUN | • No running for 6 weeks, then begin Walk/Run Protocol. • No walking for exercise. |
LEVEL OF PAIN AND DYSFUNCTION | LEVEL 3 • Pain on inside of shin during running, either at the start or end of run. • Pain after long run when wearing unsupportive shoes. |
LENGTH OF ACTIVE REHAB IN EACH LEVEL | 2 weeks, then move to Level 2 rehab. |
ACTIVITY ALLOWED | • No running for 4 weeks, then begin Walk/Run Protocol (page 166). • 30 minutes of deep-water running or stationary bike every other day, 10 minutes per week. |
FOLLOW PRICE (PROTECT, REST, ICE, COMPRESSION, ELEVATE) | P: Use self-grip tape to wrap shin or properly fit shin sleeve when weight bearing. No walking on bare feet. Wear supportive shoes in all daily activities. |
STATIC STRETCHING | • All stretches in chapter 7 3x/day. Focus on Standing Calf Stretch and Standing Calf Stretch with Bent Leg (pages 131–132). • Use foam roller on calf muscles (page 173). |
LIGHT RESISTANCE | • Runner’s Dozen strength exercises (page 150). • Rubber-band plantar flexion/dorsi flexion inversion/eversion, 3 sets of 20 reps 2x/day (page 192). • Toe curls, 5 reps 2x/day (page 183). Add 1 pound per week. |
MODERATE RESISTANCE | Double-legged toe raises (page 187) with body weight, 3 sets of 20 reps 2x/day (if no pain). Progress to single-legged toe raises (if no pain), 2 sets of 20 reps 2x/day. |
WEIGHTED EXERCISE | Add 10 to 15 lbs on shoulders, up to half your body weight, for 2 sets of 20 reps, every other day. |
WALK/RUN | • No running for 4 weeks, then begin Walk/Run Protocol. • No walking for exercise. |
LEVEL OF PAIN AND DYSFUNCTION | LEVEL 2 • Pain at the start of running that warms up and becomes tolerable. • May have pain walking at end of day or in unsupportive shoes. |
LENGTH OF ACTIVE REHAB IN EACH LEVEL | 2 weeks, then move to Level 1 rehab. |
ACTIVITY ALLOWED | • No running for 2 weeks, then begin Walk/Run Protocol (page 166). • 30 minutes of deep-water running or stationary bike. • You may substitute an elliptical trainer if tolerated with no pain during or after workout. |
FOLLOW PRICE (PROTECT, REST, ICE, COMPRESSION, ELEVATE) | P: Use self-grip tape to wrap shin or properly fit shin sleeve when weight bearing. No walking in bare feet. Wear supportive shoes in all daily activities. |
STATIC STRETCHING | • All stretches in chapter 7 3x/day. Focus on Standing Calf Stretch and Standing Calf Stretch with Bent Leg (pages 131–132). • Use foam roller on calf muscles (page 173). |
LIGHT RESISTANCE | • Runner’s Dozen strength exercises (page 150). • Rubber-band plantar flexion/dorsi flexion inversion/eversion, 3 sets of 20 reps 2x/day (page 192). • Toe curls, 5 reps 2x/day (page 183). Add 1 pound per week. |
MODERATE RESISTANCE | Double-legged toe raises (page 187), 3 sets of 20 reps 2x/day (if no pain). Progress to single-legged toe raises (if no pain), 2 sets of 20 reps 2x/day. |
WEIGHTED EXERCISE | Add 10 to 15 lbs on shoulders, up to half your body weight, for 2 sets of 20 reps, every other day. |
WALK/RUN | After 2 weeks of rehab, return to running per Walk/Run Protocol. |
LEVEL OF PAIN AND DYSFUNCTION | LEVEL 1 • Pain during palpation or when pressure is applied to the inside of your shin. • Noticeable stiffness in muscle next to inside of shin. |
LENGTH OF ACTIVE REHAB IN EACH LEVEL | 3 weeks of rehab and reduced mileage. |
ACTIVITY ALLOWED | • Continue cross-training. • Flat, non-accelatory running only. Cut daily mileage in half. No speed work or hills. |
FOLLOW PRICE (PROTECT, REST, ICE, COMPRESSION, ELEVATE) | P: Wear 1/4 inch (6 mm)-high heel lifts (page 179) in both shoes. No walking on bare feet. Remove heel lifts after return to full mileage with no pain. |
STATIC STRETCHING | • All stretches in chapter 7 3x/day. Always stretch before and after every workout. |
LIGHT RESISTANCE | • Runner’s Dozen strength exercises (page 150). • Rubber-band plantar flexion/dorsi flexion inversion/eversion, 3 sets of 20 reps 2x/day (page 192). • Toe curls, 5 reps 2x/day (page 183). Add 1 pound per week. |
MODERATE RESISTANCE | Double-legged toe raises (page 187), 3 sets of 20 reps 2x/day (if no pain). Progress to single-legged toe raises (if no pain), 2 sets of 20 reps 2x/day. |
WEIGHTED EXERCISE | Add 10 to 15 lbs on shoulders, up to half your body weight, for 2 sets of 20 reps, every other day. |
WALK/RUN | • After 2 weeks of rehab, build mileage by 10% to 15% per week. • No speed work or hills. |
Plantar Fasciitis: Anatomy and Function of the Plantar Fascia
The plantar fascia is a tight band of dense connective tissue on the bottom of the foot extending from the heel to the base of the toes. When you move your body forward over a weight-bearing foot, the toes are extended and lifted upward, winding the plantar fascia taut like a skin over a drum. This action helps transform the foot from a flexible structure able to adapt to variations in the walking surface, to a rigid lever that supports the foot while it’s on the ground, by limiting the degree that the arch collapses as the body moves forward over the foot.
HOW YOU FEEL THE PAIN
You feel plantar fasciitis as acute pain at the bottom of the heel. It typically occurs in one or both feet when taking the first few steps out of bed in the morning. Pain may improve or disappear after a few minutes of walking around the house, but will often reappear during the day after sitting for a while, and at the end of the day. Pain may be worse when barefoot or in shoes with poor arch support. The pain may also be present at the start of a running workout and improve as you warm up, which is NOT an indication that you can continue to run. In some cases, the pain may be more in the arch area.
Additionally, some runners will grow a bone spur off the heel where the plantar fascia attaches. Although this may prolong the rehabilitation process, it does not necessarily preclude you from resolving the injury and getting back to pain-free running.
HOW THE INJURY HAPPENS
The plantar fascia can be damaged in several ways. The least likely scenario is that it gets bruised and injured by a pointy rock or other obstacle in your path as you walk, hike, or run. This needs to be addressed with the same rehab procedures used for the more common mechanical cause of injury to this structure.
A very common cause of plantar fasciitis is overpronation, which overburdens the plantar fascia by leaving the foot in a flexible posture with the arch collapsed, just at the time in the running gait cycle when it should be supinated and rigid, which would allow for the efficient transfer of power from the leg to the ground during the push-off phase.
Finally, the most common cause of plantar fascia pain is leg-length discrepancy, which will often result in unilateral pain (i.e., pain in one foot and not the other). Leg-length discrepancy will cause one foot to pronate further than the other in an attempt to lower the arch and shorten the long leg to correct the leg-length inequality. (See pages 98–100 to evaluate for a leg-length discrepancy.)
REHABILITATION TECHNIQUES
Although plantar fasciitis can be one of the most recalcitrant running injuries if left untreated, a quick resolution can often be accomplished if you jump into rehab mode quickly, address the mechanical cause of the leg-length imbalance, and correct your running gait mechanics when you get back to your workouts. Local treatment with ice and the foam roller and addressing the mechanical cause must be conducted concurrently for this injury to resolve.
The use of heel lifts in both of your shoes, or wearing shoes with more heel height, will take a significant amount of stress off the plantar fascia. Heel lifts of 1/8 to 1/4 inch (3 to 6 mm) can be purchased at better national brand pharmacies. They must be worn in both shoes.
LEVEL 4 • Pain under heel is severe on your first steps out of bed. • Pain under heel is severe with extended standing and walking. • Pain under heel worse at end of long day on your feet. | |
LENGTH OF ACTIVE REHAB IN EACH LEVEL | 2 weeks, then move to Level 3 rehab. |
ACTIVITY ALLOWED | • No running for 6 weeks, then begin Walk/Run Protocol (page 166). • 15 to 30 minutes of deep-water running or stationary cycling if not painful. |
FOLLOW PRICE (PROTECT, REST, ICE, COMPRESSION, ELEVATE) | P: Heel lifts (page 187). |
STATIC STRETCHING | All stretches 3x/day. Focus on standing calf stretch in 2 positions (pages 131–132). |
LIGHT RESISTANCE | • Runner’s Dozen strength exercises (page 150). • Rubber-band plantar flexion/dorsi flexion inversion/eversion, 3 sets of 20 reps 2x/day (page 192). • Toe curls, 5 reps 2x/day (page 183). |
MODERATE RESISTANCE | Double-legged toe raises with body weight only (page 187), 3 sets of 20 reps 2x/day (if no pain). |
WEIGHTED EXERCISE | No additional weights. |
WALK/RUN | • No running for 6 weeks, then begin Walk/Run Protocol. • No walking for exercise. |
LEVEL OF PAIN AND DYSFUNCTION | LEVEL 3 • Pain severe on first steps out of bed. • Pain with extended standing and walking. |
LENGTH OF ACTIVE REHAB IN EACH LEVEL | 2 weeks, then move to Level 2 rehab. |
ACTIVITY ALLOWED | • No running for 4 weeks, then begin Walk/Run Protocol (page 166). • 30 minutes of deep-water running or stationary bike every other day up to 10 minutes/week. |
FOLLOW PRICE (PROTECT, REST, ICE, COMPRESSION, ELEVATE) | P: Heel lifts (page 187). |
STATIC STRETCHING | • All stretches 3x/day. Focus on standing calf stretch in 2 positions (pages 131–132). • Use foam roller on calf muscle (page 173). |
LIGHT RESISTANCE | • Runner’s Dozen strength exercises (page 150). • Rubber-band plantar flexion/dorsi flexion inversion/eversion, 3 sets of 20 reps 2x/day (page 192). • Toe curls, 5 reps 2x/day (page 183). |
MODERATE RESISTANCE | Double-legged toe raises (page 187), 3 sets of 20 reps 2x/day. Progress to single-legged toe raises (if no pain). |
WEIGHTED EXERCISE | No additional weights. |
WALK/RUN | • No running for 4 weeks, then begin Walk/Run Protocol. • No walking for exercise. |
LEVEL OF PAIN AND DYSFUNCTION | LEVEL 2 • Pain severe on first steps out of bed. • Pain running or after running. |
LENGTH OF ACTIVE REHAB IN EACH LEVEL | 2 weeks, then move to Level 1 rehab. |
ACTIVITY ALLOWED | • No running for 2 weeks, then begin Walk/Run Protocol (page 166). • 30 minutes of deep-water running or stationary bike every other day up to 10 minutes per week. |
FOLLOW PRICE (PROTECT, REST, ICE, COMPRESSION, ELEVATE) | P: Heel lifts (page 187). |
STATIC STRETCHING | • All stretches 3x/day. Focus on standing calf stretch in 2 positions (pages 131–132). • Use foam roller on calf muscle (page 173). |
LIGHT RESISTANCE | • Runner’s Dozen strength exercises (page 150). • Rubber-band plantar flexion/dorsi flexion inversion/eversion, 3 sets of 20 reps 2x/day (page 192). • Toe curls, 5 reps 2x/day (page 183). |
MODERATE RESISTANCE | Double-legged toe raises (page 187), 3 sets of 20 reps 2x/day as a warm-up. Progress to single-legged toe raises. |
WEIGHTED EXERCISE | • Toe raises with 10 lbs in each hand, 2 sets of 20 reps 2x/day. • Stretch before and after each session. |
WALK/RUN | After 2 weeks of rehab return to running per Walk/Run Protocol. |
LEVEL OF PAIN AND DYSFUNCTION | LEVEL 1 |
LENGTH OF ACTIVE REHAB IN EACH LEVEL | 3 weeks of rehab and reduced mileage. |
ACTIVITY ALLOWED | • Continue cross-training. • Flat non-accelatory running only. • Cut daily mileage by half. • No speed work or hills. |
FOLLOW PRICE (PROTECT, REST, ICE, COMPRESSION, ELEVATE) | P: Heel lifts (page 187). |
STATIC STRETCHING | • Always stretch before and after every workout. • Use foam roller on calf muscle (page 173). |
LIGHT RESISTANCE | • Runner’s Dozen strength exercises (page 150). • Rubber-band plantar flexion/dorsi flexion inversion/eversion, 3 sets of 20 reps 2x/day (page 192). • Toe curls, 5 reps 2x/day (page 183). |
MODERATE RESISTANCE | Double-legged toe raises (page 187), 3 sets of 20 reps 2x/day. Progress to single-legged toe raises, 2 sets of 20 reps 2x/day as a warm-up. |
WEIGHTED EXERCISE | • Toe raises with 20 lbs in each hand, 2 sets of 20 reps 3x/week. • Every week, add 10 to 15 lbs on shoulders, until you reach half your body weight. |
WALK/RUN | • After 2 weeks of rehab, build mileage by 10% to 15% per week. |
Iliotibial (IT) Band Syndrome: Anatomy and Function of the IT Band
The IT band is a thick band of fascia that extends from the pelvis down along the outside of the thigh to below the knee, attaching on the outside of the lower leg bone (the tibia). The IT band functions to stabilize the thigh bone and knee during the weight-bearing “stance” phase of the running gait and helps guide the lower leg as it swings forward through the air in the “swing” phase.
Just before foot strike, the IT band slides over a bony prominence on the outside of the knee called the lateral epicondyle. An internal structure called a bursa (a fluid-filled sac that looks like a blister) prevents friction between the bony prominence and the IT band.
HOW YOU FEEL THE PAIN
Iliotibial band problems can occur at one end or the other: at the top, where it originates on the lateral side of the pelvis, or more commonly at the lower end, at the site of the bursa on the outside of the knee.
This lower IT band pain tends to appear suddenly on a run, and it often becomes so severe, you have to limp or stop the workout and walk home. Although it does not represent a high degree of damage to the bursa or the IT band itself, it can be one of the most painful conditions runners suffer. If you ignore the pain and continue to run, the pain will progress to daily activities such as stair climbing, squatting, and pivoting.
At the top of the IT band, where it attaches to the outside of the pelvis bone (the ilium) and the surrounding muscles, the pain can come on more gradually. Although less intense up there, it can be equally persistent.
Pain in either the top or the bottom of the IT band should not be ignored. The problem can be very stubborn and difficult to resolve if you run through the pain for weeks or months.
DIFFERENTIAL DIAGNOSIS
Lateral knee pain can also represent a tendonitis of the popliteus muscle, which often accompanies IT band syndrome or can exist in isolation. Pain here can also be from a torn lateral meniscus, the cartilage disc between the thigh bone (femur) and the shin bone (tibia).
To determine whether your lateral knee pain involves the popliteus muscle-tendon complex, try to determine whether the pain is worse during downhill running, the telltale sign of a popliteus tendonitis. Also, if you feel pain and tightness at the very top of the calf on the outside edge, it may implicate this muscle as the injured structure. Symptoms of a lateral meniscus tear include clicking, locking, and buckling.
If you receive an injection for the IT band, and it does not reduce the pain even temporarily, then consider these possible diagnoses and seek treatment from an experienced physical therapist. Rehab for these conditions is beyond the scope of a self-help injury guide like this.
However, if your pain is at the top end of the IT band along the outside edge of the pelvis, which usually begins more gradually as a subtle ache that is worse at the end of the run and after longer runs, a do-it-yourself rehab, as outlined in the matrix (see pages 194–195), will most likely work to alleviate the pain.
HOW THE INJURY HAPPENS
If the lateral knee pain is symmetrical (i.e., it occurs bilaterally at the outside of both knees), it may be because you are somewhat bowlegged (technically, genu varum; see alignment evaluation on page 101). Bowleggedness places more stress on the IT bands, which have less clearance to slide past the bony prominence on the outside of a knee called the lateral epicondyle. Likewise, if the IT bands are tight, the bursa can easily become inflamed.
The most common cause of IT band syndrome is overpronation of the foot. When the foot overpronates, it causes excessive internal rotation of the lower leg bone late in the stance phase, which alters the angle of pull of the IT band and irritates the bursa. If the IT band pain is unilateral (i.e., only on one side), it might be that one foot is pronating more than the other as an adaptation for a long leg on that side (see page 99 regarding leg-length discrepancies). With overpronation, the arch on that foot will collapse, essentially shortening the leg to lower that side of the pelvis and even up the leg-length inequality, which will keep the spine straight and the head level.
Since the lower end of the IT band moves back and forth when the knee bends and straightens with every step, and it hinges from its upper attachment at the pelvis, any deviation in alignment of the pelvis has the potential to change the angle or pull an IT band and create friction at the bursa as well. For instance, if there’s any asymmetry between the two large ilium bones that make up the right and left side of the pelvis, it will alter the angle at which the band glides across the prominence at the outside of the knee and irritate the bursa.
Over time, the bursa becomes inflamed and swollen and causes even more impingement between the IT band and the lateral epicondyle. The pain is severe enough that it typically limits running before it can cause significant damage to the bursa or the IT band itself. However, if you respond to the pain by altering your gait in an effort to limit the pain, you are likely to cause excessive stress on other structures and cause additional, potentially more damaging injuries.
REHABILITATION PLAN
The primary approach to all IT band syndromes is to limit the amount of pronation in the foot when you run. And the best way to limit pronation is to increase your cadence or stride frequency—that is, take more steps per minute.
Shorter, faster steps not only position your leg to land more efficiently under your center of gravity (see proper running mechanics in chapter 2), but more steps per minute translates to less time your foot spends on the ground each step. This reduces the time your foot has to pronate and limits the degree of pronation.
To limit excessive pronation related to a functional leg-length discrepancy, correct the pelvic asymmetry with the stretching and strengthening program in chapters 7 and 8. In the case of a structural leg-length problem (one leg longer than the other), use a shoe lift.
In addition to using stretching and strengthening to address long-leg mechanical deviations, use the foam roller to break up muscular adhesions, mobilize scar tissue, and help correct the dysfunctional mechanics.
If an increased cadence and leg-length correction do not alleviate the pain, then a more stable shoe with motion control and/or wearing orthotic devices in your shoes may be necessary.
Start by using the information in chapter 6 to assess your flexibility and alignment and determine whether you have a leg-length discrepancy. Then follow the rehabilitation strategies outlined in the rehabilitation grid on pages 194–195 to correct deficiencies and resolve the pain.
LEVEL 4 • Pain outside of the knee with flat walking and squatting. • Severe pain with running. | |
LENGTH OF ACTIVE REHAB IN EACH LEVEL | 2 weeks, then move to Level 3 rehab. |
ACTIVITY ALLOWED | • No running for 6 weeks, then begin Walk/Run Protocol (page 166). • Stationary bike or elliptical (if not painful). Do 15–30 minutes every other day with stretching. |
FOLLOW PRICE (PROTECT, REST, ICE, COMPRESSION, ELEVATE) | P: Get new shoes if you’ve run 200 miles or if you have switched to a new model of shoe recently. |
STATIC STRETCHING | • All lower body stretches in chapter 7 (page 113), 3x/day from this day forward. • Follow Foam Roller Protocol for all lower-body muscles (page 173). |
LIGHT RESISTANCE | Runner’s Dozen Strength Exercises (page 150). Do 3x/week. Exceptions: no squats and no bend and reach exercises. |
WEIGHTED EXERCISE | No lower-body weight training. |
WALK/RUN | • No running for 6 weeks, then begin Walk/Run Protocol. • No walking for exercise. |
LEVEL OF PAIN AND DYSFUNCTION | LEVEL 3 • Pain outside of knee with running and walking up or down hills or stairs, especially after running. • Pain squatting. |
LENGTH OF ACTIVE REHAB IN EACH LEVEL | 2 weeks, then move to Level 2 rehab. |
ACTIVITY ALLOWED | • No running for 4 weeks, then begin Walk/Run Protocol (page 166). • 30 minutes of stationary bike or elliptical (if not painful) every other day. |
FOLLOW PRICE (PROTECT, REST, ICE, COMPRESSION, ELEVATE) | P: Get new shoes if you’ve run 200 miles or switched to a new model of shoe recently. |
STATIC STRETCHING | • All lower body stretches in chapter 7 (page 113), 3x/day from this day forward. • Follow Foam Roller Protocol for all lower-body muscles (page 173). |
LIGHT RESISTANCE | Runner’s Dozen Strength Exercises (page 150). Do 3x/week. Exceptions: no squats and no bend and reach exercises. |
WEIGHTED EXERCISE | No lower-body weight training. |
WALK/RUN | • No running for 4 weeks, then begin Walk/Run Protocol. • No walking for exercise. |
LEVEL OF PAIN AND DYSFUNCTION | LEVEL 2 |
LENGTH OF ACTIVE REHAB IN EACH LEVEL | 2 weeks, then move to Level 1 rehab. |
ACTIVITY ALLOWED | • No running for 2 weeks, then begin Walk/Run Protocol (page 166). • 30 minutes of walking 3x/week. • Stationary bike or elliptical (if not painful) every other day (for 30–60 minutes). |
FOLLOW PRICE (PROTECT, REST, ICE, COMPRESSION, ELEVATE) | P: Get new shoes if you’ve run 200 miles or have switched to a new model of shoe recently. |
STATIC STRETCHING | • All lower body stretches in chapter 7 (page 113), 3x/day from this day forward. • Follow Foam Roller Protocol for all lower-body muscles (page 173). |
LIGHT RESISTANCE | Runner’s Dozen Strength Exercises (page 150). Do 3x/week. Exceptions: no squats and no bend and reach exercises. |
WEIGHTED EXERCISE | Single-legged hamstring curl machine, seated or prone, 2 sets of 20 reps 3x/week using light weights. |
WALK/RUN | Flat walking for 20 to 30 minutes 2x to 3x/week, then begin Walk/Run Protocol. |
LEVEL OF PAIN AND DYSFUNCTION | LEVEL 1 • Pain after flat running. • Pain during or after running hills and speed work. |
LENGTH OF ACTIVE REHAB IN EACH LEVEL | 2 weeks of rehab and reduced running. |
ACTIVITY ALLOWED | Reduce mileage by half. No speed work or hills. |
FOLLOW PRICE (PROTECT, REST, ICE, COMPRESSION, ELEVATE) | P: Get new shoes if you’ve run 200 miles or switched to a new model of shoe recently. |
STATIC STRETCHING | • All lower body stretches in chapter 7 (page 113), 3x/day from this day forward. Always stretch before and after every workout. • Follow Foam Roller Protocol for all lower-body muscles (page 173). |
LIGHT RESISTANCE | Runner’s Dozen Strength Exercises (page 150). Do 3x/week and continue for at least 6 weeks until you are back to full pre-injury running. |
WEIGHTED EXERCISE | Single-legged hamstring curl machine, seated or prone, 2 sets of 20 reps 3x/week using light weights. |
WALK/RUN | • After 2 weeks of rehab, begin to build mileage by 10% to 15% per week. • No speed work or hills. |
Hamstring Injuries: Anatomy and Function of the Hamstring
Strains of the hamstring, the group of three muscles on the backside of the thigh, are so prevalent among Olympic sprinters, hurdlers, and jumpers that having a reputation for being able to treat and prevent them can make a PT a rehab rock star. But the irony is that hamstring strains are not all that difficult to rehabilitate and prevent. The key is to pinpoint the precise location of the damaged tissue, reduce inflammation and scar tissue, and restrengthen the muscle.
First, an anatomy lesson: From the top, the three hamstring muscles (from medial to lateral: the semimembranosus, semitendonosis, and biceps femoris) all attach, via a common tendon, at the ischial tuberosity, the bony prominence at the base of the pelvic bone that is the contact point when we sit. At the bottom, they insert on the backside of the lower leg bone (tibia) just below the knee joint. Because the muscles of the hamstrings cross both the hip and knee joints, they are known as two-joint muscles.
During running, the lower part of the hamstring works in a lengthening (eccentric) contraction at the knee joint to slow down the rate at which the lower leg swings through the air before it hits the ground. At the hip, the upper part of the hamstring initially works eccentrically to limit the degree that the hip joint flexes after foot strike, which helps to slow the speed that your center of gravity drops when your foot touches the ground. Milliseconds later, as the body moves over the foot (which is still on the ground), the hamstring muscles switch function to being active in the shortening (concentric) contraction that extends the hip joint and catapults your body weight forward over the stationary stance leg. The hamstrings, along with the glutes, are the prime movers in steady-state running on flat surfaces, because they are responsible for keeping your center of gravity moving forward. In uphill running and sprinting, they’re even more active.
Hamstrings get hurt when you mistreat them in the normal way: You do too much too fast.
HOW YOU FEEL THE PAIN
Because the pain from hamstring injuries appears in different areas in the back of the leg from the glutes to behind the knee, self-diagnosis is difficult. Many runners will experience pain in the upper end of the hamstring very close to its origin at the pelvis and think they’ve torn the upper attachment off the bone. However, as strong as this muscle group is, it is rare that its tendon is pulled off the bone. Instead, the muscle strain is usually found about 2 to 4 inches (5 to 10 cm) below the pain itself. The difficulty in localizing the exact site of hamstring strains is further illustrated by how often a runner will come in for physical therapy evaluation complaining of a hard-to-locate pain behind the knee. After ruling out knee pathology, the pain is invariably found anywhere in a region from the midbelly of the hamstring to 4 to 6 inches (10 to 15 cm) above the knee even though the pain is experienced lower in the back of the knee.
To further complicate the hamstring pain picture, be aware that certain pain originating in the buttocks can appear in the hamstring and magnify hamstring pain. This odd effect appears when bursa, fluid-filled sacs that stop friction between the gluteus maximus and the sit bone, become inflamed and radiate pain and tightness into the neighborhood of the hamstrings. This condition, called ischial-gluteal bursitis, is felt as pain during sitting on both hard and soft surfaces, such as on a bench, or in stadium stands, and is typically much worse while sitting in the car. It is almost always associated with hamstring strains, but may exist in isolation, too.
If you are experiencing the pain while sitting, and it’s worst when in the car, you most likely have IG bursitis. The bursitis needs to be resolved or the hamstring injury will not resolve. That’s because the pain from the bursa will keep the hamstring tight. Twice-a-day stretching and icing should resolve the buttock pain. If it doesn’t, see a PT who is experienced with running injuries. Also note that with hamstring strains, we do not stretch the hamstring because the scar tissue tightens on itself, like one of those Chinese finger handcuffs that tighten around your fingers when you pull the two ends apart from one another.
DIFFERENTIAL DIAGNOSIS
At least two other painful ailments can mimic a hamstring muscle strain–a compressed nerve root in the lower back (lumbar spine) and a spasm of the piriformis muscle deep in the buttock.
The piriformis is one of six “deep rotators” of the hip joint that act mostly as stabilizers during running. When a leg-length discrepancy causes a functional asymmetry, the deep rotators will often let you know it with a painful spasm that will mimic a hamstring strain. Each of these diagnoses must be ruled out by an experienced physical therapist before an isolated hamstring injury is identified and resolved.
HOW THE HAMSTRINGS GET INJURED
As the motor that powers running, hamstrings are subject to both traumatic and overuse injuries. They are highly susceptible to fatigue and a subsequent breakdown of normal function, especially because they function differently at two attachment points: the hip and the knee joint.
Overuse hamstring injuries occur from fatigue accumulated during too-long or too-hard workouts. Fatigue interferes with the hamstrings’ smooth transition from a lengthening contraction to a shortening contraction, resulting in muscle-fiber and connective tissue damage, collectively known as micro-trauma. Over time, as the scar tissue that tries to repair the damage of this micro-trauma is torn and re-scarred again and again, it turns into macro-trauma, an excessive, dysfunctional scar that prevents the muscle fibers from contracting normally. Muscle fibers need to shorten and spread apart to operate normally, but the macro-scar tissue prevents this, resulting in muscle weakness that decreases performance and causes an acute strain.
As the scarred tissue accumulates, the muscle gets tighter and weaker and a dull ache will appear during or after a workout. You will lose your ability to stretch; attempts to do so only increase the muscle tightness. It turns out that the scar tissue matrix acts just like the previously mentioned Chinese finger handcuffs. This is one of the few injuries that we don’t stretch in rehab–at least not until the scar tissue is resolved.
Traumatic hamstring injury is caused from overloading the hamstring and tearing a significant number of fibers all at once. The pain can be sudden and severe. Muscle strains are graded I, II, and III to indicate their severity:
A Grade I strain is caused when a limited number of fibers are disrupted. You may feel soreness after a workout and/or stiffness when you stretch. If left untreated, a Grade I strain will progress to a Grade II, which involves a more significant portion of the muscle fibers and even more pain, and a limp home. In some instances, the damage also involves the fascia, a connective tissue sheath that wraps around the muscle belly. The acute pain of Grade II strains will make walking and performing daily activities difficult for up to 10 days or even weeks. Also, black, blue, and sometimes yellow bruising may appear farther down the thigh from the injury site 3 to 7 days postinjury as it drains through the superficial tissues.
Grade III strains involve a complete rupture of the muscle or tendon and are rare. You’ll know them by an inability to contract the hamstring or walk without pain.
REHABILITATION PROGRAM
Whether you have suffered an acute traumatic muscle strain or an overuse injury, the rehab program is similar. Only the timing is different. In both instances, the inflammation must be addressed and the scar tissue has to be broken up. Finally, the muscle has to be rehabilitated to full flexibility, strength, and endurance before sport-specific workouts can begin.
In traumatic injuries the inflammation is more significant, but the focus of the first week of PRICE rehab and gentle range-of-motion exercises will begin to move the injury in the right direction. For elite athletes with an imminent competition, we will begin treating the scar tissue with cross-fiber friction massage quite early–48 to 72 hours after the injury. Cross-fiber massage is the single most important manual therapy technique used in our approach to sports injuries. This treatment involves the use of specific massage strokes applied in a direction perpendicular to the tendon or muscle fibers to disrupt the scarring that develops between fibers and prevents normal function.
To fight the lingering inflammation from the injury and limit further inflammation created with the cross-fiber massage, liberal icing and the use of ultrasound and electrical stimulation play an important role. For the recreational runner, the urgency to address the scar tissue before 72 hours is not an issue, so the PRICE acronym should guide the early phase of the rehabilitation process.
Once the acute pain and inflammation have subsided, the rehab programs for traumatic and overuse hamstring injuries proceed on the same path. In addition to cross-fiber friction massage, we instruct the injured runner to address the scar tissue with use of the foam roller and ice to control both the initial inflammation and the subsequent inflammation created by breaking up the scar tissue. To break up the scar tissue, begin by using the foam roller in the standard manner with vertical strokes from the bottom of the muscle all the way to the top, and then go back to the most tender spot; gently move your leg back and forth sideways on the roller to mimic the cross-fiber friction massage we use in the clinic. You want to apply enough downward pressure to spread the muscle fibers apart and break up the scar tissue adhesions between the fiber.
Compression, via a wrap of self-grip tape (found in most pharmacy chain stores) or a neoprene high sleeve, not only helps resolve swelling but will support the damaged tissue and reduce pain. Light resistance exercises begin only if they can be performed without pain. Unlike rehab programs for almost all other injuries, we do not begin to stretch an injured hamstring until the scar tissue is resolved.
Once the scar tissue is cleared up, the rehabilitation program is directed at regaining full strength, flexibility, and endurance. Cross-training that can be performed without pain is introduced as tolerated to maintain fitness as the muscle is restrengthened with a progressive resistive exercise program. Only after full strength and flexibility are regained can sport-specific workouts resume.
At first, workouts consist of walking alone. They then progress to alternating between a walk and a run as you ease back into training (see pages 200–201). Mileage is increased by no more than 10 percent per week. Continue icing until you are back for full training and use the foam roller to continue to fight scar tissue, improve flexibility, and prevent re-injury.
• Limping and/or pain with walking, especially after running. • Pain at rest, e.g., sitting, standing, and in bed. • Pain with running. | |
LENGTH OF ACTIVE REHAB IN EACH LEVEL | 2 weeks, then move to Level 3 rehab. |
ACTIVITY ALLOWED | • No running for 6 weeks, then begin Walk/Run Protocol (page 166). • 15 to 30 minutes of deep-water running or stationary cycling (if not painful), 3x/week. |
FOLLOW PRICE (PROTECT, REST, ICE, COMPRESSION, ELEVATE) | P: Compress with self-grip tape or properly fit thigh sleeve. |
STATIC STRETCHING | All lower-body stretches in chapter 7 (page 113), except Standing Hamstring Stretch. Do 3x/day. |
LIGHT RESISTANCE | Runner’s Dozen strength exercises (page 150) 3x/week. Exception: no squats or bend and reach exercises. |
WEIGHTED EXERCISE | No lower-body weight training in the gym. |
WALK/RUN | • No running for 6 weeks, then begin Walk/Run Protocol. • No walking for exercise. |
LEVEL OF PAIN AND DYSFUNCTION | LEVEL 3 • Pain and/or tightness with walking, especially after running. • Pain with running. |
LENGTH OF ACTIVE REHAB IN EACH LEVEL | 2 weeks, then move to Level 2 rehab. |
ACTIVITY ALLOWED | • No running for 4 weeks, then begin Walk/Run Protocol (page 166). • 30 minutes of deep-water running, stationary bike, or elliptical machine every other day for 10 minutes/week. |
FOLLOW PRICE (PROTECT, REST, ICE, COMPRESSION, ELEVATE) | P: Compress with self-grip tape or properly fit thigh sleeve. |
STATIC STRETCHING | • All lower-body stretches in chapter 7 (page 113). Do 2x to 3x/day. • Foam roller all lower-body muscles (page 172). Do once or twice a day. |
LIGHT RESISTANCE | Runner’s Dozen strength exercises (page 150) 3x/week. Exception: no squats or bend and reach exercises. |
WEIGHTED EXERCISE | No lower-body weight training in the gym. |
WALK/RUN | • No running for 4 weeks, then begin Walk/Run Protocol. • No walking for exercise. |
LEVEL OF PAIN AND DYSFUNCTION | LEVEL 2 • Pain and/or excessive tightness during or after running. • Stretching increases tightness. |
LENGTH OF ACTIVE REHAB IN EACH LEVEL | 2 weeks, then move to Level 1 rehab. |
ACTIVITY ALLOWED | • No running for 2 weeks. • 30 minutes of deep-water running, stationary bike, or elliptical machine every other day for 10 minutes/week. |
FOLLOW PRICE (PROTECT, REST, ICE, COMPRESSION, ELEVATE) | P: Compress with self-grip tape or properly fit thigh sleeve. |
STATIC STRETCHING | • All lower-body stretches in chapter 7 (page 113), 3x/day. • Foam roller all lower-body muscles (page 172), once or twice a day. |
LIGHT RESISTANCE | Runner’s Dozen strength exercises (page 150) 3x/week. Exception: no squats or bend and reach exercises. |
WEIGHTED EXERCISE | Single-legged hamstring curl machine, seated or prone, for 2 sets of 20 reps 3x/week, increase weight as tolerated. |
WALK/RUN | Flat walking 20 to 30 minutes 2x to 3x/week, then begin Walk/Run Protocol. |
LEVEL OF PAIN AND DYSFUNCTION | LEVEL 1 |
LENGTH OF ACTIVE REHAB IN EACH LEVEL | 3 weeks of rehab and reduced mileage. |
ACTIVITY ALLOWED | • Continue cross-training. • Flat, non-accelatory running only. No speed work or hills. • Cut daily mileage by half. |
FOLLOW PRICE (PROTECT, REST, ICE, COMPRESSION, ELEVATE) | P: Compress with self-grip tape or properly fit thigh sleeve. |
STATIC STRETCHING | • All lower-body stretches in chapter 7 (page 113), 3x/day. • Foam roller all lower-body muscles, once or twice a day. Also, continue Foam Roller Protocol (page 172). |
LIGHT RESISTANCE | Runner’s Dozen strength exercises (page 150) 3x/week for at least 6 weeks after you are back to full pre-injury running mileage. |
WEIGHTED EXERCISE | Single-legged hamstring curl machine, seated or prone, for 2 sets of 20 reps 3x/week, increase weight as tolerated. |
WALK/RUN | • After 2 weeks of rehab begin to build mileage by 10% to 15% each week. • No speed work or hills. |