
Chapter 10. Building penetration test labs
Information in this chapter
• Objectives
• Approach
• Core Technologies
• Open Source Tools
• Case Study: The Tools in Action
• Hands-On Challenge
As the preceding chapters discussed, numerous options are available for learning the ins and outs of penetration testing. However, when it comes to targets with which to practice penetration testing safely and legally, the only real option is to create a penetration test lab. This chapter focuses on the four steps for setting up such a lab: determine your objectives, design the architecture, build the lab, and run the lab. Next, it discusses virtualization technology, explaining how a hypervisor interacts with the physical hardware used for the virtual machine host, and discussing virtual machine architecture and its pros and cons. The chapter also covers some open source virtualization software available today, as well as a commercial package for simulating network devices, and it looks at how virtual machines can communicate using a virtual network without contaminating the real network. A topically relevant case study and hands-on challenge complete the chapter.
Many tools are available for learning how to do penetration testing; however, few targets are available with which to practice penetration testing safely and legally. Many people learned penetration tactics by attacking live systems on the Internet. Although this might provide a wealth of opportunities and targets, it is also highly illegal. Many people have gone to jail or paid huge amounts of money in fines and restitution, all for hacking Internet sites.
The only real option available to those who want to learn penetration testing legally is to create a penetration test lab. For many people, especially those new to networking, this can be a daunting task. Moreover, there is the added difficulty of creating real-world scenarios to practice against, especially for those who do not know what a real-world scenario might look like. These obstacles often are daunting enough to discourage many from learning how to perform penetration testing.
This chapter will discuss how to set up different penetration test labs, as well as provide scenarios that mimic the real world, giving you the opportunity to learn (or improve) the skills that professional penetration testers use. By the end of the chapter, you will have hands-on experience performing penetration tests on real servers. This chapter is intended for beginners, experts, and even management, so do not hesitate to dig into this topic and try your hand at creating a penetration test lab and practicing your penetration testing skills. Only through practice can someone improve his or her skills.
10.1. Objectives
When considering your penetration test lab configuration, you must focus on exactly what your objective is. Do you intend to practice a specific skill or do you need to replicate a client environment so that you can practice testing it before going to the client site? Perhaps there is an enterprise application that you'd like to focus on to find new vulnerabilities or a great idea for a new technique you'd like to try out. Whatever your individual needs are, you need to make sure that those are laid out first and foremost before beginning the build of your penetration testing lab.
When determining your objective, make sure to include all facets of the work that you may need to accomplish. For example, if you plan on testing an enterprise application, make sure that your lab supports the full architecture of the application. If you're trying to test a specific tier of a multi-tier enterprise application, it doesn't necessarily make sense to put the entire application on a single lab system. You may be tempted to take advantage of an RDBMS vulnerability to compromise the application server whereas this may not be a feasible scenario in the real world.
Make sure to consider the security of your lab environment as well. We'll discuss this more in the Approach section of this chapter, but it is very important to keep safety as an objective up front. Always make sure that your test lab cannot contaminate a “real” system or be leveraged to attack a real system. If you accidently connect a known, vulnerable lab system to both the Internet and your personal or corporate network, you could end up with some real problems.
10.2. Approach
The general approach for setting up a penetration test lab is to determine your objectives, design the architecture, build the lab, and run the lab. These four steps will position you to have a functional and useful penetration test lab where you can test out the systems, tools, and techniques necessary to achieve your defined objectives.
We've already talked about setting your penetration test lab objectives so we won't go over that again. It is important to note that proper definition of your objectives will go a long way toward ensuring that your penetration test lab will do what you need. It doesn't help much to build out a very complex lab architecture with multiple servers and workstations on a complex wired network if all you're testing is wireless attack scenarios.
10.2.1. Designing your lab
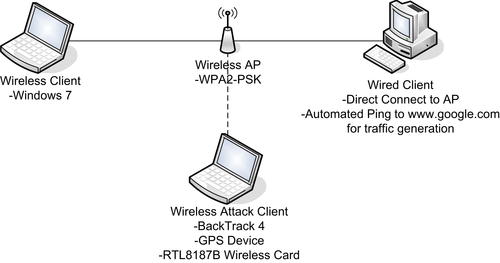
The next critical aspect of building a penetration testing lab is to design it. Your design should reflect your objectives very closely and include all elements necessary to meet those objectives. Going back to our example of building a lab to test wireless attacks, you would want to make sure that your design includes the following elements:
• A wireless access point
• A wireless client machine
• A wired client machine
• A wireless attack machine
This set of systems would give you a wireless access point to test, a wireless client to perform deauthentication attacks against, a wired client to generate traffic in order to try clientless WEP cracking, and a system to perform all of your testing with.
After these basic elements are defined, you'll need to start digging into the details on how they'll be built. Which operating system do you want to use for each? Is there a specific brand of access point that you want to test? Do you need the wired client to just sit on the network or do you need it to generate a specific amount of traffic to simulate real network activity? Should any of the machines be virtual machines (VMs)? What kind of wireless card do you need for the attacking machine to ensure that packet injection is supported?
When creating your penetration lab design, make sure that you can answer all of these questions as well as any that are specific to your objectives. Before you go to build the lab, you need to ensure that you have a pretty good idea of how it should be designed and configured. This will save you a lot of time later on when you realize that you have exactly what you need instead of having to rebuild systems because you didn't consider certain aspects of your testing.
As a final step, make sure that you document your design as well as any assumptions that went into the design. This is important, not only as a reference for you later, but also something potentially valuable for your clients. For example, if, after successfully replicating their environment, you are able to quickly go on-site to the client's facility and successfully exploit their system, they may be interested in using your lab design in-house to perform their own basic testing in the future. If you have your design documented, you can quickly put that together for them as a (potentially billable) service.
An example architecture diagram for a wireless penetration testing lab is shown in Fig. 10.1. This design represents the scenario of a basic wireless test lab with appropriate client machines and the network requirements.
10.2.1.1. Safety first
One of the biggest mistakes people make when developing a lab is that they use systems connected to the Internet or their corporate intranet. This is a
bad idea. A lot of what occurs during a penetration test can be harmful to networks and systems if the test is performed improperly. It is never a good thing to have to explain to upper management that you were responsible for shutting down the entire network, cutting them off from revenue, and negatively affecting their public image with their customers. Also, if you are developing a lab at home that is connected to the Internet and something leaks out, those ultimately affected by the leak (and their lawyers) might want to discuss a few things with you.
To illustrate this point, consider Robert Tappan Morris, who was a student at Cornell University in 1988 (he's now an associate professor at MIT). Morris released what is now considered to be the first worm on the Internet (which was still pretty small at the time, at least by today's standards). He created the worm to try to discover how large the Internet was at the time and he has stated that his intentions were not malicious. However, the worm jumped from system to system, copying itself multiple times, and each copy tried to spread itself to other systems on the Internet. This produced a denial-of-service attack against the entire Internet, with total estimated damage somewhere between $10 million and $100 million depending on who you ask.
Morris was tried in a court of law, and was convicted of violating the 1986 Computer Fraud and Abuse Act. He ended up performing 400
h of community service, paid more than $10,000 in fines, and was given a three-year probated sentence. After the impact of Morris's worm was fully understood, Michael Rabin (whose work in randomization inspired Morris to write the code in the first place) commented that Morris should have tried out his code in a simulated environment first so that he could better understand its impact.
Morris is not the only person unintentionally guilty of harming systems on the Internet, but he has the fame for being the first. The moral of his story is that you should be extremely safe and paranoid when dealing with anything even possibly hazardous to a network even if you think it is benign.
10.2.1.1.1. Isolating the network
Because penetration testing can be a dangerous activity, it is imperative that a penetration test lab be completely isolated from any other network. This produces some problems, such as having no Internet connection to look up vulnerability and exploit information or to download patches, applications, and tools. However, to guarantee that nothing in your network leaks out, you must take every precaution to make sure your network does not communicate with any other network.
Admittedly, this becomes problematic when your network contains wireless appliances. In most cases, penetration testing is conducted over wired connections, but on occasion wireless networks are valid penetration testing targets. This presents a difficult question: How do you isolate a penetration test lab with wireless access from other networks? The answer: You do not; it is not necessary.
To explain what that means, we'll talk a bit about the objective of hacking a wireless access point. In a real penetration test involving a wireless network (or any network, for that matter), first the penetration test team needs to gain access to the network. It doesn't matter whether that connection is via the wireless portion of the network or a plug in the wall. All that matters is that access is established. Once the network access is accomplished, the penetration testers move on to selecting targets using techniques that work over either wireless or wired networks (it does not matter which).
So, back to the question of how you isolate a penetration test lab with wireless access: You should have two separate labs: a wireless lab where you only practice breaking into the wireless access point, and a separate lab where you conduct your system attacks. Once you feel confident you can break into the network over the wireless lab, you should move over to the wired penetration test lab and give yourself the same access to that network as what you would have by penetrating the wireless access point. That way, all future attacks are isolated and are not exposing other networks to your efforts. In addition, your activities cannot be monitored, which is not necessarily the case over a wireless network.
In situations in which multiple wireless access points are in the vicinity of your wireless lab, you must be extremely careful that you attack only your lab and no other wireless network. After scanning for wireless networks, make absolutely certain that any cracking against the access point is really performed against your intended target. It is sometimes extremely easy, especially with automated tools, to target and test an unintended target. This can have very negative consequences.
Epic Fail
A scenario occurred where a security researcher set up a wireless lab at his home which is located near a police station. It turned out that the local police department had the same wireless configuration he had intended to use for testing purposes. After further reviewing the discovered networks, he noted that the police department set up their wireless access point with no encryption. Needless to say, if he had simply started some automated tools and started to hack away, he might have been hacking an access point owned by the police. It is unlikely that they would have taken kindly to his activities.
The good thing about wireless attacks is that the standard practice is to pinpoint your attacks against one access point using the Media Access Control (MAC) address unique to your lab's wireless access point. As long as you are careful, there should be no problem. However, if this is not acceptable, it is possible to shield a room from leaking out radio waves (which we will not cover in this chapter). If you or your employer decides it is important enough to do, you can create a completely isolated wireless network with enough effort and funding. Whatever you do, just understand that you will be dealing with viruses, worms, and more, which can quickly bring any network to its knees.
10.2.1.1.2. Concealing the network configuration
Just as you do with any other network, you have to secure the penetration test lab from all unauthorized access. There actually seems to be some resistance to this thought, mostly because additional physical access controls cost money. Nevertheless, you must remember that lab activities are very sensitive in nature, and the configuration information of the penetration test lab network is valuable in the wrong hands. Because the penetration test lab should mimic the customer's network as closely as possible, getting access to the penetration test lab is almost as valuable as gaining access to the production network.
Some of the things a malicious user would like to know are the IP addresses of machines, operating system versions, patch versions, configuration files, login files, startup scripts, and more. Even the data from a penetration test lab could be valuable to people trying to attack your client because you often need to use the same IP addresses as the customer. Some custom applications can sometimes be hard-coded with IP addresses for communication reasons which won't work correctly unless you use the customer's IP addresses. With this type of information in hand, a malicious user can build a better picture of what the production network is like, and what possible vulnerabilities exist.
Even though a penetration test is isolated, you must assume that just like any other network, someone (usually other employees not assigned to the penetration test team) will eventually try to break into it. In fact, most companies have at least one insider attack each year, meaning that chances are someone in your company or your client's company will violate the law and try to gather information he or she is not allowed access to. If this is information regarding a penetration test customer, your company (and those individuals on the penetration test team) could be exposed to legal action. Therefore, it becomes very important to follow security best practices. Penetration testers should be paranoid and expect mischief from all directions, even those internal to their company.
This type of threat does not always end up being malicious. Sometimes it is simple over exuberance on the part of employees. An example of this would be performing a software stress test. The point of the test could be to see if the software quit working when too much traffic was thrown at it. Assume, however, that during the test an exploitable bug was found. Naturally, the software engineers would be excited because it was something new for them to watch and learn. But what would the impact be if they accidently shared this information with one of the company's clients before a patch is developed?
In some cases, you cannot prevent information regarding the penetration lab from being disclosed. The casual observer will probably be able to read the appliance label on a device; logos such as those for Cisco and Sun are easy to identify. This means things such as router and firewall types are difficult to conceal, unless the lab is located in a secure room with no windows.
But for servers, it is easier to hide what is loaded on the inside. A person cannot tell whether you are using IIS or Apache strictly by looking at the server, unless you leave the install disks lying around the lab for all to see. This leads into another security practice most people ignore: proper storage of software.
10.2.1.1.3. Securing install disks
In a penetration test lab, you will use many different types of operating systems and software applications. It is important to store these disks in a secure manner, for two reasons. First, disks grow invisible legs and tend to walk out of your lab (intentionally or not). Second, you have to ensure the integrity of the disks you work with.
With regard to install disks “walking out,” anyone who has had to support a network finds himself short of disks. Sometimes it is because people borrow them, or sometimes the network administrators forget and leave disks in CD trays. You can prevent this by enforcing detailed procedures. However, the issue of install disk integrity is a more serious matter. Some operating system and patch disks are delivered through well-defined and secure channels (e.g., the Microsoft MSDN subscription will mail updates). However, more often than not, patches and updates are downloaded over the Internet. How does a person who downloads software over the Internet know that what he is downloading is a true copy of the file, and not corrupted or maliciously altered? Through hashes.
Although few people do this, all applications and software downloaded for use in a penetration test lab should be verified using a hash function. The most popular is MD5, and for those security-conscious people and companies that provide downloads, a published MD5 value is usually associated with each download. Once the pen-test team has downloaded a file, they must verify that they have a true copy of the file by conducting an MD5 hash against it, and comparing it to the file author's published value. Then they should record the value somewhere for future reference, such as a binder stored in a safe.
You should run MD5 hashes against the install disks regularly, especially before you use them in the pen-test lab. This assures the penetration test team that they are using a true copy of the file. Verifying the hash can often provide defense against someone using the wrong version of the intended application. By comparing the MD5 hash of an application against a printed list, you will quickly know whether you have the wrong disk or file. This extra validation is a valuable safeguard against innocent mistakes that can ruin weeks' worth of work, if the wrong software is used by accident. Explaining to a boss that you have to repeat a two-week penetration test effort because you used a wrong software version can have a nasty result, especially during your next performance review.
Warning
Be aware that the same program can have different hash values, depending on the operating system. An MD5 hash in one Linux distribution might be different in another distribution, resulting in a false positive. It is important to keep track of which distro you are using when you record the hash.
10.2.1.1.4. Transferring data
Once you have completely isolated your lab network from other networks, you need to design a safe way to bring data into the network. If you need to bring any patches, code, or files onto the lab network, you must do so in a manner that prohibits any data on the lab network from escaping.
Imagine the following scenario; you recently attempted to break into a target using a virus that conducts a buffer overflow attack. Let's also pretend that once successful, the virus tries to find other vulnerable systems on the network to spread itself. However, you did not realize that this virus, when successful, also attempts to replicate itself through USB devices by dropping itself on the device and modifying the autorun file.
Now imagine you are trying to upgrade the server using a thumb drive, which immediately becomes infected. You eject that thumb drive from the pen-test network, take it back to your non-lab Internet-connected work computer, and plug it in. The Autorun feature kicks off the virus, and the next thing you know, the IT department is calling you, asking you what you did to the network.
The only safe way to transfer data is to use read-only media such as CDs or DVDs. However, even these can be dangerous if you do not use them properly. One feature that is present with most CD and DVD writers is the ability to not close the disk when finished. This feature allows additional data to be copied to the disk later. Although there is no known virus or worm that copies itself to CD-ROM disks as a means of propagating itself, it's possible that someone will develop such a thing (remember, paranoia is a virtue in this field).
This means that you should close all CDs and DVDs after transferring the desired data to the disks and before moving them into the pen-test environment. In some cases, the amount of data being copied onto the disk is very small—perhaps just a few kilobytes—whereas a CD can hold 650–900
MB. This is a necessary expense, and it requires some additional planning before you create any CD. Try to anticipate additional files you might need, and add them to the disk as well.
10.2.1.1.5. Labeling
Nothing is more frustrating than picking up a non-labeled CD and trying to guess what might be on it. If that CD has malicious software on it and someone who is not on the penetration test team picks it up, the results could be a nightmare. What is worse is if computer systems or devices that you have been using in your lab are transferred temporarily to another group because they need the equipment for some reason. Whatever virus existed on that equipment just got a free ride to wreak havoc on a new and possibly defenseless network. That is where labeling comes in.
All media, appliances, systems, and devices that touch the pen-test lab must be labeled. In the case of hardware, this should be done with indelible ink, on stickers that are affixed. This does not mean sticky notes; it means something that will stay on the device until someone removes it intentionally, with great effort. Hopefully, these labels will make people think about the consequences of transferring hardware from one network to another without proper sanitization procedures.
As for media, once you have burned the data onto the CDs or DVDs, you should use a marker or printer to apply a label to the media. This should include detailed information regarding the contents, as well as a warning concerning the dangers of the contents.
In addition, you should make clear that the lab area is off-limits to unauthorized personnel. The best scenario is to have a separate room with locks to contain the lab, along with posted warnings regarding the nature of the lab.
10.2.1.1.6. Destruction and sanitization
Another critical topic when securing non-lab networks from exposure to hostile attacks is to have a firm and comprehensive plan in place to deal with all the extra CDs and DVDs floating around. In addition, eventually the equipment in your lab will be replaced or removed. The last thing you would want is to have someone plug an infected server into a production network without the server first being completely cleaned of any potential hazard.
In a lot of ways, proper disposal and sanitization of anything touching your lab is easier to grasp if you imagine that computer viruses and worms are biohazards, instead of just IT hazards. Just like in a doctor's office, you should have a trash receptacle labeled with a hazardous waste sticker in your lab, and you should shred (not just trash) the contents of the receptacle.
All CDs that touch any system on the pen-test lab should go straight to this designated trash bin as soon as they are no longer being used or needed. CDs should not sit in any disk trays, in case they are forgotten and accidentally used later. All hard drives and reusable media need to be properly degaussed before use outside the pen-test lab. In addition, a procedure should be in place to record what was done and how it was done for each piece of equipment removed from the lab network. The information recorded should include the device serial number, what method of sanitation was used, who sanitized the device, and who it was given to afterward. These records should be maintained in a secure area as well.
Although it may seem that this is excessive and bordering on the paranoid (which is encouraged in this job), if a production system gets infected later, whoever was responsible for that infection will be looking for a scapegoat. If the infected system uses a hard drive that came from the penetration test lab, fingers will quickly be pointed in that direction, deflecting responsibility from the real culprit. However, by having a record of how and when the drive was sanitized before moving into the production environment, the penetration test team can rightly avoid the blame.
Also, after each penetration test project, the lab should be completely sanitized. This means all drives should be formatted and all sectors overwritten with meaningless data. In fact, if the hard drives can be sanitized to Department of Defense standards per their publication 5220.22-M (available at http://www.dtic.mil/whs/directives/corres/pdf/522022m.pdf), all the better. Remember, the data on the drives is sensitive in nature, and the more cautionary your team is, the better. In addition, you do not want data or scripts from a previous penetration test project corrupting your new test environment.
10.2.1.1.7. Reports of findings
Penetration testing is not all fun. At the end of any test, you need to document all the findings. You must be careful to write, transport, and archive this information in a secure manner. All other security efforts are meaningless if a malicious person can acquire the final penetration test report with all the glaring deficiencies and exploitable vulnerabilities, summarized with pretty pictures and specific steps needed to bring the target network to its knees.
As a best practice, all computers need to have safeguards at least equal to the value of the data that resides on them. For the computer on which you write your report of findings, protections need to be in place to ensure that the report does not end up in the wrong hands. Your corporate policy should outline the minimum level of effort needed to secure your system. However, it is almost always acceptable to go beyond this minimum level. So, in cases where it does not seem that the corporate policy is sufficient, here are some suggestions that can improve your protection:
•
Encrypt the hard drive. Multiple products exist which can allow you to encrypt files, directories, and even the entire hard drive. However, understand that there is more than one way to decrypt the drive. Often computer encryption is controlled by the corporation, and they usually have a way to decrypt your computer as well. Key management is critical, and is hopefully in the hands of people as paranoid as penetration testers.
•
Lock hard drives in a safe. If you can remove hard drives from your work computer, putting them in a safe is a great way to protect them. In the event of physical disasters, such as fire or earthquakes, they may come out of the disaster unscathed (depending on the safe, of course). If your work computer is a laptop, just throw the whole thing in.
•
Store systems in a physically controlled room. If you can have your lab in a separate room with physical security present, all the better. In many larger organizations, the test labs are behind key-controlled doors. However, in many cases, the penetration test lab occupies space with servers from various departments. The problem is that people who have legitimate access to these other servers should probably not have physical access to the penetration test servers, because they might contain more sensitive data than other systems in the same room.
•
Perform penetration tests against your own systems. What better way to know whether your work systems are vulnerable to attack than to actually attack them yourself? Naturally, you need to make backups (and secure them properly) beforehand, and you need to perform sanitization procedures afterward. However, throw them into your lab and see whether you are exposing the “keys to the kingdom” for the world to see. Hopefully, you will not be surprised.
Epic Fail
Many organizations have had to deal with disasters such as the “Blaster” worm. One example company had been hit hard, and it took a long time to clean up the network. What was worse, though, was that they kept being infected at least once a month for almost a year, and neither the network nor the security team could figure how Blaster kept getting through their defenses. Later, it was unearthed that the production lab had created copies of various infected servers to use as images with Norton Ghost, which can be used to quickly restore a server. Although that was a great time saver for the lab team, every time they brought up a server using an infected ghost image, the network was hammered with the worm again.
10.2.1.1.8. Final word on safety
Often, during the course of a penetration test, exploitable vulnerabilities are discovered. These vulnerabilities might not have an immediate solution to prevent the exploit. This means if someone discovers that vulnerability, he just might have complete and unfettered access to the customer network, and all the data that resides on it. Lack of security of the penetration test lab can have a huge negative impact on the business objectives of your organization and/or customer. If the vulnerabilities are leaked to the public or to your customer's competitors, you might quickly find yourself being escorted off company property carrying a cardboard box with all your stuff in it, and the company you work for could end up trying to protect itself in a court of law.
Because of the sensitivity of the information used and discovered during a pen-test project, you should use and review at least annually industry-recognized best practices. After all, the penetration test team is part of an overall security strategy, and if IT security members do not follow security best practices, who should?
10.2.1.2. Types of pen-test labs
Once you get the go-ahead to build your penetration test lab from your boss (or in some cases, your “significant other”), you need to make sure you have the right equipment for the task at hand. However, to do that, you need to know exactly what kind of lab you need. There are five possible types:
Selecting the right one will save you time and money, because you have to acquire only those devices that are specific to your goals. Keep in mind that your lab might morph into another type of lab as needed.
10.2.1.2.1. The virtual penetration test lab
If you are just starting out learning how to conduct penetration testing, the best lab is a simple one. The smallest you could make it would be to have one system with virtualization software that can emulate multiple operating systems. Although this can actually be a very useful technique, it does not reflect the real-world network in today's corporate environment. However, if you are simply concerned with attacking a system and not worried about navigating through a network, a virtual penetration test lab provides a wealth of possibilities.
Virtualization software has become quite complex and versatile in the past few years. Also, different types of virtualization software are available, from the simple (designed for the desktop) to the complex (designed to house multiple systems for large corporations). In most cases, the less complex virtual machines are quite sufficient for the task at hand. However, if you need to set up complex scenarios, you might want to look into obtaining something designed for corporate use.
We should point out some problems regarding a virtual penetration test lab. Some of today's more sophisticated viruses check for virtualization before launching their malicious payload. This means that if you are using one of these viruses to attack a virtual server, you will not get the results you might expect.
Viruses are checking for virtualization because nearly all anti-virus researchers run new viruses within a virtual environment. They do this because it is much easier to contain a virus within a virtual network, and it is easy to return the virtual server back to a pristine and uninfected state. A lot of advances have been made to hide the use of virtualization software from viruses, but the state of this war between virus and virtualization writers is constantly in fluctuation. In addition, to be fair, it is not really the job of virtualization software manufacturers to be fighting this fight. Their main goal is to sell their software to all potential customers, not just to anti-virus companies. It is best to assume that if you use virtualization software, viruses and worms will not work properly.
10.2.1.2.2. The internal penetration test lab
Most beginner labs consist of two systems connected through a router. One system is the target, the second system is the penetration tester's machine, and the router is there to provide network services, such as DNS and DHCP. This setup, although simple, actually simulates most internal penetration tests because in the “real world,” the penetration tester is given internal network access in these situations anyway. The objective of internal penetration tests is to see exactly what vulnerabilities exist on the corporate network, not to see whether someone can break into the network. It is usually assumed, when tasked with an internal penetration test project, that someone who has enough time on his hands will eventually succeed in getting into the network (which is a very valid argument, especially considering how many attacks are from employees). With an internal penetration test, you can find out exactly what he might grab once he is in.
Although having two systems and a router is pretty simple, the internal penetration test lab can get quite crowded, depending on what you are trying to accomplish. By adding intrusion detection/prevention systems, proxies, syslog servers, and database servers, you can create a complicated network quite quickly. However, these add-ons are required only if you have a specific reason to have them. Usually, if the goal is to learn how to hack into a web server, you need only one server. Often, you can reduce the complexity of a more complicated scenario into something more manageable. For instance, take a scenario that involves a remote MySQL server with load balancing systems. In this case, you could default back to the “two systems and one router” scenario, and just load the web server and MySQL onto the target system. If the object is to break into the web server from the web portal, it does not make sense to reconstruct the more complex setup if there is only one “port of entry”: the web interface.
As with anything, you should keep things as simple as possible. Unless it is necessary, try to limit the number of machines in your lab. This will save you money and time in the long run.
10.2.1.2.3. The external penetration test lab
The external penetration test lab follows the principle of “defense in depth.” You must make sure you build an external penetration test lab to reflect this concept. That means you need to include a firewall as a bare minimum. Designed to keep the bad guys out, a firewall can be a difficult boundary to get past. However, as with most things in life, there are exceptions. Often, it becomes necessary for firewall administrators to create gaps in the firewall, allowing traffic to enter and leave the network unfettered. There is usually a business reason for having the hole opened, but sometimes holes are left open by accident, or because there is an expectation of future need.
In external penetration tests, the object is to see whether there is a way to penetrate past various obstacles in the network, and gain access to a system behind these defenses. This is a much more difficult scenario, but one that you need to practice mostly because, even though it is difficult, it is still possible to achieve and knowing how to achieve this will give you the ability to prevent it in the future.
Other defenses include the use of a Demilitarized Zone (DMZ), proxies, the Network Address Translation (NAT) mechanism, network intrusion detection systems, and more. Naturally, the more defenses you include in this lab, the closer you get to mimicking real-world corporate networks.
10.2.1.2.4. The project-specific penetration test lab
Sometimes a project comes along in which you must create an exact replica of the target network. This might be necessary because the production network is so sensitive (e.g., makes too much money to mess with) that management cannot risk any downtime. In this case, the penetration test team needs access to the same equipment as what is available in the target network. These types of labs are rarely built due to the large expense, but they do exist. In most cases, however, a test lab (used to test patches and updates) is used instead. This has some cost savings, but unless the test lab is secured to the safety requirements mentioned in the Safety First section of this chapter for a penetration test lab, this multi-use function of the test lab can pose some security problems that you need to address before commencing any penetration tests.
Extreme attention to detail is required when building a project-specific lab. As mentioned, you must use the same brand of equipment, but it does not stop there. You need to use the same model hardware with the same chip set, the same operating system version, the same patches, and even the same cabling.
Although this may seem a bit excessive, in the past manufacturers have changed chip suppliers in the middle of production without changing the model number, making one version act differently than another under penetration testing. In addition, different operating systems and patches have dramatically different vulnerabilities. Even network cables can alter the speed of an attack, changing the results (a slower network might not show that a server is susceptible to a denial-of-service attack). In other words, if you do not replicate the lab down to the smallest detail, you might get invalid test results.
10.2.1.2.5. The ad hoc lab
This lab grows more on whim than need. Often, this type of lab is used to test one specific thing on a server; perhaps a new patch (that affects only one service on the server) needs to be tested, or traffic needs to be sniffed to see whether there are any changes to what is being sent. In these cases, it really does not make sense to go through the hassle of setting up a penetration test lab that mirrors the network housing the server in question. It is justifiably easier to just throw something together for a quick look.
Although this is usually never done, for optimal results a formal process should exist to determine exactly which type of lab is needed for each penetration test project. However, often a lab type is picked not on what is best for the project, but on what is already “set up” and in place. Rather than tear down a lab, it is easier to simply reuse one that is currently in place. Even though it may be easier, it can also be the wrong decision.
When a formal process is in place to determine which lab should be used for each project, the team's project manager has one more tool at his disposal to determine project priorities and time lines. If additional resources need to be brought into the labs, the project manager can group together those projects that require that additional resource, better utilizing corporate assets. In short, the choice of how to set up your lab is an important consideration and should be part of a formal decision process.
10.2.2. Building your lab
Building out your penetration test lab is basically the physical work associated with making your design a reality. Based on your design, you will purchase hardware, build machines, create networks, and install software. Even with a solid design in mind, it is important to ensure that appropriate attention is given to the build phase of creating your penetration test lab.
10.2.2.1. Selecting the right hardware
If money is no object, selecting the right hardware is easy; you just buy a few of everything. However, money becomes a limiting factor in your purchases in most cases, and selection of dual-purpose equipment can stretch your budget. Here are some things to consider when creating a pen-test lab, as well as some suggestions to keep costs down.
10.2.2.1.1. Focus on the most common
Regardless of our personal backgrounds, it is important to focus on what is really happening in the corporate world. For example, a penetration tester may have experience (and prefer) Solaris of AIX-based systems, but many organizations choose to use Microsoft on x86 processor chips. Therefore when building your penetration test lab, you should ensure that your hardware supports what is commonly used in the corporate world, not your personal preferences.
Most penetration test teams are made up of people with different skill sets and backgrounds, with networking and system administration being the two primary skill sets. Sometimes the group's experience will dictate the decision of what hardware to purchase. If everyone on the team is familiar with x86, this commonality forces the issue; otherwise, hardware sits around unused.
In some cases, a pen-test team will have a particular mission. Perhaps it is to conduct primarily web-based attacks, in which case the focus needs to be on firewalls, proxy servers, and web servers. If a team is mostly concerned with network architecture vulnerabilities, hardware appliances such as routers, switches, intrusion detection systems, and firewalls become important.
Another approach for determining the use of a particular architecture is to look at how many exploitable vulnerabilities exist. If you want to put together a penetration test that has a higher level of successful penetrations, take a look at sites such as http://www.securityfocus.com/bid and see which platform has the greatest number of available exploits.
10.2.2.1.2. Use what your clients use
This may be a bit obvious, but if your clients use a particular architecture, your penetration test lab should probably have the same thing. This has a drawback, though. All new clients that you contract with need to have the same type of equipment as well, or else you will end up buying extra equipment every time you get a new customer. This can have a limiting effect on expanding your business.
There is a drawback in selecting only one architecture on which to run penetration test projects; by limiting your architecture, you are limiting who your customers can be. This is not always bad, though. If your team focuses on a niche target, such as supervisory control and data acquisition (SCADA) systems, your penetration test team could have more work available than they can handle. Nevertheless, by using only the equipment that your clients use, your team will be able to focus their energies and knowledge better, while also keeping costs down.
Often, by using what your clients use, you run into a situation in which nobody on your team is a subject expert, especially in a niche market. This has the unwanted effect that the money you save (by not buying all the possible equipment combinations available) can get diverted into hiring expensive subject-matter experts. Often, hiring a subject-matter expert is just not in the budget. If this situation is familiar to your penetration test team, the team members end up needing training. This is great for the team members because they get to improve their skills, but these training costs are not always expected by management and can cause poor results in actual penetration test projects if not committed to. Remember, niche training (and penetration testing is a niche training field) is much more expensive than the more common ones, something management may not be happy with, or accustomed to.
10.2.2.1.3. Dual-use equipment
If you purchase a Cisco PIX firewall, you are only going to use it as a firewall. However, if you decide to use a software-based firewall on an x86 system, you can use that same system later for an intrusion detection system, a web server, a syslog, or other server. Versatility becomes important when purchasing budgets are tight.
Other hardware concerns include external devices, such as tape backups, monitors, external hard drives, and the like. Internal storage devices, such as secondary hard drives and tape storage, tend to be underutilized. It is often better to purchase the more expensive external versions of these devices that will get a lot more use in the long run than to purchase the cheaper internal versions.
A favorite among system administrators is the KVM switch, which allows multiple computer systems to use the same keyboard, video monitor, and mouse. Not only does it save on the purchase of additional monitors, but also the electricity savings can be quite noticeable.
Again, planning becomes important in building your penetration test lab. Hardware can be a significant expense, and can quickly become obsolete. With the right approach, you can build a penetration test lab in a fiscally sensible manner that is appropriate to your business needs.
Naturally, there is a disadvantage to using dual-use equipment. If you need to imitate a customer's network and they use a Cisco firewall, just dropping a software-based firewall into your penetration test lab will not work. However, if your goal is to train or test on as many different scenarios as possible, dual-use systems are definitely the way to go.
10.2.2.2. Selecting the right software
This section could almost echo the things mentioned in the “Selecting the right hardware” section regarding focusing on the most common operating systems/applications, and using the same software your clients use. Most of the decisions regarding operating system and applications will be determined by which hardware platforms you end up using, and whether you are trying to re-create your customer network. However, a more important point of discussion is the selection of penetration test software for your lab.
10.2.2.2.1. Usage of open source tools
In Chapter 1, we talked about open source toolkits and we've discussed a huge number of tools throughout the other chapters in this book. This book provides a wealth of information about open source penetration testing applications which, considering the title, is probably for the best. In many penetration test labs, the majority of the tools used are open source.
It is also beneficial to remember what types of tools malicious users have available to them. Typically, it won't be expensive commercial software; it will be the same open source tools and techniques discussed in this book. The positive side of this is by becoming familiar with these tools and using them during your penetration testing, you will develop the perspective of a malicious hacker and see things that you might not have, had you strictly used some of the commercial tools that do most of the work for you. The negative side to using the open source tools concerns time. It often takes longer to use open source tools than commercial tools, simply because the commercial tools try to be as automated as possible.
There are some other disadvantages to using open source tools, with one of those being application support. The major commercial tools tend to have a support staff that will quickly respond to your questions and problems. This is generally part of the maintenance agreement with the vendor. Open source tools do not usually have this type of support. Rather, users have to search through wiki pages for the answers to most problems pages, or search various forums strewn about the Internet.
The last disadvantage open source tools have is obsolescence. It is not unusual to see tools become outdated or obsolete. However, the community tends to push and support those tools that provide the best potential and functionality and more often than not, you will see obsolete tools replaced by something better. That is why even books such as this need to be updated regularly.
10.2.2.2.2. Usage of commercial tools
The commercial tools available tend to be very expensive. It is often difficult to convince upper management of the need of some of these types of tools, especially with their yearly maintenance fees. The advantage of these tools is that a lot of them speed up the penetration test. The penetration test team probably could achieve the same results without these commercial tools, but management may feel the additional time it takes may be too costly.
A disadvantage to using commercial tools is that they are so automated that the user does not learn how to perform the same process independently. Teams that rely heavily on these commercial automated tools don't get the experience they might obtain by using open source tools. Often they involve simply clicking on a button and coming back in a couple of hours to see what to click on next.
For companies that are truly interested in improving the skill of their penetration test team, commercial applications can be detrimental to this goal. However, for companies simply interested in producing large numbers of penetration test projects, commercial tools are very effective and support the bottom line. Do not expect to sustain effective penetration test projects over the long term, though, unless your team has a solid grounding in penetration testing, which is what working with open source applications can give them.
A middle-of-the-road approach of using both commercial and open source tools can work, but you might find that members of the penetration test team gravitate initially toward using only commercial tools due to their ease of use and support. You also must guard against this, and management should monitor team member use of these commercial tools. Again, use of open source tools improves the skills of those who use them.
Finding the balance between using primarily open source or commercial tools is a tough (but critical) call for management to make. Using the tools discussed in this book (instead of trying to acquire commercial tools) will pay dividends in the long run and make you a better penetration tester, which is one of the reasons this book was written in the first place.
10.2.3. Running your lab
Now that you have determined what type of lab you need, decided what equipment to use, decided on a software approach, and established safety and documentation methods, you have to worry about running things correctly. This involves ensuring that you have appropriate processes and procedures set up for your lab and that your lab is able to (again) meet your overall objectives.
10.2.3.1. Documenting install procedures
While documentation around how to install software seems like it would exist more in the realm of system or application administrators, it plays an important part in the penetration test lab as well. You will be dealing with a substantial number of software installations within your test lab. It is important to make sure that each time you install a particular piece of software, you do it in the exact same way. Differing choices made during installation can have a tremendous impact on the final result of the install, including specific vulnerabilities which may exist in one installation type but not another. For example, if there is a vulnerability in an SSL library and you install a web server in two ways, one with SSL and one without, it is very likely that you will only find the vulnerability in one of the installations.
Even if your documentation is as light as a checklist of options selected during install, it is critical to keep and maintain this documentation. You can choose to store it with the media in some cases or keep it with other important system documentation. You should ensure that all members of the penetration test team use the same documented procedure as well so that there are no differences between installations depending on who performed the install.
10.2.3.2. Documenting results
A big part of our job as penetration testers is the generation of reports and supplemental materials for our clients. We've already talked about taking measures to ensure the safety and integrity of our reports, but it is also important to remember that in the end, our reports are often the “product” that we sell. Make sure that your results are always well documented and that your reports adequately tell the “story” associated with your testing. Depending on the target audience for your report, you may need to change the way that story is told, but regardless, you must make sure that it is accurate and complete. No one likes to hear just the beginning, middle, or end of a story.
10.2.3.3. Penetration testing frameworks
Some frameworks for penetration testing exist which can help ensure that you follow a consistent process and that no penetration test avenues go unexplored. While a detailed analysis of these frameworks is beyond the scope of this book, it is important to consider the use of a penetration test framework when determining how you will run your penetration test lab.
10.2.3.3.1. Open Source Security Testing Methodology Manual
The Open Source Security Testing Methodology Manual (available at http://www.isecom.org/osstmm/) is a peer-reviewed effort intended to provide a comprehensive methodology specific to penetration testing. The OSSTMM groups management concerns (such as rules of engagement) alongside actual penetration testing steps, and covers how to put together the reporting of findings. With regard to actual penetration testing, the OSSTMM focuses on Internet technology security, communications security, wireless security, and physical security.
The OSSTMM has a huge following in the industry, and is updated roughly every six months. Access to the latest version, however, is restricted to monetary subscribers. For those who need the latest version, the subscription may be worth the money; but for those willing to wait, the earlier releases have quite a lot to offer as well. The OSSTMM is copyrighted under the Creative Commons 2.5 Attribution-NonCommercial-NoDerivs license.
10.2.3.3.2. SP 800-115
If you work for a U.S. government agency conducting penetration testing, this National Institute of Standards and Technology (NIST) special publication will be quite familiar to you. Although this publication does not really fall under the open source tag, it is freely available to use. NIST is a U.S. federal agency that publishes multiple documents, which are free to download and use. Therefore, although not open source, the NIST SP 800-115 is freely available at http://csrc.nist.gov/publications/nistpubs/800-115/SP800-115.pdf.
The goal of the NIST SP 800-115 is to provide a varying level of guidance on how to conduct network security testing. Although intended for government systems, the publication is very useful for all networks. It tries to provide an overall picture of what system and network security is about, how attacks work, and how security should be employed in the system development life cycle. The publication also covers security testing techniques and deployment strategies for systems and networks.
10.2.3.3.3. Penetration testing framework—(VunnerabilityAssessment.co.uk)
A very useful penetration testing framework is available from http://www.vulnerabilityassessment.co.uk/Penetration%20Test.html. This framework is more or less an outline of a penetration test which lists associated tools and results in each section of the test. Included are links to additional information on many tools as well as example results and reports.
One advantage of this particular framework is that it is constantly evolving as new tools are developed and new techniques are used for penetration testing. However, due to that same dynamic feature, you may see a different layout of the framework each time you visit the site. This is somewhat helped by maintaining the framework version number with each update.
Warning
One of the more important aspects of using a penetration testing framework is to ensure that you are consistent in its implementation. If you choose to use one of the frameworks that we've discussed or even develop your own, it is a good idea to make sure that you understand how each aspect of the framework should be tested and that you do that testing in a similar way each time. Your testing will never be identical time after time, but the basic process that you follow should be pretty close.
10.3. Core technologies
When working with penetration test labs, you will primarily be dealing with technologies that we have discussed within the other chapters of this book. However, with virtualization becoming so prominent in recent years, it is important that we discuss virtualization, the technologies associated with this concept, and how it can affect your penetration testing lab.
In the past few years, there has been a very steep rise in the use of virtualized systems. What used to be a novelty and used primarily for test systems has now become mainstream and used in large and small enterprises alike for a variety of purposes. But what is virtualization and what is its affect on penetration testing? How do most virtualization systems actually work?
10.3.1. Defining virtualization
To answer this, let's focus on what virtualization is first. Virtualization at its most basic is the creation of a non-physical environment that emulates a physical environment. This virtual environment can be created using a number of methods and on a number of platforms, but in essence, they're all the same concept. There are some common features which exist across most virtualization platforms and each has its own nuances. What you need to be aware of is how a virtualized environment differs from a “real” physical environment.
First, be aware that no matter what kind of software you use to create a virtual environment, that software will have some amount of overhead. The virtualization software itself, even if it's a custom operating system, does take up processor time, memory, and I/O to perform its virtualization functions. This means that by simply adding a virtualization layer, you are changing the performance profile of the physical system.
Secondly, virtualized environments are always slower than an identical physical environment. This speed difference may be negligible and measured in nanoseconds, but it does exist. One method of determining whether or not a piece of software is running in a virtual environment is to run a series of transactions against a system and recording the timing of those transactions. Comparing that to timing taken from a physical system identical to what the virtualized environment reports that it is can tell you with a reasonable degree of certainty whether or not you're working in a virtualized environment.
Last, software sometimes behaves differently in a virtualized environment. While virtualization software is becoming better and better, it's still software and therefore still prone to have bugs. Some of these manifest only under very specific scenarios when software running within the virtualized environment tries to do something in a way that the virtualization software authors didn't expect. For example, if an ASM expert has written some code specifically designed to interact with the hardware of a particular system and the virtualization software doesn't emulate that hardware
perfectly, the code may fail.
10.3.2. Virtualization and penetration testing
Virtualization plays a very big role in present day penetration testing. Due to the high cost of hardware, it is often very common to buy one larger piece of hardware and use virtualization software to emulate a number of physical system. This saves cost, not only with hardware, but also with space, cooling, and electricity. A test lab with only a few systems can be designed to emulate hundreds of physical systems by properly using virtualization software.
In addition, your client may be using virtualization within their corporate enterprise. Again, this is becoming more and more common, so you may need to perform penetration testing in an environment that emulates theirs. For example, the client may be deploying a number of virtualized web servers in their production environment and ask you to determine not only if the web server installation is vulnerable, but also the virtualized environment that they're running within.
There are cases where virtualization can cause problems for penetration testing also. When running in a virtual environment, the virtualization software reports back to the OS certain details about the virtual machine that it has created. Data around virtual network cards, processors, hard disks, and even virtual memory is available to the OS running within the virtualization software. The challenge here is that the data being reported isn't “real,” it's what the virtualization software wants the OS to believe. For example, the virtualization software may tell the OS that only 2
GB of memory and 1 processor exist on the system. The reality may be that there are 16
GB and 4 processors. Due to the way that the virtualization software handles heavy loads, it may react differently than a physical system when those resources are exhausted. This may make denial-of-service attacks behave differently in a virtual environment than they do on a physical machine.
10.3.3. Virtualization architecture
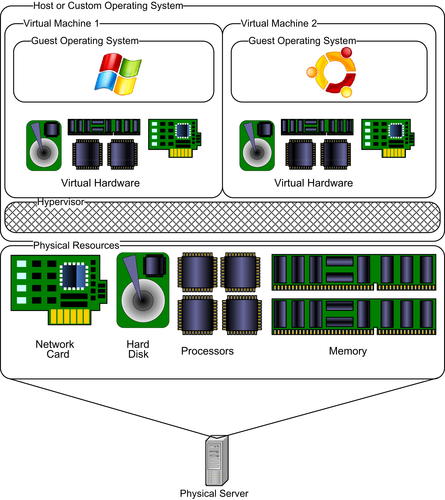
Every piece of virtualization software is different, but they do share some common features and architectural designs. In all cases, they have to run on some type of operating system on the host. This may be a standard Windows/Linux/etc. operating system or a custom operating system designed specifically for the virtualization software (such as VMware ESXi). In either case, the virtualization software runs a thin layer called a hypervisor on top of the host operating system.
This hypervisor layer is what is responsible for performing all of the hardware emulation and virtualization for the guest operating systems installed within the virtualization software. The hypervisor essentially creates a container for each guest operating system and defines the parameters for the virtual hardware associated with that container. For example, a container will typically contain a virtual hard disk of a specific size, memory, processor(s), and one or more network cards. It can also include virtual CD-ROM drives which point to either a physical drive or a disk image and even USB devices.
After the container is defined, the guest operating system can be installed within the container and will see all of the hardware in the way that the hypervisor defined it. Again, this does not reflect the reality of the physical machine, but rather the virtual environment that we want the guest operating system to believe it resides on. Fig. 10.2 shows the general architecture layout for most virtualization options.
10.3.3.1. Virtual networks
Another part of virtualization is the virtual network associated with the virtual machines. Since they are using one or more virtual network cards, those virtual cards may or may not be configured to interact with a physical network card on the host machine. The hypervisor can create a virtual network that allows the guest operating systems to communicate with each other as if they were on a physical network without actually needing to have that network hardware present. For example, a virtual switch can be set up with all of the virtual network cards for multiple guest OSs connected to it. This would allow the virtual systems to communicate with each other, but nothing else.
This is an important part of the security within a virtualized environment and is very applicable to your work with penetration testing. By creating a virtual network and keeping it isolated to the virtual machines running on the host, you can create an environment that simulates network communication without actually risking the possibility of those virtual machines connecting to your actual physical network.
In addition, there is now an effort to create virtual networks that are not necessarily just for connecting virtual hosts together. We'll discuss some of the tools for this in the Open Source Tools section of this chapter, but for now you should be aware that developers are creating virtualization software which allows you to simulate entire networks within a virtual environment. This includes objects such as switches, routers, VPNs, etc.
By virtualizing networks in this manner, you can create a safe, isolated environment for simulating all sorts of network behavior. From the penetration tester's point of view, this can give us a playground for testing network devices or performing attacks such as ARP poisoning without impacting actual physical networks.
10.4. Open source tools
There are a number of software packages which allow you to do virtualization, both commercial and open source. In addition, there are some free-to-use packages that are not open source, but are available at no cost. Examples of this are VMware ESXi and Microsoft Virtual PC. Since the focus of this book is open source tools, we will be looking at two of the most popular virtualization software options: Xen and VirtualBox.
10.4.1. Xen
Xen is an open source hypervisor available at http://www.xen.org. Its architecture fits into the standard virtualization architectures that we discussed in the Core Technologies section of this chapter. The only exception to this is that on top of the hypervisor layer, Xen uses a “Domain 0” (Dom0) concept where Dom0 is a privileged guest within the hypervisor which allows for direct hardware access as well as management of the other unprivileged guests.
Xen is able to be run either as a LiveCD or by installing it on your target system. This install can be done through an existing Linux install on the target or from the LiveCD. If you are planning on using Xen long term, it is always recommended that you install it on the target versus running with the LiveCD.
The feature set of Xen is very robust and includes some very important functionality such as:
• High performing virtual machines
• Support of up to 32 virtual CPUs within a guest virtual machine
• Support for x86/32 with Physical Address Extension (PAE), x86/64, and IA64 platforms
• Intel and AMD Virtualization Technology for unmodified guest operating systems
• Excellent hardware support
These features make Xen an option not only for personal use and testing, but also a viable solution for large farms of virtual machines.
10.4.2. VirtualBox
VirtualBox is an open source project sponsored by Oracle and is available at http://www.virtualbox.org. It is designed to run within another host operating system and supports Windows, MacOS X, Linux, and Solaris for use as that host. The VirtualBox software provides a hypervisor layer within which the guest operating systems reside in their individual virtual containers.
Like other virtualization software, VirtualBox supports the virtualization of hardware within the host physical machine including hard disks, memory, processors, etc. Among VirtualBox's features are these important factors:
• Portability (runs on a variety of host operating systems)
• Support of up to 32 virtual CPUs within a guest virtual machine
• Multigeneration branched snapshots which effectively “version” snapshots of your guest operating system at different points in time
VirtualBox differs from Xen in a couple of key areas. First, it requires that the host physical machine already has an operating system installed. This is both good and bad. It's good in that you can easily move a VirtualBox virtual machine to a new host by just installing the VirtualBox software versus installing a new operating system. However, the downside to this approach is that you have to go through a host operating system layer which is not specifically designed to support virtual machines and therefore isn't as efficient as a hypervisor which uses its own custom operating system.
In addition, VirtualBox does not support the live movement of running virtual machines. This, however, may not be a feature that you really need. If you don't envision yourself having to keep a virtual machine running when transporting it to a new host, then you don't have a need for this feature. On the other hand, if you are dealing with an environment where downtime can cause issues for you, you may want to consider using Xen for its live transport feature.
10.4.3. GNS3/Dynagen/Dynamips
GNS3, available at http://www.gns3.net, is a graphical network simulator which uses Cisco IOS images to build virtual network test labs. This software can be used to create a virtual network penetration testing lab allowing you to test a variety of different network hardware devices. It supports running on a variety of host operating system platforms including Windows, Linux, and MacOS X.
Tip
GNS3 supports the creation of a variety of network devices, but you need to keep in mind that the Cisco operating systems that run on those devices is owned and licensed by Cisco and is not publicly available. In order to use these in the GNS3 lab, you must have a Cisco account and be able to download the appropriate operating system images for use with the simulator.
GNS3 basically provides a graphical front end to Dynagen. Dynagen is designed to create accurate configurations that allow yet another product, Dynamips, to emulate the actual network device. Dynamips, originally designed to emulate a Cisco 7200, supports a wide variety of Cisco images now and is capable of simulating a number of network devices. This is made much easier with the additional layers of Dynagen and GNS3.
With later releases, Dynamips moved toward a more standard virtualized environment and now functions in a hypervisor-like mode where multiple virtual routers can be run within the Dynamips environment. The tool utilizes a Just In Time (JIT) compiler which allows it to perform quickly on the x86/32 and x86/34 platform. While other platforms are supported, they may not be as fast.
One really great feature of this virtualized network platform is that you can build the virtual network devices and connect to them from external (virtualized or physical) systems! From an architecture perspective, that means that we can set up a virtual machine to run GNS3/Dynagen/Dynamips and use that to emulate an entire network topology which we can then connect other virtual systems to. This, in essence, allows us the ability to create an entire virtual environment with client machines, routers, switches, and even VoIP systems within one single physical host machine. The cost savings in building a lab in this manner are huge, assuming that you can live with the virtualization limitations that we've discussed.
10.4.4. Other tools
Regardless of the virtualization tool that you use, you should understand that they all perform many of the same virtualization functions that we discussed in the Core Technologies section of this chapter. Your choice of tools is really driven by the exact needs of your environment and the design that you laid out when planning your penetration test lab.
In some cases, you may prefer to use one of the free (but not open source) tools due to this same reasoning. It may be a better fit for your specific needs than the other available tools. The main thing to keep in mind is that your purpose should be to build a penetration testing lab which gives you the ability to test the components necessary to perform your job to the best of your ability. If you choose a virtualization platform (or choose not to virtualize at all) which meets this criteria, you'll be in good shape.
10.5. Case study: the tools in action
For this case study, we're going to go through the process that was used to build the penetration testing lab used for a majority of the exercises in this book. This, naturally, is a great example of how a penetration test lab can be designed and built to support a number of different penetration testing scenarios.
In this case, the objective of the lab is to be fully featured and support a variety of different target systems for testing. We did not need to emulate any specific client's architecture, so we have a pretty free hand on the technologies used. Since our objective is to support a variety of systems, we'll need to make sure that the architecture can support Windows as well as Linux and provide a solid test bed for a number of different applications.
Let's start with the hardware platform. Due to the type of work performed and the potential research needs within the platform, a robust piece of hardware would be ideal versus running the lab on a PC. A Gateway 980 server was used to fit this need. This hardware is relatively inexpensive when purchased used and it has sufficient horsepower to fit the needs of this particular lab.
The server was outfitted with 4
GB of memory, 2 processors, and 3 network cards. This is by no means a powerhouse of a server, but is capable of running 3–4 virtual machines simultaneously with this configuration. For the disk configuration, a RAID-5 array was configured on the local server providing for ~100
GB of available space. However, for additional capacity, we'll connect the system to network-attached storage (NAS) later.
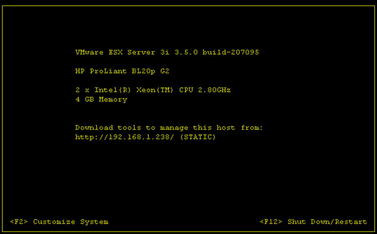
For our virtualization software, ESXi was chosen. Again, this is not an open source platform, but is free to use and the ESXi 3.5 software works very well on this platform. ESXi is now in the 4.x releases as of the time of this writing; however, that version is not compatible with the Gateway 980. ESXi 3.5 will work fine for this type of penetration testing lab.
The next step of our build is to install the ESXi hypervisor. This was done via a CD and installs very quickly using the default options. After performing the installation, you are presented with a screen similar to that shown in Fig. 10.3.
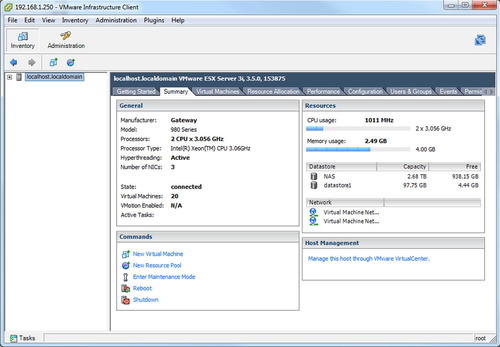
Some basic customization such as setting up the network interface and passwords are available through this console, but most of the configuration and virtual machine setup will be done using the VMware Infrastructure Client. This client allows you to create virtual machines, configure the virtual network, and even view the performance of the host physical hardware. An example of what this client looks like is shown in Fig. 10.4.
The next step in building our lab is to set up the guest virtual machines. Based on our objectives, we'll need a number of machines with varying operating systems as well as a few attack clients to perform the actual penetration testing. For this, we'll set up some Windows systems with different Windows versions and software installed as well as a number of different Linux distributions for both performing penetration tests as well as being the target for those tests.
As discussed in Chapter 1, there are a number of distributions out there which can be used for penetration test targets as well as software packages for Windows which allow you to test known-vulnerable Windows software. For our lab, we've installed a number of these distributions as well as some custom machines for a variety of different tests. In addition, a few different attack clients have been set up. The full array of virtual machines on this host can be seen in Fig. 10.5.
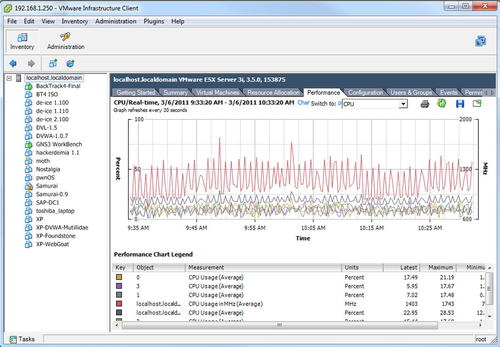
Figure 10.5 also shows the CPU performance of the host hardware as it is running the virtual machines. In this particular case, the GNS3 Workbench virtual machine and the BackTrack 4-Final virtual machine are both running while the Samurai virtual machine is in a suspended state.
The VMware Infrastructure Client allows you to bring up a remote console to the individual virtual machines so that you can install, configure, or run the system as if it were a standalone machine. In addition, after your configuration is complete, you can still use standard tools such as RDP or VNC to access the virtual hosts if the machine you're using to connect to them is on the same virtual network. Again, it is very important to keep this lab isolated from other machines on your “real” network.
Note
While this particular penetration testing lab is configured using VMware ESXi, other virtualization platforms may offer features that fit your needs better. Make sure that you do a thorough analysis of the virtualization platforms available to you should you choose to build a virtualized environment. Your goal should be to use the software that fits your needs best.
With the lab installed and configured, our next step is to go through the normal operation of the lab. As mentioned in the Approach section of this chapter, that includes labeling and other paperwork associated with running an efficient penetration test lab. As you can see in Fig. 10.5, all of our virtual machines are labeled and documentation exists which shows the software that was installed on the system as well as the versions and steps used for the install. Maintaining this documentation is key to running a successful and efficient penetration test lab.
10.6. Hands-on challenge
Your challenge for this particular topic should be pretty obvious. You need to build yourself a penetration test lab! Go through the full process described in this chapter of documenting your objectives, designing your lab, and setting up the lab. Your goal should be to build a lab environment which contains one target machine and one attack machine to simulate a very basic penetration test scenario.
To make this as simple as possible, use virtualization software such as VirtualBox to set up two virtual machines on one of your standard workstations. Again, make sure that this system is set up in isolation. You do not want to risk accidently causing problems with your real systems due to tests that you are performing in your penetration test lab.
For bonus points, set up a virtual machine using GNS3/Dynagen/Dynamips to create a virtual network comprised of a router and two switches with your two virtual machines connected to the network. The design should be similar to that shown in Fig. 10.6.
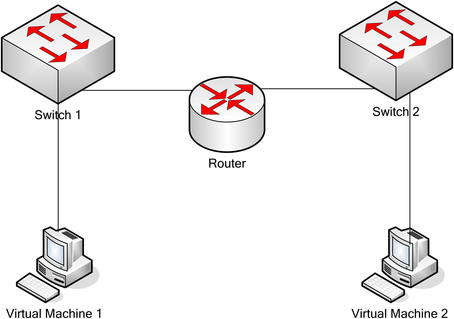
Summary
This chapter was focused on the creation of penetration testing labs. We started by discussing your objectives in creating a penetration testing lab and how those objectives help to drive the design of the lab. We also discussed documenting your objectives to ensure that your lab actually matches what your original intent was and that you have the documentation available for any potential future needs.
Next we talked about the approach to creating penetration test labs. The general approach is to design the lab based on your defined objectives, build the lab based on that design, and finally to run the lab in a safe and efficient manner. We cannot stress the importance of safety enough and we covered a great deal of information on this topic while discussing the approach to building penetration test labs. Always keep your lab environment isolated from your “real” network!
The core technology of virtualization and its various aspects was our next subject for discussion. We talked about what a hypervisor is and how that interacts with the physical hardware used for your virtual machine host. We also discussed the architecture of using virtual machines and how they have both pros and cons within the penetration testing world.
When discussing open source software, we covered two major players in the open source virtualization world as well as a package of software which allows you to simulate a variety of network devices. Using this software, you are able to create a hypervisor either on top of a host operating system or on top of a custom virtualization-optimized operating system allowing you to build containers which function as independent virtual machines. We also talked about some of the networking capabilities and how these virtual machines can communicate using a virtual network without contaminating your real network.
Lastly, we went over a real-world case study where you were able to see how virtual machines were used to create the lab used for the examples shown in this book. The penetration testing lab built for this purpose fits the objective of providing a test ground for testing a variety of different operating systems and applications in an isolated environment. Your challenge after seeing how this was done is to build your own lab where you can re-create the scenarios used in this book and learn how to use all of the open source penetration testing tools that we have discussed.
..................Content has been hidden....................
You can't read the all page of ebook, please click here login for view all page.