Introduction to Oil

Often described affectionately with words like rich and buttery, this classic painting medium is a favorite among fine artists. The paint consists of ground pigment suspended in oil, which traps light and creates a luminous effect on the canvas. The slow-drying properties of oil allow artists to create smooth blends and rework their paintings over multiple sessions. This large window for manipulating and refining a work of art can result in an impressive degree of realism.
Oil painting is notoriously messy and calls for quite a few materials. Because it’s not a water-based medium, you’ll need special solvents for thinning the paint and cleaning your brushes. You can use either turpentine or mineral spirits for this—but keep in mind that these liquids are toxic and cannot simply be poured down a drain. Also, be sure to work in a well-ventilated room, as oil paints and solvents emit strong fumes.
Now that you’re sufficiently intimidated by oil painting, experience it for yourself. You might just find it as alluring as the great masters did.
Here’s what you’ll need: set of oil paints, solvent, glass jars for holding solvent, mixing palette, palette knife, set of bristle brushes, small soft-hair brushes for detailing, linseed oil, primed and stretched canvas, rags, and artist’s easel.

Introduction to Acrylic

What started as a house paint in the first half of the 20th century has become a respected medium for the fine artist. Acrylic paint, which is made up of pigment and acrylic polymer, boasts a number of positive qualities that make it a viable competitor to oil and watercolor. First, you can dilute the paint with plain water (no harsh solvents needed!), but once it’s dry, the paint is waterproof. Second, you can apply the paint in thick or thin layers, imitating either oil or watercolor, respectively. Third, acrylic is resistant to cracking and fading. Fourth, unlike oil, acrylic dries quickly so you don’t have to wait long between applying layers. Fifth, you can apply acrylic to nearly any surface (so long as it’s not waxy or greasy), making it perfect for use in collage. And the list goes on.
Here are just few things to keep in mind while using acrylic. Because it dries quickly, you’ll need to work quickly. This can be seen as a positive or negative quality depending on your painting style—for some it interferes with blending, but for others it encourages loose and lively strokes and discourages overworking. Also, it’s important to note that acrylic paints often dry darker than they appear when wet.
Here’s what you’ll need: a set of acrylics, heavy paper or canvas, a set of synthetic brushes, two jars of water (one for rinsing the brushes and one for adding fresh water to mixtures), paper towels, and mediums.

Oil Tools and Materials

Oil Paint There are several different grades of oil paint, including student grade and artist grade. Artist-grade paints are a little more expensive, but they contain better-quality pigment and fewer additives. The colors are also more intense and will stay true longer than student-grade paints.

Supports Oil painting supports usually consist of canvas or wood. You can stretch canvas yourself, but it’s much easier to purchase prestretched, primed canvas (stapled to a frame) or canvas board (canvas glued to cardboard). If you choose to work with wood or any other porous material, you must apply a primer first to seal the surface so the oil paints will adhere to the support.
Other Oil Painting Essentials
Other oil painting tools you may need include additives to thin out your paint (linseed oil) or to speed drying time (copal), glass or metal containers for additives, an easel, turpentine for cleaning your brushes, paper towels, and a mixing palette.

Fixative A fixative helps “set” a drawing and prevents it from smearing. Varnishes are used to protect paintings. Spray-on varnish temporarily sets the paint; a brush-on varnish permanently protects the work. Read the manufacturer’s instructions for application guidelines.

Painting and Palette Knives Palette knives can be used to mix paint on your palette or as a tool for applying paint to your support. Painting knives usually have a smaller, diamond-shaped head; palette (mixing) knives usually have a longer, more rectangular blade. Some knives have raised handles, which help prevent you from getting paint on your hand as you work.

Acrylic Tools and Materials
To get started with acrylic, you need only a few basic tools: paints, brushes, supports, and water. When you buy your acrylic supplies, remember to purchase the best you can afford at the time, as better-quality materials are more manageable and produce longer-lasting works.
Selecting Paints
Acrylic paints come in jars, cans, and tubes. Most artists prefer tubes, as they make it easy to squeeze out the appropriate amount of paint onto your palette. There are two types of acrylic paints: “student grade” and “artist grade.” Artist-grade paints contain more pigment and less filler, so they are more vibrant and produce richer mixes.
Purchasing a Palette
Palettes for acrylic paints are available in many different materials—from wood and ceramic to metal and glass. Plastic palettes are inexpensive, and they can be cleaned with soap and water. Disposable paper palette pads are also very convenient; instead of washing away the remains of your paint, you can simply tear off the top sheet to reveal a fresh surface beneath.
Gathering the Basics
To get started, you’ll want to have a few household materials on hand. You’ll need two jars of water: one for adding to your paint mixes and one for rinsing out your brushes. A spray bottle will help keep the paints and mixes on your palette moist, and paper towels or rags will help with clean up.
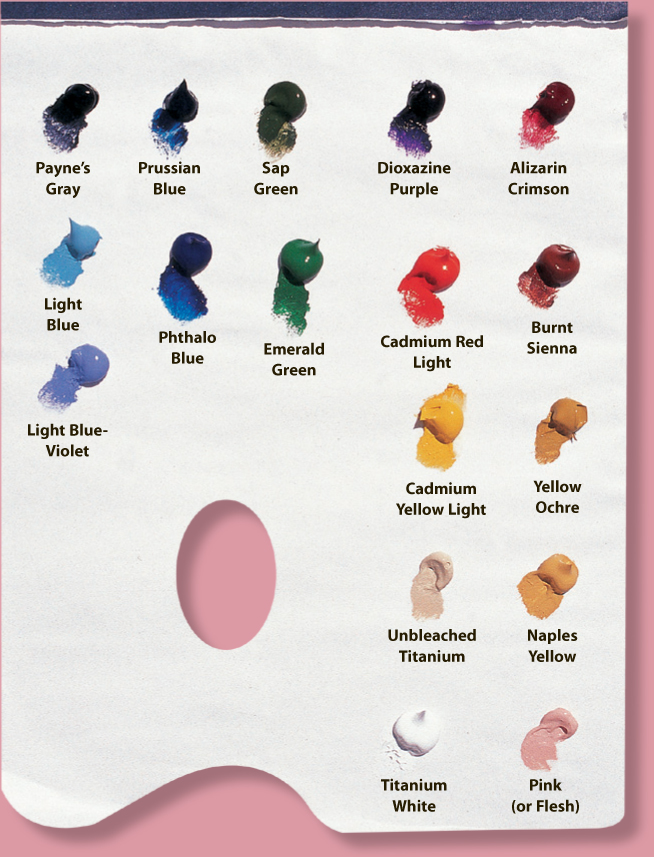
A good beginner’s palette of colors consists of one warm and one cool version of each of the primary colors: yellow, red, and blue. You’ll also want to include white, black, and a few browns, such as burnt sienna or raw umber. From these basics, you should be able to mix just about any color you’ll need. A basic palette generally consists of the following 17 colors: alizarin crimson, burnt sienna, yellow ochre, Naples yellow, pink (or flesh), dioxazine purple, cadmium red light, cadmium yellow light, unbleached titanium, titanium white, sap green, emerald green, Prussian blue, phthalocyanine (abbreviated phthalo) blue, Payne’s gray, light blue (or cerulean blue), and light blue-violet.

Supports
Acrylic paint will adhere to just about any surface, or support, as long as it’s slightly porous and isn’t greasy or waxy. Most acrylic artists use canvas or canvas board that has been primed (coated with gesso, a material used for sealing and protecting fabric and wood supports to make them less porous). It’s easiest to purchase preprimed canvas, but you also can buy raw canvas and a jar of gesso and prime the canvas yourself. Be sure to use an old brush (a house-painting brush works well) when priming your own canvas. Watercolor papers and illustration boards also work well with acrylic paint and provide a smoother working surface. And primed pressed-wood panels—which generally have a smooth side and a rough side—are another popular option.
Illustration Board
Illustration board is good-quality, sturdy cardboard with a simulated canvas surface. It can be used with acrylic, watercolor, pencil, and ink. Illustration boards come with paper mounted on the back to prevent buckling and are available in a variety of sizes and weights.

Illustration Board This example shows acrylic applied to illustration board as a thin wash (left) and in thick strokes (right).
Canvas
Ready-made canvases are available in dozens of sizes and come either stretched on a frame or glued on a board. Canvases usually are made of either linen or cotton and typically come preprimed. Make sure that your preprimed canvas does not have an oil primer on it, as acrylic paint doesn’t adhere to this slick substance.

Painting on Canvas This example shows acrylic applied to canvas in thick strokes (left) and as a thin wash (right).
Hardwood Panel
Pressed-wood panels are available “tempered” and “untempered”—be sure to choose untempered boards, as the tempered panels have been treated with oil, which isn’t compatible with acrylic paints. Preprimed pressed-wood panels are available in a range of shapes and sizes at your local art supply store.
Painting on Rough Hardwood Panel Using the textured side of a pressed-wood panel will result in a rougher, more tactile painting. This example shows acrylic paint applied to rough hardwood panel in thick strokes (left) and as a thin wash (right).
Painting on Smooth Hardwood Panel Using the smooth side of a pressed-wood panel produces finer, more detailed brushstrokes. This example shows acrylic paint applied to smooth hardwood panel in thick strokes (left) and as a thin wash (right).

Stretching and Priming Canvas

Primer A primer acts as a barrier between the support and the paint. It is easy to prepare unprimed (raw) surfaces with three coats of a professional-grade gesso. Less expensive student-grade gesso tends to be too rough, and the paint tends to sink in. For some paintings it may be helpful to tint the final coat of gesso by mixing in acrylic paint. A light sanding before and after each coat of gesso ensures a stable and smooth painting surface.

Canvas You can purchase your canvas primed and pre-stretched. When working with unusual sizes, you can stretch the canvas yourself using canvas pliers and a stapler. For paintings larger than 20" × 24", use medium-duty stretcher bars with a good “lip” edge to keep the painting surface well separated from the inside edge of the stretcher bar. This prevents the stretchers from leaving an impression on the canvas (called “ghosting”).
Preprimed supports are readily available at any art store, but you may prefer to prime the canvas or board yourself. To do this, you will need a hardwood board or stretched canvas, a jar of acrylic gesso, and a 2"-wide brush (a house painting brush works well).
Pour gesso directly on the support, and spread it evenly with the paintbrush, stroking alternately back and forth and up and down until the surface is smooth. (For a more textured surface, don’t smooth out all the brushstrokes completely.)


Basic Techniques
There are myriad techniques and tools that can be used to create a variety of textures and effects. By employing some of these different techniques, you can spice up your art and keep the painting process fresh, exciting, and fun! The examples on these pages were completed using acrylic paint.

Flat Wash This thin mixture of acrylic paint has been diluted with water (use solvents to dilute oil paint). Lightly sweep overlapping, horizontal strokes across the support.

Graded Wash Add more water or solvent and less pigment as you work your way down. Graded washes are great for creating interesting backgrounds.

Drybrush Use a worn flat or fan brush loaded with thick paint, wipe it on a paper towel to remove moisture, then apply it to the surface using quick, light, irregular strokes.

Sketching Your Subject Taking an extra moment to prepare before you paint will ensure successful results and will save you time. For example, make a sketch of your subject before you begin applying washes.

Taking Precautions Keep tools on hand that might be helpful, like a ruler, artist’s triangle, or straightedge that can be used as a guide. And be sure to have paper towels and lint-free rags handy, as well as an ample supply of water or turpentine for rinsing, diluting, and cleaning up.

More Basic Techniques

Thick on Thin Stroking a thick application of paint over a thin wash, letting the undercolor peek through, produces textured color variances perfect for rough or worn surfaces.

Dry on Wet Create a heavily diluted wash of paint; then, before the paint has dried, dip a dry brush in a second color and stroke quickly over it to produce a grainy look.

Impasto Use a paintbrush or a painting knife to apply thick, varied strokes, creating ridges of paint. This technique can be used to punctuate highlights in a painting.

Scumble With a dry brush, lightly scrub semi-opaque color over dry paint, allowing the underlying colors to show through. This is excellent for conveying depth.

Stipple Take a stiff brush and hold it very straight, with the bristle-side down. Then dab on the color quickly, in short, circular motions. Stipple to create the illusion of reflections.

Scrape Using the side of a palette knife or painting knife, create grooves and indentations of various shapes and sizes in wet paint. This works well for creating rough textures.

Mask with Tape Masking tape can be placed onto and removed from dried acrylic paint without causing damage. Don’t paint too thickly on the edges—you won’t get a clean lift.

Lifting Out Use a moistened brush or a tissue to press down on a support and lift colors out of a wet wash. If the wash is dry, wet the desired area and lift out with a paper towel.

Glazing
Glazes are thin mixes of paint and water or acrylic medium applied over a layer of existing dry color. An important technique in acrylic painting, glazing can be used to darken or alter colors in a painting. Glazes are transparent, so the previous color shows through to create rich blends. They can be used to accent or mute the base color, add the appearance of sunlight or mist, or even alter the perceived color temperature of the painting. When you start glazing, create a mix of about 15 parts water and 1 part paint. It’s better to begin with glazes that are too weak than ones that are too overpowering, as you can always add more glazes after the paint dries.

Glazing Grid In this chart, transparent glazes of 13 different colors are layered over opaque strokes of the same colors. Notice how the vertical opaque strokes are altered by the horizontal translucent strokes.

Painting Knife Knives are frequently used to mix paint, but using your knife to paint with as well as mix can add real drama to your painting. Use the flat blade to spread a thick layer of paint over the surface. Each knife stroke leaves behind thick ridges and lines where it ends, mimicking rough, complex textures like stone walls or rocky landscapes. Or you can use the edge of the blade, working quickly to create thin linear ridges that suggest and define shapes. Even the point of the knife is useful; it can scrape away paint to reveal whatever lies beneath.

Applying an Underpainting
An underpainting is a thin wash of color that is applied to the support at the beginning of the painting process. An underpainting can be used to simply tone the support with a wash of color to help maintain a desired temperature in a final painting—for example, a burnt sienna wash would establish a warm base for your painting; a blue wash would create a cool base. An underpainting can also provide a base color that will “marry with” subsequent colors to create a unified color scheme. You can also use an underpainting to create a visual color and value “map,” giving you a guideline for applying future layers. An underpainting can help provide harmony and depth in your paintings. Experiment with various underpaintings to discover which colors you prefer.

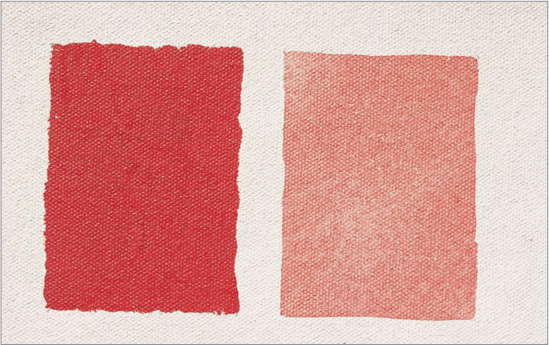
Magenta

Burnt sienna
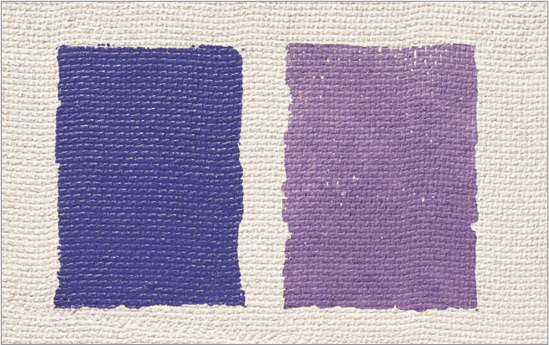
Purple

Phthalo violet

Underpainting for Temperature In the example at left, the flower has been painted over two different underpaintings: magenta (left) and light blue (right). Although the final flower is painted with identical colors on both sides of the canvas, the underpainting color greatly affects the appearance of the later layers of color. Notice that the left half of the flower appears significantly warmer in temperature, whereas the right half has a cool blue undertone.
Frisket is a masking material that is used to protect specific areas of a painting from subsequent layers of color. You can use frisket on a white surface or over previously applied color that has been allowed to dry. Liquid frisket is a type of rubber cement that is applied with a brush or sponge. When applied with a brush, it can be used for saving areas of fine detail, such as the veins of a leaf or the highlight of an eye; when applied with a sponge, it can be used to create random textures and patterns. When you’re done painting, simply rub off the dried frisket with your finger. Paper frisket comes in sheets or rolls; cut out the shape you want to mask and place it sticky-side-down on the area of the painting you want to protect.


Painting Thinly and Thickly
Painting Thinly
Acrylic paint is generally described as an opaque medium, but you also can use acrylic as you would watercolor—in thin, diluted layers of color, or glazes. You can lighten the value of an acrylic wash by adding more water to the pigment, which in turn allows more of the support to show through the color. This gives the paint a luminous quality. You also can layer thin washes of acrylic paint to build up rich color. Because acrylic is waterproof when dry, you can layer new glazes over previous ones without lifting the initial pigment.
Painting Thickly
To create a rich, buttery texture like frosting on a cake, apply thick layers of paint to your support using your paintbrush or a palette knife. Use the paint straight from the tube, or consider adding a paint-thickening medium, such as gel. Called “impasto,” this technique allows you to create ridges and peaks of paint with quick, short strokes from varying angles and directions, adding physical dimension and texture to your painting. Don’t overwork the paint—just keep your strokes loose and fresh.

TOM SWIMM
Diluting Acrylic Paint The transparent properties of thinned acrylic paint are perfect for depicting delicate, colorful subjects, such as the clear and reflective surfaces of glass and the fragile, soft curves of flower petals shown here. By thinning acrylic with generous amounts of water, you can achieve the airy quality of watercolor with a greater degree of control over your washes, as demonstrated in this light-filled painting of a vase of roses.

Using Impasto This technique is ideal for creating foamy water, as shown.

Emphasizing Highlights Punctuate the highlights in your painting (such as the white areas of rippled water shown here) by layering thick applications of paint over the highlighted areas.

Dabbing and Texturizing
Dabbing
To build up color in soft dabs, load the tip of your brush with paint and dot on color in a jabbing motion. This technique builds up layers of paint to create the illusion of depth and dimension, also adding an airy, impressionistic look to your painting. It’s best to work from dark to light when using this technique, as you’ll want to apply the lightest areas and highlights last. colors you prefer.

Building up Layers Layering dabs of several different shades of green and yellow gives fullness and dimension to foliage, as shown in this example.
Texturizing
Because acrylic dries quickly, this medium lends itself to a variety of physical texturizing techniques. Besides applying thick impasto applications to your support, you can mix in additives, such as painting mediums, sand, or eggshells. Or you can press bubblewrap, plastic wrap, coins, or fabric into wet paint to create interesting patterns and textures.

Building up Texture Add interesting textures to your paintings by randomly pressing a balled-up piece of plastic wrap into the wet paint. The mottled texture that results (shown here in the beginning stages of a painting) will create visual interest wherever it shows in the finished painting.

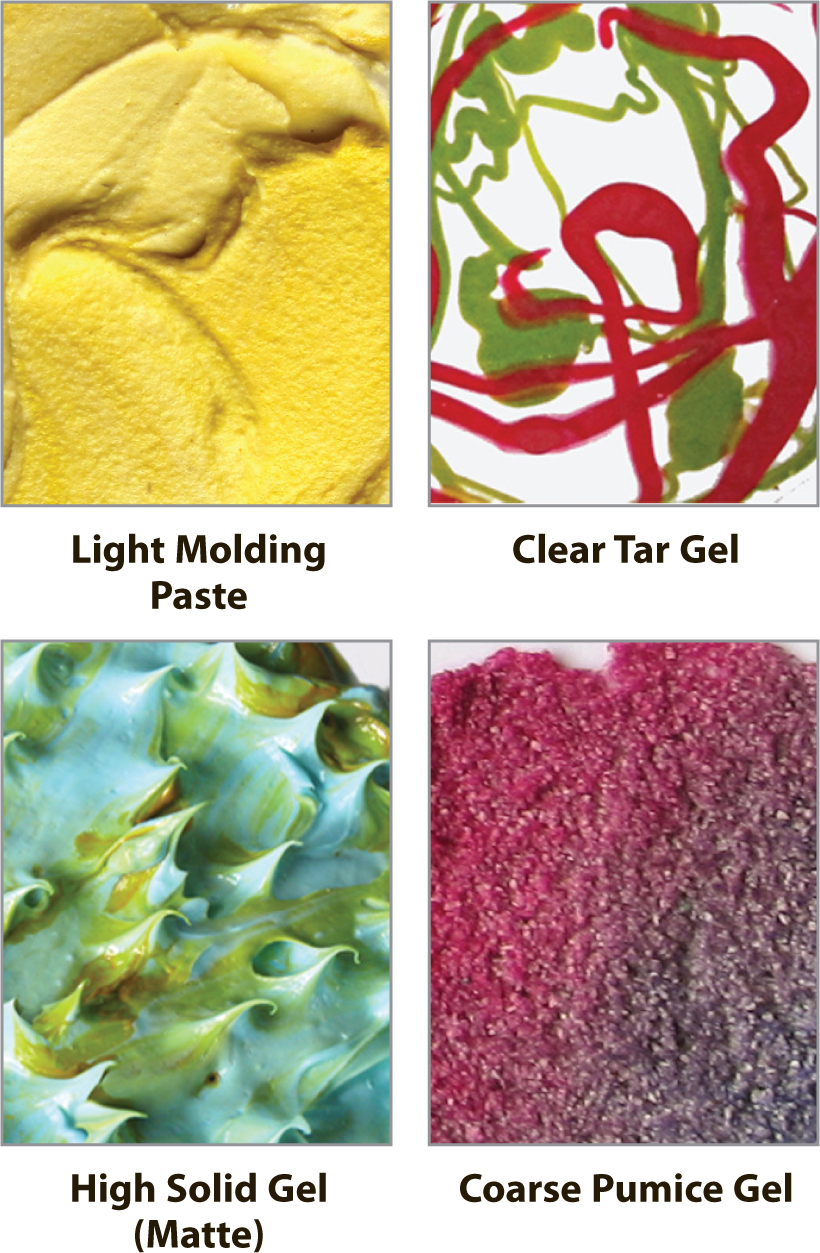
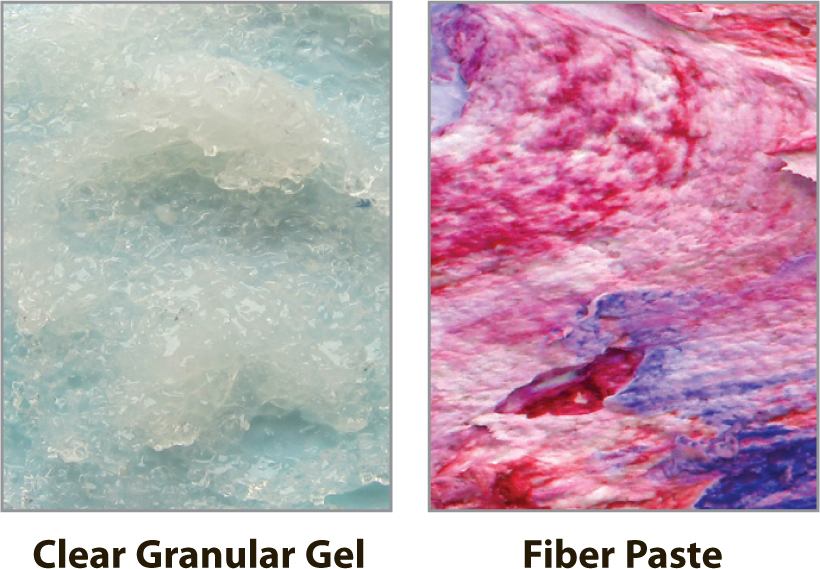
Acrylic Gels and Pastes
Gels and pastes are the “secret” ingredients that will allow you to take your creative ideas and explorations to new heights. There are many gels, pastes, and grounds that can be used alone, together, or layered in any combination and mixed with any of the paints; therefore, the opportunity to explore countless avenues for personal expression is right at your fingertips. Finding “your voice,” artistically speaking, has never been so easy and so much fun.
These materials are all made of the same ingredients: water and acrylic polymer solids. For you, this means creative freedom. You can mix, layer, and combine them in any way you wish to create endless variations and spectacular effects. The fast dry time lets you “layer up” to your heart’s delight. Unlike oils, which have oppressive rules and dry times, acrylics allow you to follow your musings without fear of improper application techniques.
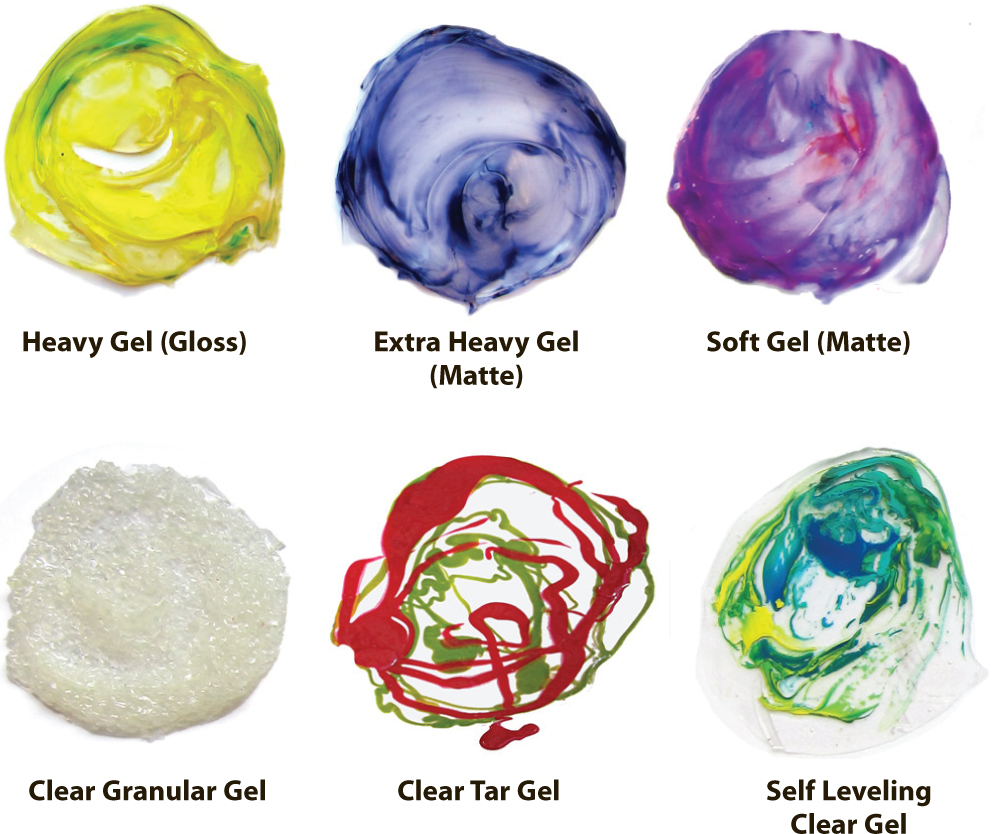
Gels can be thought of as colorless paint—they are made from binder but contain an added swelling agent to give them a heavier viscosity. They are offered in gloss, semi-gloss, and matte sheens and in viscosities ranging from light and (almost) pourable (like yogurt) to extra heavy (like peanut butter). Pastes are gels with solids added (marble dust, calcium carbonate, glass beads, etc.). This gives them body, which results in interesting textures and sculptural effects. Mediums are a low-viscosity polymer that you can use to thin paint for a better flow and to create glazes.

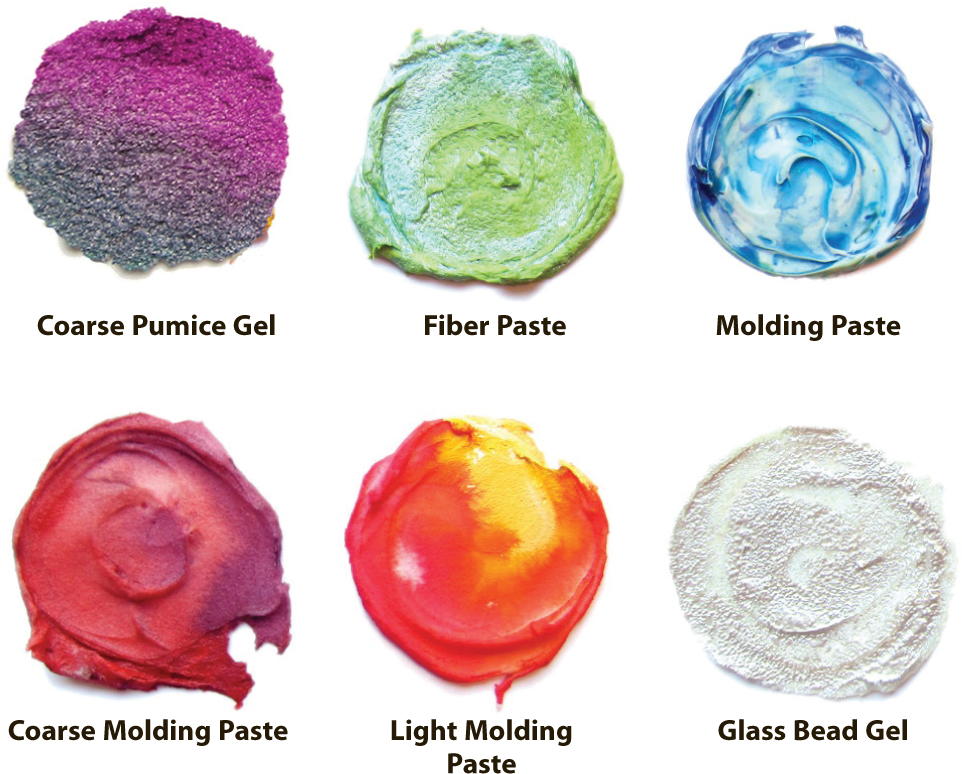
When tinted with color, the unique qualities of the gels and pastes become more apparent. You can use all gels and pastes in the following ways:
• As a surface texture on which to paint (called a ground)
• Mixed with paint for added body and sheen (called as a medium)
• Applied on top of your painting for a covering effect

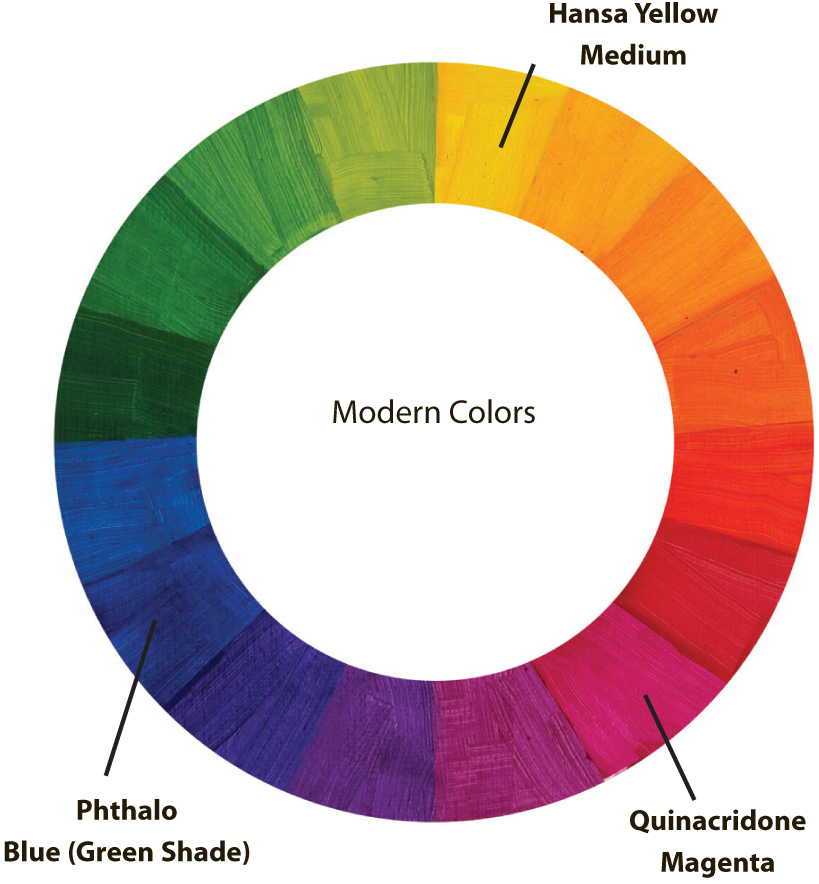
Mineral and Modern Pigments
Pigments are what make paints colorful, and they come in a wide array of hues (reds, greens, blues, browns, etc.). Pigments also come in two classifications: mineral (inorganic) and modern (organic). Although they share some similar characteristics, their makeup and behavior are different. Mineral pigments have earthy sounding names, such as sienna, ochre, cadmium, cobalt, and ultramarine. Modern pigments have names that allude to their chemical origins, such as quinacridone, phthalo, hansa, dioxazine, and anthraquinone. Knowing their unique characteristics will help you make accurate color-mixing choices.
Mineral pigments are generally characterized by:
• high opacity (very opaque)
• low chroma (less vibrant)
• low tinting strength (do not strongly change the colors they are mixed with)

Modern pigments are generally characterized by:
• high translucency (very transparent)
• high chroma (very vibrant)
• high tinting (strongly change the colors they are mixed with)

Use minerals if you want to layer one color over another without seeing the layer underneath; use moderns if you want to layer colors and allow the bottom-most colors to show through and influence the upper layers.
It is possible to achieve a wide spectrum of colors by mixing only the three primary colors: red, yellow, and blue (plus white). The color wheels below show which hues result from using mineral or modern pigments. Depending on your preferences, you can control the hues in your painting by choosing the type of pigments that suit your artistic vision.