


Linear Perspective
Perspective is the representation of three-dimensional space on a two-dimensional surface. It’s responsible for creating the illusion of depth and distance. Many artists try to make perspective into something more difficult than it is. The truth is, you’ve already seen perspective in action—you just didn’t know what to call it. The rules of perspective simply explain the reasons behind what you’re seeing.
Understanding Linear Perspective
Linear perspective is the most commonly recognized form of perspective. According to its rules, objects appear smaller as they recede into the distance. When learning about linear perspective, the horizon line—a horizontal line that bisects any given scene—is an important concept. It can be the actual horizon, or it can be a line that falls at eye level—meaning at the height of your eyes, not where your eyes are looking. The vanishing point (VP)—or the spot at which all parallel lines in a scene seem to converge—is always located on the horizon line.

One-point perspective Objects appear to shrink proportionately to one another as they recede into space. When applying one-point linear perspective, all the horizontal lines converge at one vanishing point in the distance. The vertical lines all remain at the same 90 degree angle.
One-Point Perspective
When lines are all on one plane—such as with railroad tracks—the receding lines converge at one vanishing point. Think again of the railroad tracks—parallel stripes receding into the distance, with the space between them growing smaller until the lines merge on the horizon. Establishing the vanishing point will help you determine the correct angle for any lines coming toward (or moving away from) the viewer; but the angle of vertical or horizontal lines won’t be affected. (See diagram above.)

A road is one of the simplest ways to demonstrate one-point perspective at work—the lines converge at a distant point.


Two-Point Perspective
Two-Point Perspective
If a scene has more than one plane—for instance, if you are looking at the corner of an object rather than the flat face of it—then you should follow the rules of two-point perspective. With two-point perspective, there are two vanishing points. To find the vanishing points, first find your horizon line. Next draw a line that follow one of the object’s angled horizontal lines, extending the line until it meets the horizon line. This establishes one vanishing point. Now repeat this process for the opposite side of the object to establish the remaining vanishing point. (Note: Sometimes a line will extend to a vanishing point that isn’t contained on the page!) Each vanishing point applies to the angle of all parallel planes that are receding in the same direction. As with one-point perspective, vertical lines will all remain at the same 90 degree angle—only their size (in terms of length) will be affected by perspective.


Applying the principles of perspective to your subjects will help you achieve realistic-looking sketches, but you don’t have to follow the rules rigidly. When drawings are too tight or stiff, they lose their human quality; if you bind yourself to exact lines and angles, you might turn your lively street scene into an architectural drawing. Apply your artistic interpretation to a scene to create a more natural look.

This painting is an example of two-point perspective.

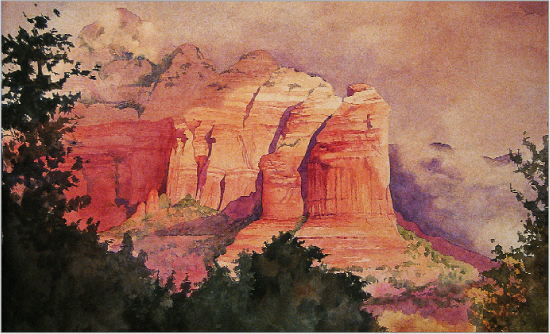
Atmospheric Perspective Basics
Atmospheric perspective is critical to creating the illusion of depth and dimension in your work. Atmospheric (sometimes called “aerial”) perspective is responsible for the way objects in our field of vision appear to change in size, color, texture, focus, and even brightness as they recede into the distance.
In nature, impurities in the air—such as moisture and dust—block out some of the wavelengths of light, making objects in the distance appear less distinct and with softer edges than objects in the foreground. And because the longer, red wavelengths of light are filtered out, distant objects also appear cooler and bluer. When applying atmospheric perspective, remember to paint distant objects with less detail using cooler, more muted colors, and remember to paint foreground objects with more detail using warmer, brighter colors.
BARBARA FUDURICH
Using Atmospheric Perspective In this painting, the artist gives the elements in the foreground the brightest, warmest colors, keeping them sharp in focus and highly detailed. She uses increasingly less detail for objects in the distance, also applying subtle, cooler colors as she moves into the middleground. The objects in the background are the most muted with blurred, unfocused edges.

TOM SWIMM
In this coastal painting, the artist gives the elements in the foreground (the sunlit building and the rocks along the shore) the brightest, warmest colors, keeping them sharp in focus with more detail. He uses increasingly less detail for the hills and rocks along the distant shore, also applying more subtle, cooler colors as he moves into the background.

BARBARA FUDURICH
Using Muted Colors Here the artist rendered the background elements (the mountains and the foliage in front of them) with cooler, bluer colors, which pushes them back into the picture plane and creates the illusion of distance. Note that the green foliage in the foreground is much brighter and more detailed; also, the red flowers in the foreground are quite distinct, but become blurred and muted as they recede into the distance.

SCOTT BURDICK
Recognizing Atmospheric Perspective Although the foreground of this painting is in shadow (and therefore the objects closest to the viewer are muted), the artist still employs atmospheric perspective to create the illusion of distance between the middleground and the background. When placed against the cool, vague mountain in the distance, the warm, reddish hills and well-defined crevices of the middleground seem to “pop” forward.

More About Atmospheric Perspective
Here are some more techniques using atmospheric perspective.

Distinguishing the Planes The foreground shrubs boast the most vibrant foliage color and detail in this scene. In the middle ground, the trees have a softer, more out-of-focus look. And the trees in the distant background are grayed and indistinct.

Pairing Perspectives Linear perspective is responsible for the way the path narrows as it leads into the distance. But atmospheric perspective accounts for the blurring of forms and dulling of colors in the distance.

Sizing and Overlapping Elements The house pictured here would be taller than the fence if the two elements were placed side by side—but enlarging the posts makes them appear nearer. Similarly, overlapping the house with the tree pushes the house into the distance, creating a more realistic sense of depth.

Implementing Color Distinctions The contrast between the bright warm flower shapes in the foreground and the hazy, gray trees of the background help explain why Leonardo da Vinci called atmospheric perspective “the perspective of disappearance!”

People in Perspective
Knowing the principles of perspective (the representation of objects on a two-dimensional surface that creates the illusion of three-dimensional depth and distance) allows you to draw more than one person in a scene realistically. Eye level changes as your elevation of view changes. In perspective, eye level is indicated by the horizon line. Imaginary lines receding into space meet on the horizon line at what are known as “vanishing points.” Any figures drawn along these lines will be in proper perspective. Study the diagrams below to help you.


Try drawing a frontal view of many heads as if they were in a theater. Start by establishing your vanishing point at eye level. Draw one large head representing the person closest to you, and use it as a reference for determining the sizes of the other figures in the drawing. The technique illustrated above can be applied when drawing entire figures, shown in the diagram below. Although all of these examples include just one vanishing point, a composition can even have two or three vanishing points.

If you’re a beginner, you may want to begin with basic one-point perspective. As you progress, attempt to incorporate two- or three-point perspective.


Foreshortening
Foreshortening causes the closest part of an object to appear larger than parts that are farther away. Technically foreshortening pertains only to objects that are not parallel to the picture plane. Because of your viewing angle, you must shorten the lines on the sides of the nearest object to show that it recedes into the distance. For example, if you look at someone holding his arm straight down against the side of his body, the arm is perfectly vertical (and parallel to the picture plane), so it appears to be in proportion with the rest of his body. But if he raises his arm and points it directly at you, the arm is now angled (and no longer parallel to the picture plane), so it appears disproportionate to the rest of his body. (The hand looks bigger and the arm looks shorter.) So you would draw a large hand and an arm with shortened sides.

Recognizing Foreshortening This drawing is an excellent example of foreshortening. Notice the difference in size between the boy’s foot (closest to the viewer) and his head (farthest from the viewer).
Simplifying Foreshortening
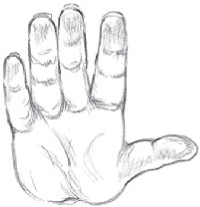
You can use this simple exercise to better understand the logic of foreshortening. All you’ll need is your own hand and a mirror!

Fingers Straight Up Hold your hand in front of a mirror, palm forward. Notice that your fingers are the correct length in relation to your palm. Nothing is foreshortened here.
Fingers Angled Toward You Now tip your hand forward a little, and see how the lengths of the fingers and the palm appear shortened. This is subtle foreshortening.

Fingers Angled Down When you turn your fingers so they’re angled down, they appear longer but still not full length, though the fingertips are visible. This pose shows some foreshortening; the fingers seem too long and thick in relation to the back of the hand.
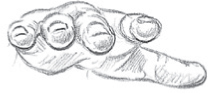
Fingers Pointing Forward Now point your fingers straight at you. This is the most extreme foreshortened view; the fingers appear to be mere stubs.

Fingers Pointing Straight Down No foreshortening is at work in this frontal view. The tips of the fingers cannot be seen, and the lengths of the fingers and hand are not at all distorted.

Proportions of the Body: Measuring Your Subject
Maintaining proper proportions when drawing will help you achieve a lifelike quality. Artists throughout history have used eight heads as the proportional height of a figure. Once you establish a unit of measurement such as the head of your model, it is best to return to the original unit of measurement to check your height and width. This will ensure the correct proportion for the figure being drawn.
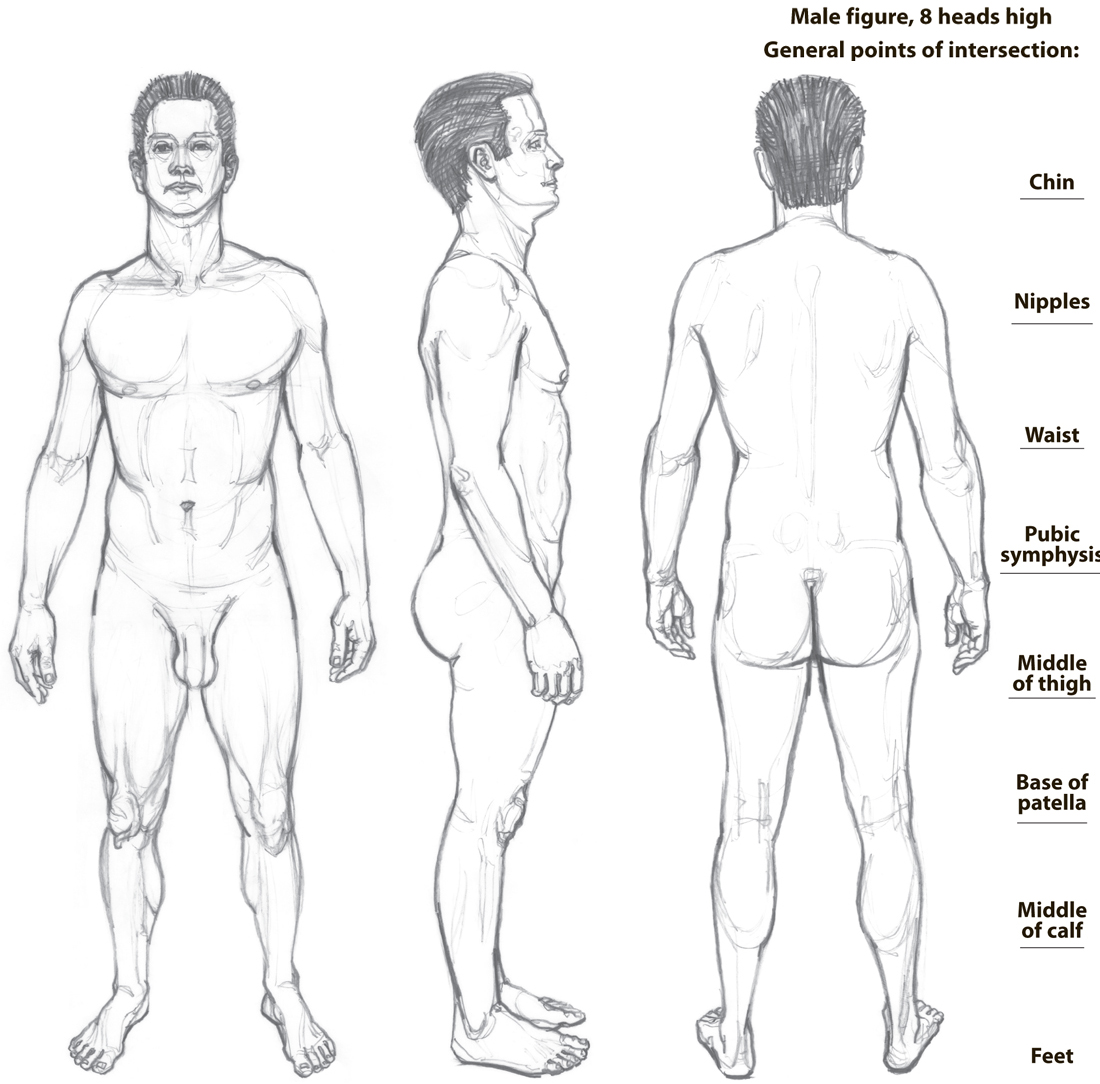
Measuring your Subject 1. From your point of view, hold the divider in your hand, stretch out your arm, and lock your elbow. It is imperative that you keep the divider the same distance between you and what is being measured. Do this every time you check a measurement in a drawing. 2. Spread open the divider and adjust it so that one point is on the top of the head and the other point is on the bottom of the chin. You might want to close one eye. This will give you the size of the figure’s head from your point of view. Use this size as your unit of measurement. You can see by the diagrams above that the male and female figures are eight heads high. 3. You can also measure the figure you’re drawing by its width in heads. Male shoulders are generally 2 heads wide, but female shoulders are a bit smaller, measuring 1-3/4 heads wide. Once you’ve established these measurements, switch to a new unit of measurement, such as half of the entire figure. The more you measure and compare, the more accurate your drawings will be!

Proportions of the Body: Points of Intersection
Remember that everyone is different. Each individual has his or her own unique proportional relationships or ratio of parts to the whole. Being true to the figure will help create individuality and realism in your drawing. Artists who rely on formulas create stylized figures that frequently lack true representation of the subject.

General Points of Intersection As shown to the right of the figures above, the general points of intersection are the chin, breasts, waist, pubic symphysis, middle of thigh, base of patella, middle of calf, and feet. You can use these as reference points, adjusting them to each unique individual. Note that if you’re viewing a figure from the side, the halfway mark (or pubic symphysis line) intersects the great trochanter; if you’re viewing a figure from the back, the halfway mark intersects the coccyx.
Point of View Always maintain and return to the same point of view when drawing. To help, you can mark your location on the ground with tape. Remember to return your head to the same position or point of view when assessing your work. Even the slightest movement from your original position is problematic. The smallest tilt or change in your head position will change the look of your subject, affecting the relationships of the parts of the figure to the whole. Using your divider will work only if you maintain the same point of view.

Proportions of the Head
Using a standard set of measurements helps the artist create accurate proportions when constructing a head drawing. In this section, you’ll find measurements that can serve as general guidelines for your head drawings. These proportions are created from averages of the human population at large; however, remember that all people are not the same—they are individuals with varying proportions, and it is these variations that make us different from one another. Solely relying on standard measurements will result in a stylized portrait.

Step One Begin with simple shapes first. A) Frontal: Start with a vertical rectangle. Inside, draw a single oval that includes the cranial and facial mass. B) Profile: Begin with a square. Then use two separate ovals connected at the forehead to draw the facial and cranial mass. In both drawings, the halfway point is lightly marked along the vertical line.

Step Two A) Frontal: Draw the major axis (vertical) to indicate the centerline of the face. Then add the minor axis (horizontal) to place the eyes. The tops of the eyelids are approximately halfway down the face. Draw a line halfway from the eye line to the chin to mark the base of the nose. The mouth is usually one-third of the way from the base of the nose to the chin. B) Profile: Divide the square into four by drawing a cross in its center. Mark nose and mouth measurements as in the frontal view (A).

Step Three A) Frontal: A head is roughly five eyes wide. Divide the eye line into five equal units, with one unit of measurement in the center, between the actual location of the eyes. The tops of the ears are slightly higher than the eye line. The bases of the ears correspond to the base of the nose. Draw the ears with simple shapes first using straight-line segments. Starting with the line for the brow ridge above the eye line, block in the forehead and base of the nose. B) Profile: Indicate the center of the ear in profile with a dark cross slightly below the center of the square. The space from the front of the face to the ear is approximately seven profile eye widths. Other ear measurements correlate with the frontal view. Place the eye approximately two eyes in from the front arch of the face. Now draw the angles of the nose and jawbone. Separate the forehead from the side of the head.

Step Four Everything on the face has a front, top, and bottom. When drawing the eyes, start with the eye socket first, using straight lines to create the overall shape. Then move to the upper lid. Articulate the nose with a bridge, sides, and base; then draw the planes of the face. Add the philtrum, which connects the base of the nose to the upper lip. Chisel out the cranial mass further. Develop the ear shapes, making them more organic and specific. Increase the line weight and override the measurement lines.

Step Five Now fluctuate the contour line to reveal the organic qualities of the face. Add the iris and pupil. The upper and lower lids of the eye eclipse portions of the iris. Articulate the eyebrows with simple shapes, and place the nostrils at the base of the nose. Reveal the protuberance of the mouth using lines from the nostrils to the corners of the mouth. Then add the contours of the neck and the hairline to separate the face from the rest of the head.

Foreshortening Head Measurements
Foreshortening occurs when parts of an object nearest the viewer appear larger than parts that are farther away. For example, have someone stand in front of you with arms at his or her side. Take note of the size relationship of the hand and the head. Now have the person hold out a hand toward you, palm facing you. Notice that the hand now appears much larger in proportion to the head. This illusion is foreshortening in action.
Applying the rules of perspective and foreshortening helps create the illusion of volume and space. Mastering these principles results in more dynamic poses and compositions. Poses and perspectives that involve foreshortening can be more challenging than others. The obstacle is to overcome drawing what you think you know and instead draw what you observe and truly see. In a three-quarter view of the head, such as the drawings below, the model is looking off to one side. Plenty of beginners make the far side of the face too large and fail to eclipse the tear duct with the bridge of the nose. This is because people are accustomed to seeing a face in frontal view. These beginners are drawing what they think they know—not what is in front of them.

Step One Starting with a simple box for the head allows you to see the major planes, indicate whether the model is looking up or down, and establish which side of the head we see. First, lightly draw a rectangle or square—whichever shape best fits your model’s head. If the model is looking down and to the right, you should see the top, left side, and front of the box. If the model is looking up and to the left, you should see the bottom, right side, and front of the box.

Step Two Mark the positions of the eyes, nose, mouth, and ears. Notice how foreshortening changes the marks from the frontal and profile views. When the model is looking down, it is important to know where the forehead becomes the top of the head. Then your measurements are easier to place on the front of the face. When the model is looking up, foreshortening appears more extreme. The eyes are high on the front of the face, reducing the amount of forehead seen. Foreshortening changes the ear line in relation to the other measurements and reduces the distances between the eyes, nose, and mouth. Check your angles and measurements—the relationships among features can be deceiving.

Step Three Begin chiseling out the shape of the head from the box using straight-line segments. When the model is looking down, we do not see the base of the nose. But when the model is looking up, we see plenty of the base. The arc of the mouth wraps with the curvature of the face and depends on the position of the head. Begin drawing the ears using straight lines that show where the curves change direction. Block in the eyes using rectangles.

Step Four Further develop the planes of the head. Build the eye sockets before refining the eyes; this allows you to analyze the shapes around the eye for proper construction. Determine the shapes contained in the ears. When the model is looking down, focus on the bridge of the nose; when the model is looking up, focus on the nostrils. At this point, some straight-line segments should slowly become more organic.

Step Five In this step, increase your line weight to suggest value and create focal points or areas of interest, such as the eyes. Use more defined contour lines to articulate the organic qualities of the human head and define the major forms. Separate the hair shapes from the “mask” of the face, and add the eyebrows. Draw the contours of the neck as they relate to the gesture of the head.