
Chapter 2: General Tips
Closing all ODS Destinations at Once
Running Multiple Instances of One Destination
Displaying Output Object Information
Selecting and Excluding Output Objects
Querying Open ODS Destination Information
Using ODS Inline Functions and Formatting
Generating Output Using Internet Services
Sending Output to an FTP Server
Setting the Default Path for Output Files
Exporting ODS Output as “Character” Separated Values
This section includes tips that span all of the Output Delivery System (ODS) world. It includes statements and options that work across all ODS destinations or affect ODS globally.
Controlling Your ODS Output
ODS offers many options and techniques to control your output. This section describes various ways of controlling ODS destinations using some common and uncommon techniques.
The ODS Sandwich
The ODS sandwich is the term used to describe the statements used to open and close an ODS destination. The ODS sandwich is the most fundamental concept in ODS and if you’ve used ODS at all before, you are likely already familiar with this technique.
The technique is fairly simple. You use one statement to open an ODS destination, then another statement to close the destination. Opening a destination causes all SAS output from that point on to be rendered to that destination. Closing it causes the destination to be closed and prevents any more SAS output from going to the destination.
If you’ve used SAS at all since Version 8, you’ve already been using at least part of this technique even if you haven’t realized it. Up until SAS 9.3, the listing destination was automatically opened by SAS when you started a SAS session. This is essentially the same as invoking the following command:
ODS LISTING;
This statement opens the listing destination, and any procedure or DATA step output from this point on will be sent to the listing destination. To close the destination and complete the ODS sandwich, you would use the ODS CLOSE command as follows:
ODS LISTING CLOSE;
In SAS 9.3 (DMS), the default destination was changed to HTML. The ODS sandwich for HTML would look like the following:
ODS HTML;
...procedure and/or DATA step code...
ODS HTML CLOSE;
This same technique works for all ODS destinations (for example, PDF, RTF, Tagsets.ExcelXP, PowerPoint, etc.). In fact, there is nothing preventing you from generating multiple outputs at one time. We will finish this tip with a code sample that demonstrates the ODS sandwich technique using multiple destinations.
ODS HTML;
ODS PDF;
ODS RTF;
PROC PRINT DATA=sashelp.class(OBS=5);
RUN;
ODS RTF CLOSE;
ODS PDF CLOSE;
ODS HTML CLOSE;
Figure 2.1 shows the output from the code above.
Figure 2.1: Output generated by multiple destinations simultaneously

Always Use ODS CLOSE
A common pitfall to the ODS sandwich is forgetting close the destination. You may have noticed in your use of ODS that, in some destinations, after you open the ODS destination and run some procedures that the output file has content in it and you can open the file even without closing the ODS destination. Don’t assume that because this works from time to time that you don’t need the ODS CLOSE statement.
If you don’t explicitly close each destination, you can end up with a partial output file which may result in a file that won’t open, or it won’t contain all of the output that you expected. So just remember to always close all of your ODS destinations.
Closing All ODS Destinations at Once
Using the ODS CLOSE statement can become tedious if you are changing destinations a lot in your SAS programs, so there is a shortcut that closes all ODS destinations (including listing) at once. The statement that does this is shown below.
ODS _ALL_ CLOSE;
This is used in place of closing each destination independently. For example, you may want to avoid using the following code to open and close a number of ODS destinations:
ODS HTML;
ODS PDF;
ODS RTF;
PROC PRINT DATA=sashelp.class(OBS=5);
RUN;
ODS RTF CLOSE;
ODS PDF CLOSE;
ODS HTML CLOSE;
You could simply do this.
ODS HTML;
ODS PDF;
ODS RTF;
PROC PRINT DATA=sashelp.class(OBS=5);
RUN;
ODS _ALL_ CLOSE;
Keep in mind that this will close any destinations that are open by default in SAS as well. So if the listing destination was opened by SAS at the beginning of the session, it will be closed as well. To make sure that the listing destination stays open, this is a common idiom.
ODS _ALL_ CLOSE;
ODS LISTING;
Interleaving ODS Destinations
All of the examples from our previous tips have assumed that all ODS destinations begin and end at the same time. It doesn’t have to be this way though. You can open and close each ODS destination independently of each other. This is most easily shown with an example.
Let’s say that we have a report that includes the output from three procedures. We want the whole report to be rendered to HTML, but we need only the second procedure output in PDF. To do this, we simply put our ODS HTML sandwich around the entire report, and our ODS PDF sandwich around only the second procedure as follows.
ODS HTML;
PROC CONTENTS DATA=sashelp.class;
RUN;
ODS PDF;
PROC PRINT DATA=sashelp.class(OBS=3);
RUN;
ODS PDF CLOSE;
PROC MEANS DATA=sashelp.class;
VAR age;
RUN;
ODS HTML CLOSE;
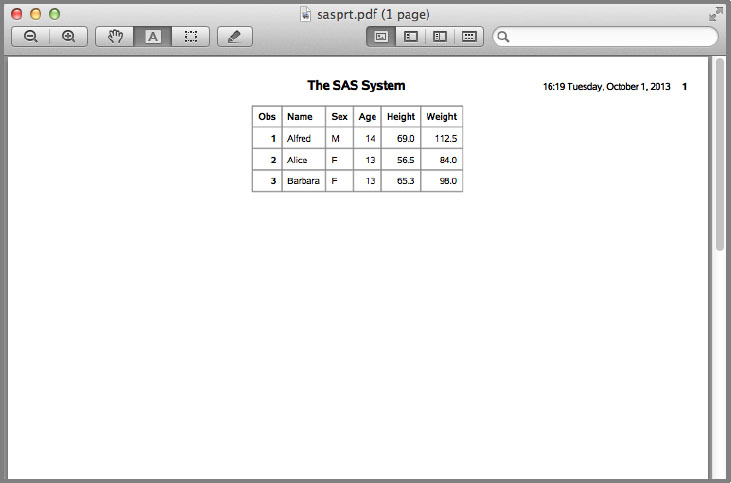
Figure 2.2 and Figure 2.3 show the HTML and PDF output that results, respectively. Notice that the HTML output has more tables than the PDF output because ODS PDF was used only for the PROC PRINT output.
Figure 2.2: HTML output

Figure 2.3: PDF output
Running Multiple Instances of One Destination
In addition to being able to run multiple ODS destinations simultaneously, you can also run multiple instances of a single ODS destination. This can be useful if you want to create different subsets of a report in one format, or if you want to create reports in the same format but different styles.
The way to do so is by giving each instance of the destination a unique identifier. This identifier goes in parentheses after the destination name. Below is an example of creating two HTML reports simultaneously, but using different styles as well as including only part of the report in the second HTML file.
ODS HTML(1) FILE='one.html';
PROC CONTENTS DATA=sashelp.class;
RUN;
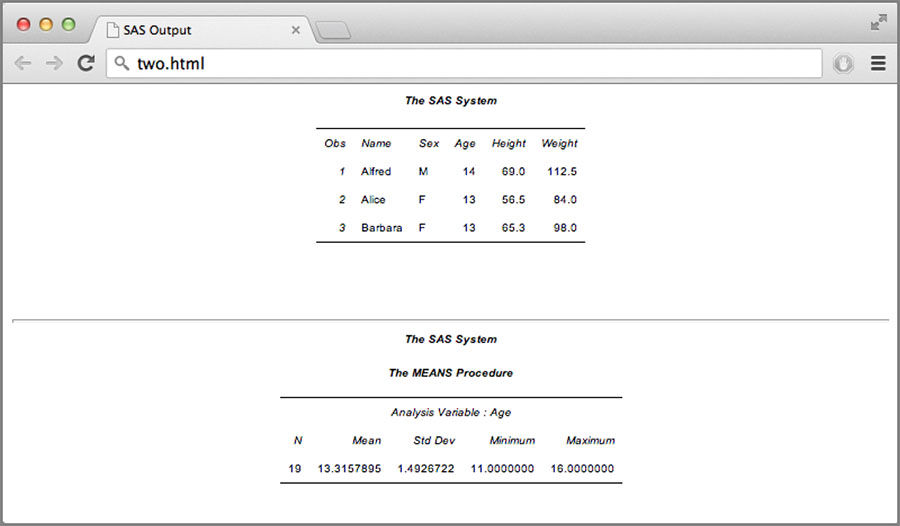
ODS HTML(2) STYLE=styles.journal FILE='two.html';
PROC PRINT DATA=sashelp.class(OBS=3);
RUN;
ODS HTML(1) CLOSE;
PROC MEANS DATA=sashelp.class;
VAR age;
RUN;
ODS HTML(2) CLOSE;
Figures 2.4 and 2.5 show the output from the two HTML reports.
Figure 2.4: Output from ODS HTML(1)

Figure 2.5: Output from ODS HTML(2)
Displaying Output Object Information
Every object that comes out of ODS has information associated with it by the procedure that created it, such as the output object name and label, the template name, and the object path. These pieces of information can be used in conjunction with other ODS statements and procedures to customize your reports.
To turn output object tracing on, you simply run the following command.
ODS TRACE ON;
You can also turn on the label path using the LABEL option as follows.
ODS TRACE ON / LABEL;
The code below demonstrates how to trace the output object information.
ODS TRACE ON / LABEL;
PROC MEANS DATA=sashelp.class;
VAR age;
RUN;
The listing and log from this program code appear as Output 2.1.
Output 2.1: Output Object Trace Information
Output Added:
-------------
Name: Summary
Label: Summary statistics
Template: base.summary
Path: Means.Summary
Label Path: 'The Means Procedure'.'Summary statistics'
-------------
Selecting and Excluding Output Objects
There may be times when you want to exclude some of the outputs from a procedure, or conversely, display only some outputs. This is possible with the use of the ODS SELECT and ODS EXCLUDE statements.
This method is a two-step process. First you turn on output object tracing, using ODS TRACE ON; to get the name of the output object that you want to select or exclude, then you use the ODS SELECT/EXCLUDE statement to enable or disable it.
We saw an example of using ODS TRACE ON in the tip on “Displaying Output Object Information”. We will use it with PROC CONTENTS here in the following code:
/* First pass to get output object names */
ODS TRACE ON;
PROC CONTENTS DATA=sashelp.class;
RUN;
/* Select just the Variables output object */
ODS SELECT Variables;
ODS HTML;
PROC CONTENTS DATA=sashelp.class;
RUN;
ODS HTML CLOSE;
Figure 2.6 shows the output. As you see, we receive only one output object this time.
Figure 2.6: Demonstration of ODS SELECT statement

Now let’s try excluding just the Variables object.
ODS EXCLUDE Variables;
ODS HTML;
PROC CONTENTS DATA=sashelp.class;
RUN;
ODS HTML CLOSE;
Figure 2.7 shows the output from the code above.
Figure 2.7: Demonstration of the ODS EXCLUDE statement

You are not limited to just one name on the SELECT/EXCLUDE statements. You can specify as many output objects as you wish. The list will, however, be reset after each procedure unless you use the PERSIST option.
Even though both the SELECT statement and the EXCLUDE statement exist, you should never try to use both of them at the same time. That behavior is undefined.
Suspending an ODS Destination
Although there isn’t exactly a “pause” button in ODS, you can effectively cause that behavior by using ODS SELECT and ODS EXCLUDE with the ALL and NONE keywords. You can turn off all of the output objects in ODS using the following command:
ODS SELECT NONE;
Or equivalently:
ODS EXCLUDE ALL;
If either of these is executed, you will no longer see any output generated by ODS destinations. To enable output again, you would use:
ODS SELECT ALL;
Or alternatively:
ODS EXCLUDE NONE;
The statements above are global to ODS and would suspend/enable all ODS destinations. You can also suspend/enable individual ODS destinations by including the destination name after “ODS”. For example, to suspend all output to PDF, but leave all other destinations untouched, you would use:
ODS PDF EXCLUDE ALL;
To enable output to PDF again, you would use EXCLUDE NONE as follows:
ODS PDF EXCLUDE NONE;
Here is a complete example that begins with PDF and HTML being generated. We then suspend PDF output using ODS PDF EXCLUDE ALL; and enable it again with ODS PDF EXCLUDE NONE; later on. All the while, HTML gets all of the output.
ODS HTML;
ODS PDF STARTPAGE=NO;
PROC PRINT DATA=sashelp.class(obs=3);
RUN;
ODS PDF EXCLUDE ALL;
PROC MEANS DATA=sashelp.class;
VAR age;
RUN;
PROC MEANS DATA=sashelp.class;
VAR height weight;
RUN;
ODS PDF EXCLUDE NONE;
PROC REPORT DATA=sashelp.class(obs=3);
RUN;
ODS HTML CLOSE;
ODS PDF CLOSE;
Figures 2.8 and 2.9 show the output from ODS HTML and ODS PDF generated by the code above.
Figure 2.8: ODS HTML output showing all tables
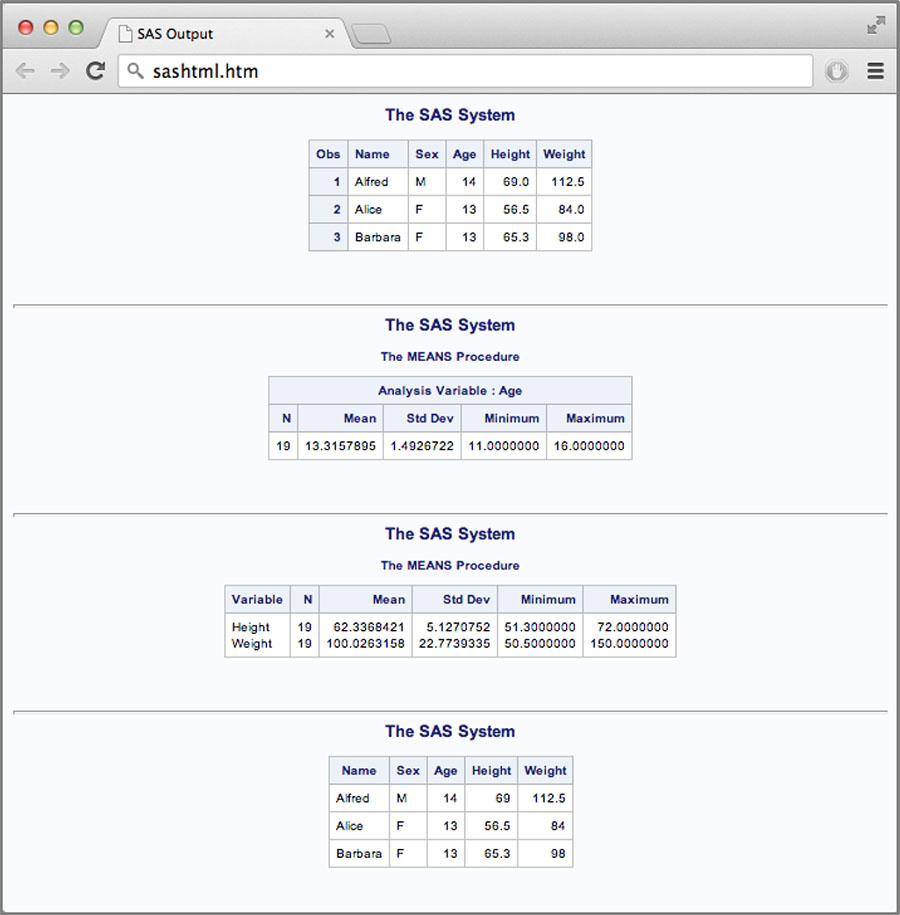
Figure 2.9: ODS PDF showing only tables not excluded

Querying Open ODS Destination Information
There may be times when you want to query ODS to see which destinations are currently open. There is a built-in data set view that allows you to do so. It is called SASHELP.VDEST. This view can be used as an input data set for the DATA step or procedures. Here is an example that simply prints out the open destination information. We will open a couple of destinations first so that there will be something to report.
/* Close everything out and start fresh */
ODS _ALL_ CLOSE;
/* Open a few destinations */
ODS LISTING;
ODS PDF;
ODS RTF;
ODS HTML;
/* Print the contents of SASHELP.VDEST */
PROC PRINT DATA=sashelp.vdest;
RUN;
/* Close all destinations */
ODS _ALL_ CLOSE;
Output 2.2 shows the output from PROC PRINT.
Output 2.2: PROC PRINT rendering of SASHELP.VDEST
Obs destination style
1 LISTING Listing
2 PDF Pearl
3 RTF Rtf
4 HTML HTMLBlue
Creating Output Data Sets
You can capture the output data from nearly every procedure by using the ODS output destination. This destination is a bit different than other destinations in that it doesn’t create files that you view, it creates a SAS data set. The syntax for opening the ODS output destination is as follows:
ODS OUTPUT output-object-name=data-set-spec;
where output-object-name is the name of the output object, and data-set-spec is the output data set name and options.
The name of the output object can be acquired using ODS TRACE (see the “Displaying Output Object Information” tip for more information). Basically, you turn on ODS tracing to get the output object name and run your SAS program. The output object name will show up in the tracing information.
The data set name is arbitrary. You can specify whatever data set name you wish. You can also specify data set options in parentheses as usual.
Here is a simple example using PROC CONTENTS. The example here turns on ODS tracing to show the output object name, then runs PROC CONTENTS again to capture the output data set. In this example, we are only keeping the Variable and Type columns by using KEEP= in the output data set options.
/* Get the output object name */
ODS TRACE ON;
PROC CONTENTS DATA=sashelp.class;
RUN;
ODS TRACE OFF;
/* Open the Output destination and
run the procedure again to capture the data set */
ODS OUTPUT Variables=MyDataSet(KEEP=Variable Type);
PROC CONTENTS DATA=sashelp.class;
RUN;
/* Print out the output data set */
ODS HTML;
PROC PRINT DATA=MyDataSet;
RUN;
ODS HTML CLOSE;
Figure 2.10 shows the output from the above code.
Figure 2.10: PROC PRINT rendering of ODS output data set

Using ODS Inline Functions and Formatting
For most of ODS’ existence, applying styles could only be done down to a table cell level. If you wanted to put formatting within a cell, you had to put destination-specific strings into your data, which would then be embedded in your output file. The problem with this is that different data had to be created for each destination. In addition, some destinations like PDF are binary files, which are nearly impossible to embed information into from a data set. To alleviate this situation ODS allows you to embed special functions and formatting calls in a destination-agnostic way so that they can be supported across destinations.
The general syntax for inline functions is:
ods-escape-char{function arguments}
where ods-escape-char is a user-specified character that indicates the beginning of an inline function, function is the name of the function, and arguments are the function arguments.
The ODS escape character is simply a single character that you specify to indicate the start of an inline function call. It can be any character, but you should choose a character that doesn’t exist in your data. To tell ODS what character you will use, you use the ODS ESCAPECHAR statement. Here is an example of the ODS ESCAPECHAR statement that sets the escape character to caret (^).
ODS ESCAPECHAR '^';
The function names are specified by ODS and include things such as dagger (dagger character), sigma (sigma character), Unicode (Unicode character), super (superscript), sub (subscript), raw (destination specific formatting), and style (font and color styling). The most common inline function is style. We will look at that one here. Other inline functions for inserting special characters and accenting characters are covered in the following tips.
To add inline styling to your reports, you simply use the general syntax shown above with ‘style’ as the function name. The arguments to the style function are the style override and the text to style. The style override is the same format as STYLE= in ODS templates and Base reporting procedures. You can specify a style element name, style overrides, or both. Here is an example of some titles with inline formatting added.
/* Set the ODS escape character */
ODS ESCAPECHAR '^';
ODS PDF;
ODS HTML;
/* Add inline function syntax to text */
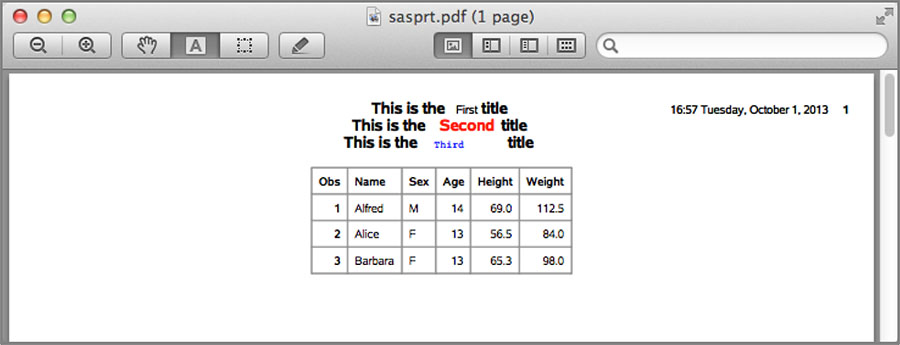
TITLE 'This is the ^{style dataemphasis First} title';
TITLE2 'This is the ^{style [color=red] Second} title';
TITLE3 'This is the ^{style datafixed[color=blue] Third}
title';
PROC PRINT DATA=sashelp.class(obs=3);
RUN;
ODS HTML CLOSE;
ODS PDF CLOSE;
Figures 2.11 and 2.12 show the output in ODS HTML and ODS PDF, respectively.
Figure 2.11: ODS HTML output demonstrating inline formatting

Figure 2.12: ODS PDF output demonstrating inline formatting
You are not limited to putting inline functions in titles. All titles and data elements go through the same processing, so you can add similar formatting inside your data cells by using the inline function syntax in your data values.
Inserting Special Characters
Inserting special characters into your reports uses the inline function syntax described in the previous tip. There are several built-in functions names for special characters that are more common. In addition, there is a unicode function to insert arbitrary unicode characters. The most commonly used special characters are Greek characters. They are available simply as the name of the character spelled out (e.g., ALPHA, BETA, GAMMA, DELTA, etc.). For uppercase characters, you add “_U” as a suffix to the name (i.e., ALPHA_U, BETA_U, GAMMA_U, DELTA_U, etc.). For example, to print an Alpha character, you would enter the following in your title or data string.
^{unicode alpha}
This is assuming that your ODS escape character is set to ‘^’.
For arbitrary Unicode characters, you can specify the Unicode decimal value in the unicode function. The decimal values can be obtained many places on the Internet such as http://www.unicode-table.com/. Let’s say we wanted to print a check mark. The Unicode value for that character is 2714 (there are more Unicode check marks, but this one will work for our example). We then use the unicode function as follows to print a check mark.
^{unicode 2714}
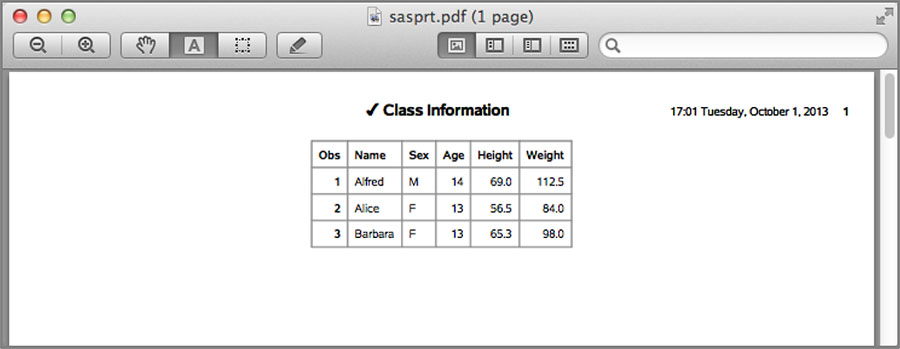
Some other common codes that you may be interested in are greater-than or equal to (2265), less-than or equal to (2264), and not equal to (2260). Let’s put a check mark character into some SAS code so we can run it and see the results.
/* Set the ODS escape character */
ODS ESCAPECHAR '^';
/* Create a title with a check mark character in it */
TITLE '^{unicode 2714} Class Information';
/* Generate some output */
ODS PDF;
PROC PRINT DATA=sashelp.class(obs=3);
RUN;
ODS PDF CLOSE;
Figure 2.13 shows the output.
Figure 2.13: ODS PDF including a check mark character in the title
Generating Output Using Internet Services
Generating output to a file is the most common way of using ODS, but sometimes you may want to send the report automatically using email or publishing it to an FTP server. This section demonstrates these techniques.
Emailing Output
This isn’t so much an ODS tip as it is a FILENAME tip. You can create a fileref that writes to email rather than to a plain file. You then use this fileref on the FILE= option of the ODS destination. The first thing you should do though is to configure an email server. This can be done using the EMAILSYS and EMAILHOST system options.
OPTIONS EMAILSYS=SMTP EMAILHOST='mail.company.com';
Then using the FILENAME statement we create an email-based fileref.
FILENAME eoutput EMAIL TO='[email protected]'
SUBJECT='Here is a copy of my report'
FROM='[email protected]'
CONTENT_TYPE='text/html';
This creates a fileref of the name “eoutput”. You can now use that on the ODS HTML statement to email the report.
ODS HTML FILE=eoutput;
PROC PRINT DATA=sashelp.class(OBS=3);
RUN;
ODS HTML CLOSE;
To send a report as an attachment rather than an HTML formatted message, you would use the following code. This is handy when you want to send a report that a mail client couldn’t read natively like HTML or plain text. You will want to use this technique for mailing output formats such as PDF or RTF. This is a two-step process. The first is creating the output; the second is sending it using the DATA step.
/* Create output file */
ODS PDF FILE='attachment.pdf';
PROC PRINT DATA=sashelp.class(OBS=3);
RUN;
ODS PDF CLOSE;
/* Email it as an attachment */
FILENAME attach EMAIL TO='[email protected]'
SUBJECT='See attachment for my report'
FROM='[email protected]'
ATTACH='attachment.pdf'
CONTENT_TYPE='application/pdf';
DATA _NULL_;
FILE attach;
PUT 'Here is the report I promised you.';
RUN;
Figure 2.14 shows a screen shot of the HTML report in a mail client.
Figure 2.14: Apple Mail displaying an ODS HTML formatted email message

Sending Output to an FTP Server
In addition to being able to send output to email (as demonstrated in the previous tip), you can also send output to an FTP server. This technique is just like the email technique except that you use the FTP access method of the FILENAME statement rather than email. To do this, your FILENAME statement will look like the following.
FILENAME ftpout FTP '/path/to/remote/file.html'
HOST='ftp.server.com'
USER='username' PASS='password'
RECFM=S; * PROMPT DEBUG;
Just as before, we use this fileref on our ODS destination statement in the FILE= option.
ODS HTML FILE=ftpout;
PROC PRINT DATA=sashelp.class(OBS=3);
RUN;
ODS HTML CLOSE;
The PROMPT option can be used to prompt for login information if necessary. The DEBUG option can be used to display information about the FTP connection in case you are having problems. Output 2.3 shows the log output with the DEBUG option turned on.
Output 2.3: Debug output from the SAS log when using the FTP libname engine for ODS output
NOTE: Writing HTML Body file: FTPOUT
NOTE: 220 (vsFTPd 2.0.1)
NOTE: <<< 220 (vsFTPd 2.0.1)
NOTE: >>> USER username
NOTE: <<< 331 Please specify the password.
NOTE: >>> PASS XXXXXXXX
NOTE: <<< 230 Login successful.
NOTE: >>> PORT 10,40,11,189,221,70
NOTE: <<< 200 PORT command successful. Consider using PASV.
NOTE: >>> TYPE I
NOTE: <<< 200 Switching to Binary mode.
NOTE: >>> PWD
NOTE: <<< 257 “/users/username”
NOTE: >>> STOR file.html
NOTE: <<< 150 Ok to send data.
NOTE: User username has connected to FTP server on Host ftp.server.com .
...
NOTE: <<< 226 File receive OK.
NOTE: >>> QUIT
In addition to standard FTP, it is also possible to write to an SFTP server using the SFTP access method in a similar manner.
The ODS Path Macro Variable
The ODS path holds the locations of all of the template stores that can be used for table, style, graph, and tagset templates. The default ODS path is SASUSER.TEMPLAT(UPDATE) SASHELP.TMPLMST(READ), where SASUSER.TEMPLAT is used to store your personal templates and SASHELP.TMPLMST holds the templates shipped with SAS. Some users will change the ODS path in order to store templates in other locations that may be shared with other users at their site. Others may change the path to load templates from a location temporarily, then change it back.
This last technique of changing the ODS path temporarily can cause some headaches in that in order to change it back to what it was previously, you have to know what the path was initially. You can print the ODS path information using the following statement.
ODS PATH SHOW;
However, this doesn’t help in automated processes because it just goes to the log. Luckily, there is a read-only macro variable that contains the ODS path information. The macro variable name is SYSODSPATH. Not only does it contain the path information, but it does it in the same syntax that the ODS PATH statement uses. Here is the output from ‘%PUT &SYSODSPATH;’.
SASUSER.TEMPLAT(UPDATE) SASHELP.TMPLMST(READ)
Here is an example of swapping out the ODS PATH using the SYSODSPATH macro variable.
/* Display default path */
ODS PATH SHOW;
/* Store a copy of the current ODS path */
%LET MYPATH=&SYSODSPATH;
/* Change the path to something else */
ODS PATH SASHELP.TMPLMST(READ);
ODS PATH SHOW;
/* ... Do operations that require new path ... */
/* Change the ODS path back to the initial value */
ODS PATH &MYPATH;
ODS PATH SHOW;
Here is the log output showing that the ODS path was changed and changed back. Obviously, you would run whatever code required the alternate ODS path between changing it and setting it back. This isn’t something everyone would need to do, but it’s a handy tip for when the occasion comes up.
Here is the original ODS path:
1. SASUSER.TEMPLAT(UPDATE)
2. SASHELP.TMPLMST(READ)
Here is the path after setting it explicitly:
1. SASHELP.TMPLMST(READ)
This is the path after setting it using the macro variable contents:
1. SASUSER.TEMPLAT(UPDATE)
2. SASHELP.TMPLMST(READ)
Setting the Default Path for Output Files
Under normal circumstances, the output files from ODS would go to the directory where SAS was invoked. However, this isn’t always the directory where you want your files to go. You could add the full path to the front of every output file in your ODS destination statements, as in the code below, but this can be very tedious and error prone.
ODS RTF FILE='/path/to/my/directory/file.rtf';
ODS HTML FRAME='/path/to/my/directory/file.html'
CONTENTS='/path/to/my/directory/contents.html'
BODY='/path/to/my/directory/body.html';
There is an option on the ODS destination statements (RTF family and markup family only) that can clean this up a lot and reduce the possibility of error. This option is the PATH= option. Rather than putting the entire directory in every filename option, you just put the filename itself. Then in the PATH= option, you specify the directory that should be prepended to all of the filenames. Using this option, the code above becomes this.
ODS RTF PATH='/path/to/my/directory/' FILE='file.rtf';
ODS HTML PATH='/path/to/my/directory/'
FRAME='file.html' CONTENTS='contents.html'
BODY='body.html';
You could clean this up even more using a macro variable if you have multiple ODS statements that use the same PATH=.
%LET MYPATH=/path/to/my/directory/;
ODS RTF PATH=“&MYPATH” FILE='file.rtf';
ODS HTML PATH=“&MYPATH”
FRAME='file.html' CONTENTS='contents.html'
BODY='body.html';
In addition to the content files going to the PATH= directory, graphs will also go to this directory. For destinations that don’t support PATH=, you can use GPATH= to specify a separate directory for the graphics files to go.
Exporting ODS Output as “Character” Separated Values
When most users hear the term CSV, they probably think “comma-separated values.” In ODS, there is a destination called TAGSETS.CSV. While the C in this name started out meaning comma, the delimiter character is configurable through an option, so I like to call it character-separated values to remind people that they don’t have to use commas.
The easiest way to get a comma-separated value file of your ODS output is to use the TAGSETS.CSV destination with the ODS sandwich technique.
ODS TAGSETS.CSV FILE='output.csv';
PROC PRINT DATA=sashelp.class(OBS=5);
RUN;
ODS TAGSETS.CSV CLOSE;
The output for this will look like the Output 2.4.
Output 2.4: Comma-separated value output
“Obs”,“Name”,“Sex”,“Age”,“Height”,“Weight”
“1”,“Alfred”,“M”,14,69.0,112.5
“2”,“Alice”,“F”,13,56.5,84.0
“3”,“Barbara”,“F”,13,65.3,98.0
“4”,“Carol”,“F”,14,62.8,102.5
“5”,“Henry”,“M”,14,63.5,102.5
You don’t have to use commas to delimit the data points in the file: Using the DELIMITER option, we can change the character to whatever we want. The code below demonstrates an ampersand (&) delimited file.
ODS TAGSETS.CSV FILE='output.txt' OPTIONS(DELIMITER='&');
PROC PRINT DATA=sashelp.class(OBS=5);
RUN;
ODS TAGSETS.CSV CLOSE;
This program code generates Output 2.5.
Output 2.5: Character-separated value output using ampersand as the delimiter
“Obs”&“Name”&“Sex”&“Age”&“Height”&“Weight”
“1”&“Alfred”&“M”&14&69.0&112.5
“2”&“Alice”&“F”&13&56.5&84.0
“3”&“Barbara”&“F”&13&65.3&98.0
“4”&“Carol”&“F”&14&62.8&102.5
“5”&“Henry”&“M”&14&63.5&102.5
There are many other options to control what happens in your CSV files. To get documentation on these other options, run the destination using the OPTIONS(DOC='HELP') option.
ODS TAGSETS.CSV FILE='output.txt' OPTIONS(DOC='HELP');