
Chapter 4: Style Tips
Getting Started with the Basics
Generating Samples of All Styles
Determining the Correct Style Element to Use
Dealing with Borders and Padding
Using CELLPADDING Versus PADDING
What are BORDERSPACING and BORDERCOLLAPSE?
Controlling Borders Individually
Advanced Traffic Lighting Functions
Style Selection Based on Media Types in CSS
Displaying ODS’s Document Object Model
Setting a Global Font for the Printer Destinations in CSS
Styles have been a big topic in ODS since its inception. There can be some tricky areas in styles, but the rewards of mastering them are great. The best way to truly set your reports apart from everyone else’s is with styles. We’ve compiled some effective style tips in this book just for that purpose.
Getting Started with the Basics
Before getting into the more esoteric tips, we’ll look at some of the basics of using styles in ODS. This includes seeing what styles SAS gives you for free and learning how to write your own styles.
Generating Samples of All Styles
There are literally dozens of style templates that are included with your SAS installation. This can be a bit daunting if you simply want to see a sample of each one. However, that’s exactly what SAS macros are good for!
Here is a SAS job that does just what was described above using a SAS macro. This code creates a file called styles.html which is a clickable index of all of the available styles in various ODS destinations.
ODS HTML FILE = “styles.html”;
PROC ODSTABLE DATA = sashelp.vstyle;
COLUMN library style links libname memname;
DEFINE library;
HEADER = 'Library';
COMPUTE AS libname || '.' || memname;
END;
DEFINE links;
HEADER = 'Samples';
COMPUTE AS
'<a href=“' || TRIM(style) || '.html”>HTML</a> ' ||
'<a href=“' || TRIM(style) || '.pdf”>PDF</a> ' ||
'<a href=“' || TRIM(style) || '.rtf”>RTF</a> ' ||
'<a href=“' || TRIM(style) || '.xls”>ExcelXP</a> ' ;
END;
DEFINE libname;
PRINT = OFF;
END;
DEFINE memname;
PRINT = OFF;
END;
RUN;
ODS HTML CLOSE;
%MACRO generateods();
ODS HTML FILE = “&style..html” STYLE = &style;
ODS PDF FILE = “&style..pdf” STYLE = &style;
ODS RTF FILE = “&style..rtf” STYLE = &style;
ODS TAGSETS.EXCELXP FILE = “&style..xls” STYLE = &style;
PROC CONTENTS DATA = sashelp.class; RUN;
ODS TAGSETS.EXCELXP CLOSE;
ODS RTF CLOSE;
ODS PDF CLOSE;
ODS HTML CLOSE;
%MEND;
* Print a sample of each style;
DATA _NULL_;
SET sashelp.vstyle;
CALL SYMPUT('style', TRIM(style));
CALL EXECUTE('%generateods'),
RUN;
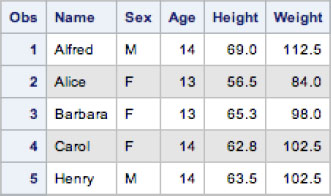
Figure 4.1 shows a small sample of the types of outputs that you will see.
Figure 4.1: Samples of style templates supplied by SAS

When listing the style templates, you may notice that some have a ‘printer’ suffix. Those style templates are intended for ODS printer destinations only. Depending on which features are used in a style template, they can look better in some destinations than in others.
Creating a Simple Style
Most of the time, when people begin talking about PROC TEMPLATE styles, they tell you to do something like this.
PROC TEMPLATE;
DEFINE STYLE MyStyle;
PARENT = Styles.HTMLBlue;
...
END;
RUN;
They start by telling you to use inheritance to begin, then just change the pieces you want changed. This method can work if you want to change only a couple of things, but most of the time it leads to more work. Inevitably, you run into some strange inheritance issue and will have to track it down through several layers of style templates. That’s why, most of the time, I write styles from scratch. It’s actually easier than it sounds.
For the most part, there are only a couple of dozen style elements that are used in 95% of all ODS reports. Many tabular reports only use the following style elements: body, systemtitle, systemfooter, table, data, header, and rowheader. That means that you only need to define those style elements for most reports to look good.
Here is a very small style template that uses no inheritance, but still creates nice looking output.
PROC TEMPLATE;
DEFINE STYLE MyStyle;
CLASS body /
FONTFAMILY = arial
FONTSIZE = 11pt
BACKGROUNDCOLOR = WHITE
COLOR = BLACK
;
CLASS systemtitle, systemfooter /
FONTFAMILY = arial
FONTSIZE = 13pt
FONTWEIGHT = BOLD
COLOR = DARK BLUE
;
CLASS table, data, header, rowheader /
BORDERSPACING = 0
BORDERCOLLAPSE = COLLAPSE
BORDERWIDTH = 1pt
BORDERCOLOR = DARK GRAY
BORDERSTYLE = SOLID
FONTFAMILY = arial
FONTSIZE = 11pt
COLOR = BLACK
PADDING = 7px
;
CLASS header, rowheader /
FONTSIZE = 12pt
FONTWEIGHT = BOLD
COLOR = DARK BLUE
BACKGROUNDCOLOR = VERY LIGHT GRAY
;
END;
RUN;
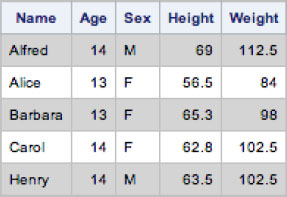
That’s it. Around 30 lines of code, and most of your reports will work just fine. Figure 4.2 shows some HTML output using this new style.
Figure 4.2: ODS HTML using a simple PROC TEMPLATE style

Once you get this far, you can check to see if there are any style elements needed. For the HTML output, you may have noticed that the procedure title isn’t styled. That would require the proctitle style element to be defined. If you ran PDF, you would notice that the page number and date are not styled. This would require the pageno and bodydate style elements to be defined.
With those few missing pieces added in, you will have a style that works with this report. If you add new output which requires another style element, you can simply add it in. You will no longer have mystery style attributes that you don’t know where they came from.
Creating a Simple CSS Style
The previous tip covered how to create a style without inheritance by using PROC TEMPLATE. The fact is that once you remove PROC TEPMLATE’s style template inheritance, it acts more like cascading style sheets (CSS). Since ODS supports CSS as well, you could just as easily rewrite that PROC TEMPLATE style definition using CSS syntax. You can even take advantage of some of the syntactical shortcuts in CSS to make it more concise.
Here is the CSS code corresponding to the PROC TEMPLATE style template in the previous tip.
.body {
font: 11pt arial;
background-color: white;
color: black;
}
.systemtitle, .systemfooter {
font: bold 13pt arial;
color: #0000bd;
}
.table, .data, .header, .rowheader {
border-spacing: 0;
border-collapse: collapse;
border: 1px solid #5e5e5e;
font: 11pt arial;
color: black;
padding: 7px;
}
.header, .rowheader {
font-size: 12pt;
font-weight: bold;
color: #0000bd;
background-color: #d4d4d4;
}
As you can see, using the CSS shortcut attributes, you can get the size down to close to 20 lines. To use CSS rather than a PROC TEMPLATE style, you use the CSSSTYLE= option as follows.
ODS HTML CSSSTYLE='myfile.css';
Here is the output using the CSS style.
Figure 4.3: ODS HTML output using a simple CSS style

Determining the Correct Style Element to Use
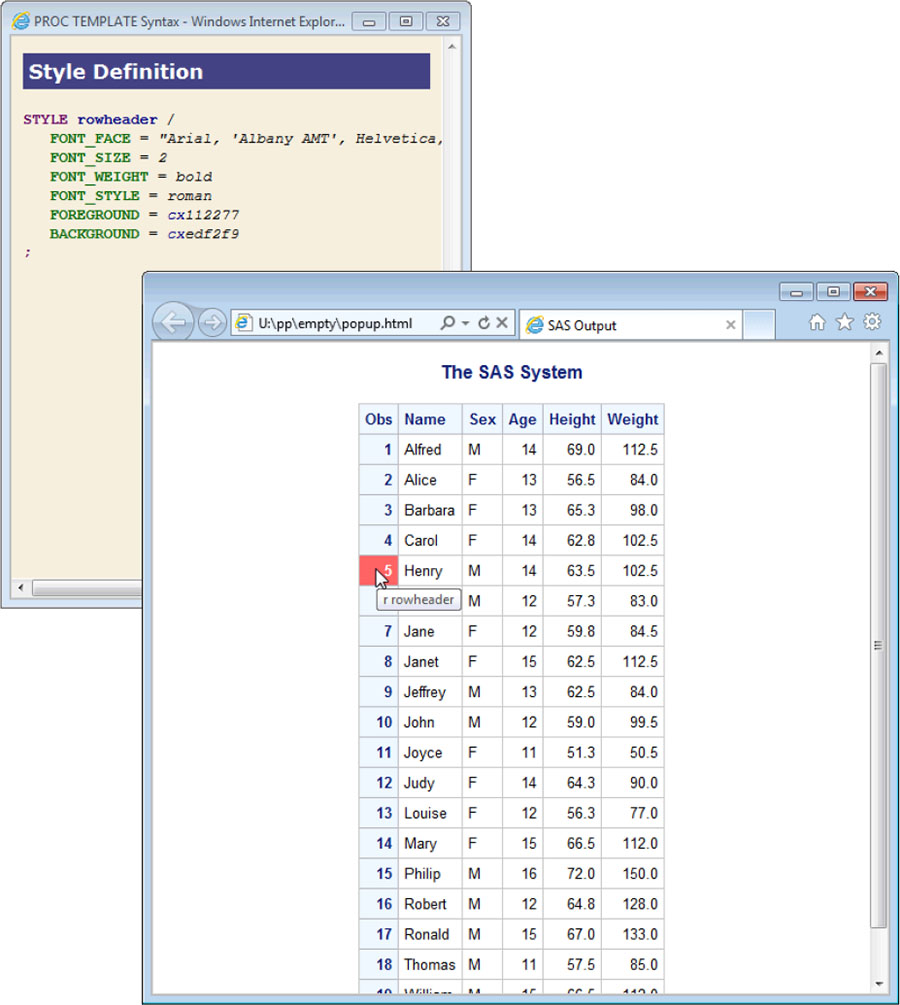
The last couple of tips depended on being able to determine which style element is being used so that they could be defined to create a minimal style template. This is easy if you work with styles frequently and already know which style element names correspond to areas in a report, but what if you are just beginning? There is an ODS destination called TAGSETS.STYLE_POPUP that can help with that.
While it is a getting a bit dated and works only with Microsoft Internet Explorer, the output from TAGSETS.STYLE_POPUP is still quite useful. It creates an HTML file with some extra JavaScript that displays style information. You simply run your report as you always would with the addition of the TAGSETS.STYLE_POPUP output (invoked as follows).
ODS TAGSETS.STYLE_POPUP FILE='popup.html';
...
ODS TAGSETS.STYLE_POPUP CLOSE;
The output will look just like standard HTML output, but when you hover your cursor over the report a tooltip will display telling you the name of the style element being used for the highlighted area. If you see an r, l, or c at the beginning of the tool tip, you can ignore that. That just indicates the alignment.
In addition to the tool tip, you can click a highlighted area of a report to see what the PROC TEMPLATE code would be for that style element. This isn’t a perfect representation of the input since some pieces of style information are lost in the conversion, but it does give a very close idea of what the original style code looked like.
Figure 4.4 shows a sample TAGSETS.STYLE_POPUP report with the popup window displaying the clicked style element.
Figure 4.4: TAGSETS.STYLE_POPUP sample output
Dealing with Borders and Padding
Borders and padding are closely related topics, so we lumped them into the same section. Borders are, of course, the lines around the outer edges of a box (e.g., table cell, paragraph, etc.). Padding is the space between the content of the cell and the border. There are a few issues with borders and padding that cause some confusion, so we are covering those here.
Using CELLPADDING Versus PADDING
There is sometimes some confusion about the difference between the CELLPADDING and PADDING style attributes. It comes up enough that we thought a tip about it would be handy. Technically, CELLPADDING isn’t really a style attribute. It’s an HTML table attribute that used to be used on HTML tables to indicate padding around cells within that table, but that method of applying padding is rather outdated. The padding style attribute was borrowed from CSS and refers to the space between the content within any box (cell, paragraph, etc.) and the border of that box.
You can emulate CELLPADDING on a table by using PADDING on the cells of that table. In fact, in SAS 9.2, the two attributes were aliased together since it seemed harmless (tables can’t have padding and nothing other than tables have cell padding). However, this was undone in SAS 9.3 because some web browsers would attempt to apply padding to tables anyway with strange results.
The primary reason the distinction is important is that HTML5 does not support CELLPADDING, and neither does CSS. To do padding in tables, you need to use the PADDING style attribute on the table cells.
Here is the traditional way of applying padding to cells using a PROC TEMPLATE style.
CLASS table /
CELLPADDING = 5px
;
In CSS, you would do the following instead.
.data, .header, .rowheader {
padding: 5px;
}
An alternative way would be to refer to the TD and TH elements inside of data tables.
.table th, .table td {
padding: 5px;
}
If you use HTML5, it’s a good idea to use the CSS method of applying padding. The PADDING attribute is available in PROC TEMPLATE styles as well. You can rewrite the first CSS example here in PROC TEMPLATE syntax as follows.
CLASS data, header, rowheader /
PADDING = 5px
;
One benefit of the PADDING attribute over CELLPADDING is that different padding values can be set on each side of the cell using PADDINGTOP, PADDINGBOTTOM, PADDINGLEFT, and PADDINGRIGHT. Sometimes tables can look nicer when the left and right padding is slightly larger than the top and bottom padding. These padding attributes allow you to create that effect.
What Are BORDERSPACING and BORDERCOLLAPSE?
In addition to the padding issues in the previous tip, another source of confusion is in BORDERSPACING and BORDERCOLLAPSE. BORDERSPACING is the exact same thing as CELLSPACING. Both attributes still work, but the new term is borrowed from CSS terminology. BORDERSPACING refers to the amount of space between cells in a table. Setting it to zero causes the borders of adjacent cells to butt up against each other.
One issue with using borders and BORDERSPACING=0 is that you can never get a border of a single pixel width. The borders of adjacent cells will abut each other and you will get a border of double width. It’s possible, although tedious, to only put borders on the top and left of cells, then put a border on the bottom and right of the table so that when the border spacing is removed, they piece together to create the appearance of a one pixel border. This is obviously not an optimal solution.
The BORDERCOLLAPSE attribute was created to alleviate the above problem. When BORDERCOLLAPSE is set to COLLAPSE, adjacent borders should merge to form a single border. Only one of the borders will be displayed according to the CSS rules for determining which border is more complex. At the time of this writing, only ODS HTML supports this style attribute.
Controlling Borders Individually
Most of the time when we specify borders, we want to do it uniformly around the entire table. There are instances though where we only want borders on specific sides of a cell, or we want the style or color to be different for certain borders. To do this, ODS supplies us with attributes for each border side, color, and style. The overall border styles are:
BORDERWIDTH
BORDERCOLOR
BORDERSTYLE
The individual border styles are:
BORDERTOPWIDTH
BORDERTOPCOLOR
BORDERTOPSTYLE
BORDERRIGHTWIDTH
BORDERRIGHTCOLOR
BORDERRIGHTSTYLE
BORDERBOTTOMWIDTH
BORDERBOTTOMCOLOR
BORDERBOTTOMSTYLE
BORDERLEFTWIDTH
BORDERLEFTCOLOR
BORDERLEFTSTYLE
Each of these border attributes corresponds to CSS style properties (CSS properties have dashes between each word in the property name; border-top-width, border-top-color, etc.). These individual border style properties can be useful when highlighting a particular data cell, or to create divisions within a table.
Here is a simple example of highlighting cells based on a data value.
PROC ODSTABLE DATA=sashelp.class(OBS=10);
COLUMN name age sex height weight;
DEFINE COLUMN age;
CELLSTYLE _VAL_ > 12 AS {BORDERLEFTWIDTH=2pt
BORDERLEFTSTYLE=SOLID
BORDERLEFTCOLOR=RED
BORDERRIGHTWIDTH=2pt
BORDERRIGHTSTYLE=SOLID
BORDERRIGHTCOLOR=RED};
END;
RUN;
Figure 4.5 shows the output from the above code.
Figure 4.5: Individual border control

Alternating Table Row Colors
One common effect people like to see in tables is alternating row colors. There are various ways to do this in SAS depending on whether the procedure uses a table template or not (PROC PRINT, PROC REPORT, PROC TABULATE), or if you want to use a style template based approach.
The table template based approach works with all procedures that use table templates. That includes all procedures except for PROC PRINT, PROC REPORT, and PROC TABULATE. It uses the CELLSTYLE-AS statement and the _ROW_ variable to apply style overrides to each row. You wouldn’t want to have to modify every table template that you used, so how do you apply it to all table templates?
There is a special template called Base.Template.Table that is the parent of all table templates. It doesn’t exist by default, but when defined, it is automatically detected and used. To create a Base.Template.Table template that creates alternating row colors, you would define it as follows.
PROC TEMPLATE;
DEFINE TABLE Base.Template.Table;
CELLSTYLE MOD(_ROW_,2) AS
{BACKGROUNDCOLOR=VERY LIGHT GRAY};
END;
RUN;
The next time you run a report, all of your template-based tables should have alternating row colors. Figure 4.6 shows the output of a PROC CONTENTS.
Figure 4.6: Alternating row colors using CELLSTYLE AS in a table template

Once you have finished with your report and you no longer want the alternating colors, you can delete the template as follows.
PROC TEMPLATE;
DELETE Base.Template.Table;
RUN;
The second method of alternating colors is used for the Base reporting procedures. Only PROC REPORT has a way to do this, and it utilizes a compute block. Here is what it looks like.
PROC REPORT NOWD DATA=sashelp.class;
COL name age sex height weight;
COMPUTE name;
bg + 1;
IF MOD(bg, 2) then
CALL DEFINE(_ROW_, 'style',
'STYLE={BACKGROUNDCOLOR=VERY LIGHT GRAY}'),
ENDCOMP;
RUN;
The output for this code is shown in Figure 4.7.
Figure 4.7: Alternating row colors in PROC REPORT
Finally, you can use a style-based approach that works across template-based and non-template-based tables. The style approach does use CSS, so you will have to either add this code to your CSS file or import it into your PROC TEMPLATE style using the IMPORT statement. The key piece of CSS that you would need is the following.
.table tbody tr:nth-child(even) td {
background-color: #e5e5e5;
}
The ‘.table tbody’ in this code specifies that this should only occur in the body section of data tables. Next comes the row specification: tr:nth-child(even). This says that only the even rows within the parent element (tbody) should be addressed. Finally, the td indicates the table data cells (this excludes the Obs column which is a th tag). The td piece is used because not all ODS destinations allow styling on rows; the style needs to be on the cell. Adding this to your CSS style would give the effect shown in Figure 4.8.
Figure 4.8: Alternating colors in CSS
Depending on your needs, you can choose whichever method of alternating colors you wish. The style-based approach does work almost universally, but requires you to use a CSS-based style. The other two only work for the specific situations described. The choice is yours.
Using RGBA Colors
RGBA (red, green, blue, alpha) colors are just like RGB (red, green, blue) colors except that they add an alpha component. This alpha component allows you to set the opacity of that color. So what’s so great about being able to have semi-transparent colors? It allows you to create some really cool effects when you use overlapping colors, or put RGBA colors over the top of background images. The latter example is one of my favorite things to do in reports to really make them stand out.
RGB and RGBA colors are specified in a very similar way. They use a hex value from 00-ff (0-255 decimal) for each component. You have probably seen colors specified in RGB format where the first character is a #.
COLOR = #e5e5e5
RGBA colors are specified the same way, but they require an ‘RGBA’ prefix and an additional component for the alpha.
COLOR = RGBAe5e5e580
Let’s do an example using a table that has a background image and alternating colors. The colors will be RGBA colors so that we can still see the background image showing through.
PROC ODSTABLE DATA=sashelp.class(OBS=12);
STYLE={BACKGROUNDIMAGE='bgimage.jpg};
CELLSTYLE MOD(_ROW_,2) AS
{BACKGROUNDCOLOR=RGBAe5e5e5a0},
1 AS {BACKGROUNDCOLOR=RGBAd0d0d0a0};
RUN;
Figure 4.9 shows the output. As you can see, we can still see the background image through the cell colors to give a very cool effect.
Figure 4.9: RGBA background colors with a background image

It should be noted that only HTML and printer support RGBA colors, and only HTML supports background images on tables. You can, however, use background images on the body of both HTML and printer for interesting effects.
Advanced Traffic Lighting Functions
Many people have done traffic lighting in the Base reporting procedures, but table templates have some advanced traffic lighting features as well that you might not be aware of. PROC ODSTABLE (which is based on table templates) supports some features of traffic lighting that no other procedure can do. First, we’ll cover some functions that you can use in style templates that work in all procedures, then we’ll go over the special PROC ODSTABLE formatting feature.
There are some special functions in style templates that you can use to create more dynamic style attribute values. These functions are SYMGET(…) and RESOLVE(…). Both of these are related to macros. SYMGET(‘macro-var’) simply gets the specified macro variable. RESOLVE(‘¯o-var’) does the same thing as SYMGET(‘macro-var’). RESOLVE(‘%macro’), however, invokes the specified macro and returns the result. In this last function, the value of the current cell is set in &_VAL_.
SYMGET(‘macro-var’) and RESOLVE(‘¯o-var’) are not terribly exciting. They can only get a static macro variable and return the value. This can be useful, but it won’t allow you to do any data-dependent styling. It will, however, allow you to parameterize your styles if needed.
RESOLVE(‘%macro’) gets much more interesting. You can write a macro that uses &_VAL_ to determine which value to return for the style attribute. Here is a simple example of that.
%MACRO weights;
%IF &_VAL_ > 80 %THEN bold;
%ELSE medium;
%MEND;
ODS HTML;
PROC ODSTABLE DATA=sashelp.class(OBS=7);
COLUMN name age sex height weight;
DEFINE COLUMN weight;
STYLE = {FONTWEIGHT = RESOLVE('%weights')};
END;
RUN;
ODS HTML CLOSE;
Figure 4.10 shows the output from the code above.
Figure 4.10: Using RESOLVE( ) to evaluate FONTWEIGHT

The SYMGET and RESOLVE functions can be used in style overrides or style templates, and they work in all procedures. The next function only works in table templates.
The EXPRESSION(…) function has some added capabilities beyond what SYMGET and RESOLVE can do. It can reference all variables in a data set as opposed to just the current data value. This gives you the ability to have traffic lighting that is conditional on multiple data values.
The value given to the EXPRESSION(…) function is a standard SAS expression with access to all DATA step functions as well. The only requirement is that an appropriately typed value for the style attribute is returned.
Here is an example.
ODS HTML;
PROC ODSTABLE DATA=sashelp.class;
COLUMN name age sex height weight bmi;
DEFINE COLUMN name;
STYLE = {FONTSTYLE =
EXPRESSION('CHOOSEC(((weight / (height * height) *
703) > 18) + 1, “ROMAN”, “ITALIC”)')
};
END;
RUN;
ODS HTML CLOSE;
Figure 4.11 shows the output from the code above. Notice the italic font on some names.
Figure 4.11: Using EXPRESSION( ) to evaluate FONTSTYLE

Using CSS
Writing styles using CSS is fairly new to ODS. It offers a lot of capabilities that you can’t do with PROC TEMPLATE styles, so it is worthwhile to learn them. The good news is that CSS is a web standard so you can use documentation from any source to learn about CSS in general. There are some SAS extensions to CSS to allow you to access internal SAS information in your stylesheets. Some of those details are covered in the tips below.
Referencing CSS Styles
We have already seen some examples of using CSS formatted styles with ODS using the CSSSTYLE= option rather than the STYLE= option. So far we have only shown that you can use filenames. However, you can also use filerefs and URLs. Filerefs are a fairly standard way of accessing files in SAS and they work the same way with CSSSTYLE=. You simply give the fileref as the argument to CSSSTYLE= instead of a string containing a filename.
Using filerefs gives you a lot of flexibility and can even allow you to reference URLs. But creating filerefs is sometimes just an unnecessary extra step. The CSSSTYLE= option accepts URLs directly. So rather than creating a fileref and using that with CSSSTYLE= you can simply do something like this:
ODS HTML CSSSTYLE='http://myserver.com/styles/style.css';
This allows you to store your ODS CSS files in your normal web server space with your other CSS files.
Importing CSS from CSS
The previous tip showed how to import CSS files in various ways. However, each one of those methods accessed only a single CSS file. Many times, CSS files are written in modular ways such that each module is kept in a different file. Since CSSSTYLE= only accepts a single file, this can be a problem. However, CSS itself has a solution to the problem: the @import rule.
The @import rule allows you to import CSS files from a CSS file, essentially making the content appear as if it came from a single file. Here is an example. Let’s say we have three CSS files. The first is a CSS reset file that resets all of the common style elements to a standard value (reset.css). The second is a company CSS file that incorporates the company’s style (company.css). The third is our set of personal styles (personal.css).
To make all of these appear to come from the same CSS file, we use the @import rule in a new CSS file (mystyle.css) as follows.
@import url('reset.css'),
@import url('company.css'),
@import url('personal.css'),
Now we can reference this new CSS file using CSSSTYLE= to include all of the sub-CSS files.
ODS HTML CSSSTYLE='mystyle.css';
Note that if you don’t have all of the CSS files in the same directory, the paths to the CSS files in the @import rules are relative to the main CSS file.
Style Selection Based on Media Types in CSS
One common problem with writing styles for various ODS destinations is that not all style attributes work equally well in all destinations. Plus, there are times when you want to use colors on fonts for web pages that you wouldn’t want to use in printed forms. This usually results in writing one style that isn’t really optimal for all destinations, or creating multiple styles (one optimized for each destination). However, with CSS, you can use media types to write one style that contains optimizations for each destination.
Prior to SAS 9.4, media types had to be specified explicitly on the ODS destination’s statement like this.
ODS HTML CSSSTYLE='mystyle.css'(web);
ODS PDF CSSSTYLE='mystyle.css'(print);
The media types are simply a list of space-separated names in parentheses after the CSS filename. There are some standard names for media types in the CSS specification, but ODS lets you use any names you wish. They simply need to match the names used in the CSS file itself. The SAS code above selects the media types in the CSS file, but what does the CSS look like? Here is a small example. Most of the CSS file will be global and apply to both destinations, but ‘web’ and ‘print’ media types are created to apply only to those destinations that request them.
/* global styles */
.body {
background-color: white;
color: black;
font: 11pt arial;
}
.table, .table th, .table td {
border: 1px solid gray;
}
.table th, .table td {
padding: 5px 8px;
font: 11pt arial;
}
/* web styles */
@media web {
.table th {
background-color: #800000;
color: white;
}
.table td {
background-color: #e5e5e5;
}
}
/* print styles */
@media print {
.table th, .table td {
font: 11pt times;
}
.table th {
font-weight: bold;
}
}
You can see in the code above that there are sections marked with @media that are named and grouped in curly braces. The styles within those groups only apply when the media type of the given name is specified. In this case, we have sections called “web” and “print” that correspond to the media types specified on the ODS destination statements in the previous code block.
The names of the media types are completely arbitrary. You can make up as many as you wish and select up to 10 at a time on the CSSSTYLE= option. In SAS 9.4, things were made a little simpler because the ODS printer destinations automatically have the “print” media type set, so you don’t have to specify it explicitly. You can just add a “@media print” section to your CSS files and it will automatically be included by the ODS printer destinations.
CSS Color Models
If you thought that there were a lot of ways to specify colors in PROC TEMPLATE styles (RGB, RGBA, and all of the SAS/GRAPH color variants), you haven’t seen anything yet. CSS gives us many ways of specifying colors, so there should be at least one that you will be happy with.
Just to quickly summarize all of the colors models supported in ODS CSS files, here is a list.
#RGB
#RRGGBB
RGB( R, G, B )
RGBA( R, G, B, A )
CMYK( C, M, Y, K )
CMYKA( C, M, Y, K, A )
HSL( H, S, L )
HSLA( H, S, L, A )
In addition to these, CSS specifies many standard color names (including aqua, black, blue, fuchsia, gray, etc.). And ODS, like many browsers, supports a large list of color names used by X11 systems (including, AliceBlue, AntiqueWhite, Aqua, Azure, etc.). Lists and samples of the CSS and X11 colors can be found on the web.
That’s a lot of ways to specify colors. While you can find documentation on these colors in many places on the web, let’s briefly cover them here.
#RGB and #RRGGBB may look familiar. They are just red, green, and blue component colors prefixed with a #. In the three-letter form, the R, G, and B are hex values from 0-f. In the six-letter version, RR, GG, and BB are hex values from 00-ff. In both cases, the range of values represented is 0-255 decimal, where 0 is no contribution of that component to 255, which is 100% contribution of that component.
RGB(…) and RGBA(…) forms also allow you to specify red, green, and blue components, but the values are different than the hex versions. The values of each color component must be specified by a decimal (0-255), or a percentage (0%-100%; which must include the percent symbol). The alpha value can be specified using a percentage from 0%-100%, or a decimal from 0-1. Here are a few examples.
rgb( 0, 80, 255 )
rgb( 10%, 20%, 5% )
rgba( 255, 255, 0, 50% )
rgba( 50%, 50%, 100%, 0.8 )
CMYK(…) and CMYKA(…) colors are very similar to the RGB(…) forms, but they only accept percentages for each of the color components. The alpha value can still be either a percentage or a decimal. Note that CMYK colors are not supported natively by ODS. They are internally converted to relatively equivalent RGB colors.
cmyk( 0%, 25%, 10%, 80% )
cmyka( 20%, 15%, 5%, 50%, 0.5 )
HSL(…) and HSLA(…) colors are quite different than the other models. They are cylindrical-coordinate representations of points in the RGB color scheme. The hue (H) is specified with a value from 0-360 corresponding to the 360 degrees in a color wheel that starts with red. Green would be 120, and blue is 240. The saturation (S) and lightness (L) values are percentages from 0%-100%. Alpha is, again, a percentage or a decimal.
hsl( 0, 100%, 50% )
hsl( 120, 75%, 75% )
hsla( 120, 100%, 25%, 0.5 )
Displaying ODS’s Document Object Model
The biggest difference between traditional PROC TEMPLATE styles and CSS in ODS is the way in which the areas of the report get selected. Traditional styles simply associate a style element name with each area of a report (as described in the TAGSETS.STYLE_POPUP tip). However, CSS is much more complex (and powerful). It still uses the style element names from traditional styles, but that’s only one piece of many that you can use to select an area.
So why would I want more information than just the style element name? Other pieces of information give you the capability of selecting parts of a report in a much more specific manor. We have already seen in the alternating color tip that you can use CSS’ :nth-child pseudo-class to select alternating rows in a table. You can also select areas based on the tag name as well as ID (aka anchor). In addition, there are many element attributes that you can use to select specific areas as well, such as by variable names and values, proc name, output object name, etc.
CSS is generally thought of as a web technology that is only used with HTML. When you are adding style to HTML documents, it’s easy to open the source file and see what elements, classes, and attributes are available to you that you can use in your CSS selectors. However, in ODS, all of this information is internal in memory. So how do you get access to it? You use the ODS TRACE DOM statement.
The ODS TRACE DOM statement is a lot like the ODS TRACE ON statement. Rather than displaying output object information, the ODS TRACE DOM statement prints out an HTML-like representation of ODS’ internal Document Object Model (DOM). You can then use this to see what elements, classes, attributes, etc. are available to you for your CSS selectors.
The easiest form of displaying the ODS DOM is through the global statement.
ODS TRACE DOM;
This turns on DOM tracing for all destinations, and they all get printed to the log. This is fine if you only have one or two destinations open, but it can get cluttered pretty quickly. An alternative is to use the DOM option on the destination.
ODS HTML DOM;
ODS PDF DOM;
This still prints to the log though, so it can be difficult to read interspersed with other log messages. To alleviate this, you can send the DOM output to a file.
ODS HTML DOM='htmldom.html';
ODS PDF DOM='pdfdom.html';
Now with this DOM file, you can open it in the editor of your choosing to examine and determine which pieces you want to use for applying styles to your reports.
Setting a Global Font for the Printer Destinations in CSS
One issue with writing styles for the printer destination is that you need to make sure that you specify a font for every style element used. If the printer destination can’t find a font, it will drop down to using Courier. This isn’t as obvious when writing styles for destinations for HTML because web browsers will cascade font attributes down from the body element. There is a neat trick in CSS, however, that allows you to specify style attributes for every area in a document. This trick makes use of the “universal selector”.
Unlike other selectors like class selectors (.body, .table), element name selectors (th, td, table), ID selectors (#IDX1, #IDX2), or attribute selectors ([proc=print], [byvar1=age]), the universal selector doesn’t narrow the scope of what gets selected, it just selects everything. This might not seem generally useful, but it does come in handy with the printer destination font issue. The universal selector in CSS is just an asterisk (*). To handle our printer font issue, we can specify a font using the universal selector at the top of our CSS file.
* {
font: 11pt arial;
}
It should be noted that using the global selector to select a font isn’t needed in all destinations, so a media type rule should be used to scope it only to those that do (media types are covered in a previous tip). Generally, the universal font rule should be specified as follows.
@media print {
* {
font: 11pt arial;
}
}
Using IDs in CSS
IDs (or anchors as they are known in ODS) are a very common way to select areas in CSS. The only trick is getting the IDs placed into the report so that they can be addressed by CSS properties. The way to insert IDs into ODS output is to use the ANCHOR= option on the ODS statement as follows.
ODS ANCHOR='MyID';
This will insert an ID in the ODS DOM on the next output object. You can see the ODS DOM by using the ODS TRACE DOM statement or using the DOM option on your ODS destination’s statement. Here is a small example that uses ODS HTML. It runs two procedures and puts an ID on each one.
ODS HTML;
ODS ANCHOR='print';
PROC PRINT DATA=sashelp.class(OBS=3);
RUN;
ODS ANCHOR='report';
PROC REPORT DATA=sashelp.class(OBS=3);
RUN;
ODS HTML CLOSE;
Now that the IDs are being set on the output objects, we can use them in our CSS style to address these sections and apply styles differently for each one.
/* global styles */
.body {
background-color: white;
color: black;
font: 11pt arial;
}
.table, .table td, .table th {
border-spacing: 0;
border-collapse: collapse;
border: 1px solid gray;
}
.table td, .table th {
padding: 5px 8px;
font: 11pt arial;
}
/* proc print styles */
#print .table th {
background-color: black;
color: white;
}
/* proc report styles */
#report .table th {
background-color: gray;
color: black;
}
Now we can use this on our ODS HTML CSSSTYLE= option as follows.
ODS HTML CSSSTYLE='mystyle.css';
...
ODS HTML CLOSE;
With the same procedure and anchor code as before, but using this CSS information, our output looks like that in Figure 4.12. Notice that the PROC PRINT and PROC REPORT tables have different colored headings which was implemented using the IDs that we set in the document.
Figure 4.12: Using IDs in CSS to scope style attributes

BY Group Styling in CSS
Another nice feature of CSS-based styles is that BY group information is surfaced in the ODS DOM as attributes. In fact, there are quite a few BY group related attributes in the DOM including byline, byvar (as well as byvar1, byvar2, etc.), byval (as well as byval1, byval2, etc.), and byiter (as well as byiter1, byiter2, etc.). The byvar and byval attributes contain all by variables and by values in one string, where as the numbered versions (byvar1, byvar2, byval1, byval2, etc.) contain single values. The byiter attributes are used to create generic BY group references that aren’t dependent on actual data values; we’ll get to those later.
Since the BY group information is surfaced as attributes in the ODS DOM, we use CSS’ attribute syntax to address them. The basic syntax looks like this:
[ attribute-name = attribute-value ]
Let’s start off with a simple example.
PROC SORT DATA=sashelp.class OUT=class;
BY sex;
RUN;
ODS HTML DOM;
PROC PRINT DATA=class;
BY sex;
RUN;
ODS HTML CLOSE;
You will notice, if you look at the ODS DOM, that the BY group attributes are always on an output object. When using attribute selectors in CSS, it’s always a good idea to use a class or element selector as well because attribute references are quite expensive. Since output objects use the “oo” class, we can address our two BY groups as follows.
.oo[byval=m] {
...
}
.oo[byval=f] {
...
}
This will be the basis for our differing styles for each BY group. We just need to add the rest of the selector to address the table cells and put in some differing style attributes.
/* global styles */
.body {
background-color: white;
color: black;
font: 11pt arial;
}
.table, .table td, .table th {
border-spacing: 0;
border-collapse: collapse;
border: 1px solid gray;
}
.table td, .table th {
padding: 5px 8px;
font: 11pt arial;
}
/* byval=m styles */
.oo[byval=m] .table th {
background-color: black;
color: white;
}
/* byval=f styles */
.oo[byval=f] .table th {
background-color: gray;
color: black;
}
If we apply this CSS file to our ODS HTML statement using CSSSTYLE=, we get the following output.
Figure 4.13: Changing style attributes for each BY group
This is great, but it does tie our CSS rules to the data itself. It might be nice if we could generalize the CSS so that it would work for other data sets that have two by values. To do this, we can use the byiter attributes. The byiter attributes simply increment for each by value. That way you can use 1, 2, 3, etc. rather than ‘m’, ‘f’, etc. Rewriting our output object CSS code above using byiter instead looks like this.
/* first by value styles */
.oo[byiter=1] .table th {
background-color: black;
color: white;
}
/* second by value styles */
.oo[byiter=2] .table th {
background-color: gray;
color: black;
}
Now this style code can be used with any data set that has two by values. Of course, it can be extended to more by values by adding more sections of CSS, and more by variables by using byiter1, byiter2, etc.