
Chapter 7: Excel Tips
Using Excel Formulas in TAGSETS.EXCELXP
Controlling Worksheet Names Manually
Using BY Group Information in Worksheet Names
Preventing Cell Merging in PROC TABULATE
There are actually a few ways to get ODS output into Excel. The primary methods are the TAGSETS.EXCELXP destination, the TAGSETS.MSOFFICE2K destination, and importing ODS HTML into Excel. Each one has strengths and weaknesses, so you may have to choose one based on your current reporting needs. TAGSETS.EXCELXP is the only destination that generates an actual Excel document. The other two are simply variants of HTML that get imported.
Comparing ODS Excel Formats
You recall from the introduction several ways of creating ODS output for use in Excel. So how do you know which one to use? This section describes the capabilities of each. Depending on your needs, this list should give you a good starting point.
TAGSETS.EXCELXP
As an Excel input format, TAGSETS.EXCELXP is the most supported ODS output. It has many, many features surfaced by OPTIONS(…) options (see the next tip for how to display these options). It supports multiple worksheet workbooks, ways to embed Excel formats and formulas, lots of print setup options, and many options for controlling title/footnote behavior. On the downside, it does not support images of any type (due to a limitation in the XML file format used).
TAGSETS.MSOFFICE2K
The TAGSETS.MSOFFICE2K output is really HTML with some extra information added to it to help Excel import the document properly and add support for native Excel features such as formats and formulas. It does work well with styles and images. It also allows you to embed native Excel formats, but doesn’t create multiple worksheets.
HTML
Using ODS HTML for inputting to Excel is more of a last ditch effort. Excel will import the file, but no native Excel functionality is addressed.
TAGSETS.CSV
One other format that you can use to get data into Excel is comma-separated values (CSV) from TAGSETS.CSV. This is a very minimalistic approach since you will not get any style information, graphs, or native Excel functionality.
Displaying Help
All three of the destinations used to create Excel output (TAGSETS.EXCELXP, TAGSETS.MSOFFICE2K, and HTML) have a built-in help system to display options. HTML and TAGSETS.MSOFFICE2K don’t have a lot to display, but TAGSETS.EXCELXP has literally dozens of options. The syntax to display the help information is as follows.
ODS TAGSETS.EXCELXP OPTIONS(DOC='help') FILE='help.xml';
ODS TAGSETS.MSOFFICE2K OPTIONS(DOC='help')
FILE='help.xls';
ODS HTML OPTIONS(DOC='help'),
The FILE= option on the first two is required even though, at this point, we aren’t generating any output. Note that this help information is only for options specified in the OPTIONS(…) option, not the statement options such as FILE=, STYLE=, etc.
Using Excel Formats
Using native Excel formats is usually the first thing that people want to do when getting their output from ODS to Excel. Luckily, TAGSETS.EXCELXP and TAGSETS.MSOFFICE2K have ways for you to pass a true Excel format to the document to be used by Excel. The two methods, however, are somewhat different.
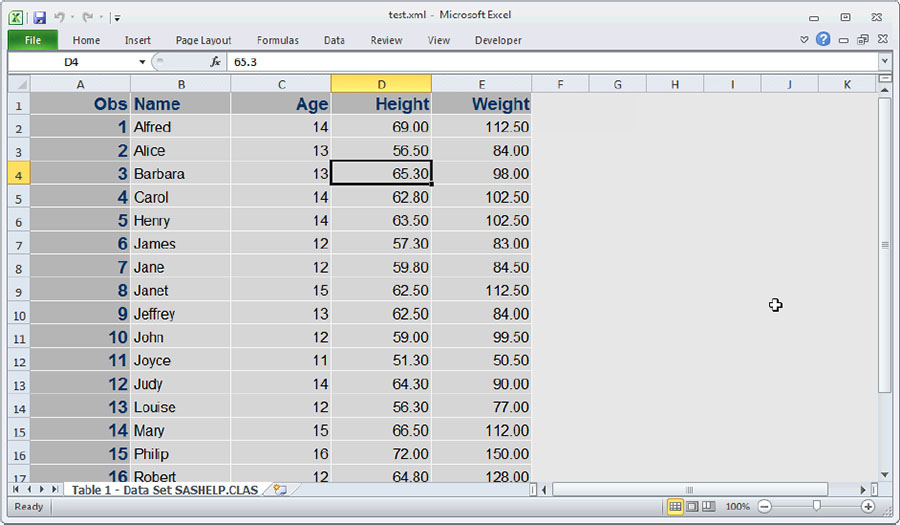
For TAGSETS.EXCELXP, the way to pass formats to the document is to use the TAGATTR= style attribute. This is a quoted string that accepts various native Excel constructs in addition to formats. The syntax to pass a format to the document is as follows.
TAGATTR = 'format:excel-format'
How this style attribute gets applied to the appropriate columns in your report depends on which procedure you are using. Each of the Base reporting procedures has its own syntax for applying style overrides. We will use PROC PRINT in this example.
ODS TAGSETS.EXCELXP FILE='test.xml';
PROC PRINT DATA=sashelp.class;
VAR name / STYLE(COLUMN)={TAGATTR='format:@'};
VAR age / STYLE(COLUMN)={TAGATTR='format:###'};
VAR height / STYLE(COLUMN)={TAGATTR='format:###.00'};
VAR weight / STYLE(COLUMN)={TAGATTR='format:###.00'};
RUN;
ODS TAGSETS.EXCELXP CLOSE;
Figure 7.1 shows the output from the code above.
Figure 7.1: Using native Excel formats in TAGSETS.EXCELXP
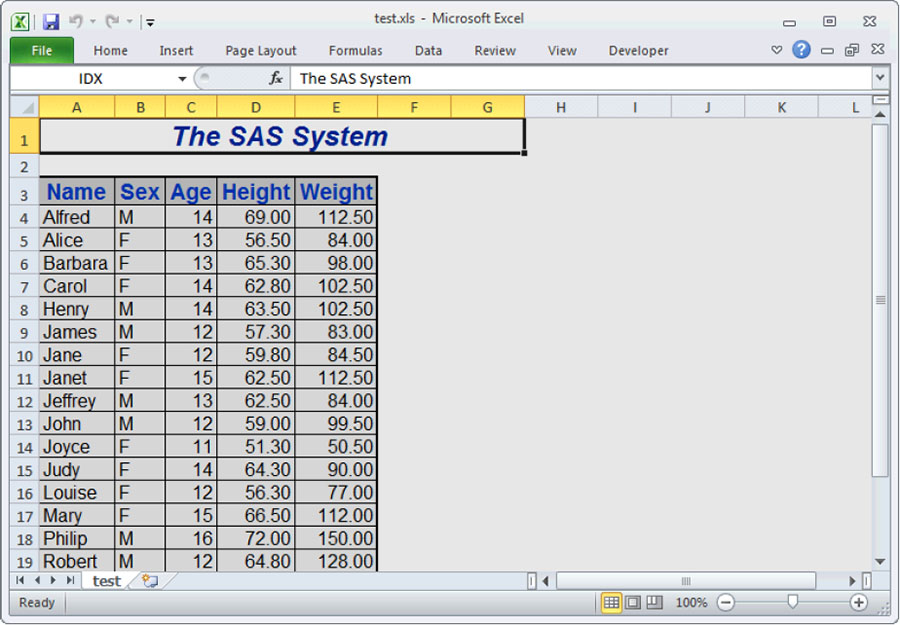
For TAGSETS.MSOFFICE2K, the style attribute HTMLSTYLE= must be used with the mso-number-format parameter instead. We’ll do a similar table to the one above, but this time we’ll use PROC REPORT.
ODS TAGSETS.MSOFFICE2K FILE='test.xls';
PROC REPORT DATA=sashelp.class;
DEFINE name /
STYLE(COLUMN)={HTMLSTYLE='mso-number-format:@'};
DEFINE age /
STYLE(COLUMN)={HTMLSTYLE='mso-number-format:###'};
DEFINE height /
STYLE(COLUMN)={HTMLSTYLE='mso-number-format:###.00'};
DEFINE weight /
STYLE(COLUMN)={HTMLSTYLE='mso-number-format:###.00'};
RUN;
ODS TAGSETS.MSOFFICE2K CLOSE;
Figure 7.2 shows the output from this code.
Figure 7.2: Using native Excel formats in TAGSETS.MSOFFICE2K
Preserving Leading Zeros
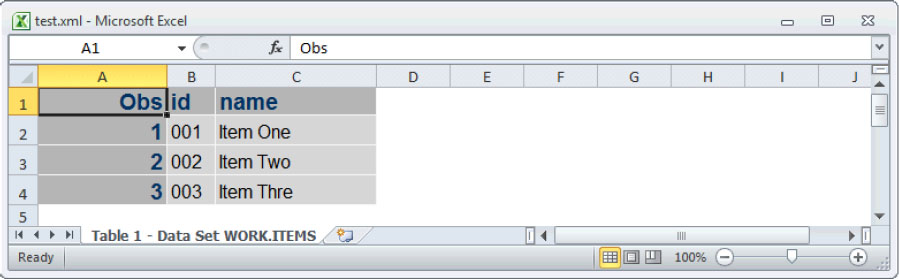
One common issue with using fields with leading zeros in Excel is that the cell generally gets converted to numeric and Excel strips the leading zeros. This likely isn’t what you want. Luckily, the solution is fairly simple. We can force Excel to use a native Excel format that preserves the leading zeros.
In the last tip, we showed how to set Excel formats on columns in TAGSETS.EXCELXP and TAGSETS.MSOFFICE2K. We will use that same method here to set the Excel format on the leading zero column to ‘@’ (the plain text format).
DATA items;
INPUT id $3. name $10.;
DATALINES;
001 Item One
002 Item Two
003 Item Three
;
RUN;
/* no format set – leading zeros disappear */
ODS TAGSETS.EXCELXP FILE='test1.xml';
PROC PRINT DATA=items;
VAR id;
VAR name;
RUN;
ODS TAGSETS.EXCELXP CLOSE;
/* text format set – leading zeros stay */
ODS TAGSETS.EXCELXP FILE='test2.xml';
PROC PRINT DATA=items;
VAR id / STYLE={TAGATTR='format:@'};
VAR name;
RUN;
ODS TAGSETS.EXCELXP CLOSE;
Here is the output showing the leading zeros disappearing (Figure 7.3) and using an Excel format to keep the leading zeros (Figure 7.4).
Figure 7.3: Leading zeros suppressed

Figure 7.4: Leading zeros preserved

For TAGSETS.MSOFFICE2K, you would use HTMLSTYLE='mso-number-format:@' rather than the TAGATTR= syntax above.
Alternate Solution
In the last tip, we showed how to retain leading zeros by setting the Excel format for the cell to @ (the plain text format). This does work, but it also has a side effect. When Excel sees a cell with just numeric characters in it, it assumes that the cell should be converted to a number. When this happens, you will see a small triangle appear in the upper corner of the cell indicating that Excel thinks something isn’t quite right. There is an alternative to using the plain text format in Excel that will preserve leading zeros while also making Excel happy.
The format we are going to use in this case is all zeros. The only trick to making this work is making sure that you put in the same number of zeros as the width of your data column. In our data, the column with leading zeros contains 3-digit values, so our Excel format will be “000”. Here is the code.
DATA items;
INPUT id $3. name $10.;
DATALINES;
001 Item One
002 Item Two
003 Item Three
;
RUN;
ODS TAGSETS.EXCELXP FILE='test.xml';
PROC PRINT DATA=items;
VAR id / STYLE={TAGATTR='format:000'};
VAR name;
RUN;
ODS TAGSETS.EXCELXP CLOSE;
Figure 7.5 shows the output. Notice that we still have leading zeros, but since the column is truly numeric, Excel doesn’t display the warning triangle in the upper corner. Just remember to match up the number of zeros in the Excel format to the number of digits in your data column.
Figure 7.5: Preserving leading zeros while keeping the data cell numeric
TAGSETS.EXCELXP Tips
The TAGSETS.EXCELXP destination has many options to control its behavior. They can’t possibly all be covered here, so we picked just a few common issues to cover.
Using Excel Formulas in TAGSETS.EXCELXP
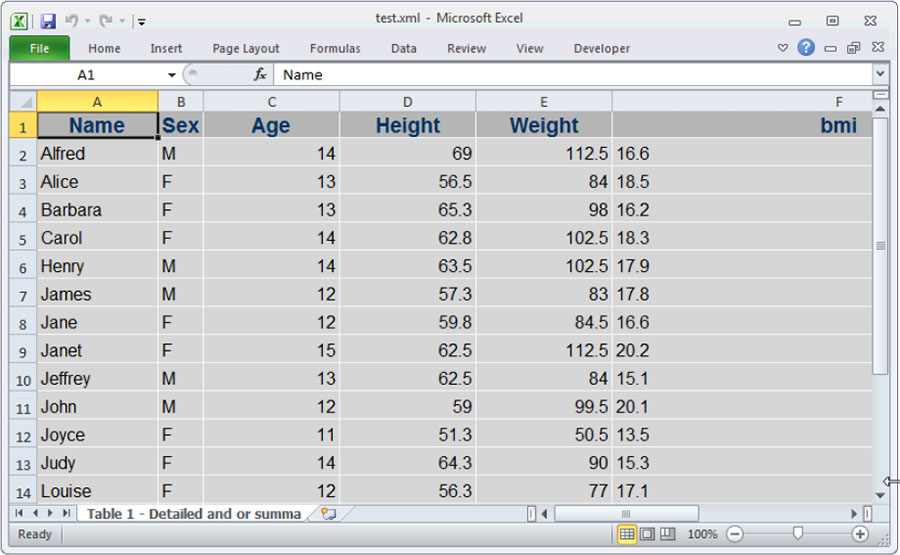
Next to Excel formats, Excel formulas are probably the next most desired feature in ODS output. There are actually two ways to put formulas into your ODS output. The first one is very similar to the way that formats are embedded. The second way is by putting the formula in the data set. We’ll look at both methods in this tip.
The first method is just like embedding formats in Excel. We will use the TAGATTR= style attribute, but rather than using format: in the string value, we will use formula:. Here is an example that calculates body mass index (BMI) in an Excel formula. Note that you must use relative cell references (R1C1 notation), not absolute references (A1 notation).
ODS TAGSETS.EXCELXP FILE='test.xml';
PROC REPORT DATA=sashelp.class;
COLUMN name sex age height weight bmi;
DEFINE bmi / COMPUTED FORMAT=BEST4. STYLE={
TAGATTR='formula:(RC[-1]*703)/(RC[-2]*RC[-2])'
};
COMPUTE bmi;
bmi = 0; * insert dummy value;
ENDCOMP;
RUN;
ODS TAGSETS.EXCELXP CLOSE;
Figure 7.6 shows the output.
Figure 7.6: Applying Excel formulas using style overrides

The second method of inserting Excel formulas is to put the formula into the data column itself. We will use the same BMI example as above, but this time, we’ll put the formula into the data. The trick here is to insert an equals sign (=) as the first character of the data value. This indicates to TAGSETS.EXCELXP that the data value is a formula.
ODS TAGSETS.EXCELXP FILE='test.xml';
PROC REPORT DATA=sashelp.class;
COLUMN name sex age height weight bmi;
DEFINE bmi / COMPUTED STYLE={TAGATTR='format:#0.0'};
COMPUTE bmi / CHARACTER LENGTH=30;
bmi = '=(RC[-1]*703)/(RC[-2]*RC[-2])';
ENDCOMP;
RUN;
ODS TAGSETS.EXCELXP CLOSE;
You’ll notice that in this case, we also used an Excel format because SAS can only interpret the formula as a string. Of course, you could put the equation in a data set variable rather than a computed column as well. Figure 7.7 shows the output.
Figure 7.7: Applying Excel formulas using the data value
Controlling Worksheet Names Manually
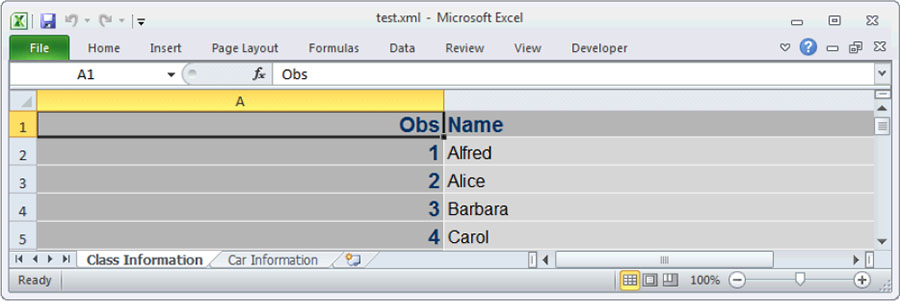
TAGSETS.EXCELXP does its best to generate meaningful worksheet names based on the sheet interval and the output object information. However, there will likely be times when you want to set your own worksheet names. This can be accomplished using the SHEET_NAME= option. If you are controlling the sheet names manually, you may also want to control the worksheet generation manually. Adding a SHEET_INTERVAL='none' to the options in addition to SHEET_NAME= will cause a new worksheet to be generated at the next output. Here is an example.
ODS TAGSETS.EXCELXP FILE='test.xml'
OPTIONS( SHEET_INTERVAL='none'
SHEET_NAME='Class Information' );
PROC PRINT DATA=sashelp.class;
RUN;
PROC CONTENTS DATA=sashelp.class;
RUN;
ODS TAGSETS.EXCELXP
OPTIONS( SHEET_INTERVAL='none'
SHEET_NAME='Car Information' );
PROC PRINT DATA=sashelp.cars;
RUN;
PROC CONTENTS DATA=sashelp.cars;
RUN;
ODS TAGSETS.EXCELXP CLOSE;
Figure 7.8 shows the output. Notice the two worksheet tabs at the bottom of the window, and the fact that the worksheet names are the names we specified above.
Figure 7.8: Worksheet names in TAGSETS.EXCELXP
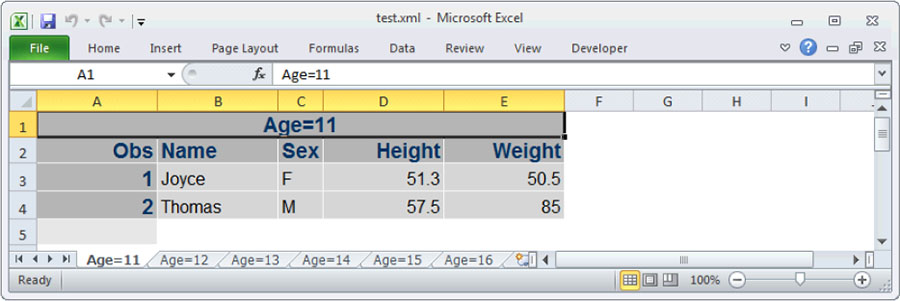
Using BY Group Information in Worksheet Names
If you are using BY groups in your reports with SHEET_INTERVAL='bygroup', TAGSETS.EXCELXP will try to generate reasonable worksheet names with the BY group information. Here is a sample.
ODS TAGSETS.EXCELXP FILE='test.xml'
OPTIONS( SHEET_INTERVAL='bygroup' );
PROC SORT DATA=sashelp.class OUT=class;
BY age;
RUN;
PROC PRINT DATA=class;
BY age;
RUN;
ODS TAGSETS.EXCELXP CLOSE;
Figure 7.9 shows the output from the code above.
Figure 7.9: Worksheet names controlled by BY group information
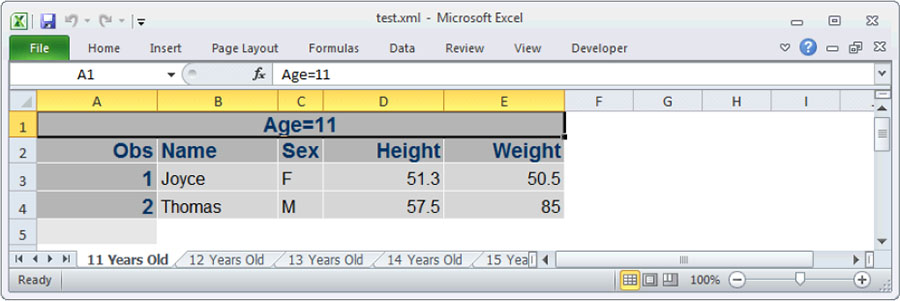
This may not be the worksheet names you prefer though. You can use the #BYVAL1, #BYVAL2, #BYVAR1, #BYVAR2, etc. parameters in your worksheet names to create your own BY group information-based names.
ODS TAGSETS.EXCELXP FILE='test.xml'
OPTIONS( SHEET_INTERVAL='bygroup'
SHEET_NAME='#BYVAL1 Years Old'),
PROC SORT DATA=sashelp.class OUT=class;
BY age;
RUN;
PROC PRINT DATA=class;
BY age;
RUN;
ODS TAGSETS.EXCELXP CLOSE;
Figure 7.10 shows the output from this example. Notice that the sheet names include the current BY value.
Figure 7.10: Explicit worksheet names including BY group information
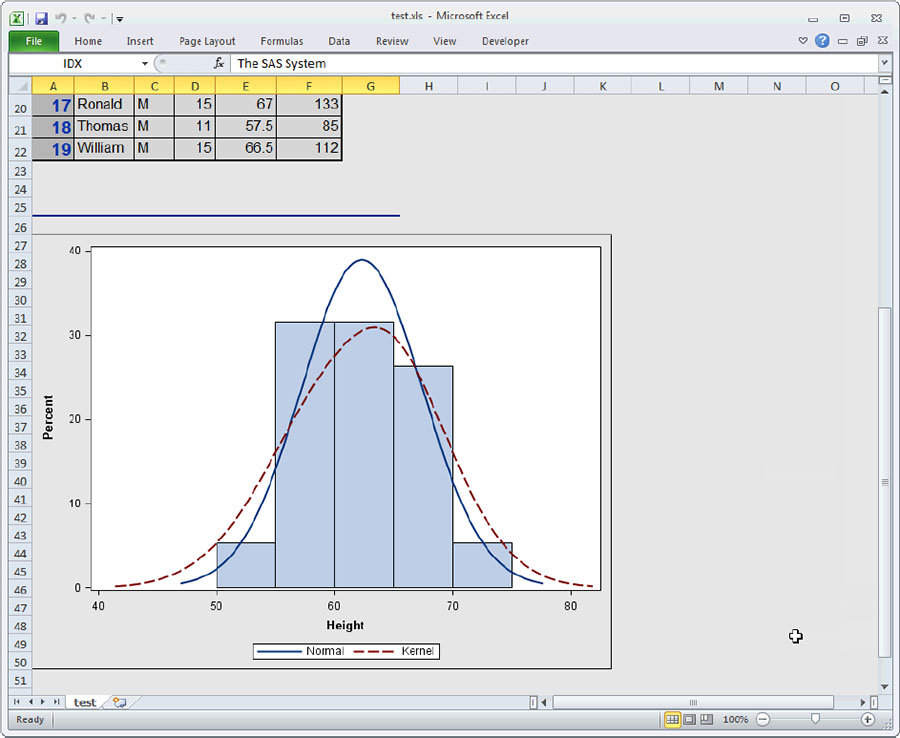
Using Graphical Output in Excel
We already mentioned that due to limits of the XML format used by TAGSETS.EXCELXP, you cannot use images in those documents. However, TAGSETS.MSOFFICE2K and HTML are both HTML-based outputs, which can reference images. When imported into Excel, the referenced images will also be imported. Here is an example that creates a table and a graph.
ODS TAGSETS.MSOFFICE2K FILE='test.xls';
PROC PRINT DATA=sashelp.class;
RUN;
PROC SGPLOT DATA=sashelp.class;
HISTOGRAM HEIGHT;
DENSITY HEIGHT;
DENSITY HEIGHT / TYPE=KERNEL;
RUN;
ODS TAGSETS.MSOFFICE2K CLOSE;
When you open the output file with Excel, it will import both the table and the graph into the worksheet. Figure 7.11 shows the output.
Figure 7.11: Graph output in Excel using TAGSETS.MSOFFICE2K
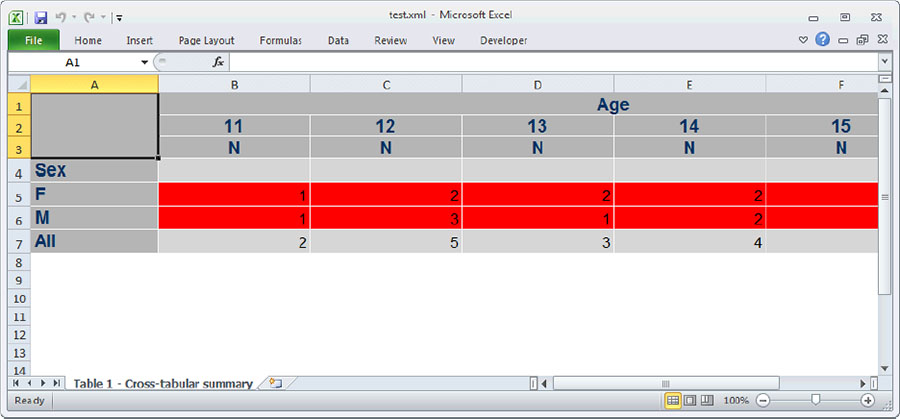
Preventing Cell Merging in PROC TABULATE
This tip was already covered in the Table and Text Tips chapter, but it is relevant enough to TAGSETS.EXCELXP usage that we think it should be recapped here. As we mentioned the first time, when PROC TABULATE has a class variable header on the left side of a table, it creates another row that is spanned by the first data row. Since Excel uses a grid for its data, this can cause problems with formulas that reference relative cells, or you just may not like how it looks in Excel. To turn this merging of cells off, you would use the NOCELLMERGE option on PROC TABULATE’s TABLE statement. Here is an example.
PROC TABULATE DATA=sashelp.class;
CLASS sex age;
TABLE sex*{style={backgroundcolor=red}} all, age
/ NOCELLMERGE;
RUN;
Figure 7.12 shows the output.
Figure 7.12: Preventing cell merging in PROC TABULATE using NOCELLMERGE
More Excel Tagsets Online
While they are not in the default SAS installation, there are a couple of tagsets available from the SAS support web site that you may wish to look into as well. The first one is TAGSETS.MSOFFICE2K_X (since URLs can change, we won’t put a link here, but you can simply do a search for “msoffice2k_x” at http://support.sas.com/ to locate the tagset). This tagset is an extension of the standard TAGSETS.MSOFFICE2K. It adds many options, including some options only found in TAGSETS.EXCELXP. Some of the added features include multiple worksheets, title and footnote controls, and print and display settings. With these additions, TAGSETS.MSOFFICE2K_X takes a big step closer to the capabilities of TAGSETS.EXCELXP while also retaining the ability to import images.
The other tagset resource that includes functionality specifically for Excel is TAGSETS.TABLEEDITOR. Again, this tagset is available on the support.sas.com web site. You can locate it by doing a keyword search for “tableeditor”. While many of the options of the table editor tagset are for HTML viewing, there are several options added for Excel’s benefit as well. These options include functionality such as worksheet names, auto-filtering, display settings, and pivot tables. Also, since this tagset is HTML-based as well, any images referenced in the document will be imported by Excel.