
Chapter 5: HTML Tips
Generating an External CSS File
Inserting Arbitrary Markup in the Document Preamble
Linking to Your Own Custom JavaScript
Change the Image Format Used By Graphs
Using a Background Image on a Table
HTML has been around in a few variants in ODS since early years. There are some significant differences in each of the versions. We’ll go over some of the differences in the first tip, then go on to some neat tricks you may not know were possible.
HTML3 vs HTML4 vs HTML5
HTML has been around in various forms for quite a while. The first version that ODS supported was version 3. Back in those days, the Microsoft Internet Explorer and Netscape Navigator wars brought forth many proprietary features that each browser vendor used to make their browser more attractive to the user. ODS’ HTML 3 implementation also included some of those. When HTML 4 came out, Cascading Style Sheets (CSS) were better supported by browsers and many of the proprietary elements and attributes started to fade away. That era also ushered in more consistency in Javascript implementations in browsers. Now with HTML 5 becoming the new standard, all browsers are expected to play nice and follow the specifications.
Because of the changes in specifications and browser support for various features, each variant of ODS HTML has also had varying capabilities. Here are the behaviors of each of the ODS HTML incarnations. I hesitate to categorize these into “pros” and “cons” because depending on your viewpoint, they could fit into either.
ODS HTML 3
• All style information is inline which allows you to copy portions of the file into other documents while retaining the style information, but it also bloats file sizes
• Limited CSS support
• Can look clunky compared to modern web pages
• ODS HTML3 is in maintenance mode, so newly encountered bugs are unlikely to be fixed
ODS HTML 4
• Good CSS support
• The most tested and used ODS HTML implementation so far. It has been the default HTML output for SAS for many, many years.
• Transitional DTD can cause rendering inconsistencies in Microsoft Internet Explorer
ODS HTML 5
• Excellent CSS support
• Better consistency between browsers
• Newest and least tested of the HTML outputs (at least at the time of writing)
• Uses only elements and attributes from specifications; no proprietary browser features
• Defaults to using inline SVG for graphics so that the entire report is in one file
• Can be run in inline-style mode to mimic HTML3’s ability to copy-and-paste sections of HTML into another document
Depending on your goals, you may lean towards one version of ODS HTML over another. However, as each version becomes available, the previous versions tend to be less supported, so keep this in mind when choosing. In general, HTML3 is very much discouraged since it has been in maintenance mode for a long time. HTML5 is very similar to HTML4 in capabilities, but cleans up a lot of messy details that have built up over the years.
Cascading Style Sheet Tips
There are various ways to use cascading style sheets (CSS) with ODS HTML. ODS HTML uses CSS as an input format, but it also uses it as an output format for a web browser to interpret. The tips below demonstrate both uses and how you can use both to enhance your reports.
Generating an External CSS File
By default, when you use HTML4 or HTML5, the cascading style sheet (CSS) information is embedded at the top of the HTML file. This information is helpful if you want all of the information in one file for emailing or for some other reason, but it’s not great if you want to keep file sizes small or share style sheets across reports. CSS was created to separate the style information in a file from the content, so while embedding it is possible, it seems to go against the spirit of the specification. Luckily, you can choose to embed the style sheet in the ODS HTML file, or generate an external style sheet.
The option that controls the generation of an external style sheet is STYLESHEET=. It accepts a file name or fileref. Here is an example of using the STYLESHEET= option with ODS HTML.
ODS HTML STYLESHEET='test.css';
PROC PRINT DATA=sashelp.class(OBS=5);
RUN;
ODS HTML CLOSE;
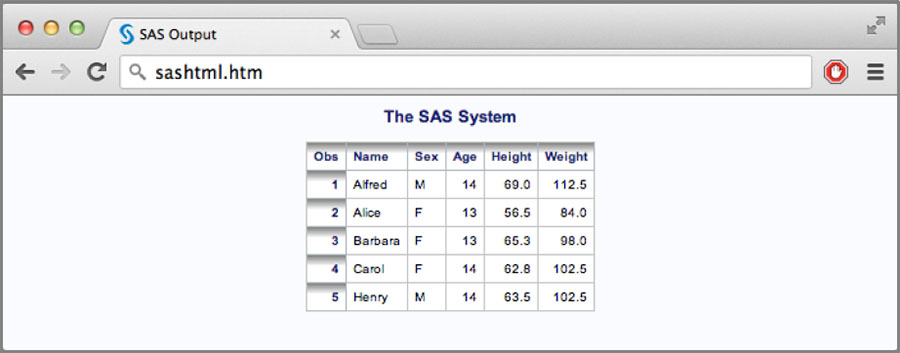
The rendered output will look the same regardless if you use an embedded style sheet or an external style sheet, but the markup in the file will be different. Here is a snippet of the HTML file with the embedded style sheet.
<style type=“text/css”>
<!--
.aftercaption
{
background-color: #FAFBFE;
border-spacing: 0px;
color: #112277;
font-family: Arial, 'Albany AMT', Helvetica, Helv;
font-size: x-small;
font-style: normal;
font-weight: bold;
padding-top: 4pt;
}
.batch
{
background-color: #FAFBFE;
border: 1px solid #C1C1C1;
border-collapse: separate;
border-spacing: 1px;
color: #000000;
font-family: 'SAS Monospace', 'Courier New', Courier, monospace;
font-size: x-small;
font-style: normal;
font-weight: normal;
padding: 7px;
}
.beforecaption
{
background-color: #FAFBFE;
border-spacing: 0px;
color: #112277;
font-family: Arial, 'Albany AMT', Helvetica, Helv;
font-size: x-small;
font-style: normal;
font-weight: bold;
}
...
</style>
This is a snippet of HTML using an external style sheet.
<link rel=“stylesheet” type=”text/css” href=“test.css”>
Specifying Your Own CSS File
In the previous tip, we showed you how to generate a CSS file from ODS. However, this CSS file didn’t contain information any different from the embedded CSS file. There is another option, though: pointing to an external style sheet not generated by ODS. The benefit to writing your own custom CSS file is that you can use features of CSS that aren’t supported by ODS such as vendor-specific properties, pseudo-classes that affect interactive behaviors, or features that just haven’t made it into your version of SAS yet.
To link to your own CSS file, you still use the STYLESHEET= option as in the previous tip. However, in this case, you specify a URL= sub-option. You don’t specify a filename to generate because you simply want to use your existing CSS file.
ODS HTML STYLESHEET=(URL='mystyle.css'),
PROC PRINT DATA=sashelp.class(OBS=5);
RUN;
ODS HTML CLOSE;
When you run this code, you will get a link in the HTML that points to your own CSS file rather than CSS generated by ODS.
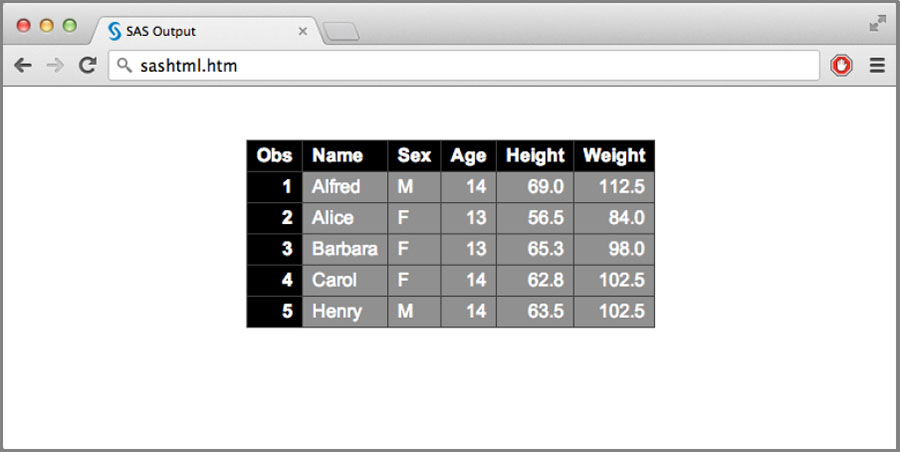
Here is a simple CSS file that we will use in our example.
.body {
font-family: arial;
color: white;
}
.table {
border-spacing: 0;
border-collapse: collapse;
}
.table th, .table td {
border: 1px solid #404040;
padding: 4px 8px;
}
.table th {
background-color: black;
font-weight: bold;
}
.table td {
background-color: #909090;
}
Using this file in the STYLESHEET=(URL='…') sub-option gives the output in Figure 5.1.
Figure 5.1: ODS HTML output using a custom CSS file
Usually when you are referencing your own style sheets, they will exist in another location that is loaded through a web server. The location that you specify in URL= can be in any format that your web browser will recognize. The most common would be an HTTP URL as shown in the example below.
ODS HTML STYLESHEET=(
URL='http://myserver.com/styles/mystyle.css'),
Specifying Multiple CSS Files
In the previous tip, you learned how to link to an external CSS file. While working with HTML, it is very common to have to link to multiple CSS files. It is possible to do this in the CSS itself using import statements, but ODS HTML gives you the option of generating multiple link elements in the HTML markup itself.
Specifying multiple CSS files works just like specifying a single CSS file, the only difference is that the string that contains the references to the external style sheets is a space-delimited list of filenames (or even URLs). Here is a simple example.
ODS HTML STYLESHEET=(URL='reset.css company.css
mystyle.css'),
As previously mentioned, you can use URLs that point to locations on a web server as well.
ODS HTML STYLESHEET=(
URL='http://myserver.com/styles/reset.css
http://myserver.com/styles/company.css
http://myserver.com/styles/mystyle.css'),
Just as a side note, there is no reason that you can’t use an ODS generated style sheet in addition to external style sheets. Here is an example that generates an ODS style sheet and links it as well as other CSS files.
ODS HTML STYLESHEET='odsstyle.css'(
URL='http://myserver.com/styles/reset.css
http://myserver.com/styles/company.css
http://myserver.com/styles/mystyle.css
odsstyle.css'),
Setting the Document Title
By default, ODS HTML output sets the document title to “SAS Output”. This title generally shows up in the web browser title bar or the document’s tab, and is used by search engines to determine relevance to search queries. Because of this, it’s a good idea to set the title to something a bit more useful.
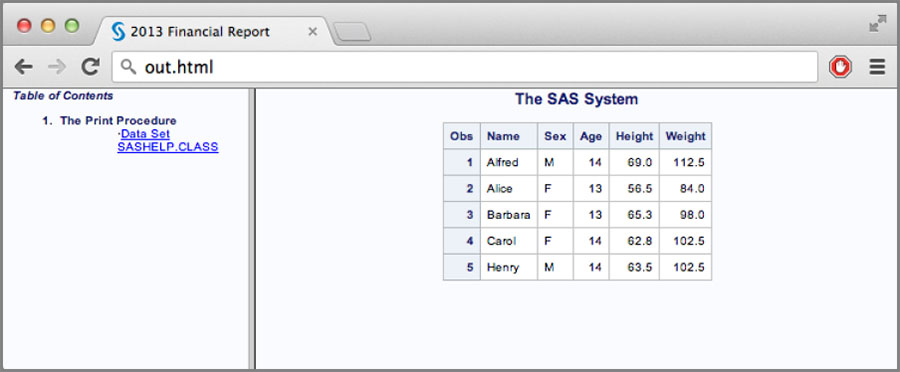
Changing the document title takes two forms depending on whether or not you use frames. If you don’t use a frame file (meaning that you just use a body file), you would use the TITLE= sub-option on the FILE option. This would look something like the following.
ODS HTML FILE='out.html'(TITLE='2013 Financial Report'),
PROC PRINT DATA=sashelp.class(OBS=5);
RUN;
ODS HTML CLOSE;
A screen shot of the browser with the specified title is shown in Figure 5.2. Note that the document title shows in the browser tab at the top.
Figure 5.2: Setting an explicit document title

If you are using a frame file, the title needs to go on that file instead of the body file in order for the web browser to display it correctly.
ODS HTML FRAME='out.html'(TITLE='2013 Financial Report')
BODY='body.html' CONTENTS='contents.html';
PROC PRINT DATA=sashelp.class(OBS=5);
RUN;
ODS HTML CLOSE;
Figure 5.3 is a screen shot of the output using the frame file.
Figure 5.3: Setting an explicit document title while using frames
Creating Document Fragments
There may be times when you want to embed tables from an ODS HTML report into another HTML document. While you could generate the file in the usual way, then search for the table in the source, and then copy-and-paste it, there is an easier way. The FILE= (or BODY=) option includes the NO_TOP_MATTER= and NO_BOTTOM_MATTER= (or NOTOP= / NOBOT=) sub-options that suppress the document preamble and closing, respectively. This gives you a file that can be included in another document that already has the preamble and closing markup.
Usually both NOTOP and NOBOT are used together as follows.
ODS HTML FILE='out.html'(NOTOP NOBOT);
PROC PRINT DATA=sashelp.class(OBS=5);
RUN;
ODS HTML CLOSE;
Rather than creating a complete HTML document, this generates a document fragment as shown below, which can be pasted into another HTML document.
<div class=“branch”>
<a name=“IDX”></a>
<table class=“systitleandfootercontainer” width=”100%”
cellspacing=“1” cellpadding=“1” rules=“none”
frame=“void” summary=“Page Layout”>
<tr>
<td class=“c systemtitle”>The SAS System</td>
</tr>
</table><br>
<div>
<div align=“center”>
<table class=“table” cellspacing=“0” cellpadding=“5”
rules=“all” frame=“box”
summary=“Procedure Print: Data Set SASHELP.CLASS”>
...
</table>
</div>
</div>
<br>
</div>
Inserting Arbitrary Markup in the Document Preamble
The head container in HTML can include various elements, such as title, base, link, style, script, and meta. Many of these elements are accessible through other ODS HTML options, but you may want to drop a large chunk of markup into your document without going through the ODS HTML options. This can be done with the HEADTEXT= option on the ODS HTML statement.
The usage of this option is quite simple.
ODS HTML HEADTEXT='Text to insert into the head';
One example of using HEADTEXT= is to add some additional style information that is relevant only to the HTML destination. It may include changes to CSS that control interactive behavior, or possibly a global change to some visual facet of the report.
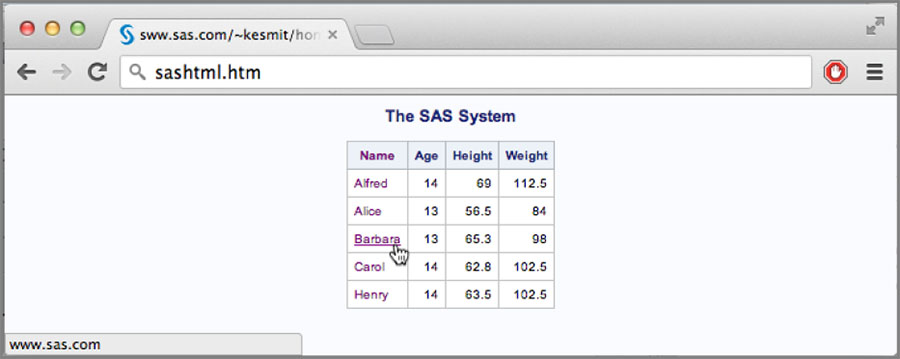
One common thing to do is change the behavior of hyperlinks based on whether the cursor is hovering over the link. This isn’t a feature that is available from any ODS feature directly, but we can add that behavior using HEADTEXT=.
Here is the CSS code that we need to make our change.
<style>
a:link { text-decoration: none}
a:visited { text-decoration: none}
a: active { text-decoration: underline }
a:hover { text-decoration: underline; color: red}
</style>
We can specify this code in the HEADTEXT= option to embed it into the head area of the HTML document.
ODS HTML HEADTEXT='
<style>
a:link { text-decoration: none}
a:visited { text-decoration: none}
a:active { text-decoration: underline }
a:hover { text-decoration: underline;
color: red}
</style>';
PROC REPORT DATA=sashelp.class(OBS=5);
COLUMN name age height weight;
DEFINE name / STYLE={URL='http://www.sas.com/'};
RUN;
ODS HTML CLOSE;
Figure 5.4 shows what the document looks like. Notice that the link with the cursor over it is red with an underline, whereas other links don’t have those styles.
Figure 5.4: Adding arbitrary markup to the top of an ODS HTML file
Using External Resources
There are many third-party resources available for HTML such as web fonts and JavaScript. These are great resources for enhancing your ODS reports. In the following sections, we’ll show you how to use them in your reports.
Utilizing Web Fonts
One thing that can be tricky with HTML reports is making sure that the client machine has all of the fonts that the style designer’s computer has. Fonts are not embedded in HTML, so if the person viewing the report doesn’t have the referenced fonts installed, then the report won’t look the same as it did to the designer. One way to work around this problem is to use third-party web fonts. There are many places on the web that serve fonts in a way that modern web browsers can use them directly rather than having to install them on your machine.
One of the most common repositories of these web fonts is Google Fonts (http://www.google.com/fonts/). Google has literally hundreds of open-source fonts that you can reference in your HTML. You can use the tip about referencing multiple style sheets to take advantage of web fonts in your reports. Simply go to Google Fonts at the URL above, browse through and find a font that you like, then click the “Quick-use” button to reveal the CSS link that you need to include the font.
For our example, we’ll use the Roboto font. Google tells us that the link code for our report will need to look like this:
<link rel='stylesheet' type='text/css'
href='http://fonts.googleapis.com/css?family=Roboto'>
We can get a link element like that in our report by specifying the href= attribute value above in our STYLESHEET=(URL='…') option as follows.
ODS HTML STYLESHEET='odsstyle.css'(
URL='http://fonts.googleapis.com/css?family=Roboto
odsstyle.css'),
While this code links the web fonts into our page, we need to update our style to use those fonts. Since ODS HTML defaults to the styles.HTMLBlue style, we have to change that style to use the Roboto font.
PROC TEMPLATE;
DEFINE STYLE MyStyle;
PARENT = styles.htmlblue;
CLASS fonts /
'docFont' = ('Roboto', 2)
'headingFont' = ('Roboto', 2, bold)
;
END;
RUN;
We now have to use this new style on our ODS HTML statement.
ODS HTML STYLE=MyStyle STYLESHEET='odsstyle.css'(
URL='http://fonts.googleapis.com/css?family=Roboto
odsstyle.css
PROC PRINT DATA=sashelp.class;
RUN;
ODS HTML CLOSE;
Figure 5.5 shows the output using the Roboto font.
Figure 5.5: ODS HTML output using web fonts

Using this technique, we don’t have to worry about what fonts are installed on the client machine. They will simply be downloaded and used directly from Google (or whatever web font supplier you use).
Linking to Your Own Custom JavaScript
The JavaScript file that ODS generates only works with the table of contents to expand and collapse the tree of entries. You may have some of your own JavaScript code that you would like to include in your reports to enhance their capabilities. We will use the HEADTEXT= option on the ODS HTML statement to include our custom JavaScript just like we include style information in the previous tip.
Here is the code we will use to include our JavaScript file.
ODS HTML HEADTEXT='<script type=“text/javascript”
href=“myscript.js”></script>';
Of course, you can use a full URL in the href attribute. You can also specify multiple script elements in the string to include JavaScript frameworks, plugins, etc.
There are countless ways to use JavaScript in HTML. We obviously can’t cover them all here, but here is one example that covers a jQuery plugin called tablecloth (http://tableclothjs.com/). This plugin gives you various styling updates to your tables as well as making the columns sortable. Because of a limitation in the number of characters allowed in the HEADTEXT= option, we have to play a few tricks to get all of the JavaScript files loaded.
Here is what our HEADTEXT= option will look like:
ODS HTML HEADTEXT='
<link href=“http://server.com/jquery/assets/css/
tablecloth.css” rel=“stylesheet”>
<script src=“http://server.com/jquery/assets/js/
jquery-1.7.2.min.js”></script>
<script src=“http://server.com/jquery/tables.js”>
</script>';
Of course, the line breaks in the URLs are simply there to make them fit in the book. They should be contiguous in your SAS file. The link element is there to include the CSS file supplied by the tablecloth plugin. The first script element loads the jQuery framework. The second script element loads a JavaScript file that we will be writing. It is shown below.
$(document).ready(function() {
var base = 'http://server.com/jquery/assets/js/';
var needed = 4;
function load() {
needed -= 1;
if ( !needed ) {
$(“.table”).tablecloth({
theme: 'paper',
striped: true,
sortable: true,
condensed: true
});
}
}
$.getScript(base + 'bootstrap.js', load);
$.getScript(base + 'jquery.metadata.js', load);
$.getScript(base + 'jquery.tablesorter.min.js', load);
$.getScript(base + 'jquery.tablecloth.js', load);
});
This might be a little bit confusing if you’ve never seen JavaScript or used jQuery before. The first line simply calls the inner function when the HTML document has been completely loaded by the browser. The inner function loads four JavaScript files (using $.getScript). These four JavaScript files contain the tablecloth plugin code. Since $.getScript runs asynchronously, we are using another function (load) as a callback function to $.getScript to keep track of how many of the JavaScript files have been loaded. Once all four have been loaded, we fire off the tablecloth plugin on all of the elements with class=”table” (i.e., .table) on them.
When you run the ODS HTML command above with a PROC PRINT, the output looks like Figure 5.6.
Figure 5.6: Adding JavaScript effects to your ODS HTML

Notice that the look has changed somewhat from the SAS default style. Table rows are alternating colors, and the column headers are clickable so that the columns can be sorted.
Change the Image Format Used by Graphs
By default HTML3 and HTML4 use a bitmapped graphics format called PNG for graphs. HTML5 on the other hand supports inline SVG and uses that as the default. Depending on your needs, you may want to change the default to another format. There are actually two methods for changing graph formats depending on whether you are using traditional graphs or the newer template-based statistical graphics.
For traditional graphs, you would use the GOPTIONS statement to change the graphics device. Some of the commonly used devices for HTML would be GIF, JPEG, PNG, SVG, JAVA, or ACTIVEX. To set the graphics device to GIF, you would use the following.
GOPTIONS DEVICE=GIF;
Statistical graphics use a different statement to change the image format: the ODS GRAPHICS statement. They support a different set of formats, so you should check the SAS documentation to determine if your desired format is available. Setting the image format using the ODS GRAPHICS statement goes as follows.
ODS GRAPHICS ON / IMAGEFMT=GIF;
Here is an example that changes both traditional graphs and statistical graphs to the GIF image format.
ODS GRAPHICS ON / IMAGEFMT=GIF;
GOPTIONS DEVICE=GIF;
ODS HTML3 FILE='html3.html';
ODS HTML FILE='html.html';
ODS HTML5 FILE='html5.html';
PROC GCHART DATA=sashelp.class;
WHERE NAME IN(“Alice” “Carol” “Jane” “John” “Mary”);
VBAR NAME / SUMVAR=height WIDTH=10;
RUN;
QUIT;
ODS SELECT FitPlot;
PROC REG DATA=sashelp.Class;
MODEl weight=height;
QUIT;
ODS _ALL_ CLOSE;
Because most graphics formats will look the same in the browser, showing the visual output won’t do much here. But if you look at the markup within the files, you’ll see that the <img> elements reference GIF formatted images rather than the default format.
Background Effects
Backgrounds in HTML can consist of colors, images, and even gradients. Combining these components in the various layers of a table (e.g., table, row, cell) can result in some very interesting effects. We show some of those techniques in the following sections.
Using a Background Image on a Table
We’ve all seen background images being used on the body, or possibly even a cell of a table, in an HTML document. But did you know that you can use background images on tables as well? This can create some very interesting effects, especially if combined with RGBA colors on cells.
The simplest way to put a background image on a table is to set one in the style being used by ODS HTML. The code for this would look like the following.
PROC TEMPLATE;
DEFINE STYLE MyStyle;
PARENT = styles.htmlblue;
CLASS Table /
BACKGROUNDIMAGE = 'bgimage.jpg
;
END;
RUN;
While this works and is fairly straightforward, it’s not always the most useful since it will add the background image to every table in the report. This effect can by used this way, but it can really be useful when the background image is relevant to the data in the table. The Base reporting procedures can apply style overrides to a single table. The method varies slightly between each one. Here is the basic syntax for each.
PROC PRINT STYLE(table)={BACKGROUNDIMAGE='bgimage.jpg};
RUN;
PROC REPORT STYLE(table)={BACKGROUNDIMAGE='bgimage.jpg};
RUN;
PROC TABULATE;
TABLE ... / STYLE={BACKGROUNDIMAGE='bgimage.jpg};
RUN;
Most of the style templates that SAS supplies use colors on the cells. So if you are using one of those, you will have to remove the cell color or change it to something semi-transparent using RGBA colors; otherwise, you won’t be able to see the background image on the table because it will be covered up.
PROC TEMPLATE;
DEFINE STYLE MyStyle;
PARENT = styles.htmlblue;
CLASS Data /
BACKGROUNDCOLOR = RGBAFFFFFF80
;
END;
RUN;
Here is an actual example showing the effect.
ODS HTML STYLE=MyStyle;
PROC PRINT DATA=sashelp.class(OBS=12)
STYLE(table)={BACKGROUNDIMAGE='bgimage.jpg'};
RUN;
ODS HTML CLOSE;
Figure 5.7 shows the output.
Figure 5.7: Background image on a table

Using Gradients Backgrounds
Gradients are still a bit of a moving target since, at the time of this writing, they still haven’t reached the recommendation state in the W3C. Because of this, most browsers don’t support the W3C documented gradient property values yet. In addition, since ODS HTML5 avoids browser specific code; only ODS HTML4 supports gradient backgrounds at this time.
Gradients are specified in the BACKGROUNDIMAGE style attribute. There are essentially two types of gradients: linear and radial. Radial gradients are more complex and less common, so they won’t be covered in this tip. The syntax for linear gradients is the following:
linear-gradient( [ angle, ] color-stop[, color-stop]+ )
The angle is a numeric such as 45deg, 60deg, etc., or a combination of keywords left/right and top/bottom indicating the starting point of the gradient. Color stops are colors paired with an optional dimension (typically a percentage) that indicates the position of that color in the gradient.
Here is an example that applies a gradient background to all Header and RowHeader areas in a report.
PROC TEMPLATE;
DEFINE STYLE MyStyle;
PARENT = styles.htmlblue;
CLASS Header, RowHeader /
BACKGROUNDIMAGE =
'linear-gradient(top, gray, white 40%)'
;
END;
RUN;
ODS HTML STYLE=MyStyle;
PROC PRINT DATA=sashelp.class(OBS=5);
RUN;
ODS HTML CLOSE;
Figure 5.8 shows the output from the code above.
Figure 5.8: Using gradient backgrounds
Preserving White Space
There may be times when you want the white space in a data cell to be preserved. Normally, web browsers will collapse all white space down to a single character. However, there is an attribute that allows you to indicate that you want whitespace to be treated differently than that. It is the aptly named WHITESPACE style attribute.
The two most common values of WHITESPACE are NOWRAP and PRE. NOWRAP still collapses whitespace, but it won’t wrap the content into lines. PRE doesn’t collapse whitespace and only puts line breaks in where they were in the data.
Here is an example of using NOWRAP. Let’s say that you have a data set with columns that you don’t want to have line breaks in. You can use WHITESPACE=NOWRAP to prevent this.
Here is an example using PROC PRINT.
DATA addresses;
INPUT name $24. ip $16. location $8. os $12. comment $60.;
DATALINES;
braeburn.sas.com 10.10.123.1 R1123 Windows Dual
2GHz, 8GB RAM, 2TB Hard Drive
pinklady.sas.com 10.10.123.2 CB113 Linux Dual
2GHz, 16GB RAM, 1TB Hard Drive
red.sas.com 10.10.123.34 S2222 Linux Dual
2.2GHz, 16GB RAM, 1TB Hard Drive
golden.sas.com 10.10.123.46 T2037 Linux Dual
2GHz, 8GB RAM, 2TB Hard Drive
grannysmith.sas.com 10.10.123.67 V101 OSX
2.3GHz, 16GB RAM, 1TB Hard Drive
;
RUN;
ODS HTML;
PROC PRINT DATA=addresses;
VAR name ip location os comment /
STYLE={WHITESPACE=NOWRAP};
RUN;
ODS HTML CLOSE;
Figure 5.9 shows the output.
Figure 5.9: Controlling whitespace behavior

If you hadn’t used NOWRAP and the window was sized down, Figure 5.10 is what you would see.
Figure 5.10: ODS HTML output with default whitespace behavior

ODS HTML5 Techniques
ODS HTML5 adds some features that previous variants of ODS HTML don’t have. Some of these features are covered in the following sections.
Turning Off Inline SVGs
By default, HTML5 uses inline SVGs for graphs. This means that the SVG content is actually written in the HTML file itself. This is nice if you want to send the HTML file as an email attachment and don’t want to have to attach a bunch of graph files to the email as well; it is self-contained. However, you may not want the graphs in the HTML file. The HTML5 destination has several options for dealing with SVG files. This setting is specified in the SVG_MODE sub-option of the OPTIONS parameters.
The SVG_MODE option can be set to LINK, IMG, EMBED, OBJECT, or INLINE. LINK means to create a hyperlink to the image, but don’t display the image itself. IMG, EMBED, and OBJECT indicate that the <img>, <embed>, or <object> element should be used, respectively. Finally, INLINE means to inline the image (which is the default setting).
To change SVGs so that they use the <img> element instead, you would do the following.
ODS HTML5 OPTIONS(SVG_MODE='IMG'),
The other option values work the same way. It should be noted that browsers have various degrees of support for each of the element types, and you should check that the browsers you support work with the element used.
Since displaying the image inline or using another element looks the same, we won’t display the output here.
Inlining Bitmapped Images
While SVG images are inlined in HTML5, bitmapped images are not. If you are emailing HTML files where some images are inlined and others aren’t, it can be a pain to deal with. While it is not commonly known, it is possible to inline bitmap images within HTML using data URLs. ODS HTML5 makes inlining bitmaps easy. It is once again done with an OPTIONS setting: BITMAP_MODE.
BITMAP_MODE takes the same values as SVG_MODE (as discussed in the previous tip). They are LINK, IMG, EMBED, OBJECT, and INLINE. By default, IMG is used. To enable inline bitmaps, you would use the following.
ODS HTML5 OPTIONS(BITMAP_MODE='INLINE'),
When you use this command in HTML5, it base-64 encodes the bitmap image and converts it to a data URL. This conversion will cause the size of the data in the image to increase because of the base-64 encoding; some browsers limit the size of data URLs, so you will want to make sure that your images are small enough for the browser to handle.
Just as with the previous tip, the output with the default BITMAP_MODE setting looks just like the output with the INLINE setting, so we won’t show the output here.
Inline All Style Attributes
As with HTML4, HTML5 uses CSS for most of its styling. This separates the style information from the actual report content. HTML3, on the other hand, did all of its styling using inline styling. If you want to copy-and-paste sections of an HTML file into another document and retain the styling, you may want the HTML3 behavior. But with HTML3 being extremely old and minimally supported, it’s not usually a good idea to depend on it. However, there is a trick you can play on HTML5 to make it act in a similar way.
While HTML5 does use CSS-based styling, unlike HTML4, if you change the style in HTML5, it switches to an inline style mode to attempt to do the best it can with the style change. The overall body of the document will still be done using CSS, but the content of the report will use inline styles. Here is how you do it.
/* Open HTML5 */
ODS HTML5 STYLE=Default;
/* Change the style to the one we really want */
ODS HTML5 STYLE=HTMLBlue;
PROC PRINT DATA=sashelp.class(OBS=5);
RUN;
ODS HTML5 CLOSE;
You’ll notice that we invoked ODS HTML5 twice in the code above. The first one starts up ODS HTML5 and writes the style sheet. The second one changes the style and forces HTML5 into inline style mode. The only reason we specified a different style in the first one is to show that the style does in fact change for the tables, titles, etc. in the screen shot below. In the real world, you could just leave off the first STYLE=.
Figure 5.11 shows the output from the code above. Notice that the body of the document is dark gray (from Default). The titles and tables use the HTMLBlue scheme. If you look at the HTML markup itself, you will see inline styles all over the tables and titles.
Figure 5.11: ODS HTML5 output using all inline styles
