
Chapter 8: ODS Document Tips
Customizing Your Report Structure
Creating a Completely Custom Table of Contents
Recording Actions in the Documents Window
Using Links to Create Custom Tables of Contents
Using Links to Create Aggregate Reports
Using WHERE Clauses in Documents
Templates and Dynamic Variables
Display the Template Used by an Object in a Document
Displaying Dynamic Variables Used by an Output Object
Swapping Templates During Replay
Accessing the Data in Document Output Objects Directly
Inserting Plain Text Objects into a Document
Operating on a Document Using CALL EXECUTE
The ODS Document is a bit more of an abstract concept. It doesn’t generate output that you view with an application. It stores all of the output objects and information generated from procedures into an item store. These objects can then be replayed later through other ODS destinations without needing access to the original procedures or data. It’s more of a meta-destination that gives you the ability to customize reports in ways that simple ODS options can’t.
Customizing Your Report Structure
The ODS Document allows you to change the structure of your report in ways that no other ODS feature can. The nice side-effect of changing your report structure is that you can completely control the structure of the table of contents in destinations like HTML and PDF. The following sections show various techniques on how to control your report structure.
Creating a Completely Custom Table of Contents
By default, the table of contents information used by ODS HTML, the printer family of destinations, and the RTF destinations comes from the procedures. There are some options such as ODS PROCLABEL= that allow you to change it a little bit, but for the most part, you are stuck with that structure. There is one tool that will allow you to change everything in the table of contents, and that tool is ODS DOCUMENT.
The first thing we need to do is create an ODS DOCUMENT to work with. Here is a basic example.
ODS DOCUMENT NAME=mydoc;
PROC PRINT DATA=sashelp.class;
RUN;
PROC CONTENTS DATA=sashelp.class;
RUN;
ODS DOCUMENT CLOSE;
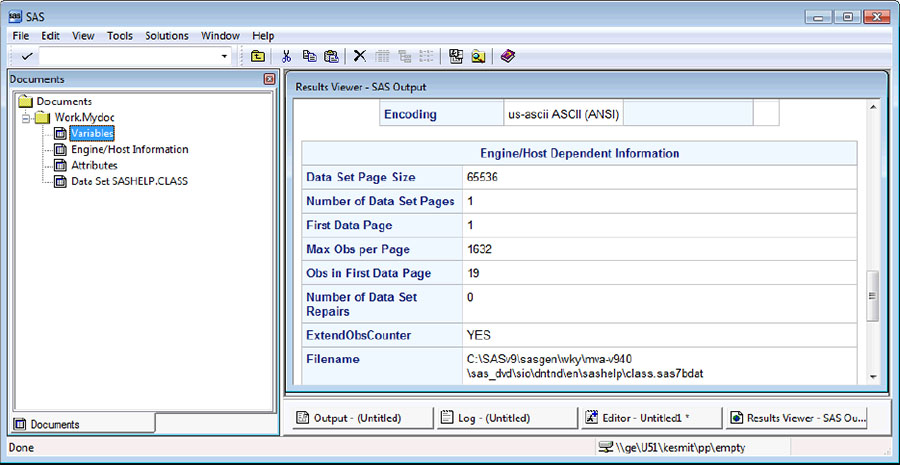
To view the structure of your document, type “odsdoc” in the run box in the SAS graphical interface. You’ll see something like Figure 8.1 (after using the Expand All right-click menu selection on the top-level):
Figure 8.1: The report structure in the ODS Documents window

The structure you see here is mirrored in the table of contents in any ODS destinations that generate a table of contents. That means that any changes you make here will be reflected in the table of contents as well. Using the right-click menu options and drag-and-drop, you can completely rearrange the document structure in the Documents window. Figure 8.2 shows an example after editing.
Figure 8.2: The new report structure after editing
Now if we replay this document to a destination that supports a table of contents, we will see the new structure.
ODS HTML FRAME='test.html' CONTENTS='testc.html'
BODY='testb.html';
PROC DOCUMENT NAME=mydoc;
REPLAY;
RUN;
QUIT;
ODS HTML CLOSE;
Figure 8.3 shows the output with the new table of contents structure.
Figure 8.3: The ODS HTML table of contents structure reflecting the edited report structure

Recording Actions in the Documents Window
In the last tip, you learned how you can modify the table of contents using the documents window. This is really handy, but it has one major downfall. If you generate the document again, all of your modifications will be lost and you will have to replicate all of your changes manually. Luckily, there is a way to record your actions so that you can reapply them. If you select the Documents window and look under the View menu, you will see a selection called Document Recorder. When you select this, a new window will pop up. This is a code window that contains the PROC DOCUMENT code you can run to replicate the actions you are doing through the user interface.
If you turn the Document Recorder on and do the same modifications from the previous tip, you will get the following code.
PROC DOCUMENT;
DOC NAME=Work.Mydoc;
COPY Attributes#1 TO Attributes#1;
COPY EngineHost#1 TO EngineHost#1;
COPY Variables#1 TO Variables#1;
COPY Print#1Print#1 TO Print#2;
DELETE Print#1;
DELETE Contents#1;
QUIT;
You can now paste this SAS code at the end of your program so that whenever you generate a new document, the structure also gets changed back to the desired form.
Using Links to Create Custom Tables of Contents
In the previous tips, we have seen how to modify the table of contents using the Documents window, and also how to record and replay those actions using PROC DOCUMENT. We also mentioned the problem of losing modifications made in the Documents window when a report is run again. Another solution doesn’t require that you modify the document and record the actions. This solution uses links in a new document.
Rather than modifying the existing document, you can create a new document that simply contains pointers to the original output objects. This way, you don’t have to worry about replaying modifications after the original report is regenerated. We’ll use the same document from the previous tips as our source material. Using PROC DOCUMENT’s LINK, MAKE, and SETLABEL commands, we can create the structure we want, then link to the original document’s output objects. Note that we are using the WRITE access method here to make sure that we are creating a new document, not appending an existing one.
PROC DOCUMENT NAME=newdoc(WRITE);
MAKE myreport;
SETLABEL myreport 'My Report';
DIR myreport;
LINK work.mydoccontentsdatasetattributes to obj1;
SETLABEL obj1 'Variable Attributes';
LINK work.mydoccontentsdatasetenginehost to obj2;
SETLABEL obj2 'Other Information';
LINK work.mydoccontentsdatasetvariables to obj3;
SETLABEL obj3 'Variables';
LINK work.mydocprintprint to obj4;
SETLABEL obj4 'Hi There';
RUN;
We now have a new document that references the output objects in our original document. If we replay this document to a destination that supports tables of contents, we will see the same result as in the previous tips.
ODS HTML FRAME='test.html' CONTENTS='testc.html'
BODY='testb.html';
PROC DOCUMENT NAME=newdoc;
REPLAY;
RUN;
QUIT;
ODS HTML CLOSE;
Figure 8.4 shows the output.
Figure 8.4: Custom table of contents structure created using an ODS Document with links

Using Links to Create Aggregate Reports
The previous tip demonstrated how to use links to create a new report with a custom structure. However, there’s no reason that you can’t use the same technique to create a new report that is an aggregate of multiple other reports. The method is exactly the same as the previous tip, but it uses multiple source documents. Let’s create the new source documents first.
ODS DOCUMENT NAME=doc1;
PROC MEANS DATA=sashelp.class;
VAR height weight;
RUN;
ODS DOCUMENT CLOSE;
ODS DOCUMENT NAME=doc2;
PROC CONTENTS DATA=sashelp.class;
RUN;
ODS DOCUMENT CLOSE;
Now that we have multiple source documents to use, let’s create a new document that references output objects from them.
PROC DOCUMENT NAME=newdoc(WRITE);
MAKE report;
SETLABEL report 'Aggregate Report';
DIR report;
LINK work.doc1meanssummary to obj1;
SETLABEL obj1 'Height and Weight Means';
LINK work.doc2contentsdatasetvariables to obj2;
SETLABEL obj2 'Variable Information';
RUN;
Now we can replay this document to create an aggregate report.
ODS HTML;
PROC DOCUMENT NAME=newdoc;
REPLAY;
RUN;
QUIT;
ODS HTML CLOSE;
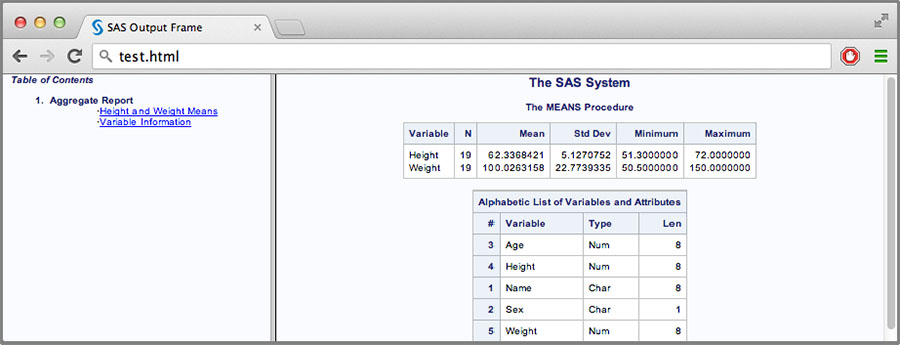
Figure 8.5 shows the output. As you can see, we are using output objects from multiple documents to create our new report. This technique is a nice way to aggregate information from multiple people’s documents into one report.
Figure 8.5: Aggregate report using multiple ODS Documents
Using WHERE Clauses in Documents
Many of the statements in PROC DOCUMENT support WHERE clauses so that you can conditionally operate on objects within a document. These statements include DELETE, LIST, MOVE TO, and REPLAY. These WHERE clauses include access to many built-in variables as well. These include _LABEL_, _LABELPATH_, _NAME_, _PATH_, _SEQNO_, _TYPE_, as well as several that contain creation and modification dates and times. The list also includes any BY variables that are in the report.
WHERE clauses can be used to subset reports based on the built-in variables. This gives you much more dynamic control over report sub-setting. Let’s start with a document that contains BY group information.
ODS DOCUMENT NAME=mydoc(WRITE);
PROC SORT DATA=sashelp.class OUT=class;
BY age;
RUN;
PROC PRINT DATA=class;
BY age;
RUN;
ODS DOCUMENT CLOSE;
Now we can replay this document using a WHERE clause to only print the BY groups that we want to see.
ODS HTML;
PROC DOCUMENT NAME=mydoc;
REPLAY ^(WHERE=( age > 12 ));
RUN;
QUIT;
ODS HTML CLOSE;
The ^ in the statement above simply refers to the “current directory” which is the root document directory in this case. The WHERE clause indicates that only the output objects with a BY variable of age > 12 should be replayed. Figure 8.6 shows the output.
Figure 8.6: Replaying using a WHERE clause for a custom report

Templates and Dynamic Variables
PROC DOCUMENT has some interesting features for displaying information about objects in a report. Two of these items are 1) the template used to render the object and 2) the dynamic variables passed into the template to control conditional behavior. These pieces of information can be useful if you are trying to customize objects at the template level. These PROC DOCUMENT features are covered in the following sections.
Display the Template Used by an Object in a Document
When a document is created, the templates associated with each of the output objects aren’t stored in the document (except in special cases such as PROC PRINT, PROC REPORT, PROC TABULATE, and the s tatistical graph procedures). Only a reference to the template is written to the document. Because of this, it is possible that the template (that was in the ODS path when the document was written) isn’t the same one used when the document is being replayed.
You can get the source of the current template for an output object by using the OBTEMPL statement in PROC DOCUMENT. Here is an example.
/* generate a document */
ODS DOCUMENT NAME=mydoc;
PROC MEANS DATA=sashelp.class;
RUN;
ODS DOCUMENT CLOSE;
PROC DOCUMENT NAME=mydoc;
/* list the document paths to find the one we want */
LIST / LEVELS=ALL;
RUN;
/* display the template of the output object */
OBTEMPL means#1summary#1;
RUN;
Here is a partial listing of the template from the code above.
proc template;
define table base.summary;
notes “Summary table for MEANS and SUMMARY”;
dynamic clmpct one_var_name one_var_label
one_var _double_space_;
column class nobs id type ways (varname) (label)
(min) (max) (range) (n) (nmiss) (sumwgt)
(sum) (mean) (uss) (css) (var) (stddev) (cv)
(stderr) (t) (probt) (lclm) (uclm) (skew) (kurt)
(median) (mode) (q1) (q3) (qrange) (p1) (p5)
(p10) (p20) (p25) (p30) (p40) (p50) (p60)
(p70) (p75) (p80) (p90) (p95) (p99);
header h;
define h;
text “Analysis Variable : “ one_var_name
“ “ one_var_label;
space = 1;
just = C;
print = one_var;
spill_margin;
end;
...
required_space = 5;
control = _control_;
double_space = _double_space_;
underline;
overline;
byline;
use_format_defaults;
split_stack;
use_name;
order_data;
classlevels;
end;
run;
Displaying Dynamic Variables Used by an Output Object
Many of the templates that are supplied by SAS and that are used for generating tables and statistical graphics use a feature called dynamic variables. These variables are passed to the template by the procedure in order to invoke conditional behavior in the template on the basis of procedure options, or in order to pass in printable information so that the table headers aren’t so generic. There isn’t a way to see the values of these variables directly, so if you are trying to determine what variables are being passed to decipher some behavior in a template, you used to have no options. However, using PROC DOCUMENT, we can now display the values of those variables.
/* create document with ods graphics */
ODS DOCUMENT NAME=mydoc(WRITE);
ODS GRAPHICS ON;
PROC REG DATA=sashelp.class;
MODEL weight=height;
RUN;
ODS DOCUMENT CLOSE;
PROC DOCUMENT NAME=mydoc;
LIST / LEVELS=ALL;
RUN;
/* display graph dynamic variables */
OBDYNAM Reg#1MODEL1#1ObswiseStats#1
Weight#1FitPlot#1;
RUN;
Here is a partial listing of the variables associated with the graph. Note that statistical graphics use a lot of dynamic variables. Tables generally do not have this many dynamic variables.
Name Value Type
--------------------------------------------------------------
_SHOWCLM 1 Data
_SHOWCLI 1 Data
_WEIGHT 0 Data
_SHOWSTATS 1 Data
_NSTATSCOLS 2 Data
_SHOWNOBS 1 Data
_NOBS 19 Data
_SHOWTOTFREQ 0 Data
_TOTFREQ 19 Data
_SHOWNPARM 1 Data
_NPARM 2 Data
_SHOWEDF 1 Data
_EDF 17 Data
_SHOWMSE 1 Data
...
Swapping Templates during Replay
Previously, you learned that, except in special cases, the templates used by objects in a document are simply referenced, not stored, in the template. This means that the template used during replay might not be the same as the template used when the document was created. We can use this fact to create customized reports or even view the data in completely different forms when doing a replay.
One way of accomplishing this is to create your document in the usual fashion, then change the ODS path so that the new template is earlier in the path than the original template, and then replay the document. This does work, but it’s a bit clunky. Luckily in SAS 9.4, a new option was added to the path components in the REPLAY statement of PROC DOCUMENT. Using this new option, we can replay using different templates without having to change the ODS path.
/* turn on tracing so we can get the template name */
ODS TRACE ON;
/* generate a document */
ODS DOCUMENT NAME=mydoc(WRITE);
ODS GRAPHICS ON;
PROC REG DATA=sashelp.class;
MODEL weight=height;
RUN;
ODS DOCUMENT CLOSE;
/* define table using same name as the template
we want to replace. in this case, we are creating
a table using all of the default attributes */
PROC TEMPLATE;
DEFINE TABLE Stat.REG.Graphics.Fit / STORE=work.xxx;
END;
RUN;
ODS HTML;
PROC DOCUMENT NAME=mydoc;
/* replay using standard template */
REPLAY Reg#1MODEL1#1ObswiseStats#1
Weight#1FitPlot#1;
/* replay using our new non-graph template */
REPLAY Reg#1MODEL1#1ObswiseStats#1
Weight#1FitPlot#1(STORE=work.xxx);
RUN;
ODS HTML CLOSE;
Figure 8.7 shows the output. Notice that originally the object was a graph, but the new template is a table template, so the representation changes drastically.
Figure 8.7: Swapping templates for two different representations of an object

Accessing the Data in Document Output Objects Directly
You have learned that you can view data differently, depending on the template that you use. You could even run the previous program and use the ODS OUTPUT destination to capture the data in a data set. However, there is another way to directly view data stored in a document using the SASEDOC libname engine.
The SASEDOC libname engine is used in conjunction with the libname statement. You simply set up a new library name using the SASEDOC engine and specify the path to a folder in an ODS document. After that, all of the output objects in that folder will be accessible as data sets under the given library name. Let’s look at an example. We’ll use the graph path from the last example (note that we must include the document location at the beginning and remove the output object name from the end).
LIBNAME mylib SASEDOC
'work.mydocReg#1MODEL1#1ObswiseStats#1Weight#1';
Now that we have a libname setup, we can use that in whatever procedure we want.
ODS HTML;
PROC PRINT DATA=mylib.fitplot(DOC_SEQNO=1);
RUN;
ODS HTML CLOSE;
We also specified the DOC_SEQNO= option above. It isn’t needed for this case since we want the object with sequence number 1, but if you wanted a different object that only varied by sequence number, this is how you would specify it. Figure 8.8 shows the output.
Figure 8.8: Accessing data using the SASEDOC libname engine

Inserting Plain Text Objects into a Document
Normally objects are entered into an ODS document using SAS procedures, but there is another way using PROC DOCUMENT’s IMPORT TO statement. The IMPORT TO statement takes a TEXTFILE= option which accepts either a filename or a fileref. This text file is then imported into the document and can be replayed just like any other output object. Here is an example. First we need a text file to import. We will save the following in a file.
A person who never made a mistake never tried anything new.
-- Albert Einstein
Now we can import this text file into a document as follows.
PROC DOCUMENT NAME=mydoc(WRITE);
IMPORT TEXTFILE='einstein.txt' TO einstein;
RUN;
If we list the contents of the document, we will see the new object.
PROC DOCUMENT NAME=mydoc;
LIST;
RUN;
Here is the listing.
Listing of: Work.Mydoc
Order by: Insertion
Number of levels: 1
Obs Path Type
--------------------------------------------------------
1 einstein#1 Batch
We can also replay it to a destination.
ODS HTML;
PROC DOCUMENT NAME=mydoc;
REPLAY;
RUN;
ODS HTML CLOSE;
Figure 8.9 shows what the output looks like.
Figure 8.9: Replaying plain text output from an ODS Document

Operating on a Document Using CALL EXECUTE
This tip is just as much a tip about the CALL EXECUTE function as it is a tip about a document, but it demonstrates a way to work on documents in a more automated fashion. In this tip, we will capture the contents of PROC DOCUMENT’s LIST statement and loop over it with a DATA step. In the DATA step, we can use CALL EXECUTE to operate on each of the paths in the document. It’s easier than it sounds but does take a few steps, so let’s look at some code.
The code below does the steps described above. The macro that is called for each path in the document strips all titles, footnotes, notes, and page breaks from the output objects.
/* create a document */
ODS HTML FILE='before.html';
ODS DOCUMENT NAME=mydoc(WRITE);
PROC CONTENTS DATA=sashelp.class;
RUN;
PROC MEANS DATA=sashelp.class;
VAR height weight;
RUN;
ODS DOCUMENT CLOSE;
ODS HTML CLOSE;
/* list the contents of the document to a data set */
PROC DOCUMENT NAME=mydoc;
ODS OUTPUT properties=doclist;
LIST / LEVELS=ALL;
RUN;
/* strip all notes, titles, and page breaks */
%macro strip_obj( docname, path );
PROC DOCUMENT NAME=&docname;
OBBNOTE &path;
OBANOTE &path;
OBTITLE &path;
OBSTITLE &path;
OBFOOTN &path;
OBPAGE &path / DELETE;
OBPAGE &path / AFTER DELETE;
RUN;
%mend strip_titles;
/* loop over data and call macro on each path */
DATA _NULL_;
SET doclist;
IF type ~= 'Dir' THEN
CALL EXECUTE('%strip_obj( mydoc, ' || path || ')'),
RUN;
/* replay the document */
ODS HTML FILE='after.html';
PROC DOCUMENT NAME=mydoc;
REPLAY;
RUN;
ODS HTML CLOSE;
Figure 8.10 shows the output before processing the document with CALL EXECUTE.
Figure 8.10: The report before stripping titles, notes, and page breaks
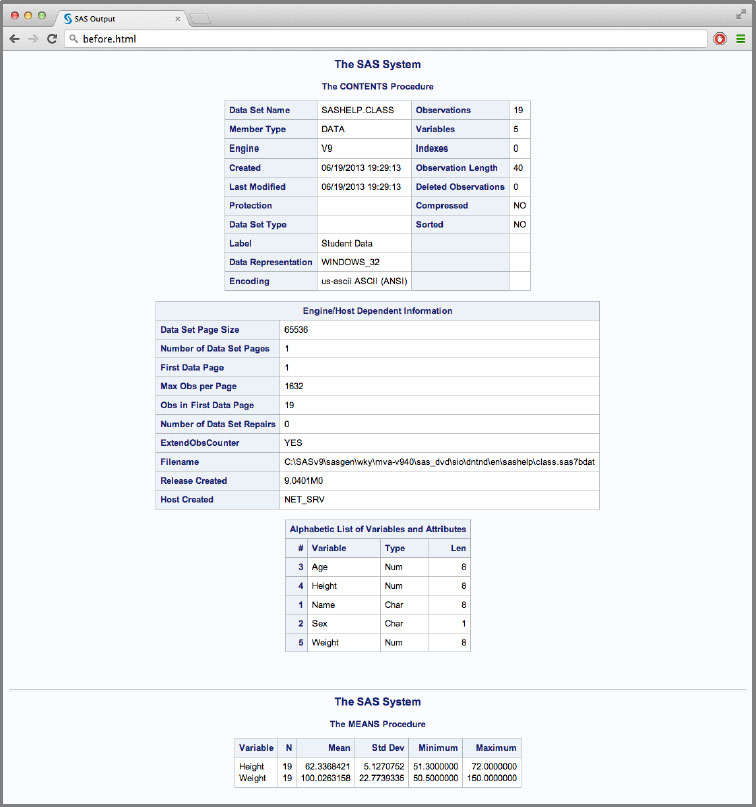
Figure 8.11 shows the output afterward. Notice that all titles and page breaks are gone.
Figure 8.11: The report after stripping the titles, notes, and page breaks using CALL EXECUTE
