Chapter 17. Local and Push notification services
As mobile devices become more popular, developers must face new and exciting challenges. One of these major challenges has been around since the dawn of mobile software. It’s related to background processes. All the previous chapters we have been focusing on the foreground activities. When the application is active and running, it’s easy to interact with users. However, what shall we do when the application is not in the foreground. What is the best way to update application data and notify users to launch the application without the user explicitly running the application? Local and Push notifications are Apple’s solution on iOS 4. In this chapter we’ll look at Apple’s local and push notification system, how to use local notifications, how to prepare an application to work with push notifications, and how to create a notification provider on a server. First though, let’s examine what exactly local and push notifications are.
17.1. What are local and push notifications?
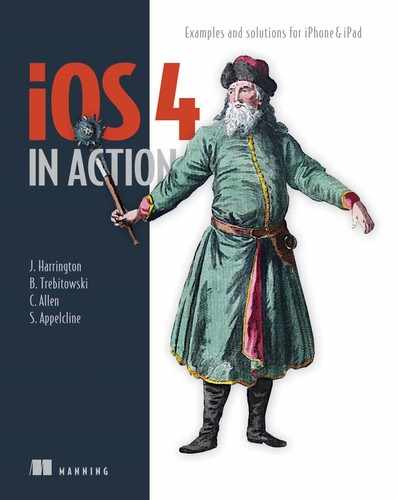
At the beginning of this chapter, we briefly discussed that we would like to have the local and push notifications to notify end users when the application is not running on the foreground. First let’s take a closer look at what notifications are. On iOS 4, the notifications may include the sound, a short message, and badge the application’s icon. For example, in figure 17.1 you will find the common user interface for local and push notifications.
Figure 17.1. Local and push notifications with custom message and badge number
There are two notification methods in iOS 4: local and push notifications. On the first glance, they are similar. Both may come with the alert sound, short custom message body and badge number on the icon. What’s the difference?
Push notification is a notification sent remotely by Apple’s Push Notification service to the device that your application is running on. A classic example of the problem of presenting the user with real-time data updates is an instant messenger program. Instant messaging allows users to send quick chat messages to their contacts who are online.
Suppose that a contact isn’t online, so they can’t receive the chat messages. In order to maintain constant communication, you must stay online indefinitely. One way to solve this problem on a mobile device is to run the chat client in the background and pulling data from server even after the user has exited the application.
This allows the chat client to periodically ping the server to check whether the user has received any new chat messages.
The elegant solution that Apple came up with is called push notification. A push notification is a simple message that originates at a push provider, containing information related to a specific program. These messages can contain any number of things, including a message, a sound file to play, a badge count, and any custom key-value pair needed for an application. Figure 17.1 shows an example of what a push notification might look like for an application. As you can see in the figure, the push notification looks similar to a text message. It contains a title, a message, and buttons. The title is the title of the application that the push notification is related to. When the user taps the View button, the iPhone or iPad launches the application that invoked the push notification.
It should become apparent how this approach solves the issue of background processing for most applications. In the case of an instant message program, users can opt to stay online via the chat server. That way, they can exit the application and the server can push notifications any time they receive a new chat message. Users don’t have to waste system memory having their chat client run in the background, pinging the server for new messages. Push notifications are simple to include in your applications, because little code is required. One challenge is the fact that in addition to enabling your applications for push notifications, you must also create a push provider. We’ll discuss both of these aspects of the system and show you how to create a full system for sending and receiving push notifications.
Push notification has been a great service since iOS 3, but it only works when the iPhone or iPad is connected to the internet. With local notifications available in iOS 4, it’s much easier to handle local reminders for your To-Do list application or fire up an alert for your timer application locally on the iPhone, iPod Touch, or iPad. In this chapter we will work on how to implement a custom local notification in the Alarm application. Using local notifications, you need to define exactly when the alarm should trigger, so the event has to be predefined. However in some occasions, for example, you may want to notify your users about the latest score from ESPN or a new game application you just created is available in the App Store, you won’t be able to forecast the date or message ahead of time. How can you notify your users in this situation? The solution is push notification. We will cover this topic later in this chapter. First, let’s start coding with local notifications.
17.2. Implementing local notifications on Timer application
In this section, we will cover how to fire up a countdown local notification with sound and badge count. Let’s start by creating a new project. In Xcode, select New Project ... from the File menu. When the new project assistant comes up, choose view-based application, the target is iPhone, and name the new application Alarm.
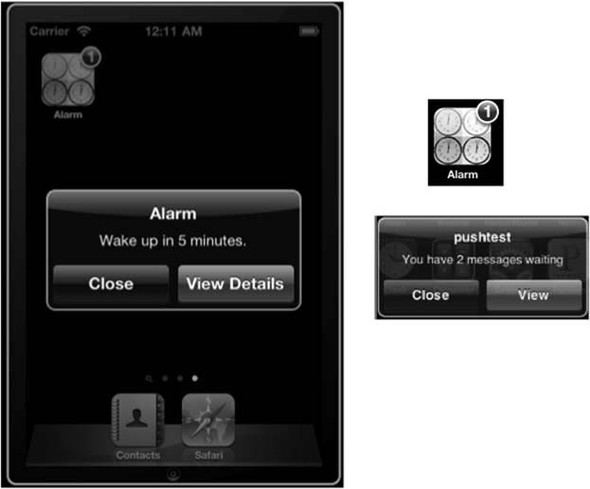
By default, the app’s icon is a white square. Let’s change the icon to be a better looking clock image as we see in figure 17.1. There will be a button on the AlarmViewController’s nib file. When you tap on the button, the createAlarm method will be called and schedule a local notification based on the count down timer. The UI is similar to figure 17.2.
Figure 17.2. The AlarmViewController.xib under Interface Builder
We are going to create our very first local notification in the application. Single-click AlarmViewController.h, and add in the methods to create the alarm and respond to the date picker:
#import <UIKit/UIKit.h>
@interface AlarmViewController : UIViewController {
IBOutlet UIDatePicker *myPicker;
NSTimeInterval myTimer;
}
-(IBAction)createAlarm;
-(IBAction)datePickerValueDidChange:(id)sender;
@end
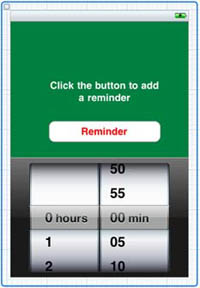
Double-click the AlarmViewController’s nib file, drag and add the button and date picker to the view as figure 17.3 demonstrates.
Figure 17.3. The screenshot of the AlarmViewController.xib with button and date picker connected to action methods under Interface Builder
Select our new button, bring up the attributes inspector, change the text and font color; click the File’s Owner icon next to the view, keep the mouse button down. Drag away toward to the View’s button. When the actions options appear, choose Touch up inside. By doing so, we connect the method createAlarm to button’s event Touch up inside. Follow the same step to link the method datePickerValueDidChange to UIPickerView’s event Value Did Change.
Next, single-click the AlarmViewController.m file, and add listing17.1. We want to display an alert view message: Wake up right now, the action button will be “view details”, and add a badge count on the Icon to inform user there is one notification from this application.
Listing 17.1. Creating a custom local notification based on the count down timer
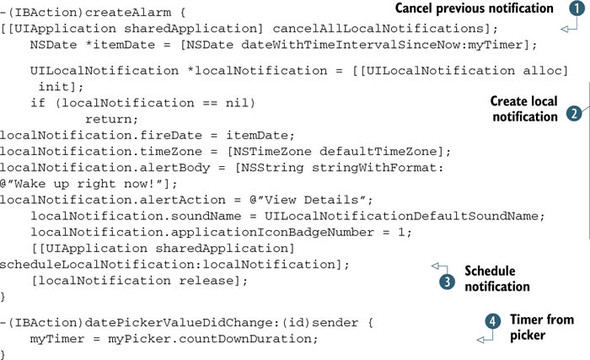
Let’s take a look at the code. Inside the method createAlarm, we first use cancelAllLocalNotifications ![]() to cancel all the previous local notifications to reset the system, and then define the starting date based on the count
down timer. We create a localNotification object
to cancel all the previous local notifications to reset the system, and then define the starting date based on the count
down timer. We create a localNotification object ![]() , define the fire date, with a custom message “Wake up right now.” custom the notification’s action button and the alarm sound.
More we defined the badge count to 1 on the application’s icon; use scheduleLocalNotificaiton
, define the fire date, with a custom message “Wake up right now.” custom the notification’s action button and the alarm sound.
More we defined the badge count to 1 on the application’s icon; use scheduleLocalNotificaiton ![]() to schedule the localNotification for this application. In datePickerValueDidChange
to schedule the localNotification for this application. In datePickerValueDidChange ![]() , we simply read out the count down timer from the date picker’s value.
, we simply read out the count down timer from the date picker’s value.
The local notification methods are straightforward. You can play with the property settings to custom the notification on your own.
One more thing, we need to reset the badge number back to 0 when the application is launched again. Let’s next add in the new changes to the appdelegate.m file. Inside the method application:didFinishLaunchingWithOptions: add the reset as highlighted in the code snippet below:
- (BOOL)application:(UIApplication *)application
didFinishLaunchingWithOptions:(NSDictionary *)launchOptions {
    [window addSubview:viewController.view];
    [window makeKeyAndVisible];
    application.applicationIconBadgeNumber = 0;
    return YES;
}
That’s all we need to do for setting up a timer based local notification. Build and Run, you will have the application launching in the simulator. When you set the timer value and click the button, it will automatically schedule a local notification for you.
Now it’s time to take a break and go back to the home screen, drink a cup of coffee. Soon the local notification will work though the application is not running in foreground, you will see an message on the home screen similar to figure 17.1; that’s the local notification, as defined in the notification’s badge number property, there will be a badge count showing up on the app’s icon. When you click on the button options “view details”, the alarm app will launch automatically.
So far it’s pretty amazing, right? You’ve already learned how to implement local notifications. It’s time to move to the next part: push notifications.
17.3. An overview of Apple’s push notification system
Push notifications rely on one specific service provided by Apple. This service is called Apple Push Notification Service (APNS). APNS is a web service that every provider must communicate with in order to send notifications to a client device. Devices establish a connection to this service and receive messages from it when they’re available. If a device isn’t running the application that received the notification, it’s prompted with an alert window containing information pertaining to the state of the application. Figure 17.4 shows the complete cycle of a push notification that we’ll discuss in this section.
Figure 17.4. The lifecycle of a push notification

Push notifications originate in what Apple calls the push notification provider. The provider is a server created by the developer of an application. These providers are often used in conjunction with applications that depend on the web to get new data to use.
When something changes on the provider, data must be generated and sent to the APNS. This data, called the payload, is in the format of a JSON dictionary. JSON is an acronym that stands for JavaScript Object Notation. It’s a simple format that allows associative arrays to be transferred between applications regardless of their implementation language. The following code shows an example of the JSON data that is sent to APNS:
{
"aps":{"alert":"This is a message","badge":11,"sound":"default"}
}
This format isn’t much different from a dictionary. You first have a key named aps that has a value of an associative array. Within this array, you see the various types of data that you can send to Apple. Table 17.1 lists all of these data types as well as their descriptions.
Table 17.1. Push data descriptions
|
Data |
Description |
|---|---|
| Alert | The text message that appears to users when they aren’t running the application that received the notification. |
| Badge | The number to display on the icon of the application receiving the notification. If you choose to omit this value, the badge number is set to 0 and isn’t displayed. |
| Sound | The sound file in your application to be played when the notification arrives. This file must be in a specific format, as discussed later in this section. |
In addition to the aps dictionary, you can also send a dictionary containing your own custom data. Here’s an example of a notification containing the standard data as well as a custom dictionary:
{
"aps":{"alert":"Hello World","badge":1,"sound":"default"},
"foo":{"bar":1,"baz":"Custom text"}
}
Notice that you add a new dictionary with the key foo. You can assign this dictionary to strings, numbers, and even other dictionaries. This one contains a key named bar that has the value 1 and a key named baz that has the value of “Custom text”. Using this technique, you can customize the data that is sent to your application.
After the payload has been created, you must establish a secure connection to APNS. This is done using an SSL certificate, which you’ll create in section 17.5. The SSL certificate also contains other data that APNS uses to identify which application is receiving the notification. After APNS receives the payload and device token, it attempts to send a push notification to the given device. But sometimes the notification isn’t received.
If APNS tries to send a notification to a device and fails, it queues up the notification until a connection can be established. One of the main reasons for failed deliveries is a device that doesn’t have an internet connection. This happens when a device is off or is out of range for cell and wi-fi service. When a connection is established, all of the stored-up notifications are sent to the device.
If a device receives more than one push notification at a time, only the most recent one is displayed. Although the other messages can still play a sound and modify the badge number, their alert messages are hidden from view and aren’t shown again.
You’ll see in section 17.5 that a device will handle notifications differently depending on whether the application is running. The next section will walk you through all the steps necessary to get your application ready to receive and process push notifications.
17.4. Preparing your application to use push notifications
Leave it to Apple to make the preparation more complex than the coding. You’ll find that you spend more time creating and uploading the signing certificates than writing the code to receive push notifications. You begin by setting up the signing certificates.
17.4.1. Setting up your application certificate
You must have a valid Apple iOS developer account to test push notifications. We’ll show you how to generate two items that are required. The first item you’ll generate is a special provisioning profile. This profile will be used to sign the application when deploying it to your device. The second is a client SSL certificate. The push provider will use this to establish a connection with Apple’s push notification servers.
Start by logging into your iOS developer account. Then, open the program portal, and navigate to the App IDs tab. If you haven’t already done so, you’ll need to add your application bundle identifier to this list. The format for this should be reverse domain—for example, com.rightsprite.pushtest. Make sure you don’t use any wildcards, because the system must be able to uniquely identify your application.
After you’ve added your application, you must configure it to receive push notifications. You have the option to configure the app for development as well as production. It’s always good practice to use the development certificate when testing and switch to the production certificate when you’re ready to submit to the app store. Figure 17.5 shows what this section should look like.
Figure 17.5. Configuring the app to receive push notifications

Click the Configure button. The following screen gives you the option to configure either the development or the production certificate. For this example, you’ll configure the debug certificate, but the steps for both are exactly the same. Figure 17.6 shows what this process looks like.
Figure 17.6. Wizard to create a push certificate
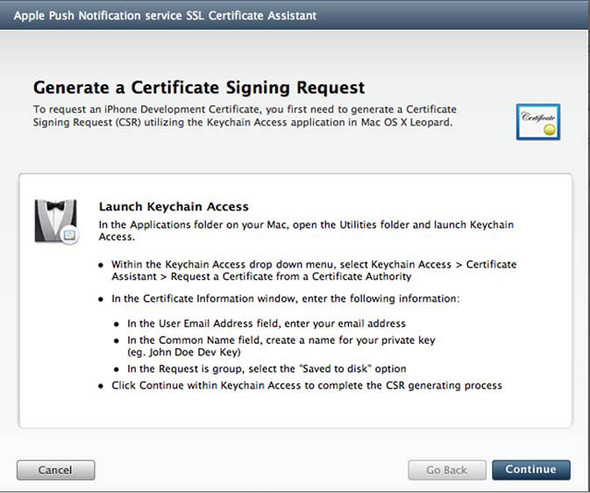
As you may have guessed, this process is similar to creating any other provisioning profile. After completing this step, you need to download this certificate and install it in your keychain by double-clicking it.
17.4.2. Setting up your provisioning profile
Now that you’ve created the signing certificate, you need to create the provisioning profile to allow the application to be installed. Again, you don’t want to use your generic developer certificate. You must generate a new certificate that is specific to your app’s full bundle id.
Go to the Provisioning tab. Because you created a push certificate for debug, you must also create a debug provisioning profile. Had you created a production certificate, you would need to create an app store or ad hoc certificate. Click the New Profile button on the Development tab.
As you may have seen before, you need to set up quite a few options. The first is the profile name. This can be anything you want, but your best bet is to be descriptive. Name the profile something of the format “(application name) Debug”. Next, you’ll select the certificate that the profile will use.
If you’re a single user, you should see only your certificate in the list. But if you’re on a team, you should see a certificate for every one of your team members. Check the boxes of the teammates who will be testing the push notifications. Note that when you’re creating a build for the app store, you’ll select your distribution certificate.
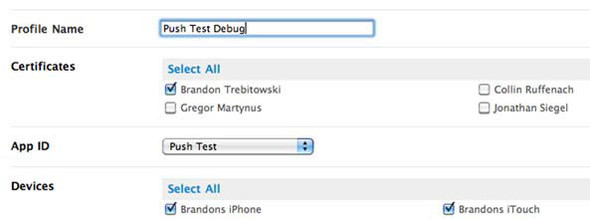
Following the certificate, you need to select the app id that the profile will be used for. This corresponds to the app id created in section 17.4.1. Finally, you must select the devices the provisioning profile will work on. Figure 17.7 shows an example of what this form looks like when it’s complete.
Figure 17.7. Provisioning profile form
After you create this profile, you need to download and install it. That’s about it for the certificate creation. We’ll now discuss how to implement the methods in your client application to enable and receive push notifications.
17.4.3. The code for handling push notifications
As we mentioned earlier, the code to handle push notifications is simple. You need to implement only three methods. We’ll walk through each of these methods and discuss their use.
The first method is application:didFinishLaunchingWithOptions:. This method is already implemented for you in any application that you create. You need to add one line of code that tells your application to register for push notifications. The following code shows you how to do this:
- (BOOL)application:(UIApplication *)application
     didFinishLaunchingWithOptions:(NSDictionary *)launchOptions
    [[UIApplication sharedApplication]
        registerForRemoteNotificationTypes:( UIRemoteNotificationTypeAlert
        |UIRemoteNotificationTypeBadge | UIRemoteNotificationTypeSound)];
}
As you may have seen, your application will have other setup tasks in this method; we just wanted to show you the line of code that must be added to register for push notifications. This code tells the device that this application wants to receive push notifications in the form of alerts, badge numbers, and sounds. You can omit any of these properties if you choose not to send them.
You may wonder why you must do this more than once. The reason is that the token generated when you set up push notifications isn’t guaranteed to be the same. You must touch base with Apple every time the application launches, to make sure everything is correct to receive notifications.
As you may have guessed, you must implement some delegate methods to react to events generated by this registration call. The following code shows a simple implementation of these methods:
- (void)application:(UIApplication *)app
didRegisterForRemoteNotificationsWithDeviceToken:(NSData *)devToken {
    [self sendProviderDeviceToken: devToken];
}

- (void)application:(UIApplication *)app
    didFailToRegisterForRemoteNotificationsWithError:(NSError *)err {
     NSLog(@"Error in registration. Error: %@", err);
}
The first method fires upon successful registration for push notifications. When you register to receive push notifications, your application communicates with Apple and receives back a unique device token. This token is used in all push communication with your device.
Notice that you call a method called sendProviderDeviceToken: in the class. This is a custom method you should create to send the device token to your push provider. You can do this via a web service interaction, as discussed in chapter 14. We’ll discuss a simple method for creating a push provider in the next section.
The method didFailToRegisterForRemoteNotificationsWithError: is for error handling. It fires when there is an error registering for push notifications. If this method is called, your signing certificate is probably invalid, or the device doesn’t have an internet connection. Make sure you put some code in this method to notify the user that there was a problem registering for notifications and they won’t receive any at this point.
Now that the application has registered to receive push notifications, the next step is to handle the notifications when they come in. Apple gives you a few methods that let you control what happens when the user clicks the View button on the notification alert.
The first way to handle an incoming push notification is to implement the code in the application:didFinishLaunchingWithOptions: method. You should go this route if the notification was used to open the application and didn’t pass any additional data. The following code shows a simple way to respond:
- (BOOL)application:(UIApplication *)application
     didFinishLaunchingWithOptions:(NSDictionary *)launchOptions
    application.applicationIconBadgeNumber = 0;
    [self getUpdatedDataFromServer];
}
The first and most important thing you must do here is to reset the badge number to 0. If you don’t do this, the badge count will stay at whatever number was sent by the push notification. After that, you should perform any updates that are needed. The previous code assumes that some data has changed on the server and calls a method to download the updated data.
If the notification contains a custom dictionary, you must use the application:didFinishLaunchingWithOptions: method. The options variable is an NSDictionary containing the custom values passed in.
In the event that the user is currently running the application, you must implement the application:didReceiveRemoteNotification: method. It’s called automatically and passed a dictionary containing all the standard information, including badge number, message, sound, and any custom dictionaries sent to the device.
After implementing the aforementioned methods, your application should be ready to receive push notifications. One final step in preparation is to format any audio files that will be played in response to a push notification.
17.4.4. Preparing audio files
As noted before, when a push notification is received, it can invoke the playback of an audio file included with your application. There are many interesting scenarios in which different audio files may be appropriate. For example, during a chess match, if a player receives a notification informing them that it’s their turn, the system might play the default audio file. But if they receive a notification related to a piece being captured, the system might play some sort of battle sound effects. The more creative you get with this, the more value you add to your application.
The first thing to note when considering the audio file to play is the fact that the file must be stored in your application’s main bundle directory. This is the root folder in which your applications files are stored. Your audio file could be any format but based on best practice, AIFF, WAV or CAF format is recommended and is limited to 30 seconds. In order to convert the audio file to one of these formats, use the afconvert command on your Mac.
To do this, open the terminal and navigate to the directory containing the audio file you wish to convert. Next, type the afconvert command followed by -f caff -d LEI16 {INPUT} {OUTPUT}. The following shows an example of using this command to convert the file track2.mp3 to track2.caf (see figure 17.8):
Figure 17.8. Converting audio files in the terminal
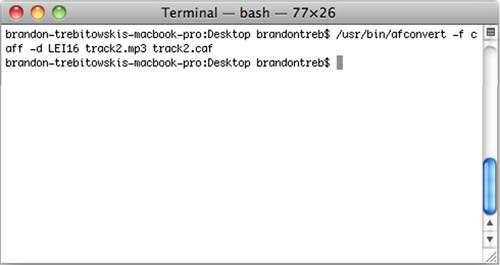
/usr/bin/afconvert -f caff -d LEI16 track2.mp3 track2.caf
Now that your application is ready to receive push notifications, we can discuss a method for creating a push notification provider using the PHP programming language.
17.5. Creating a push notification provider in PHP
Push notification providers can be implemented in many different ways. Plenty of open source scripts are available for you to use in your applications; but we’ll show you a simple way to implement your own using PHP. This book isn’t about PHP development, so we won’t go into much detail about the code. But we’ll explain the process at a high level to help you understand it. The first step is to create an SSL certificate.
17.5.1. Creating the SSL certificate
Before you can begin coding, you must generate an SSL certificate to communicate with Apple. You’ll create this certificate in the terminal using your push certificate and the private key that you generated in section 17.4.
Here are the steps required to generate this certificate:
- Open your keychain.
- Click My Certificates.
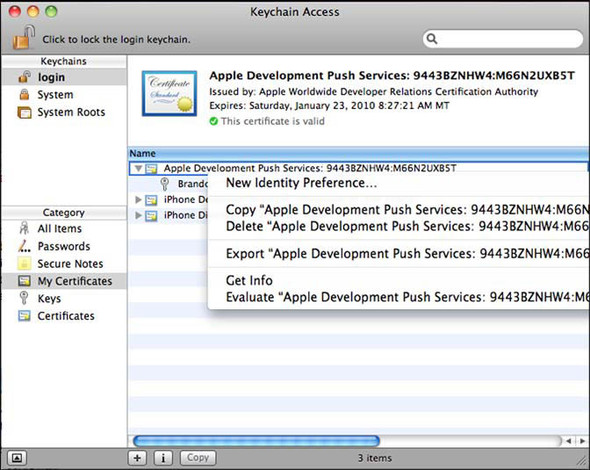
- Click the arrow next to the Apple Development Push Services certificate, to expand it.
- Ctrl-click the certificate, and select Export (see figure 17.9). Save this certificate as apns_cert.p12.
Figure 17.9. Exporting your Apple developer certificate
- Do the same thing with the private key, and name it apns_key.p12. Note that you’ll be prompted for a password when exporting. Make it something simple, because you’ll need it later.
- You need to merge the key and the certificate and convert the merged file to the .pem format. This allows your PHP application
to load it. Open the terminal, navigate to the location of your certificate and key, and type the following commands:
openssl pkcs12 -clcerts -nokeys -out apns_cert.pem -in apns_cert.p12
openssl pkcs12 -nocerts -out apns_key.pem -in apns_key.p12 - To remove the passphrase on your apns_key.p12 file, type the following command:
openssl rsa -in apns_key.pem -out apns_key_unenc.pem - The last thing you need to do is merge these two files using the cat command. Type the following command into the terminal:
cat apns_cert.pem apns_key_unenc.pem > apns.pem
Make sure you keep track of all these files, because you may need to do this again if you change your APNS provider server.
Note
This process is exactly the same for development and production.
Now that you’ve generated this certificate, upload it to the server, and place it in the directory where you’ll be putting the provider script.
17.5.2. Implementing the PHP push notification provider
A quick Google search reveals that quite a few free libraries are available to help you interface with Apple’s push servers. Although it’s recommended that you use a pre-made solution, we’ll show you how to write your own.
The code for sending a push notification to Apple’s server is simple. You need to make an SSL connection and send the data in the form of JSON. As we mentioned in section 17.3, JSON data is a form of a dictionary. Apple uses this data to create an NSDictionary that is sent to the device.
The following listing shows the code in PHP to send a push notification to Apple.
Listing 17.2. PHP code to send a push notification
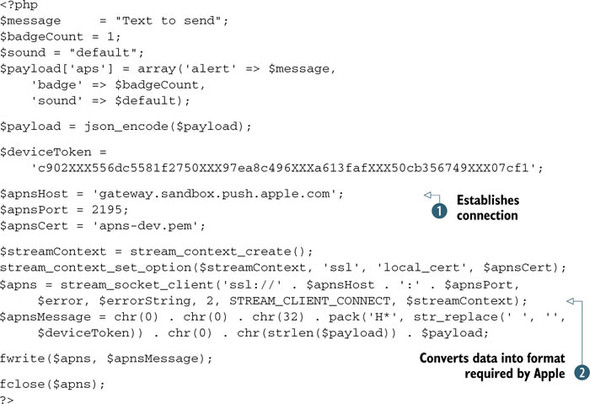
The first thing you see is a declaration of all the data that will be sent in the payload. This includes the text, badge count, and sound to play. If you specify a custom sound in your application, make sure it’s in the correct format, as discussed in 17.4.2. Following this, you create the payload and convert it into the JSON format. You also see a declaration for the device token to which you’ll send a notification.
Normally, you’ll want to send data to every device that has registered for notifications. To achieve this, you must store the device tokens in a database when they’re sent to you from your application. Then, you use a loop in your server code to send notifications to each token in the system.
Next, you establish a connection stream with Apple ![]() . Notice that you connect to Apple’s sandbox server. This is because you chose to send messages in debug mode. You should
switch to Apple’s production server when you’re ready to submit your app to the store. Note the $appCert variable: this is the name of the SSL certificate you uploaded to the server. The code uses this certificate to establish
a secure connection to Apple.
. Notice that you connect to Apple’s sandbox server. This is because you chose to send messages in debug mode. You should
switch to Apple’s production server when you’re ready to submit your app to the store. Note the $appCert variable: this is the name of the SSL certificate you uploaded to the server. The code uses this certificate to establish
a secure connection to Apple.
The next section is a little tricky ![]() : it converts the packet to be sent into the binary interface required by Apple. You can find more information about this
format in the documentation for push notifications. Finally, you write the data to the stream and close it.
: it converts the packet to be sent into the binary interface required by Apple. You can find more information about this
format in the documentation for push notifications. Finally, you write the data to the stream and close it.
The code for this provider is by no means complete for production. You must make several improvements. The first includes making a way for devices to send their tokens to your server. You need some sort of endpoint that takes a device token as a POST or GET request and stores it into a database. Also, you need to loop over these tokens and send out push notifications to everyone to which you intend to send a push notification. Finally, you need to create an interface to your provider that sends notifications when certain actions occur. These actions may be anything from a text message to notifying the user that it’s their turn to move in a game.
17.6. Summary
In this chapter, we started by introducing the notifications and the system behind both local and push notifications. Now, you’ve learned how to create a local notification inside the alarm application, then get the application ready for Apple’s push notification service. As you’ve seen, local and push notifications offer a simple solution to a complex problem. They give developers the ability to notify users while the application is running in the background and conserving the system resources on the iPhone and iPad.
Apple has provided a robust service that you can use free of charge. This service is the centerpiece of the entire push notification system and lets you send simple messages from a provider to a specific device with little delay.
The communication is done using a simple data format known as JSON. The JSON format allows you to send text messages, badge counts, sounds, and even custom data from your provider to any device with your application installed.
In order to receive push notifications, applications must be prepared and signed with a special signing certificate generated on Apple’s website. You must create a signing certificate for use in development mode as well as debug mode when testing push notifications in your application. This certificate is used in conjunction with your private key to create the SSL certificate needed to communicate with Apple’s servers.
The last thing to keep in mind when creating a push notification system is the architecture of your provider. We showed you how to create a simple provider using a few lines of PHP code. You may choose to use this as the core code of your system, or you can select from a growing number of open source solutions. In the next chapter, we’ll discuss the MapKit framework, which offers an easy way to integrate fully functional and customizable maps into your application, complete with custom annotations.