Chapter 2. Learning Objective-C
In this chapter, we’ll examine all of the Objective-C elements that are applicable to iOS development. We assume that you have a good understanding of a rigorous programming language (like C), that you know the basic concepts behind object-oriented programming (OOP), and that you understand what the Model-View-Controller (MVC) architectural model is.
We’re now ready to move into the world of SDK development. We’ll take a quick tour to examine the programming language and frameworks you’ll be using when you program with the SDK.
2.1. Introducing Objective-C
All of the SDK’s programming is done in Objective-C, a full superset of C, allowing you to write any traditional C code. (There is also Objective-C++, which allows for full integration of Objective-C and C++, with some caveats.) It adds powerful object-oriented capabilities as well. These extensions come by way of the design philosophies of Smalltalk, one of the earliest object-oriented languages. Because of its origin beyond the standard boundaries of C, Objective-C’s messaging code may look a little strange to you at first. But after you get the hang of it, you’ll discover that it’s elegant and easy to read, providing some nice improvements over traditional ANSI C code.
We’ll look at Objective-C’s messages, class definitions, properties, compiler directives, categories, and protocols. Although this overview gives you enough to get started with Objective-C, it can’t provide all the details, particularly for more complex functionality like properties and categories. If you need more information than we’ve been able to provide, look at Apple’s own references on the topic, particularly “Learning Objective-C: A Primer,” “Object-Oriented Programming with Objective-C,” and “The Objective-C 2.0 Programming Language,” all of which can be found in Apple’s iOS developer library.
Let’s start with a look at Objective-C’s big picture. It’s an object-oriented language, which means it’s full of classes and objects, instance variables, and methods.
As implemented by Apple and used throughout iOS’s frameworks, Objective-C is built entirely around objects. Windows, views, buttons, sliders, and controllers all exchange information with each other, respond to events, and pass actions in order to make your program run.
A header (.h) file and a source code (.m) file together represent each object in Objective-C. Sometimes you’ll access standard classes of objects that come built into the iOS frameworks, but often you’ll instead subclass objects so that you can create new behaviors. When you do this, you’ll add a new header file and source code file to your project that together represent the new subclass you’ve invented.
Although we won’t dwell on it much, note that C++ code can be mixed in with Objective-C code. We leave the specifics of that for the experienced object-oriented programmer (and, as usual, there’s more detail on Apple’s website). You can also freely insert older C syntax; as we’ll discuss shortly; this is necessary when you’re working with older libraries.
With all that said, we’re ready to dive into Objective-C’s unique syntax. Table 2.1 summarizes the seven major elements of syntax.
Table 2.1. Objective-C code can look different from ANSI C; it depends on a handful of syntactic changes.
We offer a more technical summary at the end of this section, showing all the syntax of these elements. But first, we discuss these syntactic elements at length, in approximate order of importance.
2.2. The message
Objective-C’s most important extension to the C programming language is the message. A message is sent when one object asks another to perform a specific action; it’s Objective-C’s equivalent to the procedural functional call. Messages are also where Objective-C’s syntax varies the most from ANSI C standards—which means that when you understand them, you’ll be able to read most Objective-C code.
A simple message call looks like this:
[receiver message];
Here’s a real-life example that you’ll meet in the next chapter:
[window makeKeyAndVisible];
That message sends the window object the makeKeyAndVisible: command, which tells it to appear and start accepting user input.
There are three ways in which this message could be slightly more complex. First, it could accept arguments; second, it could be nested; and third, it could be a call to one of a few different recipients.
2.2.1. Messages with arguments
Many messages include a simple command, as in the previous example. But sometimes you’ll want to send one or more arguments along with a message to provide more information about what you want done. When you send a single argument, you do so by adding a colon and the argument after the message, like so:
[receiver message:argument];
Here’s another real-world example:
[textView setText:@"These are the times ..."];
When you want to send multiple arguments, each additional argument is sent following a label, as shown here:
[receiver message:arg1 label2:arg2 label3:arg3];
Here’s an example:
[myButton setTitle:@"Goodbye" forState:UIControlStateNormal];
This is the way in which Objective-C’s messages vary the most from C’s functions. You’re going to come to love it. You no longer need to remember the ordering of the arguments because each gets its own title, clearly marking it. The result is much more readable.
2.2.2. Nested messages
One of the most powerful elements of Objective-C’s messaging system is the fact that you can nest messages. This allows you to replace either the recipient or the argument of a message (or both) with another message. Then, the return of that nested message automatically fills in the appropriate space of the message it’s nested inside.
Object creation frequently replaces the receiver in this manner:
[[UITextView alloc] initWithFrame:textFieldFrame];
The object created by sending the alloc message to the UITextView class object is then initialized. (We’ll get to class objects in a moment.)
When you’re passing a color as an argument, you almost always do so by nesting a call to the UIColor class object:
[textView setTextColor:[UIColor colorWithWhite:newColor alpha:1.0]];
Message nesting is a core Objective-C coding style, and you’ll see it frequently. It also shows why Objective-C’s bracketed messaging style is cool. With good use of code indentation, it can make complex concepts readable.
2.2.3. Message recipients
As you’ve seen over the last couple of examples, Objective-C uses two different types of objects. Class objects innately exist, and each represents one of the classes in your framework. They can be sent certain types of requests, such as a request to create a new object, by sending a message to the class name:
[class message];
Here’s an example:
UIButton *myButton =
    [UIButton buttonWithType:UIButtonTypeRoundedRect];
Instance objects are what you’re more likely to think of when you hear the term object. You create them yourself, and the majority of your programming time is spent manipulating them. Except for those examples of creating new objects, all of our real-life examples so far have involved instance objects.
In addition to calling an object by name, you can also refer to an object by one of two special keywords: self and super. The first always refers to the object itself, whereas the second always refers to the class’s parent.
You’ll often see self used internal to a class’s source code file:
[self setText:@"That try men's souls. "];
You’ll often see super used as part of an overridden method, where the child calls the parent’s method before it executes its own behavior:
[super initWithFrame:frame]
All your message calls should follow one of these four patterns when naming its receiver: they can call something by its class name (for a class method), by its instance name (for an instance method), by the self keyword, or by the super keyword.
Now that you know how to send messages between objects, you’d probably like to know how to create those classes from which your objects are instantiated in the first place. That’s the topic of the next section.
2.3. Class definition
As we’ve noted, each class tends to be represented by a matched pair of files: a header file and a source code file. To define a class, each of these files must contain a special compiler directive, which is always marked in Objective-C with an @ symbol.
First, you define the interface for the class, which is a simple declaration of its public variables and methods. You do this in the header (.h) file. Next, you define the implementation for the class, which is the content of all its methods; this is done in a source (.m) file.
Figure 2.1 shows this bifurcation graphically; we’ll look at the headers and implementation files in more depth in the next few sections.
Figure 2.1. Headers and source code files contain distinctive parts of your Objective-C classes.

2.3.1. The interface
Interfaces begin with an @interface directive and finish with an @end directive. They contain instance variable declarations in curly brackets and then method declarations. The following listing shows an example of their usage. It’s the first of several examples that we offer in this section that depict a fake class, AppleTree.
Listing 2.1. Defining the class of Appletree
/* AppleTree.h */
@interface AppleTree : UrTree
{
    NSString *appleType;
}
- (id)growFruit:(NSString *)appleColor;
@end
You begin the interface command with the @interface directive and end it with the @end directive. Note that the @interface directive includes not only the class name but also the name of its superclass, following a colon. It could also include a list of protocols, a topic we’ll return to later in this section.
The variable declaration is entirely normal. NSString is a type that you’ll meet when we look at iOS later in this chapter. Note that you don’t have to declare all your variables in your @interface—those instance variables that you want to be accessible outside a particular method. You’ll declare variables that are used within only individual methods inside those methods, as you’d expect.
The method declaration contains a typed description of a method with one argument, matching the syntax you’ve seen for messages. It also contains one other new element: it starts with a hyphen (–). That means this is an instance method, which is a method that can only be used by an instance object. Its opposite number, which is marked with a plus sign (+), is the class method, which is used by a class object. Class methods can’t make use of instance variables or call install methods, because they’re accessible only from an instantiated object.
The id type used as the return of growFruit: is another Objective-C innovation. Objective-C allows for dynamic typing, where type is decided at runtime. To support this, it includes the weak type of id, which can be a pointer to any object.
Before we finish our discussion of method declarations, we’d like to mention that, as with variables, you only have to declare those methods that can be called externally. Methods that remain internal to a class can remain hidden if you desire.
2.3.2. The implementation
After you’ve declared a class with an @interface, you can then define it with the @implementation directive. The following listing provides a brief example of what the implementation might look like for the AppleTree class, including a single example method.
Listing 2.2. Implementation file for the AppleTree class
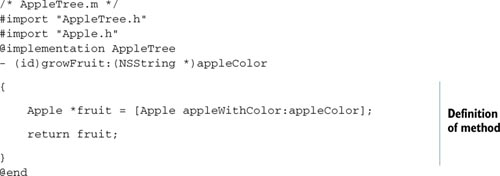
The code starts with the #import directive. This is Objective-C’s variant for the #include macro. It includes the file unless it’s already been included, and it’s the preferred alternative when using Objective-C. In this case, you include AppleTree.h, which should contain the interface described in the code snippet in listing 2.1. Without including it, you’d need to redefine all the instance variables and include the superclass in the @implementation statement. The #import helps you avoid redundant code. You also include the Apple.h file so that you can create an Apple.
As with the interface, the implementation code begins with a directive and ends with @end. In between, you describe what the method does, which includes sending a message to the Apple class object.
2.3.3. Object instantiation
You now have two parts of a puzzle: how to create new classes of objects and how to send messages among instantiated objects. What you’re missing is how to instantiate an object from a class.
Generally, object instantiation follows the same pattern. First, you allocate memory for the object, and then you initiate any variables and perform any other setup. The precise manner in which this is done can vary from class to class. A framework usually decides how object creation works—which for our purposes means iOS. As you’ll see later in this chapter, iOS specifies two methods for object instantiation: the alloc-init method and the class (or factory) method. You’ll meet each of these soon, when we talk about iOS, but first let’s finish up with the core syntax of Objective-C.
2.4. Properties
What we’ve covered so far should be sufficient for you to understand (and write) most simple Objective-C code. One other major feature in Objective-C deserves some extended discussion because of its unique syntax: the property.
2.4.1. The purpose of properties
Because instance variables are encapsulated, you usually have to write tons of getter and setter methods when doing OOP. This can get tedious, and you must also be careful about consistency so you don’t have dozens of different syntaxes for your accessors and mutators.
Objective-C offers a solution to these problems: you can declare an instance variable as a property. When you do so, you standardize the variable’s accessor and mutator methods by automatically declaring a getter and a setter. The setter is called setVariable and the getter is called variable.
For example, returning to the apples that we’ve been talking about in our major examples, if you define the NSString *appleType; variable as a property, the following declarations automatically occur:
-(void)setAppleType:(NSString *)newValue;
-(NSString *)appleType;
You’ll never see these declarations, but they’re there.
2.4.2. Setting a property
You declare an instance variable as a property by using the @property directive as part of your @interface statement. The following listing demonstrates how to do so, in the full context of the example so far.
Listing 2.3. AppleTree.h
@interface AppleTree : UrTree
{
    NSString *appleType;

}
@property(retain) NSString *appleType;
- (id)growFruit:(NSString *)appleColor;
@end
The header file shows that any property must start with the declaration of an instance variable. The @property directive then repeats that declaration. If you wish, you can stop here. You’ve now implicitly declared your accessor and mutator methods, and you can go and write those methods on your own if you see fit. Let’s look at another example.
Listing 2.4. AppleTree.m
#import "AppleTree.h"
#import "Apple.h"
@implementation AppleTree
@synthesize appleType;
- (id)growFruit:(NSString *)appleColor
{
    Apple *fruit = [Apple appleWithColor:appleColor];
    return fruit;
}
@end
Objective-C will also write these methods for you if you ask it to. This is done with the @synthesize declaration in the @implementation statement. This creates accessor methods that read and set the variable by the simple methods you’d expect. The setter method is by default of type assign, but you can choose a different method using property attributes, which we’ll talk about down the road.
2.4.3. Using the accessors
If you’re not doing anything fancy, you can immediately use your class’s default getter and setter methods, as shown in the following three examples:
NSString *chosenType = [AppleTree appleType];
[AppleTree setAppleType:@"Washington Red"];
[AppleTree setAppleType:myAppleType];
In addition to providing you with automatically created accessors and mutators, properties also give you access to a bit of syntactic sugar, which can make using them that much easier.
2.4.4. The dot syntax
Objective-C offers a dot syntax that makes it easy to use an object’s accessor and mutator methods (whether you synthesized them or created them yourself). The following are the dot-syntax equivalents to the messages you sent earlier:
NSString *chosenType = AppleTree.appleType;
AppleTree.appleType = @"Washington Red";
AppleTree.appleType = myAppleType;
The dot syntax can also be nested, just as you can nest messages. In the following example, the treeType property returns a tree object that has an AppleType property:
Apple.treeType.AppleType
With that in hand, you should now be able to write simpler and more intuitive code.
2.4.5. Property complexities
There are several complexities of properties that we’ve opted not to delve into here. First, property declarations can include attributes. They let you change getter and setter names, change setter assignment methods, modify memory management (retain, autorelease, and so on), set nonatomic accessors (which are accessors that can be interrupted by the CPU scheduler while in use), and determine whether the property is read-only or read-write. These can all be set as part of the @property line.
Second, another directive called @dynamic lets you add accessor and mutator methods at runtime.
Third, it’s possible to override default values that you’ve synthesized through normal method creation as part of your @implementation.
A variety of information about properties is available in Apple’s Objective-C reference; if you need to delve into any of these complexities, you should refer to that.
2.5. The @ directive
We’re almost finished with our overview of Objective-C, but we want to alert you to one other frequently used bit of syntax. As you’ve seen, the @ symbol denotes a compile directive. It’s a core part of class definition, and it’s required for properties. You’ll also see it in a few other places in Objective-C code.
Sometimes an @ is used to create variables of certain types, most frequently a variable of type NSString *. You saw this in a few of the messaging examples. You include the @ symbol, followed by the string value you want to set:
NSString *mySample = @"What does this have to do with apples?";
In chapter 6, you’ll also encounter the @selector directive, which is used to create a variable of type SEL. This is a method selector, which is what you use when you want to pass the name of a method as an argument, as will occur when we get to events and actions. A standard usage looks like this:
SEL mySelector = @selector(growFruit:);
There are many other directives you can use in Objective-C. Our purpose here is to highlight those you’re most likely to see in this book and most likely to use in introductory SDK programming.
Tip
Forgetting to mark a string with an @ is the most common error in iOS programming, so keep an eye out for this one! (Without the @, you’ll have a C-style char* string, which is almost certainly not what you want.)
2.6. Categories and protocols
It’s important to touch on two final elements of Objective-C: the category and the protocol. We broadly define what they do, but we won’t delve too deeply into their details. To learn more, refer to Objective-C Fundamentals by Manning Publications.
2.6.1. The category
Categories are used if you want to add behavior to a class without subclassing. As usual, you do so by creating a new pair of files containing @interface and @implementation code. This time, you no longer need to worry about the superclass name but must include a category name in parentheses, as follows:
@interface AppleTree (MyAppleChanges)
@implementation AppleTree (MyAppleChanges)
As a result, the categorized methods and variables that you describe for the classes are added to the core class definition in your program.
We don’t use categories in this book.
2.6.2. The protocol
A protocol is effectively an interface that’s not tied to a class. It declares a set of methods, listing their arguments and their returns. Classes can then state that they’re using the protocol in their own @interface statements. For example, if you had a Growing protocol that was used by plants and animals alike, you could define its usage as follows:
@interface AppleTree : UrTree <Growing>
The AppleTree class would be promising that it would respond to all the methods defined in the Growing protocol.
You won’t be creating any new protocols in this book. But you’ll use existing ones, because within Apple’s iOS, they’re tied integrally to the MVC model. Views hand off protocol descriptions of how they should be used to view controllers via datasource and delegate properties—both topics that we’ll introduce when we talk about iOS.
With that, the shine has gone off our apples, so we’ll return to real-life examples when we move on. But first, having provided an overview of a whole new programming language in an impossibly short number of pages, we’ll summarize what you’ve learned.
2.7. Wrapping up Objective-C
Table 2.2 summarizes the syntax specifics of the Objective-C elements that we’ve been discussing. This table can serve as a quick reference whenever you want to revisit how Objective-C code works differently from traditional C.
Table 2.2. Objective-C uses many typical object-oriented coding elements, but its syntax is somewhat unique.
|
Object-oriented element |
Syntax |
|---|---|
| Object messaging | [recipient message]; |
| Class creation | /* .h file */ |
| @interface class: super declarations | |
| @end | |
| /* .m file */ | |
| @implementation class definitions | |
| @end | |
| Method declaration | - (return type)instancemethod:arguments |
| + (return type)classmethod:arguments | |
| Property declaration | @property (Property Behavior Modifiers) variable; |
| Property synthesis | @synthesize property; |
| Property accessor | [object property]; |
| Property mutator | [object setProperty:value]; |
| Property dot syntax | object.property |
| Category declaration | @interface class: super (category) @implementation class: super (category) |
| Protocol declaration | @interface class: super <protocol> |
And with that, we’ve completed our look at the syntax and structure of the Objective-C programming language. But that’s only half of the foundation you need in order to use the SDK. You also need to be familiar with the specific methods and programming styles provided by iOS’s extensive set of frameworks.
2.8. Summary
Objective-C is your programming language for creating iOS applications. It’s an object-oriented version of C that has some unique syntax thanks to its elegant Smalltalk inspiration. After you get used to it, you’ll find it simple and easy to read.
Now that we’ve completed our Objective-C primer, let’s dive into putting Objective-C to use in Xcode 4 in chapter 3.