Chapter 3. Using Xcode 4
Now that you have Xcode and the iOS SDK installed, and you’ve learned a bit about the puzzle pieces needed to build an application, you’re ready to write your first HelloWorld application. The main purpose of this chapter is to show you the new features in Xcode 4 and how Xcode works. Using a traditional HelloWorld application, we’ll look at the parts of a standard application, and you’ll learn how to build and run your first iOS application. Then we’ll look at how Interface Builder works under Xcode 4. And last, you’ll create the AppleStock application, which shows how to create new objects, manipulate them graphically, and use the inspector window.
3.1. Introducing Xcode 4
At the time of this writing, Xcode 4 is a brand-new release to iOS developers. With a new user interface, Xcode 4 also includes a lot more changes under the hood. Let’s first look at the new features in Xcode 4.
When Xcode 4 was first introduced at Apple’s WWDC 2010, developers were excited and looked forward to the new features in Xcode 4. Compared to Xcode 3, Xcode 4 is more powerful, more tightly integrated, easier to use, and great for organizing your projects.
Note that you can have both Xcode 4 and Xcode 3 installed on your Mac at the same time, and the existing project will be fully compatible in Xcode 4.
Let’s look at the advantages in Xcode 4:
- Single-window interface— You can create a workspace and add multiple projects under the same workspace and edit them in the same window. In Xcode 4, Interface Builder is fully integrated as part of the Xcode application, making it much easier to connect objects between the source code and the graphic design interface.
- Source control— Although this isn’t an exciting topic, Xcode 4 makes it a lot easier to control and compare the new changes with version control and Git. New projects are even given the option to automatically have a Git repository created. Version Editor provides the side-by-side view for any two versions of a file.
- LLVM 2.0 compiler includes full support for C, Objective-C, and C++— The benefit is in the speed of compiling and linking, as well as improvements to syntax highlighting and code completion driven by the new LLVM parser.
- Powerful debug support— The Fix-it feature presents the potential solution for the issue inside the program.
- Scheme concept— Instead of creating each platform as a build target, you can use Xcode Schemes to collectively define targets to build, the configuration to be used, and the associated tests to execute.
There are more features in Xcode 4. You can find out the details from the iOS Dev Center. Now let’s launch the Xcode 4 application on your Mac.
3.2. Using Xcode 4 to create the HelloWorld application
In this section, you’ll work through creating your first iOS application with step-by-step instructions under Xcode 4. The goal is to get you started programming with Xcode and teach you how to write code and run the application on the iOS Simulator.
3.2.1. Creating a new project
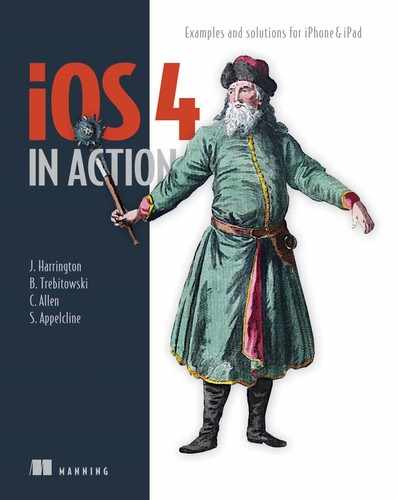
Through the default installation path, you can launch Xcode 4 from the Developer directory (typically located at Macintosh HD > Developer > Applications > Xcode). An even easier way to launch Xcode is to use Spotlight: press Command-spacebar, type xcode, and then press Enter. The first time you launch the Xcode 4 program, you’ll see the Welcome to Xcode window, as shown in figure 3.1.
Figure 3.1. The Welcome to Xcode window appears when Xcode launches.
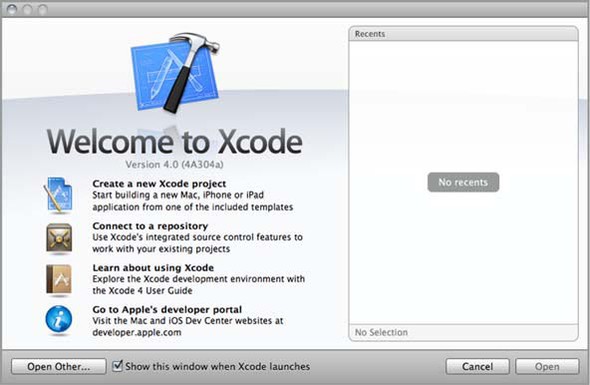
Select Create a New Xcode Project (or choose File > New > New Project), and you’re immediately prompted to choose a template for your new project, as shown in figure 3.2.
Figure 3.2. Choose a template for your new project.
The template you choose will fill your project with default frameworks, default files, default objects, and even default code. As you’ll see, it’ll be a great help in jump-starting your own coding.
When you’re creating a new project in Xcode, you always have the option to select from among several templates, as shown in figure 3.2, each of which gives you a different basis for your code. Besides a Window-Based Application, you can create a project as a View-Based Application, a Tab Bar Application, a Navigation-Based Application, a Utility Application, a Split View-Based Application, or an OpenGL ES Application.
Most of these templates will involve view controllers, which you won’t encounter for a couple of chapters. We provide you with an overview for now so you can see the possibilities that Xcode offers:
- A Window-Based Application is entirely minimalist. It provides a starting point for your application with the application delegate and window.
- A View-Based Application has a bit more functionality. It includes a basic view controller that allows you to add custom content. You’ll use it in chapter 5 (and most of the time thereafter).
- A Tab Bar Application creates a tab bar along the bottom of the screen that allows you to switch between multiple views. The template does this by creating a tab bar controller and then defining what each of its views looks like. You’ll use it in chapter 7.
- A Navigation-Based Application sets you up with a navigation controller, a navigation bar along the top, and a table view in the middle of the page so you can easily build hierarchical applications. You’ll also use it in chapter 7.
- A Utility Application defines a flip-side controller that has two sides, the front side containing an info button that allows you to call up the backside. This is the last view controller we’ll explore in chapter 7.
- An OpenGL ES Application is another minimalistic application. The difference from the Window-Based Application is that it includes GL frameworks, sends the glView messages to get it started, and otherwise sets certain GL properties. We won’t get to GL until chapter 13, and even then we’ll only touch on it lightly.
- A Split View-Based Application is a split view controller–based application that works only on the iPad. You’ll use this template in chapter 7.
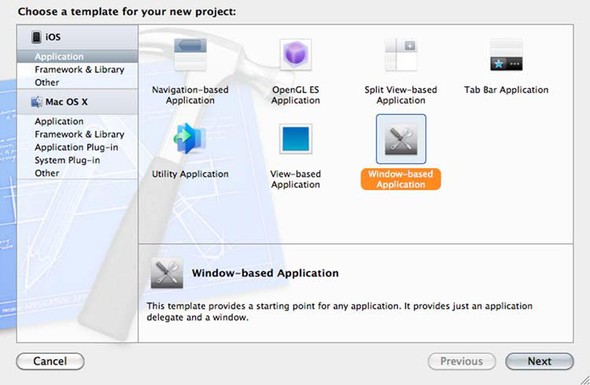
For your first program, go with the simplest template you can find: Window-Based Application. Select Next. You can specify options for your project, as shown in figure 3.3.
Figure 3.3. Choose options for your new project.
First, enter your project’s name under Product Name. In this example, use Hello-World. Then fill in the company’s name. Make sure to select iPhone from the Device Family option. (Note that neither Use Core Data nor Include Unit Tests is selected, as shown in figure 3.3.)
Click Next, and choose where to save this new project. You’re ready to start coding under Xcode. Now, let’s look at the single-window interface.
3.2.2. Getting familiar with the workspace window
As you can see in figure 3.4, Xcode 4’s single workspace window contains a lot of information. The toolbar is on the top of the Xcode workspace window, and it offers a few commonly used commands for quick access. Below the toolbar, the window is divided into three main areas or sections: Navigator area on the left pane, Editor area in the center, and Utility area on the right pane. (Note that by using the default setting, the Utility area is hidden. You can show the utility view by selecting View > Utilities > Show Utilities, or clicking the Utility View button on the top-right-corner toolbar.)
Figure 3.4. Xcode 4 in a single-window interface, which has the Navigator area on the left pane, the Editor area in the center pane, and the Utility area on the right pane
The Navigator area contains a list of all the files that are being used in your project, organized by type. Whenever you need to add new frameworks, images, databases, or other files to your project, you can do so under the Navigator.
Select any .h file in the project in the Navigator area, and the contents appear in the Editor area in the center. When you select the HelloWorld application under the Navigator area (the top-level node of the tree, which also lists the iOS Build Target), the Editor area is the place to change the product information, such as the application icon, launching image, build setting, and so on.
The Utility area shows the selected file information. It’s split into two sections: on the top is the identity info, and on the bottom is the library.
Now that you have an overview of the Xcode single-window interface, let’s zoom in to the Navigator area and learn the details of the files under your HelloWorld project.
3.3. Closer look at files under the Navigation area
The HelloWorld application has three subfolders: HelloWorld, Frameworks, and Products. Let’s spend some time reviewing what’s under the hood.
3.3.1. HelloWorld folder
The HelloWorld folder is where you spend most of your time writing code and designing the application’s interface. Click the triangle beside the HelloWorld folder to expand the contents so that you can review what it contains. You’ll find one subfolder called Supporting Files and three files: HelloWorldAppDelegate.h, HelloWorldAppDelegate.m, and MainWindow.xlb.
Supporting Files Subfolder
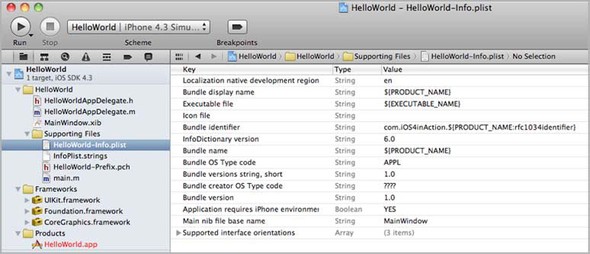
The Supporting Files subfolder contains files that support the application. In the HelloWorld project, you can find HelloWorld-Info.plist, InfoPlist.strings, HelloWorldPrefix.pch, and main.m. HelloWorld-Info.plist is a property list that contains information about the application, as shown in figure 3.5. It contains a number of instructions for your program compilation, the most important of which is the reference to the main nib file used in your program. InfoPlist.strings is a localization string file for your application’s InfoPlist.
Figure 3.5. Select the project’s Info.plist file to show details in the Editor area.
The HelloWorld-Prefix.pch file contains special prefix headers, which are imported into every one of your source code files.
Main.m comes with standard code generated by the project template, as you can see in the following listing.
Listing 3.1. Main.m file
#import <UIKit/UIKit.h>

int main(int argc, char *argv[])
{
     NSAutoreleasePool * pool = [[NSAutoreleasePool alloc] init];
     int retVal = UIApplicationMain(argc, argv, nil, nil);
             [pool release];
             return retVal;
}
The creation of this main routine is automatic, and you generally shouldn’t have to fool with it at all. But it’s worth understanding what’s going on. You start with an #import directive, which you’ll recall is Objective-C’s substitute for #include. More specifically, you include the UIKit framework, the most important framework in Cocoa Touch. Notice that it’s also in the helloworldxc_Prefix.pch file, but at least at the time of this writing, it’s part of the default main.m file.
Notice that NSAutoreleasePool is created here. Recall that we mentioned this in our discussion of memory management in chapter 2. Note that the autorelease pool is released after you’ve run your application’s main routine, following the standard rule that if you allocate the memory for an object, you must also release it.
The UIApplicationMain line creates your application and kicks off the event cycle. The function’s arguments look like this:
int UIApplicationMain ( int argc, char *argv[], NSString *principalClassName,
NSString *delegateClassName);
As with the rest of the main.m file, you should never have to change this. But we nevertheless briefly touch on what the latter two arguments mean—although they’ll usually be set to their defaults, thanks to the nil arguments.
principalClassName defines the application’s main class, which is UIApplication by default. This class does a lot of the action and event controlling for your program, topics that we’ll return to in chapter 6. The UIApplication object is created as part of this startup routine, but you’ll note that no link to the object is provided. If you need to access it (and you will), you can use a UIApplication class method to do so:
[UIApplication sharedApplication];
This returns the application object. It’s typically sent as part of a nested message to a UIApplication method, as you’ll see in future chapters. For now, the application does two things to note: it calls up your default .xib file, and it interfaces with your application delegate.
The delegateClassName defines the application object’s delegate, an idea introduced in chapter 2. As noted there, this is the object that responds to some of the application’s messages, as defined by the UIApplicationDelegate protocol. Among other things, the application delegate must respond to lifecycle messages: most important, the applicationDidFinishLaunching: message, which runs your program’s content, as we’ll talk more about momentarily.
Appdelegate
As you’ve already seen, the application delegate is responsible for answering many of the application’s messages. You can refer to the previous chapter for a list of some of the more important ones or to Apple’s UIApplicationDelegate protocol reference for a complete listing.
More specifically, an application delegate should do the following:
- At launch time, it must create an application’s windows and display them to the user.
- It must initialize your data.
- It must respond to “quit” requests.
- It must handle low-memory warnings.
Of these topics, the first one is the most important to you. Your application delegate files, HelloWorldAppDelegate.h and HelloWorldAppDelegate.m, start your program.
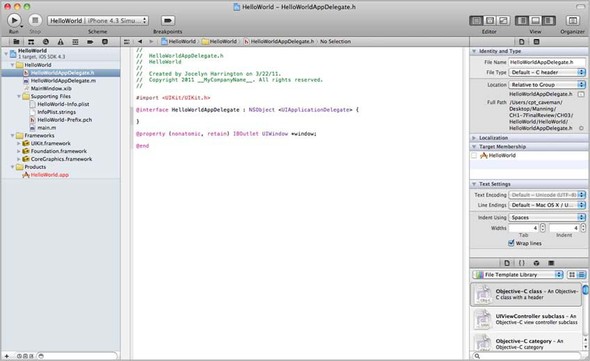
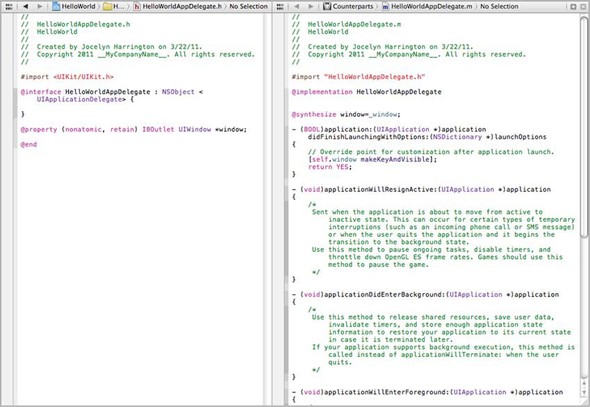
Now that you’ve moved past main.m, you’ll be using classes, which is the sort of coding that makes up the vast majority of Objective-C code. Select HelloWorldAppDelegate.h in the Navigator area to view the source in the Editor area. You can also enable the assistant for the Editor area (choose View > Editor > Assistant). You’ll see that the side-by-side editor view contains the header file in the left section and the source file in the right section, as shown in figure 3.6.
Figure 3.6. HelloWorldAppDelegate header file and source file under editor assistant view
Listing 3.2 shows the HelloWorldAppDelegate header file.
Listing 3.2. HelloWorldAppDelegate’s header file
#import <UIKit/UIKit.h>
@interface HelloWorldAppDelegate: NSObject <UIApplicationDelegate> {
}
@property (nonatomic, retain) IBOutlet UIWindow *window;
@end
Again, there’s nothing to change here, but we want to examine the contents, both to reiterate some of the lessons you learned in the previous chapter and to give you a good foundation for work you’ll do in the future.
First, an @interface line subclasses your delegate from NSObject (which is appropriate, because the app delegate is a nondisplaying class) and includes a promise to follow the UIApplicationDelegate protocol. Then @property declares window as a property. Note that this statement includes some of the property attributes, nonatomic and retain. You use the nonatomic attribute to specify that the synthesized getter method return the value directly. The retain attribute means that when a new value is assigned through the synthesized setter method, the old value will be released and the new value will be retained.
This line also includes an IBOutlet statement, which is used to mark the object as usable from Interface Builder. We’ll examine this concept in more depth in the next section; for now, you only need to know that you have a window object already prepared for your application. Although you won’t modify the header file in this example, you will in the future, and you’ll generally be repeating the patterns you see here: creating more instance variables, including IBOutlets, and defining more properties. You may also declare methods in this header file, something that this first header file doesn’t contain.
The following listing shows the application delegate’s source code file, Hello-WorldAppDelegate.m.
Listing 3.3. HelloWorldAppDelegate source code
#import "HelloWorldAppDelegate.h"
@implementation HelloWorldAppDelegate
@synthesize window=_window;
-(BOOL)application:(UIApplication*)application
didFinishLaunchingWithOptions:(NSDictionary *)launchOptions {
   [self.window makeKeyAndVisible];
   return YES;
}
- (void)applicationWillResignActive:(UIApplication *)application{
}
- (void)applicationDidEnterBackground:(UIApplication *)application{
}
- (void)applicationWillEnterForeground:(UIApplication *)application{
}
- (void)applicationDidBecomeActive:(UIApplication *)application{
}
- (void)applicationWillTerminate:(UIApplication *)application{
}
- (void)dealloc{
    [_window release];
    [super dealloc];
}
@end
The source begins with an inclusion of the class’s header file and an @implementation statement. The window property is also synthesized, which means the setter and getter methods will be automatically added when the program is compiled. Here window =_window means the property window is represented by the instance variable _window.
It’s the content of the application:didFinishLaunchingWithOptions: method that’s of most interest. As you’ll recall, that’s one of the iOS lifecycle messages we touched on in chapter 2. Whenever an iOS application gets entirely loaded into memory, it sends an application:didFinishLaunchingWithOptions: message to your application delegate, running that method. Note that there’s already some code to display in that Interface Builder–created window.
Inside the dealloc method, the instance variable _window, which represents the property window, is released for the memory management. (Recall we mentioned that the window property declared in listing 3.2 will be retained through a setter accessor; if there’s no release command here, you’ll end up with a memory leak.)
Mainwindow.Xib
MainWindow.xib is an Interface Builder file, more broadly called a nib file. MainWindow creates a window, which is the root for your application to draw any other view. This is your connection to the interface design that may be used to easily create graphic interfaces for your project. We’ll discuss it in depth in the next section.
3.3.2. Frameworks folder and Product folder
The Frameworks folder contains all the libraries that will be linked into your project. By default, UIKit.framework, Foundation.framework, and CoreGraphics.framework are automatically added by the template. The Foundation framework gives you access to NS objects, UIKit gives you access to UI objects, and CoreGraphics gives you access to various graphics functions. Later in this book, we’ll cover the details on how to add a new framework to the project. For now, you can leave this folder the way it is.
The Products folder contains the products when the project compiles or builds. For the HelloWorld project, HelloWorld.app is the only product sitting under this folder. Right now, HelloWorld.app is shown in red, which means this file doesn’t exist yet. You’ll compile the HelloWorld project shortly, which will generate the commpiled application HelloWorld.app.
3.3.3. Building and running an application in Xcode
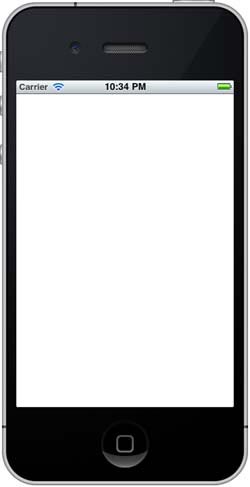
To compile in Xcode, navigate to Product and choose Product > Build from the drop-down menu. Your program compiles, and with a successful build, it can be launched on the iOS Simulator or an iOS device. Then choose Product > Run, and the iOS Simulator starts it up. Or, you can click the Run button in the top-left corner of the Xcode window. If you try this using the HelloWorld project you just created, you’ll see the whole build and run process, resulting in an empty white screen displaying on your iOS Simulator, as shown in figure 3.7.
Figure 3.7. Build and run the application on the iOS Simulator.
iOS applications run only on your iOS Simulator (or on the iPhone or iPad device); they can’t be run on your Macintosh directly. Notice that by default the iPhone Simulator is started up. To switch to the iPad Simulator, navigate to the top-left Scheme menu on the Xcode window, choose iPad Simulator, and click the Run button. You’ll see the iOS Simulator displaying the iPad interface.
If you try to run the current HelloWorld application on the iPad Simulator, it will end up displaying the small iPhone window in the center of the iPad Simulator. That’s because when you create this project, the project options for Device Family are set to iPhone (refer to figure 3.3).
You could create a real iPad target for this project when creating the new project for the Device Family option. Do this by selecting iPad or Universal (supports both iPhone and iPad). Because you’ve already created the project, there’s another way to update the current project to change the device family to Universal. For details, please refer to appendix D. We won’t cover the details in this chapter because the essentials have been covered. Please take this opportunity to practice on your own and gain more knowledge of Xcode by yourself.
If you later want to restart a program that you’ve already compiled, you can do so in one of three ways. You can click the program’s icon, which should now appear in your iOS Simulator. Or, you can choose Product > Run from the Xcode menu. Finally, you can click the Run button in the Xcode window, which builds only if required and then executes your application.
That’s it! With a rudimentary understanding of Xcode now in hand, you’re ready to write code for your first iOS program.
3.3.4. Writing code for HelloWorld
We’ve been promising for a while that you’ll be amazed by how simple it is to write things using the iOS SDK. Granted, the HelloWorld program may not be as easy as a single printf statement, but nonetheless it’s pretty simple, considering that you’re dealing with a complex, windowed UI environment.
As promised, you’ll write everything inside the application:DidFinishing-Launching method, as shown in the next listing. The bolded code is the extra code you need to display “Hello, World!” on a window.
Listing 3.4. Presenting HelloWorld on the screen
-(BOOL)application:(UIApplication*)application
didFinishLaunchingWithOptions:(NSDictionary *)launchOptions {
[_window setBackgroundColor:[UIColor redColor]];
CGRect textFieldFrame = CGRectMake(50, 50, 150, 40);
UILabel *label = [[UILabel alloc] initWithFrame:textFieldFrame];
label.textColor = [UIColor whiteColor];
label.backgroundColor = [UIColor redColor];
label.shadowColor = [UIColor blackColor];
label.font = [UIFont systemFontOfSize:24];
label.text = @"Hello, World!";
[_window addSubview:label];
[label release];
[self.window makeKeyAndVisible];
return YES;
}
Because this is your first look at real live Objective-C code, we’ll examine everything in some depth. You start by sending a message to the window object, telling it to set the background color to red. Recall back in the AppDelegate’s header file, Interface Builder created the window. The IBOutlet that was defined in the header allows you to do manipulations of this sort.
Note that this line also makes use of a nested message, which we promised you’d see with some frequency. Here, you make a call to the UIColor class object and ask it to send the red color to the receiver, which then passes that on to the window. In this book, we hit a lot of UIKit classes without explaining them in depth. That’s because the simpler objects all have standard interfaces; the only complexity is in which particular messages they accept. If you ever feel you need more information about a class, look at appendix A, which contains short descriptions of many objects, or see the complete class references available online at http://developer.apple.com (or in Xcode, select the class name for which you wish to find the defination, navigate to View > Utilities, and choose Quick Help. You should be able to see the documentation related to the class shown on the Utility area under the Quick Help section).
You next define where the text label is placed. You start that process by using CGRectMake to define a rectangle. Much as with Canvas, the iOS drawing uses a grid with the origin (0,0) set at the upper left. Your rectangle’s starting point is 50 to the right and 50 down (50,50) from the origin. The rest of this line of code sets the rectangle to be 150 pixels wide and 40 pixels tall, which is enough room for your text.
You’ll use this rectangle as a frame, which is one of the methods you can use to define a view’s location. Where your view goes is one of the most important parts of your view’s definition. Many classes use an initWithFrame: method, inherited from UIView, which defines location as part of the object’s setup.
The frame is a rectangle that you’ve defined with a method like CGRectMake. Another common way to create a rectangular frame is to set it to take up your full screen with the following code snippet:
[[UIScreen mainScreen] bounds];
Sometimes you’ll opt not to use the initWithFrame: method to create an object. UIButton is an example of a UIKit class that instead suggests you use a class factory method that lets you define a button shape.
In a situation like that, you must set your view’s location by hand. Fortunately, this is easy to do, because UIView also offers a number of properties that you can set to determine where your view goes, even after it’s been initialized. UIView’s frame property can be passed as a rectangle, like the initWithFrame: method. Alternatively, you can use its center property to designate where the middle of the object goes and the bounds property to designate its size internal to its own coordinate system. All three of these properties are further explained in the UIView class reference. Note that CGRectMake is a function, not a method. It takes arguments using the old, unlabeled style of C, rather than Objective-C’s more intuitive manner of using labeled arguments. When you get outside of Cocoa Touch, you’ll find that many frameworks use this older paradigm. For now, all you need to know is what it does and that you needn’t worry about releasing its memory. If you require more information, read the section “Using Core Foundation” in chapter 9.
The label is a simple class that allows you to print text on the screen. Figure 3.2 shows what the label (and the rest of the program) looks like.
As you’d expect, your label work begins with the creation of a label object. Note that you follow the standard methodology of nested object creation that we introduced in the previous chapter. First, you use a class method to allocate the object, and then you use an instance method to initialize it. Afterward, you send a number of messages to your object, this time using the dot syntax. We offer this as a variation from the way you set the window’s background color. If you prefer, you can use the dot shorthand of _window.backgroundColor there, too. The two ways to access properties are equivalent.
The most important of the messages sets the label’s text. You also set a font size and font color. You can even give the text an attractive black shadow, to demonstrate how easy it is to do cool stuff using iOS’s objects. Every object that you use from a framework is full of properties, methods, and notifications that you can take advantage of. The best place to look up all these is the class references in Quick Help.
The final steps in your program are all pretty simple and standard. First, you connect the label and the window by using the window’s addSubview method. This is a standard (and important!) method for adding views or view controllers to your window. You’ll see it again and again.
Do you remember the standard rule that you must release anything you allocated? Here, that’s the label. And that’s a simple HelloWorld program, completely programmed and working, with some neat graphical nuances. Now click the Run button on Xcode’s toolbar, and enjoy your first application running in the iOS Simulator (see figure 3.8)!
Figure 3.8. Running HelloWorld on the iOS Simulator

Although it was sufficient for this purpose, HelloWorld didn’t make much use of the class creation that’s possible in an object-oriented language. Sure, you depended on some existing classes—including UIColor, UILabel, and UIWindow—but all of your new code went into a single function, and you didn’t create any classes of your own. We’ll address how to create your own class in chapter 4, when you start working with new classes.
Creating a project for the iPad is almost identical to creating one for the iPhone. The main difference is that the window is much larger. We won’t cover the iPad files in detail as we did for the iPhone template in the beginning of this section, because they’re almost the same. As mentioned earlier, the primary difference is the size of the main window. We’ll discuss the iPad interface and universal application further in chapter 7.
So far, you created your first iOS application with Xcode and pure Objective-C code. Now that you’re familiar with the basics of Xcode, let’s move on to the next most important tool for iOS application development under Xcode: Interface Builder.
3.4. Using Interface Builder in Xcode 4
At the beginning of this chapter, we mentioned the new Xcode 4 interface and highlighted the single-window interface. Interface Builder is a graphical environment tool built into Xcode 4. Whenever you write an Xcode project, it includes a MainWindow.xib file that contains Interface Builder definitions for where graphical objects are placed. Every Xcode template comes with different objects prebuilt this way. Some of them have multiple, linked .xib files, with one file representing each separate screen of information.
In the project navigator, find the nib file MainWindow.xib. Click MainWindow.xib to open the document in the Interface Builder Editor pane. In the Xcode menu bar, choose View > Navigators > Hide Navigator to narrow the focus of the workspace. If the dock on the left doesn’t look like the one in figure 3.9, click the button in the lower-left corner to switch the dock to outline view. In the Xcode menu, choose View > Utilities to show the Utility area on the right pane.
Figure 3.9. Interface Builder displaying the MainWindow.xib file. A few fundamental displays in Interface Builder are the nib document window (left), the main Editor pane in the middle, together with the Library pane (right bottom), and the Inspector pane (right top).
Let’s look at what’s inside Interface Builder and then quickly look at how to mock up Interface Builder objects.
3.4.1. The anatomy of Interface Builder
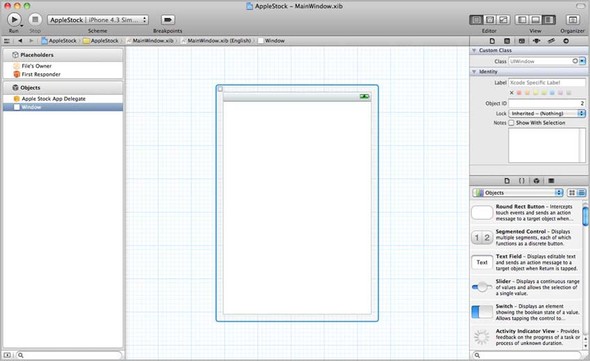
You usually access Interface Builder by selecting a .xib file in your project under Navigator area. The default .xib file is generally called MainWindow.xib. Clicking it brings up the MainWindow on the Canvas inside the Interface Builder window, showing how default objects have been designed visually, as shown in figure 3.9.
Nib Versus .Xib
You’ll see both terms .xib files and nib files in this and later chapters. They’re pretty much the same thing: a nib file is a compiled .xib file. (.xib files express the same data as nib files but in a text-based XML format.) They appear as .xib files in Xcode, but some methods call them nib files, as you’ll see later in this chapter. Apple documents refer to a nib document window in Interface Builder; we’ve done the same here.
Interface Builder
As you can see in figure 3.9, when you select a nib file or .xib file, the Interface Builder window will become the focus of the editor view automatically; all the files stay in the same window with your source code. Interface Builder contains a couple of important windows: the nib document dock on the left and the main Editor pane (Canvas) in the middle.
Turn on the utility view on the right panel view by selecting View > Utilities > Show Utilities or by clicking the utility view button on the top-right window. Utility view has two parts: the Inspector pane and the Library pane. The top part contains the Inspector window; and the third tab starting from the left is the Identity tab, followed by Object Attributes tab, Size tab, and Connections tab, as shown in figure 3.10. The Inspector window gives you access to a wide variety of information about an object and lets you change it.
Figure 3.10. Inspector pane with Identity tab selected
The bottom part contains the Objects library available for Interface Builder. It’s the third tab from the left on the bottom toolbar, as shown in figure 3.11. The Library window is where you can find all the UI elements that you may want to add to your program. You can start exploring the library by selecting the submenu under the Objects drop-down menu. You’ll see four main classes of UI elements:
- Controllers give you different ways to manage your views.
- Data Views give you different ways to display data.
- Inputs & Values give you a variety of simple input mechanisms.
- Windows, Views & Bars give you the core window and view objects, plus a variety of other elements.
Figure 3.11. Library pane

Interface Builder is one of the most important editors within Xcode 4, so you may want to spend more time digging out the features under each tab and objects. It will definitely make your future design much smoother.
So, what’s inside the nib file? Taking a closer look under the MainWindow.nib file (see figure 3.12), you find two categories: Objects and Placeholders. Interface objects are the objects that are created when the nib file is loaded. Placeholders refer to files that live outside the nib file but are connected to the contents of the nib file.
Figure 3.12. Contents of the MainWindow.nib file shown on the dock
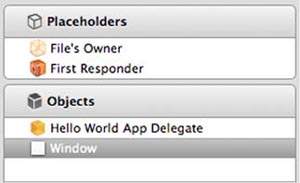
Under Placeholders in the nib file, you can see File’s Owner and First Responder. The File’s Owner placeholder is the main bridge between your application and the contents of the nib file. The File’s Owner object is the owner of this nib file. The First Responder placeholder object represents the first object in the responder chain, which is determined dynamically at runtime by the UIKit frameworks. Don’t worry if you find the concept difficult for now because we’ll cover events and actions in detail in chapter 6.
A default MainWindow.xib file includes one window object. The window object is the one real object you can see on the Canvas here; you can play with it in the Editor pane on the Canvas. As you’d expect, this is the window object that was created by default in the templates you’ve used so far.
The Canvas in the center shows what the .xib file currently looks like. Because you used the Window-Based Application template in Xcode, there’s nothing here yet. If you’d used one of the other templates, you’d see tab bars or other prebuilt elements. In any case, this is where you arrange your user interface elements as you create them.
Before you start using Interface Builder to create an application, though, we want to introduce two additional core concepts: IBOutlets and IBActions.
Iboutlet and Ibaction
In order for Interface Builder–created objects to be useful, Xcode must be able to access their properties and respond to actions sent to them. This is done with IBOutlet and IBAction.
You saw an IBOutlet in listing 3.2, as part of the app delegate header file for your first project:
@property (nonatomic, retain) IBOutlet UIWindow *window;
An IBOutlet provides a link to an Interface Builder–created object. It’s what you use to access that object’s properties and methods. You won’t see an IBAction until we get to chapter 6, where we’ll deal with events and actions, but it’s similar. You declare a method in your class, including IBAction as its return:
- (IBAction)pushButton:(id)sender;
An IBAction is a message that’s executed when a specific action is applied to an Interface Builder–created object, such as when a slider moves or a button is clicked.
With the overview of Interface Builder out of the way, you’re ready to create a simple application that will show a web view atop a background image.
3.4.2. Building the AppleStock application
Now let’s build the AppleStock application. In this section, we’ll look at how to create new objects, manipulate them graphically, and use the Inspector window. You can follow the step-by-step instructions to get familiar with the new tool. To give you a preview of the result, figure 3.13 shows what the AppleStock application will look like when it’s finished.
Figure 3.13. The AppleStock application in the iOS Simulator, running with a web view atop a background image
Creating A Window-Based Application
Go to Xcode 4, select File > New > New Project, and select Window-Based Application. When the prompt for the project name appears, enter AppleStock and your company or your own name as the project identifier. In the example, this book’s name is used as the identifier, so the final project will be uniquely identified in the app store as com.iOS4inAction.AppleStock. Under Device Family, choose iPhone. The rest of the options are similar to when you created the HelloWorld application, as shown in figure 3.3.
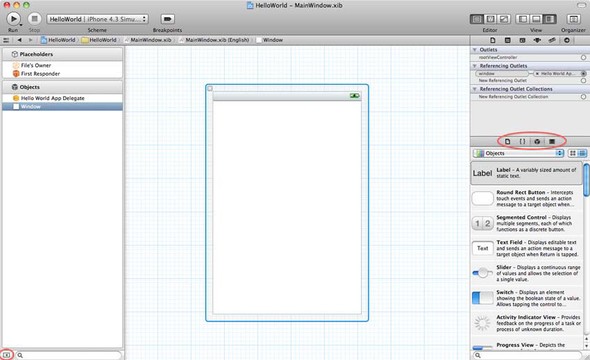
Once the project is created under the workspace, under the project navigator on the left panel, go to the Resources folder and click the MainWindow.xib file to bring up the Interface Builder window under the Editor focus, as shown in figure 3.14.
Figure 3.14. MainWindow.xib under Interface Builder
Make sure your utilities view is shown. You’re now ready to create new objects on the blank Canvas in the center.
Creating New Objects in Interface Builder
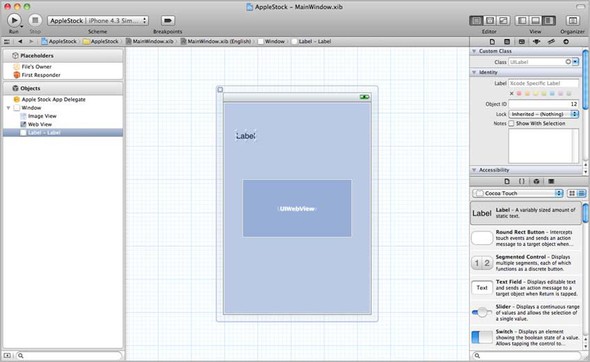
Imagine a program that uses an image as a background, sets up a web view on top of that, and has a label running above everything. We’ll show you how easy it is to create those entirely usable objects in Interface Builder.
You’ll find the Image View object under Data Views in the Objects Library on the bottom of the utility view. Drag it over to your window in the center, and it quickly resizes to suggest a full-screen layout. You should be able to arrange it to fit exactly over the screen, and then release your mouse button to let it go. One object created!
The Web View object will be near the Image View. Drag it over to the main window. If you move it toward the center of the view, dashed lines appear: they’re intended to help you center your object. If you mouse over the middle of the screen, a dashed line appears in each direction, forming a sort of crosshairs. When that happens, release the mouse button—you now have a web view in the middle of the screen. Two objects created!
Finally, select Label, which is under Inputs & Values. Drag it toward the top left of your screen, and let go. You’re finished! You now have three objects laid out in Interface Builder, as shown in figure 3.15.
Figure 3.15. MainWindow.xib file in the center with an image view on the bottom and web view and label added in
Notice that when you mouse over and select the object in the library, a quick helper window pops up; it’s helpful when you’re not so familiar with all the objects at the beginning.
Using the Inspector Window
Let’s spend some time here to make the graphic interface look pretty. Interface Builder is an editor that focuses primarily on user interface design, so it makes sense that you can do some simple manipulation of your objects graphically. For example, if you want to change the text of your label, double-click it; then you’re given the option to fill in your own text. To adjust the font color and the font size of the label, navigate to the Attributes tab under the Inspector pane on the top of the utility view, as show in figure 3.16.
Figure 3.16. Using the inspector to update the label’s text, font color, font size, and so on
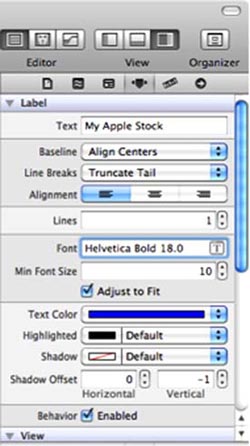
Double-click the label, and type My Apple Stock. Don’t forget to press Enter to finish the change. When you manipulated the label graphically, you changed the text to My Apple Stock for reasons that will become obvious shortly. You can see that this change has already been made in the label’s attributes. You can set a lot of other properties via this single window, with no programming required.
Do you want your text to be a nice blue? No problem: click the Text Color box. Doing so leads you to a window that offers several ways to set colors. Choose the tab that allows selection by name, and find blue on the list. You can also set shadows, alignments, font size, and a number of other text options from this panel.
In addition to the label options, the Attributes tab contains several options that relate to the view—they’re the UIView properties that most graphical objects inherit. You can change alpha transparency, background color, and a number of other elements. For now, you can stop after having changed the color of the text and having generally seen what the Attributes tab can do.
The Attributes tab is available to all Interface Builder objects, but it has different contents depending on the object in question. If you look at the attributes for the web view and image view objects you created, you’ll see that you can set them in specific ways as well, but we’ll save those for later. For now, we’re concentrating on that label.
You can use the Size tab to adjust the size and position of an object. Figure 3.17 shows the options you can change here.
Figure 3.17. Size tab under the Inspector pane. You can change an object’s position and size from the Size tab.
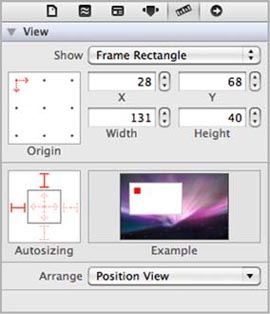
This tab leads off with values for size and position. Not only can you change an object’s starting point, but you can also define where that starting point is, relative to the object, using the grid at the upper left. Width and height are available here too.
The Autosizing box controls how your object resizes its subviews when it resizes. For now, leave it as is; it’ll be of more importance when we talk about basic view controllers in chapter 5.
Finally, the Arrange section lets you align your current object.
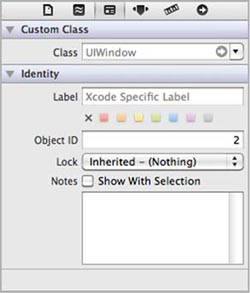
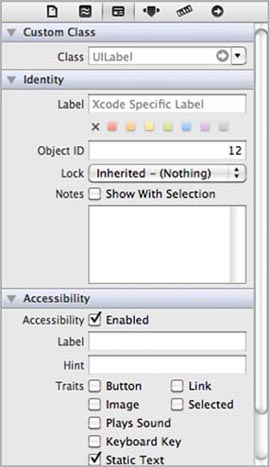
The Identity tab is of little use for this label, but we cover its functionality for the sake of completeness. Figure 3.18 shows what it looks like. For simple Interface Builder objects (like this example label), you use only the Interface Builder Identity section at the bottom of the Identity tab. This lets you name your object, which makes it easier to see what you’re accessing in Interface Builder. It’s strictly for your own use.
Figure 3.18. Identity tab under the Inspector window
The Connections tab shows an object’s IBOutlets and IBActions, as shown in figure 3.19. The example label doesn’t have an IBOutlet, which means it can’t be accessed from Xcode yet. But this is fine; we’re happy with how the label is set up in Interface Builder, and you won’t need to adjust it during runtime for this example.
Figure 3.19. Connection tab showing a web view’s IBOutlets and IBActions
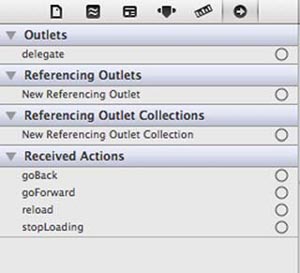
The Class Actions and Class Outlets sections show IBAction and IBOutlet declarations that you’ve made in your object’s header file. For example, the app delegate object has a window IBOutlet (which you’ve seen several times), and the web view object has a few system-defined actions, as shown in figure 3.19. These are the things to which you can build connections.
For now, leave them alone. They’re not required for the label. But you have two more objects to work with in Interface Builder: the image view and the web view.
We promised you that we were going to introduce a totally new object in this section: the image view. As with web views, we’ll get more into the guts of images several chapters down the line; for now, we want to show how easy it is to work with an unfamiliar object type—like the image view—in Interface Builder.
Adding an Image
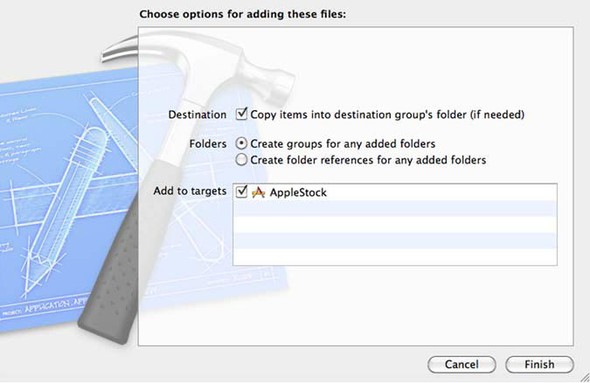
To use an image in an application, you need to add that image into your project first. That means you drag the image file into Xcode Navigator area, alongside all your other files. Generally, you should drag the images into the separate group from your source code. After dragging a file into Xcode, you’ll see a confirmation prompt, as shown in figure 3.20. Make sure you select the Copy Items into Destination Group’s Folder check box; this will ensure that all your resources are managed inside your project.
Figure 3.20. Prompt window for adding new files to the project
Once you’ve done that, you can go to your image view’s Attributes tab in Interface Builder and select or type in the filename of your image file. In this case, it’s apple.png. As soon as you enter this name, your picture should automatically pop up in Interface Builder’s main window.
You then may wish to use the Attributes tab to change how the picture displays in the window (including automatically resizing it if you didn’t build your image to be a specific size) or to adjust other elements. For example, we opted to change the image’s alpha transparency to .5, to make it easier to see the text over the image.
If you want, you can now go ahead compile and run this program, which was built entirely in Interface Builder. You can see the results in figure 3.21.
Figure 3.21. Combining graphics and text can be hard in some programming languages, but under the SDK it can be done entirely with Interface Builder. Here you see a background image with a text overlay.

The problem is that an unsightly web view box is sitting in the middle of the display. If you inspect the Attributes tab for the web view, you’ll see why you didn’t do anything more with it: you can’t set the starting URL from inside Interface Builder.
You can do other things in Interface Builder. Specifically, you can easily resize the view. We chose to set it to 280 × 391 pixels, which various Interface Builder guidelines suggested was the right size; but you can size it by dragging the corners. We also opted to leave the Scales Page to Fit option off, which would make the web view act as if it had a viewport 980 pixels wide, like iPhone Safari. But to fill the web view window, you have to access it from the source code, which means adding a new IBOutlet to the app delegate.
Connecting the Dots in Interface Builder
Now it’s time to code. Let’s declare the web view as an IBOutlet in the app delegate, by connecting the outlets from app delegate to myWebView from Interface Builder.
Connecting takes a few steps with drag and drop:
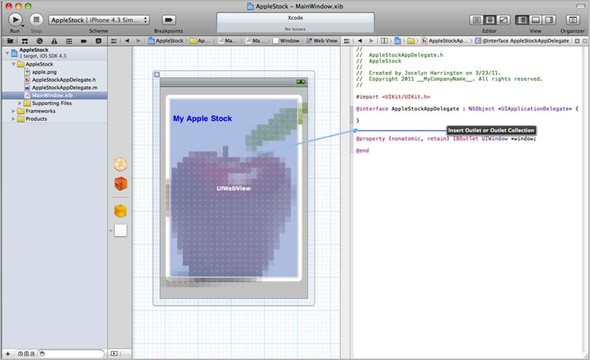
- With the MainWindow.nib file open, click the Assistant button. You see a side-by-side view under the Editor pane.
- In the jump bar above the assistant view, select the header file in which you want to declare a new outlet. In this case, it’s the AppleStockAppDelegate.h file.
- Control-drag from a nib object to the location in the header file for the new outlet. In this case, Control-drag from the
web view to the header file, and insert a new outlet (as shown in figure 3.22).
Figure 3.22. Control-drag from the web view to the app delegate header file to create a new outlet.
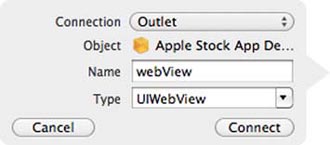
- In the dialog (see figure 3.23), choose Outlet from the Connection menu, type the name of the new outlet, and click Connect. In this case, use webView as
the new IBOutlet name.
Figure 3.23. Dialog box to create the Outlet connection from the nib object to the header file
That’s all! Now you have the webView IBOutlet added to the header file automatically by Xcode, and it can be manipulated from within the Interface Builder editor. You can examine the app delegate’s header file and source code. Notice that you have the new IBOutlet property properly declared and synthesized. Even the memory management is automatically taken care of.
Adding Code for Iboutlet
Now it’s time to add in the function to load the AppleStock’s URL in the web view. Select the AppleStockAppDelegate.m file, and the implementation file will be in the Editor area (you can hide other views to focus on the source file editing). Add the code snippet from the following listing.
Listing 3.5. Create webView with automatic refresh content from Apple’s stock quote
- (void)refreshQuote {
    NSString *url = [[NSString alloc] initWithString:@"http://quote-"
"web.aol.com/?syms=AAPL&e=NAS&action=hq&dur=1&type=mountain&hgl=1&vgl=1&vol="
"1&splits=1&div=0&w=723&h=964&gran=d"];
    [_webView loadRequest:[NSURLRequest requestWithURL:[NSURL
URLWithString:url]]];
    [url release];
}

- (BOOL)application:(UIApplication *)application
didFinishLaunchingWithOptions:(NSDictionary *)launchOptions
{
    [self refreshQuote];
    [NSTimer scheduledTimerWithTimeInterval:5 target:self
selector:@selector(refreshQuote) userInfo:nil repeats:YES];
    [self.window makeKeyAndVisible];
    return YES;
}
Note how you call the refreshQuote method. It’s called using an NSTimer. This allows you to automatically call the refreshQuote method every so often—in this case, every 5 seconds.
Also note that you don’t have to allocate the web view, nor do you have to initialize it, nor do you have to add it as a subview of your window; all those details are taken care of by Interface Builder. But after you link to the object via an outlet, you can access it like any object you created yourself.
We’ll take a more complete look at how web views work in chapter 14. But we wanted to include them here to demonstrate (again) how easy it is to incorporate an unfamiliar object into your code using Interface Builder.
In addition, a web view provides a nice example of client-server integration between web design and the application—a topic that we first touched on in chapter 2 and that turns out to be pretty simple to attain using the iOS. By linking to a URL that sends dynamic content to your device, you can make a sophisticated, always-up-to-date program despite only designing the display engine on the iOS program side of things.
Upgrading to a Universal Application
Follow appendix D to upgrade the current iPhone application to a universal application. Under the new MainWindow for iPad, adjust the image view’s size to fit the full screen of iPad. That’s it! Now click Build and Run. You’ll have a nice stock chart show up in the web view and refresh every 5 seconds on the iOS Simulator.
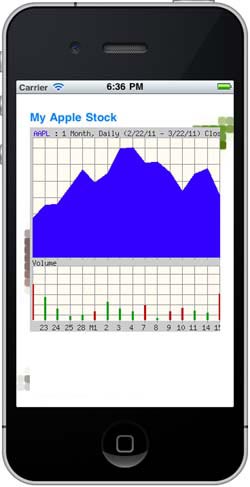
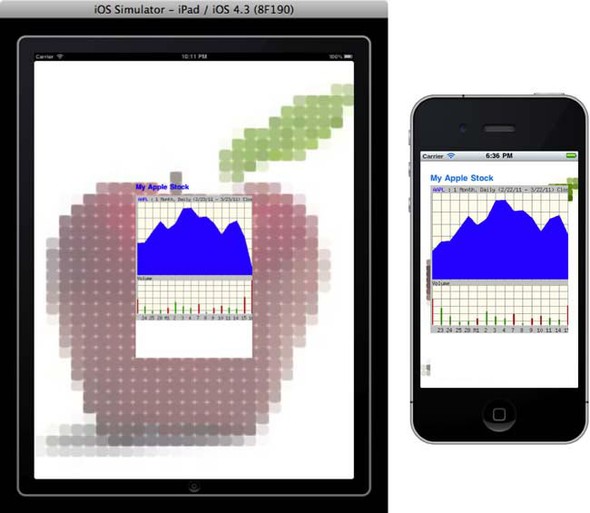
Congrats! You just built your first application, AppleStock, in Xcode, with the major help of Interface Builder, as shown in figure 3.24.
Figure 3.24. This shows what the final product looks like. An image, a label, and a dynamic web view are put together in Interface Builder with only a single line of code required. This demonstrates how simple it is to build a sophisticated interface with little work by using Interface Builder.
That brings us to the end of the AppleStock example. It presented some fundamental uses of Interface Builder that you’ll encounter again and again. In particular, creating objects in Interface Builder and then adding an outlet to a header file will likely become a regular part of your iOS coding experience, so you should make sure you’re entirely familiar with that process.
3.5. Summary
Xcode is ultimately the tool to build an iOS application. It’s where you write the code that allows you to create, manipulate, and destroy objects. As you’ve seen in this chapter, it’s easy to use Xcode to do some sophisticated things.
You can also create basic user interface objects visually using the Interface Builder tool under Xcode. It allows you to design objects using a graphical UI that makes their arrangement a lot easier.
In the next chapter, you’ll use Xcode to create a new file and define a custom class. You’ll also learn how to debug under Xcode.