Chapter 19. In-app purchasing using Store Kit
This chapter will be structured a little differently than ones prior. Rather than going over the Store Kit API, we’ll demonstrate the topics for creating an in-app store by walking through a basic example. We’ll look at how to set up a sandbox testing environment (to mimic selling actual items) and work through how to build the store interface.
The Store Kit API allows you to sell various items within your application. The items sold are called products. These products may be virtual goods, services, or even subscriptions. All transactions are processed securely through iTunes without the user ever having to enter their payment information on the device. There are countless ways to add a store to your application, and how you do so depends entirely on your needs. In this chapter, we’ll discuss one of those ways and give you the tools to implement your own store.
The example store you’ll be creating will let users purchase iPhone backgrounds on their phone. Users will browse through the available products and purchase the ones they want to keep. When a background has been purchased, it will be saved to the user’s camera roll so the user can use it on their device.
19.1. Setting up a sandbox testing environment
Prior to building a store into your application, you must set up the products and testing environment on iTunes Connect. This will allow you to simulate payment processing without charging your iTunes account each time.
The major prerequisite for setting up products is that you must first add the application you want to test with to iTunes Connect at http://itunesconnect.apple.com. To do this, you must go through all the steps to create a new app under Manage your applications. Keep in mind that you shouldn’t upload a binary, so your application isn’t accidently submitted to Apple before it’s ready.
The sample application we’ve uploaded for this test is called RS Wallpaper. It has the bundle identifier com.rightsprite.wallpaper. You’ll want to change this to something unique to you. It’s important to use this reverse domain style when adding your bundle ID, because this is what iTunes uses to recognize your application for in-app purchase. For example, if your website is www.foobar.com, and your application is called baz, your bundle identifier should be com.foobar.baz.
19.1.1. Creating an iTunes test user
In order to test in Apple’s sandbox (testing) environment, you must first set up a test iTunes account in iTunes Connect. The sandbox account functions exactly like a live one except that it doesn’t bill your iTunes account. Attempting to log into the sandbox with your normal iTunes account will cause your iTunes account to become invalid.
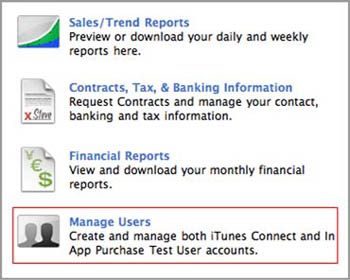
To create a test user, navigate to the Manage Users section in iTunes Connect. Figure 19.1 shows what this link looks like.
Figure 19.1. Managing users in iTunes Connect
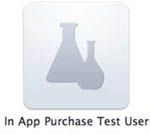
When you’re inside, iTunes Connect asks what type of user you want to create. Make sure you select In App Purchase Test User, as shown in figure 19.2.
Figure 19.2. In App Purchase Test User
This user is created for the sole purpose of testing the sandbox store. Apple is picky about the information you use here, so be sure you don’t use the information from your current iTunes account. If you don’t have a ton of email addresses to test with, a good trick is to use Gmail. If you have a Gmail account, you can add +1, +2, and so on after your existing address to a create new one. For example, if your email address is [email protected], you can register for new accounts with the address [email protected], and all the mail will forward to [email protected].
After you click the Add New User button, you’re presented with the form shown in figure 19.3.
Figure 19.3. The form to add a new test user
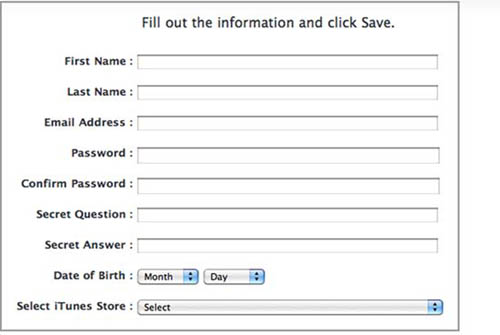
A new test user must be created for each territory you want to test with. For example, if you want to test products in the U.S. App Store and the Chinese App Store, you’ll need to create two separate users. That way, each user will see their localized version of your product. If you don’t specify, your purchase will be available in all the app stores. After you’ve added all your test users, navigate back to the iTunes Connect homepage.
19.1.2. Adding products
You can sell three types of products in your store:
- Consumable—A product that is purchased every time the user needs it. An example of a consumable product might be a power-up in a video game.
- Non-consumable—A product that a user purchases only once and gets to keep. An example is a downloadable song or image.
- Subscription—Consumable or non-consumable. This gives you the ability to let users renew their subscriptions as frequently as you want. Because this is the case, Apple doesn’t provide a record of whether a subscription is valid. You must provide this on your own server.
For this example, you’ll create non-consumable products. After the user has purchased a background, they will forever have access to it without any additional charge. Follow these steps:
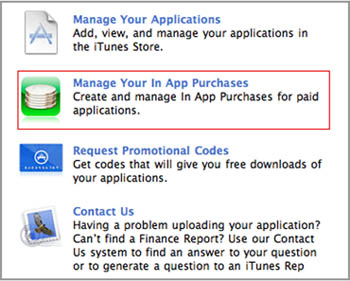
1. Select Manage Your In App Purchases from the iTunes Connect homepage, as shown in figure 19.4.
Figure 19.4. Choosing Manage Your In App Purchases in iTunes Connect
2. On the next screen, click the Create New button, as shown in figure 19.5. You see all the applications you’ve added to iTunes Connect.
Figure 19.5. Click the Create New button.
3. Select the application that will be using in-app purchasing. Doing so takes you to a page where you’ll add your first product.
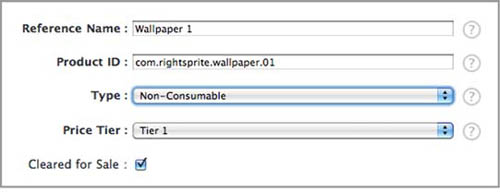
4. You need to fill out three sections. The first contains the pricing details and product type. Figure 19.6 shows the information to add for one of the example background products.
Figure 19.6. Setting up wallpaper product pricing in iTunes Connect
The first field is Reference Name. This is a plain text name that identifies the product in iTunes Connect; it’s only for your reference and is never seen by the user.
The Product ID is similar to your application identifier and must be unique for each product. You’ll use this identifier to look up products in the store code later in the chapter.
For the Type value, choose Non-Consumable. This is the most appropriate for the type of application you’re creating.
Finally, set the price tier and clear the product for sale. Apple provides a link so that you see what price corresponds with which tier. For this example, use Tier 1, which is $.99.
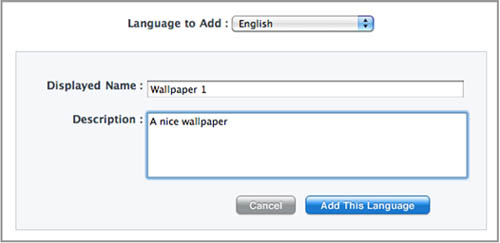
5. In the next section, you create the product title and description. You need to create a localized name and description for every language in which you intend to offer your product. Figure 19.7 shows the information you should add for the first test product.
Figure 19.7. Creating a test product name and description in iTunes Connect
You don’t have to add a localized name and description for every language, but doing so is a good idea if you want to increase profits in countries that don’t speak English.
6. In the last section, you can add a screenshot. This is important only when you’re ready to submit the in-app purchase to Apple for approval, so you can do it later.
7. Click the Save button.
You need to add a separate product in iTunes Connect for each thing you want to sell. For this example, add two more products. You can call your products whatever you want, but make sure you keep their product IDs consistent with your application. In this case, use the IDs com.rightsprite.wallpaper.02 and com.rightsprite.wallpaper.03. After you submit all of your products, your in-app purchase screen should look something like figure 19.8.
Figure 19.8. Your in-app purchase list in iTunes Connect
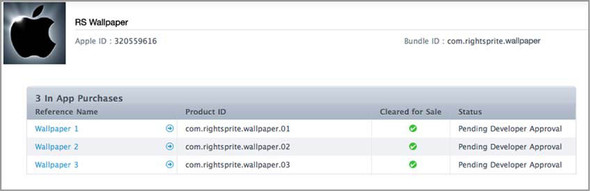
Note that Apple must approve your products before you can sell them in your application. When you’ve fully tested your products, you must come back to this screen and approve each product. Then, they will go into review by Apple. The review process for products is similar to the review process for applications and follows the same guidelines as to what’s appropriate. It can take several days for your products to be approved.
19.2. Creating a simple store interface
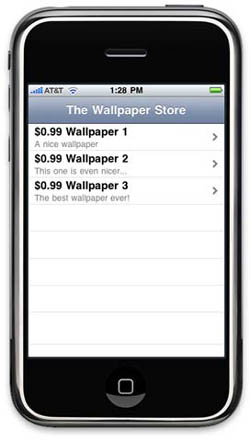
Generally, you’ll add a store to an existing application to improve functionality. This is why, for this example, you’ll create a basic store without any additional bells and whistles. It will use the Navigation-Based Application template and display a list of products in a UITableView. Check out figure 19.9 for an idea of what the application will look like.
Figure 19.9. The wallpaper store interface as shown on the iPhone
19.2.1. Creating the demo app
To get started, open Xcode and create a new navigation-based project. Name the project WPStore. Then, add the Store Kit framework to your project by right-clicking Frameworks and selecting Existing Framework from the menu that displays.
Now, you need to declare the class properties and methods that will be used in the application. Open RootViewController.h, and add the code in the following listing.
Listing 19.1. RootViewConroller.h
#import <StoreKit/StoreKit.h>

@interface RootViewController : UITableViewController
<SKProductsRequestDelegate,SKPaymentTransactionObserver> {
    NSMutableArray * products;
    NSMutableArray * transactionHistory;
}

@property (nonatomic, retain) NSMutableArray * transactionHistory;
- (void) requestProductData;
- (void) completeTransaction: (SKPaymentTransaction *)transaction;
- (void) restoreTransaction: (SKPaymentTransaction *)transaction;
- (void) failedTransaction: (SKPaymentTransaction *)transaction;
- (void) recordTransaction:(SKPaymentTransaction * )transaction;
- (void) provideContent:(NSString * )productIdentifier;

@end
The first thing you see here is that the class imports the Store Kit header file. This gives you access to all the objects and properties needed for the application to implement a store. Following that, the class signature states that the class implements the SKProductsRequestDelegate and SKPaymentTransactionObserver protocols. We’ll explain what each of these does further on in this section.
The class has two properties. The first is an NSMutableArray of products. This is the product array that populates the UITableView. The other property stores transaction history when a user purchases items. The last bit of code declares the methods you’re using in the class. We’ll explain these methods in detail when you implement them in this section.
19.2.2. Adding Store Kit interface
Now that you’ve created the header file, you’re ready to implement the initialization method. Open RootViewController.m, and add the code in the following listing to the viewDidLoad method.
Listing 19.2. viewDidLoad method of RootViewController.m

The first thing you may notice is you import a file called WallpaperViewController.h. Don’t worry about it at the moment; you’ll create it later in the section.
You add the class as the transaction observer ![]() . This means the class implements the SKPaymentTransactionObserver protocol as well as the delegate methods. The methods that must be implemented for this protocol are completeTransaction, restoreTransaction, and failedTransaction. These methods are called in response to various actions received from the Store Kit framework.
. This means the class implements the SKPaymentTransactionObserver protocol as well as the delegate methods. The methods that must be implemented for this protocol are completeTransaction, restoreTransaction, and failedTransaction. These methods are called in response to various actions received from the Store Kit framework.
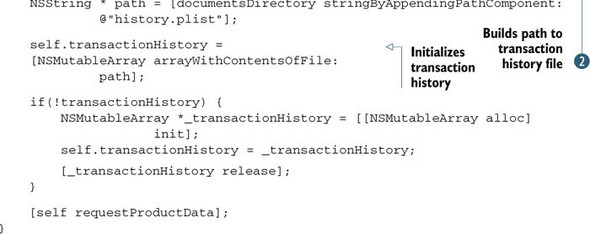
Next, you retrieve the transaction history. Whenever transactions are made, it’s a good idea to store them somewhere in your
application or on a server. You store the products that are purchased in a simple plist file and attempt to load the plist
file into memory ![]() . If no history exists, this array is initialized to be empty.
. If no history exists, this array is initialized to be empty.
The last line in the code starts the process of retrieving your products from Apple. Although you don’t do it here, it’s a good idea to display a loading message to the user at this point while they wait for the product list to download. The next listing shows the code for this method.
Listing 19.3. Requesting product information
- (void) requestProductData {
  SKProductsRequest *request= [[SKProductsRequest alloc]
   initWithProductIdentifiers:[NSSet setWithObjects:
       @"com.rightsprite.wallpaper.01",
       @"com.rightsprite.wallpaper.02",
      @"com.rightsprite.wallpaper.03",nil]];
  request.delegate = self;
  [request start];
}
- (void)productsRequest:(SKProductsRequest *)request
  didReceiveResponse:(SKProductsResponse *)response{

  NSArray *myProducts = response.products;
  for(SKProduct * product in myProducts) {
    [products addObject:product];
  }

  [request autorelease];
  [self.tableView reloadData];
}
You start by creating the product request. Notice that these are the product IDs you registered in section 19.1.2. You’re basically asking iTunes for information about the products with these identifiers. If you wanted to make your application a little more dynamic, you could load the identifier list from a server. We won’t go into detail about that because it’s out of the scope of this book.
After the request has been created, the code starts the process of retrieving the product information from iTunes. When the information has been retrieved, the delegate method didReceiveResponse is called with the data. You loop over the products and add them to the global products array. That way, you can populate the UITableView with their names and descriptions.
Finally, you reload the UITableView with the product data. The last thing you need to do to see the product list is to implement the delegate methods for the UITableView. Add the code from the following listing to your RootViewController.
Listing 19.4. Delegate methods for UITableView
- (NSInteger)tableView:(UITableView *)tableView
     numberOfRowsInSection:(NSInteger)section {
    return [products count];
}

- (UITableViewCell *)tableView:(UITableView *)tableView
     cellForRowAtIndexPath:(NSIndexPath *)indexPath {

     static NSString *CellIdentifier = @"Cell";

    UITableViewCell *cell = [tableView
            dequeueReusableCellWithIdentifier:CellIdentifier];
    if (cell == nil) {
        cell = [[[UITableViewCell alloc]
          initWithStyle:UITableViewCellStyleSubtitle
         reuseIdentifier:CellIdentifier] autorelease];
    }

     SKProduct * product = [products objectAtIndex:indexPath.row];
     cell.textLabel.text = [NSString stringWithFormat:@"$%.2f %@",
            product.price.doubleValue, product.localizedTitle];
    cell.detailTextLabel.text = product.localizedDescription;
    cell.accessoryType = UITableViewCellAccessoryDisclosureIndicator;

    return cell;
}
This code is straightforward: you’ve already seen how to populate a UITableView from an NSArray. Note that you populate the cell’s text label and detail text label from the localized product information.
At this point, you should be able to see your list of products when you run the application. If you intend to test now, make sure you comment out the line to import WallpaperViewController.h, because you haven’t yet created it.
19.2.3. Creating individual wallpaper product
The next step is to display the wallpapers to the user when they tap on a row in the table. This will allow them to see the wallpaper as well as purchase it. Before you create the view controller you’ll use, let’s implement the didSelectRowAtIndexPath method of the UITableView to push the new view onto the navigation stack. The next listing details this code.
Listing 19.5. didSelectRowAtIndexPath method for the UITableView
- (void)tableView:(UITableView *)tableView
    didSelectRowAtIndexPath:(NSIndexPath *)indexPath {

    SKProduct * product = [products objectAtIndex:indexPath.row];

    WallpaperViewController * wpViewController = [[WallpaperViewController
    alloc] initWithNibName:@"WallpaperViewController" bundle:
    [NSBundle mainBundle]];

    wpViewController.product = product;

    [self.navigationController pushViewController:wpViewController
            animated:YES];

    [wpViewController release];
}
You first get the product associated with the selected row. This is then passed to the WallpaperView-Controller class after initialization. The WallpaperViewController uses this product to determine which wallpaper image to display. Finally, the view is pushed onto the navigation view stack.
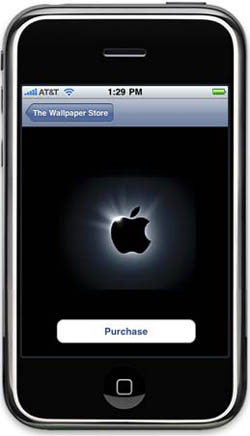
You’ll now create the WallpaperViewController. Figure 19.10 shows what its view will look like.
Figure 19.10. Previewing the product in the wallpaper view
To create this object, add a new UIViewController subclass called WallpaperViewController to your project. Make sure you select the With XIB for User Interface check box.
Before creating the interface, you need to create the IBOutlets and IBAction. Open WallpaperViewController.h, and add the code in the following listing.
Listing 19.6. WallpaperViewController.h
#import <UIKit/UIKit.h>
#import <StoreKit/StoreKit.h>

@interface WallpaperViewController : UIViewController {
    IBOutlet UIImageView * imageView;
    SKProduct * product;
}

@property (nonatomic, retain) IBOutlet UIImageView * imageView;
@property (nonatomic, retain) SKProduct * product;

- (IBAction) buttonClicked:(id) sender;

@end
As you may have guessed, you only need an IBOutlet for the UIImageView that will display the selected wallpaper. You set its image property from the product property after the view has been initialized.
In addition to the IBOutlet, you create an IBAction that responds when the user presses the Purchase button. As you’ll see later in this section, this will initiate the inapp purchasing process.
After you’ve created this header file, open WallpaperViewController.xib and add a UIImageView and a UIButton. Finally, connect the UIImageView to your IBOutlet and the touchUpInside method of the UIButton to your IBAction.
19.2.4. Store Kit Payment
The code for this class is simple. Open WallpaperViewController.m, and implement the methods in the following listing.
Listing 19.7. WallpaperViewController.m
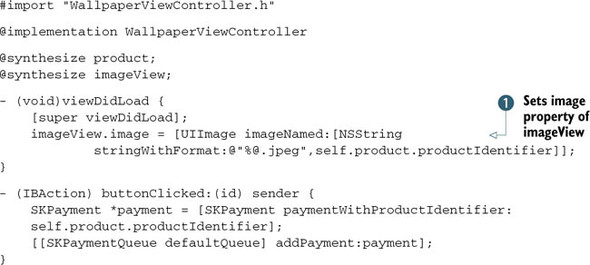
You set the image property of the UIImageView to a JPEG with the same name as the product identifier ![]() . To make things easy, you name each of the images you’re selling based on their product identifiers. For example, the three
images in the sample code are named com.rightsprite.wallpaper.01.jpeg, com.rightsprite.wallpaper.02.jpeg, and com.rightsprite.wallpaper.03.jpeg.
If you didn’t want to name your images this way, you could store a mapping of product IDs to image names in a plist file.
. To make things easy, you name each of the images you’re selling based on their product identifiers. For example, the three
images in the sample code are named com.rightsprite.wallpaper.01.jpeg, com.rightsprite.wallpaper.02.jpeg, and com.rightsprite.wallpaper.03.jpeg.
If you didn’t want to name your images this way, you could store a mapping of product IDs to image names in a plist file.
When the user presses the Purchase button, the code creates a new SKPayment object and queue in the global payments queue. Because SKPaymentQueue is a singleton class, payments can be queued from anywhere in your code. All you need is the product identifier of the product being purchased.
After the payment has been queued, Store Kit takes over and begins processing it. Figure 19.11 shows the alert that pops up when you press the Purchase button.
Figure 19.11. A purchase confirmation as shown on the iPhone
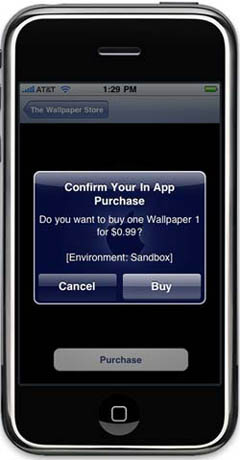
When the user presses the Buy button, Store Kit notifies your transaction observer class about the status of payment via the delegate methods you declared in listing 19.1. We’ll now discuss how to implement those methods and deliver the purchased content to the user.
Add the code from the next listing to the file RootViewController.m.
Listing 19.8. Delegate methods for Store Kit
- (void)paymentQueue:(SKPaymentQueue *)queue updatedTransactions:(NSArray
     *)transactions
{
    for (SKPaymentTransaction *transaction in transactions)
    {
        switch (transaction.transactionState)
        {
            case SKPaymentTransactionStatePurchased:
                [self completeTransaction:transaction];
                break;
            case SKPaymentTransactionStateFailed:
                [self failedTransaction:transaction];
                break;
            case SKPaymentTransactionStateRestored:
                [self restoreTransaction:transaction];
            default:
                break;
         }
     }
}
Store Kit calls this method after the user has tried to purchase an item, and it’s used as a controller based on the status of the purchase. A purchase has three potential states:
- SKPaymentTransactionStatePurchased Occurs when the transaction was successful. At this point, you should deliver the content to the user and record the transaction history.
- SKPaymentTransactionStateFailed The transaction may fail for a number of reasons, including insufficient funds or a network error. If this is the case, you need to notify the user that their purchase wasn’t completed.
- SKPaymentTransactionStateRestored Occurs when the user has already purchased an item. If this is the state of the transaction, you should deliver the content to the user as if it was a new transaction.
Now that you’ve implemented this driver method, you need to implement each of the response methods that it calls. Add the code from the following listing to your RootViewController.m file.
Listing 19.9. Store Kit response methods

As we stated before, the actions for completing and restoring transactions are usually similar. For the example, you have restoreTransaction call completeTransaction to save lines of code.
When a purchase is successful, Store Kit notifies the user via a UIAlertView. Figure 19.12 shows what this view looks like in the application.
Figure 19.12. A successful purchase confirmation as shown on an iPhone

The process you should follow when completing a transaction is usually the same in every application. You call a series of methods to record the history, provide the content to the user, and finalize the transaction. Listing 19.10 details each of these methods. To record the transactions, you keep a plist file on disk containing the product identifiers of every product purchased by the user. Although you don’t do much with the recorded transaction information in this application, it’s good practice to track it.
Listing 19.10. Recording transactions and delivering content
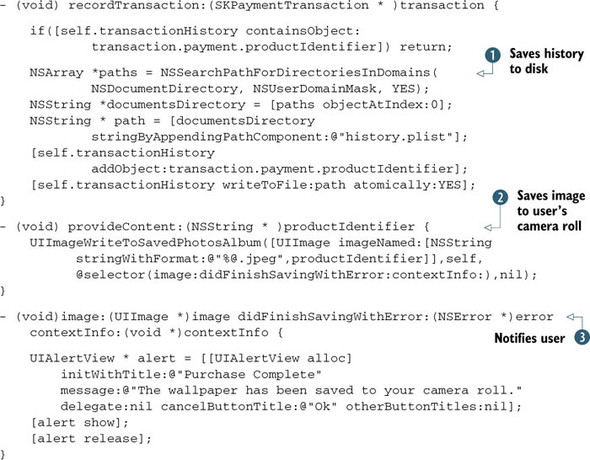
The code first checks to see if the user has already purchased the given item. If so, you don’t need to double-record it.
After that, you resolve the path to the file history.plist in the application’s documents directory and write the history
to it ![]() .
.
When you’re creating a store in an application, the provideContent method varies depending on what type of content you’re selling. In the case of the wallpaper sale application, you need to
save the purchased wallpaper from the application’s directory to the user’s camera roll. You can do this using the UIImageWriteToSavedPhotosAlbum method ![]() . After this method completes, it calls the selector you passed in, which notifies the user that the wallpaper was saved to
their device
. After this method completes, it calls the selector you passed in, which notifies the user that the wallpaper was saved to
their device ![]() . The user now has full access to that wallpaper via their camera roll.
. The user now has full access to that wallpaper via their camera roll.
The last method in ![]() shows what to do if an error occurs. It’s important to notify the user that their payment wasn’t processed. Otherwise, you’ll
have unhappy customers thinking they paid for something and it wasn’t delivered.
shows what to do if an error occurs. It’s important to notify the user that their payment wasn’t processed. Otherwise, you’ll
have unhappy customers thinking they paid for something and it wasn’t delivered.
19.3. Summary
In this chapter, you’ve seen one way to implement a store for non-consumable goods. You provided a simple store interface that lets users browse, purchase, and save wallpapers on their iPhones.
Stores can come in many different varieties to suit your needs. Almost anything can be considered a product to be sold in a store. Be creative, and utilize this opportunity to make some extra income off your application.
When adding a store to your application, always think about how it will affect development time. Be sure to submit your in-app purchase products as soon as you consider them ready, so the review process doesn’t slow down your deployment.
Finally, keep functionality in mind. Don’t make your application entirely dependent on in-app purchases. Be sure to offer some value for the users who download it and choose not to purchase your products. Make sure you structure your store in such a way that it adds to your application rather than being the focus of it.
In the next chapter, we’ll discuss how to make money with iAd.