Chapter 22. Multitasking in depth
- Monitoring the location service in the background
- Building an audio-playing application
- Enabling background audio playing
- Handling remote-control events
In the previous chapter, you learned the multitasking basics in iOS 4 and how to finish a task in the background with blocks and Grand Central Dispatch. When the application needs to (or for better user experience) continue running in the background, remember that these multitasking features are available on iOS 4:
- Audio—The application can continue running and play audio to the user while in the background. The user can use the multitasking UI or the lock screen UI to remotely control the audio play, pause, fast-forward, and so on.
- Location—The application can receive location updates to support location-related tasks or navigation in the background, such as the significant location change service and turn-by-turn directions.
- VoIP—Allows the application to receive voice calls through the internet even though other applications are in the foreground.
These multitasking features are useful and can boost your application to a brand-new level. In this last chapter of the book, first we’ll continue the background location-monitoring service from the previous chapter by building a location-tracking application. Next, we’ll focus on background audio playing and cover some additional advanced topics, such as handling interruptions and remote-control events.
22.1. Using the location-monitoring service
In the last chapter, you learned the features of significant location change updates and region-based location monitoring in the background. Now let’s continue exploring the location service by building a location-monitoring application. In this section, we’ll build a demo application that tracks location updates in the background.
22.1.1. Updating the UI when the app relaunches
The first step is to create the application to display the location data collected. First, open Xcode and create a project using the Navigation-Based Application template in the iOS application projects. Name it Locations. In this application, we’ll use a table view to display all the new location updates from the location service running in the background.
The application’s view controller needs to update the user interface with location data when the app is restarted from the background state. You learned how to do that in the last chapter’s fast app-switching section, section 21.2.
Inside the RootViewController.h file, define an NSArray called locationData and use it as the table view’s data source, as shown in listing 22.1. Then in the Root-ViewController.m file, display the location data on the table view. Keep in mind that the table view needs to reload the data when the application is restarted from the background.
Listing 22.1. RootViewController’s header file and implementation file
HEADER
#import <UIKit/UIKit.h>
@interface RootViewController : UITableViewController {
     NSArray *locationData;
}
@property (nonatomic, retain) NSArray *locationData;
@end

IMPLEMENTATION FILE
#import "RootViewController.h"
@implementation RootViewController
@synthesize locationData;

- (void)updateUI {
     NSUserDefaults *defaults = [NSUserDefaults standardUserDefaults];
     self.locationData = [defaults objectForKey:@"kLocationData"];
     [self.tableView reloadData];
}
- (void)viewDidLoad {
    [super viewDidLoad];
    self.title = @"Locations";
    [self updateUI];
     NSNotificationCenter *notifcenter =
      [NSNotificationCenter defaultCenter];
    [notifcenter addObserver:self selector:@selector(updateUI)
       name:UIApplicationWillEnterForegroundNotification
  object:nil];
}

- (NSInteger)numberOfSectionsInTableView:(UITableView *)tableView {
    return 1;
}

- (NSInteger)tableView:(UITableView *)tableView
    numberOfRowsInSection:(NSInteger)section {
    return [locationData count];
}
- (UITableViewCell *)tableView:(UITableView *)tableView
    cellForRowAtIndexPath:(NSIndexPath *)indexPath {
   static NSString *CellIdentifier = @"Cell";
   UITableViewCell *cell = [tableView
                           dequeueReusableCellWithIdentifier:CellIdentifier];
   if (cell == nil) {
     cell = [[[UITableViewCell alloc]
            initWithStyle:UITableViewCellStyleDefault
            reuseIdentifier:CellIdentifier]
            autorelease];
    }
     cell.textLabel.text = [locationData
                           objectAtIndex:indexPath.row];
    return cell;
}
- (void)dealloc {
   [locationData release];
   [super dealloc];
}
@end
When the table view controller gets loaded, the locationData array will fetch the data stored with NSUserDefaults and then update the table view based on the location-Data array. The notification center will observe the event when the application resumes from the background state and reload the table view’s data.
Now the table view is ready to display the location data. Next, let’s look at how to get the location updates from the Core Location framework with the significant-change location service.
22.1.2. Enabling the significant-change location service
In this section, we’ll add the significant-change location service to our Locations application. First, add the Core Location framework to the project and include the core location header (CoreLocation/CoreLocation.h) in the app delegate file.
Then add the Core Location Manager to the app delegate as an instance variable: CLLocationManager *locationManager;. You must also modify the definition of the LocationsAppDelegate @interface to state that CLLocationManagerDelegate is implemented, like this:
@interface LocationsAppDelegate : NSObject <UIApplicationDelegate,
     CLLocationManagerDelegate>
Now add changes from the following listing into the app delegate implementation file to enable the location-monitoring service when the app launches.
Listing 22.2. Implementing location updates in the background
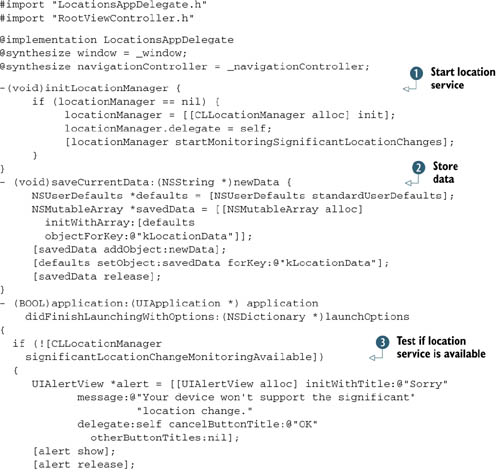
Inside the application delegate, you use the Core Location Manager to monitor the significant location change. When the application
first launches, you call the method initLocationManager ![]() to initialize the Location Manager and start the significant location update service. In order to make sure the location
service is actually available on this device, you use the method significantLocationChangeMonitoring-Available
to initialize the Location Manager and start the significant location update service. In order to make sure the location
service is actually available on this device, you use the method significantLocationChangeMonitoring-Available ![]() to test the availability, and if it’s not possible to use the location update service on this device, you give the user an
alert.
to test the availability, and if it’s not possible to use the location update service on this device, you give the user an
alert.
Once the new location is available, the Location Manager delegate method gets called ![]() . You need to store the new location data using NSDefaults in the method saveCurrentData
. You need to store the new location data using NSDefaults in the method saveCurrentData ![]() . That’s how the table view can get all the new location updates from the application delegate.
. That’s how the table view can get all the new location updates from the application delegate.
In case an error occurs during location updating, the Location Manager calls the delegate method ![]() . You can read the error message inside the console window under Xcode.
. You can read the error message inside the console window under Xcode.
You need to test this application on your iPhone or iPad with 3G because the Simulator doesn’t support the location change service. Build and run this application on the device. Quit the application to let the location service run in the background.
The location application will continue receiving updates in the background, and once it’s relaunched, you can track all the places you’ve been. Notice that even if the application is suspended in the background or the application isn’t running at all, the location service is running. You can tell by the indicator on the status bar of your iPhone or iPad 3G, as shown in figure 22.1.
Figure 22.1. Significant location updates application running in the background
![]()
You can combine this significant location updates service and notify the user with local notifications. The region-based location monitoring service works exactly like the significant location updates service. You can define which region to monitor; when the user enters that specific region, the application will receive the location update through Core Location delegate methods. The system will wake up the application even if the application isn’t running or suspended. We covered the key methods in the previous chapter.
Next, we’ll dive into the background audio techniques and build an advanced application to support background audio together, step by step.
22.2. Building an audio-playing application with the Audio Toolbox framework
In order to demonstrate the background audio API, we need to have an application playing audio. Back in chapter 12, you learned how to use the AV Foundation framework to play music inside the application. Let’s start by building a MySong application to play music with the AV Foundation framework. We’re going to use the AV Foundation framework’s audio player that you’ve already learned and add in the new Audio Toolbox framework to support background audio-playing and remote-control events.
The Audio Toolbox framework sits one level below the AV Foundation framework, so there are more methods available. The new class we’re going to use is AVAudio-Session in the Audio Toolbox framework.
First, you may want to spend some time learning new methods in AVAudioSession. AVAudioSession is a singleton object that helps you configure the audio behavior in your application. Call the following class method to get the singleton audio session: [AVAudioSession sharedInstance];
There are a few reasons for using an audio session:
- To define the audio session category
- To respond to the headset plug-in or unplug it
- To handle interruptions during audio playing
Why do you need to define the audio session category? Table 22.1 show the six categories in iOS that allow you to customize the audio role in your application.
Table 22.1. Audio session category
|
Audio session category |
Definition |
|---|---|
| AVAudioSessionCategoryAmbient | Audio playing is not the primary purpose but it allows another application’s audio to play. Will be muted when the screen is autolocked or the Silent switch is on. |
| AVAudioSessionCategorySoloAmbient | Default value. Only the current application will play the audio. Will be muted when the screen is autolocked or the Silent switch is on. |
| AVAudioSessionCategoryPlayback | Audio playing is the primary purpose in this application. Won’t allow other applications to play along. Won’t be muted even if the Silent switch is on. Supports background audio playing. |
| AVAudioSessionCategoryRecord | Audio recording is the primary purpose. Continues recording when the screen is autolocked. |
| AVAudioSessionCategoryPlayAndRecord | For audio playing and recording at the same time or not, i.e., voice over IP. This setting will mute the other application’s audio. |
| AVAudioSessionCategoryAudioProcessing | Not playing audio or recording but processing the audio, such as format conversion. |
When you set the category to playback, the system knows your application’s main purpose is to play music, and it should continue playing even when the application isn’t active. By default, this value in the audio session’s category is AVAudioSessionCategorySoloAmbient, and the system will stop the audio playing when the application is inactive. Because we’re building an audio-playing application that supports continuous audio playing in the background, we need to set the audio session category to playback.
Use this code snippet to define the audio session’s category to playback:
[[AVAudioSession sharedInstance] setCategory:
     AVAudioSessionCategoryPlayback error: nil];
Let’s build the audio-playing application with both the Audio Toolbox and AV Foundation frameworks in Xcode. Create a new project, use the View-Based Application template in the iOS application, and name it MySong. Because we’re going to use the AV Foundation and Audio Toolbox frameworks in this application, go ahead and add in the needed extra frameworks. Include the header files inside the MySongViewController.h file:
#import <AVFoundation/AVFoundation.h>
#import <AudioToolbox/AudioToolbox.h>
Let’s add an audio file called backgroundmusic.m4a into our project. That’s the audio file we’ll play in the application. You can use any music or audio file available on your own computer; just make sure the name matches the example in this project.
Files in M4A format are actually the audio layer of (nonvideo) MPEG 4 movies. M4A is slated to become the new standard for audio file compression.
Next, we’ll design the UI inside the MySong view controller. There will be a text label to display the current audio file’s name in the center of the screen, and below the label will be three buttons: one button for play/pause events, one for fast-forward, and another one for rewind. When you tap the Play button, the button image will flip to Pause, indicating you can pause the currently playing audio.
In order to have a better user experience, let’s add the background images for the three buttons into our project.
Select the MySongViewController.h file, and add in the new changes, as shown in the following listing.
Listing 22.3. Project MySong’s view controller header file
#import <UIKit/UIKit.h>
#import <AVFoundation/AVFoundation.h>
#import <AudioToolbox/AudioToolbox.h>
@interface MySongViewController :
  UIViewController <AVAudioPlayerDelegate> {
     AVAudioPlayer         *myPlayer;
     IBOutlet UILabel      *fileName;
     IBOutlet UIButton     *playButton;
     IBOutlet UIButton      *ffwButton;
     IBOutlet UIButton      *rewButton;
}
@property (nonatomic, assign)     AVAudioPlayer      *myPlayer;
@property (nonatomic, retain)     UILabel            *fileName;
@property (nonatomic, retain)     UIButton          *playButton;
@property (nonatomic, retain)     UIButton           *ffwButton;
@property (nonatomic, retain)     UIButton           *rewButton;

- (IBAction)playButtonPressed:(UIButton*)sender;
- (IBAction)rewButtonPressed:(UIButton*)sender;
- (IBAction)ffwButtonPressed:(UIButton*)sender;
@end
In the header file, you add in one label for the filename and three buttons for the audio playing control. Three methods are defined to handle each button’s touch event.
Save the changes for the header file. Next, let’s add the new objects to the nib file and connect them to the view controller’s header file.
Click the MySongViewController.xib file to open it for editing, and then open the object library. First, add a new text label into the view, and then drag three buttons into the view. By default, the button’s type is a rounded rectangle. Let’s change the button’s attributes to a custom type and assign the background image to each button. Once it’s complete, you’ll see the view controller’s UI, similar to the one shown in figure 22.2.
Figure 22.2. MySong’s view controller UI

Single-click the file’s owner under the MySongViewController’s File panel. Go to the connection inspector and make sure all four UI outlets in the file’s owner are connected to new subviews. Hook up the three action buttons and save everything.
Now we’ll move on to implement the MySongViewController.m file. There are many changes in the next step, considering this is a comprehensive audio playing project.
Select the file and add in the code according to the following listing.
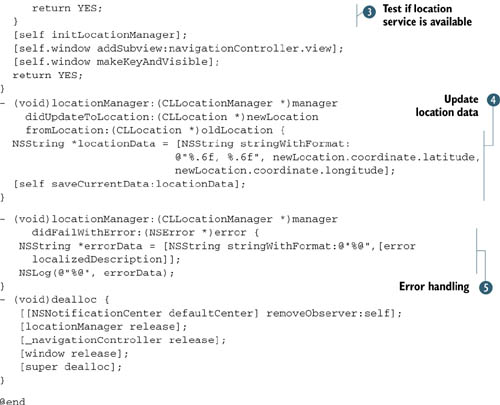
Listing 22.4. MySongViewController.m file
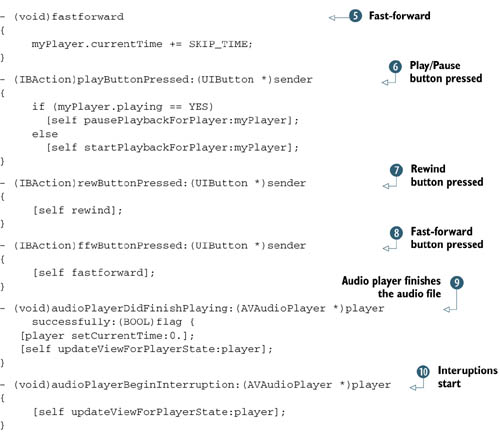
Let’s review what you’ve changed inside this view controller file.
You want to use the Play/Pause button to toggle between play and pause, so you define the method updateViewForPlayerState ![]() to update the Play/Pause button’s background image, indicating the audio player’s status. The method pausePlaybackForPlayer
to update the Play/Pause button’s background image, indicating the audio player’s status. The method pausePlaybackForPlayer ![]() can pause the audio player and update the UI. The method startPlaybackForPlayer
can pause the audio player and update the UI. The method startPlaybackForPlayer ![]() will start playing the audio file if the audio player is not playing.
will start playing the audio file if the audio player is not playing.
The method rewind ![]() can control the audio player’s timeline to go back 3 seconds, and the method fastforward
can control the audio player’s timeline to go back 3 seconds, and the method fastforward ![]() will control it to fast-forward 3 seconds.
will control it to fast-forward 3 seconds.
The action method playButtonPressed ![]() will respond to the Play/Pause button’s action event. The action methods rewButtonPressed
will respond to the Play/Pause button’s action event. The action methods rewButtonPressed ![]() and ffwButtonPressed
and ffwButtonPressed ![]() will respond to the Rewind button’s action and the Fast-forward button’s action, respectively.
will respond to the Rewind button’s action and the Fast-forward button’s action, respectively.
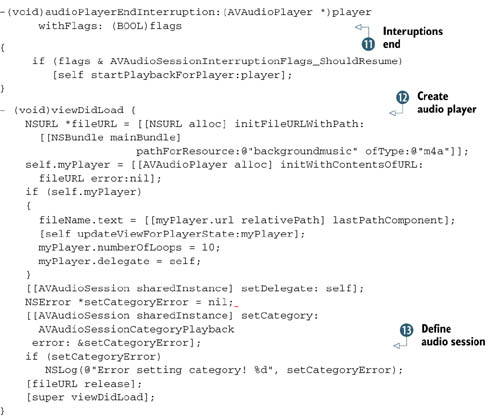
Then you define the audio player’s delegate callbacks in audioPlayerDidFinish-Playing ![]() , audioPlayerBeginInterruption
, audioPlayerBeginInterruption ![]() , and audioPlayerEndInterruption
, and audioPlayerEndInterruption ![]() . In audioPlayerDidFinishPlaying
. In audioPlayerDidFinishPlaying ![]() , when the audio playing task is complete, you reset the timeline back to the beginning. When an interuption occurs in the
system, the delegate callbacks give you the chance to update the UI. When the interuption is gone, you need to resume playing
the music.
, when the audio playing task is complete, you reset the timeline back to the beginning. When an interuption occurs in the
system, the delegate callbacks give you the chance to update the UI. When the interuption is gone, you need to resume playing
the music.
Finally, in viewDidLoad ![]() , you first define the audio player’s music file as back-groundmusic.m4a and then customize the view controller’s UI by displaying
the file’s name in the label fileName. In addition, you want to autoplayback this music file 10 times and set the delegate to self.
, you first define the audio player’s music file as back-groundmusic.m4a and then customize the view controller’s UI by displaying
the file’s name in the label fileName. In addition, you want to autoplayback this music file 10 times and set the delegate to self.
Then inside the audio session ![]() , you define the category as AVAudioSessionCategoryPlayback to inform the system that this application will use audio playing as a primary function.
, you define the category as AVAudioSessionCategoryPlayback to inform the system that this application will use audio playing as a primary function.
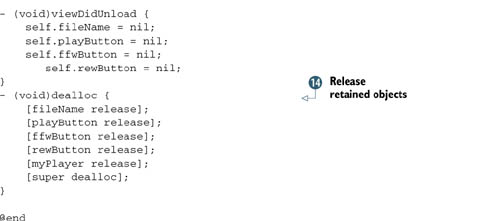
Finally, you release the retained objects inside the dealloc ![]() .
.
That’s all! Change the target to a universal application for both iPhone and iPad. Save all the changes, click Build, and run it in Xcode.
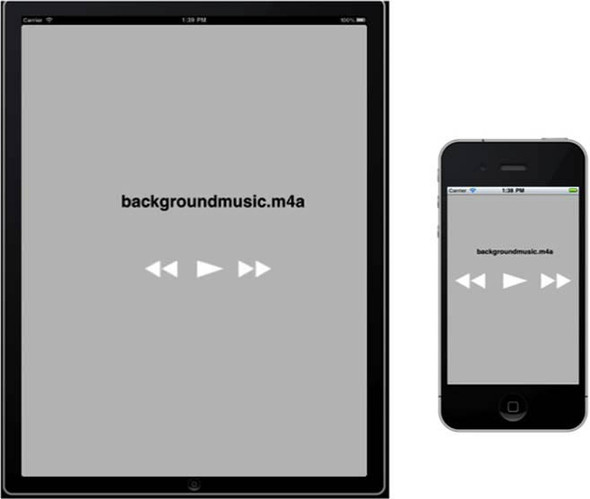
If everything runs smoothly, you should see a comprehensive audio-playing application launch on your iPhone or iPad that contains a Play/Pause button, Fast-forward button, and Rewind button. The text label will display the audio file’s name, as shown in figure 22.3.
Figure 22.3. The audio-playing application when it’s launched on the iPhone and iPad
Play with this application a bit, and you will find that our application has the first priority in audio playing. For example, try to play music using the iPod system app in the background, and when this application starts playing audio, the system will mute the iPod music; this application will continue playing even if the screen is autolocked.
When you have an incoming phone call, this application will pause playing the current music as defined in the interruption-handling methods.
This application uses fast app switching to automatically handle the different application’s life transitions. You just built an advanced audio-playing application with the Audio Toolbox and AV Foundation frameworks. Keep in mind that the audio session category is important for audio-playing applications.
Now let’s continue with our multitasking project to enable background audio playing and handle remote-control events.
22.3. Enabling audio playing in the background
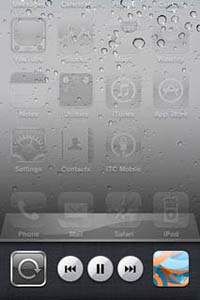
Under iOS 4, when an application is playing music in the background, such as an iPod application or Pandora, the status bar on the iPhone or iPad has an audio-playing indicator (a Play icon) on the right corner indicating that the music is playing, as shown in figure 22.4.
Figure 22.4. Two remote-control UIs on the iPhone when the audio application is playing in the background

In the previous section we created a pretty nice audio-playing application, but the music will stop playing if the user taps the Home button. How can we continue playing the music in the application when it’s in the background? Even more, how can we control the music playing through the remote-control UI just like in the iPod application, as shown in figure 22.4? We’ll explain the details in the next section.
22.3.1. Adding the UIBackgroundModes in Info.plist
The first step to enable the background audio playing is to tell the system that this application will continue playing audio while in the background. How can we do that?
In iOS 4, there’s a new key inside the application’s Info.plist called UIBackground-Modes, and we need to define the value of this key as “App plays audio.”
Inside our MySong project, go to the Resources folder and select MySong’s Info.plist. Add in a new row, Required background modes, and define the item’s value as “App plays audio,” as shown in figure 22.5.
That’s the important step to tell the system that we need to enable the background audio for this application. Let’s give it a try right now.
Figure 22.5. The info.plist with the background audio key enabled

Save the change, and hit Build and Run under Xcode. When the application launches on your iPhone or iPad, tap the Play button to start playing the music. Then tap the Home button to quit the application. Notice that there is an audio-playing icon on the right corner of the status bar, indicating that you have a background audio application running.
Are you listening to the music playing in the background? Congrats! You just learned how to enable the background audio in iOS 4.
Note
At the time of writing, background audio is not supported on the Simulator, so make sure you’re testing your application on a real device, either on an iPhone, iPod Touch, or iPad. That will save you some time trying to figure out what the problem is with the background audio playing.
Now you might want to try the remote-control UI to pause the music, but it won’t work. Why? That’s because the response is not defined yet, so the system doesn’t know what to do when the remote-control events occur. We’ll work through the new changes in the next section.
22.3.2. Handling the remote-control events
You’ve already learned how to enable background audio in the MySong application. Now it’s time to handle the remote-control events.
There are two kinds of remote-control user interfaces in iOS 4. One is on the multitasking UI deck, as shown in figure 22.4 on the left side; when you swipe from left to right under the multitasking UI deck, the remote-control UI will present. A few buttons are available: Fast-forward, Play/Pause, and Rewind. The other remote control UI appears when you lock the screen and double-tap the Home button, it’s the iPod remote control UI that you’ve been familiar with since iOS 3, as shown in figure 22.4 on the right side.
It turns out that you just need to define the remote-control events once, and they’ll work for both remote control user interfaces. Let’s get started.
First, you need to tell the application that you want to begin receiving the remote-control events. Call the method beginReceivingRemoteControlEvents under UIApplication and define the view controller as the first responder when the Remote-control button is tapped. Use the following code snippet:
-(void)viewDidAppear:(BOOL)animated {
     [[UIApplication sharedApplication] beginReceivingRemoteControlEvents];
     [self becomeFirstResponder];
}
- (BOOL)canBecomeFirstResponder {
     return YES;
}
Then you can start to define each event’s action method in the view controller:
-(void)remoteControlReceivedWithEvent:(UIEvent *)event
There are quite a few touch events inside the subtypes, and you want to define the related method inside our application so the system will know how to handle different remote-control events. The UIEvent’s subtypes related to the audio remote-control events are listed in table 22.2.
Table 22.2. UIEvent’s remote-control subtypes and descriptions
|
UIEvent subtype |
Description |
|---|---|
| UIEventSubtypeNone | The event has no subtype. |
| UIEventSubtypeRemoteControlPlay | Playing audio. |
| UIEventSubtypeRemoteControlPause | Pausing audio. |
| UIEventSubtypeRemoteControlStop | Stopping audio from playing. |
| UIEventSubtypeRemoteControlTogglePlayPause | Toggling audio between play and pause. |
| UIEventSubtypeRemoteControlNextTrack | Fast-forward, skipping to the next audio. |
| UIEventSubtypeRemoteControlPreviousTrack | Rewind, skipping to the previous audio. |
| UIEventSubtypeRemoteControlBeginSeekingBackward | Start seeking backward through the audio. |
| UIEventSubtypeRemoteControlEndSeekingBackward | End seeking backward through the audio. |
| UIEventSubtypeRemoteControlBeginSeekingForward | Start seeking forward through the audio. |
| UIEventSubtypeRemoteControlEndSeekingForward | End seeking forward through the audio. |
Now with the new remote-control method you learned, we’ll start coding with the background audio application and handle the remote-control events in the next section.
22.4. Building the background audio application
In our MySong application, three action methods are defined already: when the Play/ Pause button is tapped, when the Fast-forward button is tapped, and when the Rewind button is tapped. Therefore, in the method remoteControlReceivedWithEvent:, we’ll use the three action methods to handle the remote-control events:
- UIEventSubtypeRemoteControlTogglePlayPause:—Toggle between Play and Pause
- UIEventSubtypeRemoteControlNextTrack:—Next track, fast-forward 3 seconds
- UIEventSubtypeRemoteControlPreviousTrack:—Previous track, rewind 3 seconds
With the methods from the last section, define the view controller to be the first responder and begin to receive the remote-control events. Then define the reaction method for each remote-control event in the view controller’s method remote-ControlReceivedWithEvent:, as shown in the following listing.
Listing 22.5. Enabling remote-control and handling remote-control event reactions
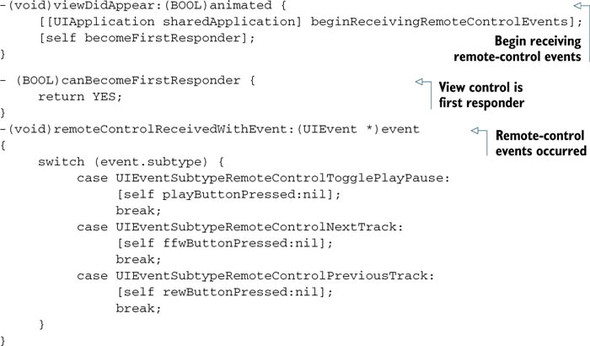
With new methods added in the MySongViewController.m file, the new audio-playing application MySong can now handle the remote-control events.
Save all the changes, build the application under Xcode, and launch the app on the device. When the application launches, first tap the Play button to start the music playing, and then tap the Home button to quit. The music will continue playing in the background.
Double-tap the home screen to enable the multitasking UI dock, and swipe from left to right to launch the remote-control UI on the multitasking dock, as shown in figure 22.6.
Figure 22.6. Remote-control UI of My-Song application on the multitasking dock
Now this application can support the remote-control play/pause feature. When you tap the Fast-forward button, the music timeline will jump 3 seconds forward. Tap the icon, and this app will launch from the background to the foreground.
In addition, when you have an incoming phone call or some other notification from the system, the audio player delegate callback methods will handle the interruption and resume playing music when the interruption is dismissed.
In the remote-control UI dock, the application queues are last-in, first-out. So, if you have the application running in the background and change to another music-playing application, such as the iPod application, the latter one will be on the remote-control dock.
Now enjoy this audio-playing application! You did a great job of building an awesome application that supports background audio.
22.5. Summary
In this last chapter of the book, we dug further into the multitasking topic, built the location-tracking application with background significant location updates, and then focused on the background audio topic. We enhanced the audio-playing application with the audio session from the lower-level Audio Toolbox framework and multitasking API for background audio playing. This application will not only continue running in the background but also react to remote-control events. Even more, it’s capable of handling system interruptions. When you combine background audio with internet streaming data, such as Pandora, there’s unlimited potential.
iOS 4 provides many enhancements to the user’s experience. By default, fast app switching is supported on all applications built on iOS 4. Moreover, multitasking gives developers the power to use local notifications, enable background audio playing, finish a task in the background, and track location updates in the background with lower power consumption. With multitasking knowledge, you can create amazing applications with all the frameworks covered throughout the book.
As always, we encourage you to explore more with the iOS SDK.
So long, my friend! Thanks for staying with us. You started with a basic application and mastered the solid foundation and advanced features of iOS 4. You’re ready to build the next best-selling application in the App Store.
We wish you the best of luck on the application development journey!