Chapter 18. The Map Kit framework
With the Map Kit framework, you can add fully functional and customizable google maps to your application. This framework provides you with a simple view that you can add anywhere you want a map to appear.
In addition to adding the map, you can add custom annotations such as pins to show more information about a specific location. In this chapter we will look at how to add a map to an application first, then use the other functions available in Map Kit to find out the address and put the annotations on the map. Let’s get started!
18.1. Adding a map view to an application
Adding a map view to an application is similar to adding any other view. You can either do it through Interface Builder or programmatically. The choice is up to you, depending on how you like to work with UI elements. We’ll show you both methods.
The view that displays a map is called MKMapView. This class contains quite a bit of functionality including how to display the map, annotations, and user location. We’ll first discuss how to add an MKMapView through Interface Builder. After you add the map to the view, you’ll connect it to an IBOutlet and set its delegate class.
18.1.1. Adding the map using Interface Builder
In this section we will build a View-based application containing the map view and name it SimpleMap. Before you start coding the MKMapView, you must first import MapKit.framework to your project. It provides all the libraries you need to work with maps.
To add a map to your view, your must first create an MKMapView IBOutlet in the class that will be using the map. The following listing shows how to include the MapKit to the header file in the view controller and define the outlet for the map view.
Listing 18.1. View Controller header file with map view
#import <UIKit/UIKit.h>
#import <MapKit/MapKit.h>

@interface SimpleMapViewController : UIViewController<MKMapViewDelegate> {
    IBOutlet MKMapView * theMap;
}

@property (nonatomic, retain) IBOutlet MKMapView * theMap;
@end
The first thing we want to point out is that you must import the MapKit.h header file. It’s included in MapKit.framework and is needed for all Map Kit interaction. Second, your class implements the MKMapViewDelegate interface. It will allow this class to become the delegate of the MKMapView and receive messages from it. We’ll discuss the delegate methods in detail later in this section. In addition to making a property, you should also synthesize the map property in the.m file.
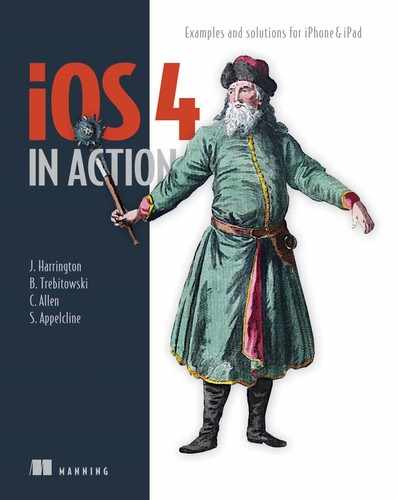
Now that the IBOutlet has been declared, you need to add the MKMapView to the view in the nib file. To do this, open the nib file associated with the class that contains your IBOutlet. Select MKMapView from the Object Library, and drag it on to your view. Figure 18.1 shows what this object should look like.
Figure 18.1. Adding an MKMapView to your view
When you drag the map onto your view, you can move and resize it however you like. Now that it’s been added, you must connect it to the IBOutlet. To do this, click the file’s owner object and open the Connection Inspector. Drag from the map outlet to the map view to make the connection.
The last thing you need to do is set the delegate of the MKMapView. To do this, right-click the map, and drag to the file’s owner object. It should pop up a bubble that reads delegate. Click the word delegate to make the connection. Figure 18.2 shows what the Connection Inspector should look like after you’ve completed all these steps.
Figure 18.2. Connection Inspector for the MKMapView connections

As you can see, adding an MKMapView is very similar to adding UILabels, UITextFields, and other view elements. Next, we’ll show you how to add one programmatically.
18.1.2. Adding the map view programmatically
As noted before, whether you add the map visually or with code is up to you. It depends completely on your preferences and organizational technique. The following example demonstrates how to add an MKMapView to your view controller’s view using code:
- (void)viewDidLoad {
    [super viewDidLoad];

    MKMapView * map = [[MKMapView alloc] initWithFrame:
    CGRectMake(0, 0, 320, 480)];
    map.delegate  = self;
    [self.view addSubview:map];
}
This code is quite short. You create the map using a frame, set its delegate to your class, and add it to your class’s view. As with any other view, modifying the frame passed to the map will alter its size and position.
18.1.3. Controlling the map
By default, a map gives the user some control. Without any additional code, they can scroll all over the world by scrolling the map. The map also lets users zoom in and out by using the pinch and tap gestures.
To navigate a map programmatically, you must specify a region. Doing this lets you move the map to a specified location. You also can set the zoom level.
Let’s examine the region properties and methods for navigating a map. Table 18.1 discusses them and their uses.
Table 18.1. MKMapView region properties and methods for navigating the map
Continue with our app SimpleMap. In this section, we want to add a button titled Apple inside the view controller’s nib file. When the user taps on the button, it will move the map’s center from the current location to Apple’s headquarters in Cupertino. The method in listing 18.2 shows how to create an MKCoordinateRegion and move the map to display it on the screen. Connect the bar button’s action to the method - (IBAction) apple:(id) sender under the interface builder.
Listing 18.2. Controlling the zoom in and center on the map view
- (IBAction) apple:(id) sender {
    CLLocationCoordinate2D coords;
    coords.latitude  = 37.33188;
    coords.longitude = -122.029497;
     MKCoordinateSpan span = MKCoordinateSpanMake(0.002389, 0.005681);

     MKCoordinateRegion region = MKCoordinateRegionMake(coords, span);
    [theMap setRegion:region animated:YES];
}
The first thing you see here is the creation of a CLLocationCoordinate2D. This is a struct that holds two doubles for latitude and longitude. Next, you assign them to the Apple coordinates using the WGS 84 reference frame.
Following the coordinates, you create a span using the MKCoordinateSpanMake method. An MKCoordinateSpan is a struct made of two doubles that represent a delta for latitude and longitude. The span represents the amount of area to view and is used when setting the zoom level. A larger number tells the map to show a larger view area, resulting in the map zooming out. Similarly, a smaller number tells the map to show less area and causes it to zoom in.
After the coordinates and span have been initialized, you can create a region using the MKCoordinateRegionMake method. Finally, you set the region of the map to your newly created one and animate the transition.
In addition to controlling the map’s location, you can control how the user can interact with it. Table 18.2 details these properties.
Table 18.2. MKMapView user interaction properties
|
Task |
Description |
|---|---|
| mapType | The type of map to be displayed. The possible options for this variable are MKMapTypeStandard, MKMapTypeSatellite, and MKMapTypeHybrid. Updating this property automatically causes the map to change its view. |
| zoomEnabled | Determines if the user is able to zoom in. If set to NO, the map is fixed to a specific span. |
| scrollEnabled | When set to YES, the user is able to scroll around the map. If set to NO, the map becomes fixed on one location. |
As we’ve mentioned, the mapType property allows you to display the map in three different ways. Most likely, you’ll want to make this configurable by the user, because preferences vary about how the map should display. In the SimpleMap’s view controller, let’s add in a segmented controller to the navigation bar as shown in Figure 18.3. There are three choices for map type. We will use this segmented controller to allow user change the map type. Now let’s add a new function to the view controller in charge of the segmented controller’s action - (IBAction) changeMapType:(id)sender; Make sure it’s connected to the segmented controller under the nib file. Then define the function inside the view controller’s implementation file as below:
Figure 18.3. Layout of MKMapView with segmented controller set up with appropriate options in Interface Builder

- (IBAction) changeMapType:(id)sender {
         UISegmentedControl *control = (UISegmentedControl *)sender;

         [self.theMap setMapType:control.selectedSegmentIndex];
}
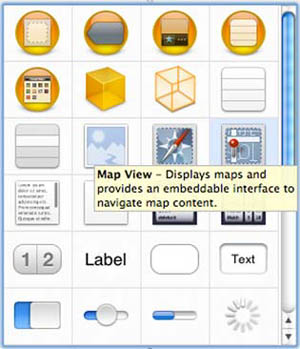
Build and launch the app after all the changes you will see the difference between the map types as shown in figure 18.4. As you can see, you have quite a bit of control over how the map looks. The standard map view looks much like a road map that you use for navigation. This is often the most useful of the map types.
Figure 18.4. mapTypes: (from left to right) MKMapTypeStandard, MKMapTypeSatellite, MKMapTypeHybrid
The other two are similar. The only difference between them is the road names that appear in the hybrid view in addition to the satellite photos.
Now that you have a grasp of the basic map controls, we’ll discuss something a little more interesting: reverse geocoding.
18.2. Reverse geocoding
Reverse geocoding is the process of finding an address, an area, or other information about a given location based on its latitude and longitude. Apple has provided a simple interface for retrieving this information.
The class used for reverse geocoding is called MKReverseGeocoder. It’s a powerful class with a simple interface. In addition to its init method, it only has two other methods and two properties. Table 18.3 lists these and explains their use.
Table 18.3. MKReverseGeocoder class methods and properties
|
Task |
Type |
Description |
|---|---|---|
| delegate | Property | Specifies the delegate of the reverse geocoder. The delegate receives messages from the geocoder, including errors and location information. |
| coordinate | Property | The coordinate for which the reverse geocoder is retrieving data. |
| start: | Method | Invokes the reverse geocoding. When this method completes, it calls one of the two delegate methods for this class. |
| querying | Property | A Boolean variable to indicate whether the reverse geocoder is currently retrieving data. |
| cancel: | Method | Cancels the request for data. |
To create a new MKReverseGeocoder object, you must call its initWithCoordinate method. This method sets the geocoder’s coordinate property to the incoming value and prepares it to receive the data. The following code shows how to initialize an MKReverseGeocoder given the center of a map:
- (IBAction) getAddress:(id) sender {
    MKReverseGeocoder * geoCoder = [[MKReverseGeocoder alloc]
         initWithCoordinate:theMap.centerCoordinate];
    [geoCoder setDelegate:self];
    [geoCoder start];
}
You need to make sure you set the geocoder’s delegate property to something that implements the MKReverseGeocoderDelegate protocol. Otherwise, you won’t see the data that gets received.
Only two methods must be implemented as part of the MKReverseGeocoder-Delegate protocol: reverseGeocoder:didFindPlacemark: and reverseGeocoder: didFailWithError:.
The didFailWithError method is similar to any other error delegate method. It’s passed a reference to the geocoder as well as an error object containing information about the failure.
There are two cases for a failure. The first occurs when the device isn’t connected to the internet. Because information is retrieved from Google’s web servers, a device must be connected to the internet to be able to access it. The second case for failure occurs when no data is available for the given coordinate. This may occur when the user requests information about a remote location or the ocean.
Upon a successful retrieval of data, the didFindPlacemark method is called with a reference to the geocoder and an MKPlacemark object. An MKPlacemark is a simple object that contains specific information about a given location. This information is stored inside a property called addressDictionary. In addition to this dictionary, all the values are parsed out and put into their own properties of the class. Here’s some simple code to output the placemark data in the form of an NSDictionary:
-(void)reverseGeocoder:(MKReverseGeocoder *)geocoder
    didFindPlacemark:(MKPlacemark *)placemark {
    NSLog(@"%@",placemark.addressDictionary);
}
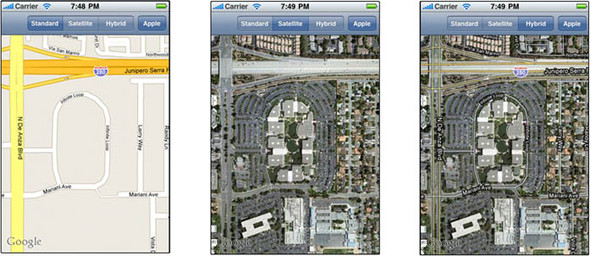
Figure 18.5 shows the output of the method.
Figure 18.5. Reverse geocoder output
As you can see, the dictionary contains quite a bit of information about a location in Glendale, Arizona. In addition to this dictionary, all these keys are made available through properties of an MKPlacemark. For example, if you just want to output the country, you can call placemark.country, and it will return the string “US”.
Keep in mind that Google limits the number of reverse geocode lookups. This is often believed to be by IP address. Make sure you save the retrieved data in order to cut down on duplicated calls.
Now that you’ve seen how to retrieve data for a specific location, we’ll show you how to drop pins on the map to display that data.
18.3. Annotating the map
As you may have seen with applications such as Maps, developers can annotate an MKMapView. By dropping “pins” on the map, you can display additional information to the user about a given location. This may be anything from geographic details to the spot where they parked their car.
Apple gives you considerable control when creating annotations for the map. You can use the built-in pins or create your own. We’ll explore both methods and show you how to annotate a map using the MKAnnotationView class.
At first glance, the design pattern used when annotating a map seems strange. But when you start writing code for it, you’ll quickly understand why it’s needed. You add an annotation to the map by calling the addAnnotation method of MKMapView. This adds the annotation to a queue to be displayed on the map. When the map needs to display the annotation, it calls the viewForAnnotation method in the delegate class. This is where you tell the map how to display your annotation.
Apple recommends that you add all your annotations at once, even if they won’t be seen. They aren’t added to the map until they’re needed in the view. This saves memory, because the map reuses each of the annotation UI elements.
18.3.1. Adding basic map annotations
If you only plan to display simple pins in your application, the basic map annotations are the way to go. They’re simple to use, and you can quickly integrate them with any application. The example code in this section uses the code you created in the reverse geocoding section as a base.
The first thing you must do when annotating a map is make the calling class implement the MKMapViewDelegate protocol. To add annotations to the map, you need to implement only one of the delegate methods. The following listing shows how you can use the reverse geocoder code to drop a pin at the center of the map.
Listing 18.3. Dropping a pin on the center of the map
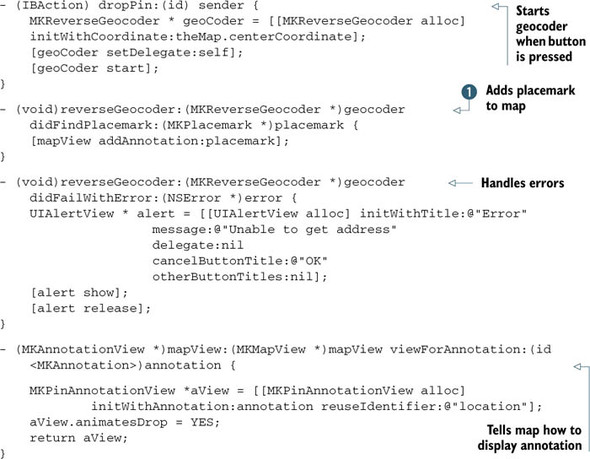
As you can see, you add little code to the geocoder example to annotate the map. In the first new code, MKPlaceMark conforms to the MKAnnotation protocol and can be used to add an annotation to the map ![]() . In this case, it uses the address as the title of the annotation. When the geocoder finds a location, it adds it to the
map using the addAnnotation method of your MKMapView object.
. In this case, it uses the address as the title of the annotation. When the geocoder finds a location, it adds it to the
map using the addAnnotation method of your MKMapView object.
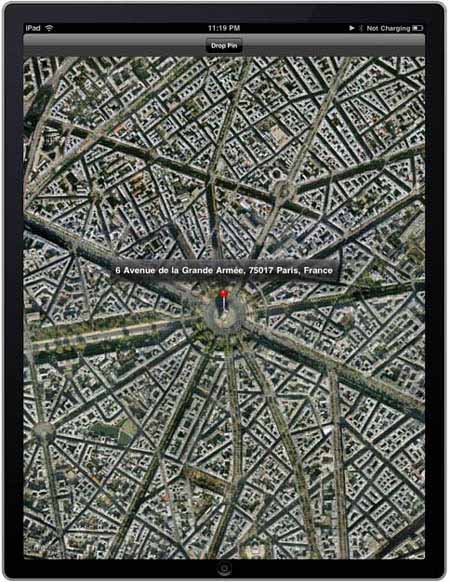
Now that the annotation has been added, the map queries your delegate to find out how to display it. In this case, you create a new object of type MKPinAnnotation-View. This is a simple view, similar to the one used in the Maps application that comes on the iPhone. When you tap the pin, it displays the address of the location in a popup. Figure 18.6 shows what the annotated map should look like after dropping a pin.
Figure 18.6. Annotated map
All the data for the pin, including how the pin looks, is fully customizable. We’ll discuss how to do this customization in the next section.
18.3.2. Adding custom map annotations
Adding a custom annotation isn’t much different than creating custom UITableView-Cells. You create a view that extends the parent and return that in the viewFor-Annotation method. In this case, the parent is MKAnnotationView.
Before we dive into the code for creating your own view, let’s discuss some of the properties available for use in customization. Table 18.4 details some of the important MKAnnotationView properties associated with customization.
Table 18.4. MKAnnotationView properties
|
Property |
Description |
|---|---|
| enabled | A Boolean value that determines whether an annotation is enabled. If this is set to NO, the annotation won’t respond to various events such as touching. |
| image | The graphic representing the annotation. The MKPinAnnotationView is a view with the graphic set to an image of a pin. This is probably the most useful property in customization. |
| highlighted | You should never manually set this property. It’s set by the map view and is accessed by calling isHighlighted. It’s set to YES when the user touches the annotation. |
| centerOffset | Tells the annotation where to center. By default, it centers on the point on the map. This property is useful when you want to change where the annotation is with respect to the map point. |
| calloutOffset | Determines the offset of the callout when the user taps the annotation. By default, this is (0,0) and is placed on the top center point of the annotation’s frame. |
| canShowCallout | Determines whether the annotation shows the callout when the user taps it. |
| rightCalloutAccessoryView | View on the right side of the callout. Usually used to display additional information or link to another place in the app. This is usually a UIButton with type UIButtonTypeDetailDisclosure. |
| leftCalloutAccessoryView | View on the left side of the callout. Usually used to display additional information or link to another place in the app. |
As you can see, Apple gives you considerable control over annotations while preserving their basic use. Note that MKPinAnnotationView is an MKAnnotationView with the image property set to an image of a pin.
To create your own MKAnnotationView, you’ll also need to create a class that implements the MKAnnotation protocol. The MKAnnotation object will be used to populate the information for the MKAnnotationView.
In the following example, you’ll plot custom views for the locations of Google and Apple on an MKMapView. After the map has been added to your view, you must create the MKAnnotation object. The next listing shows the code for the header file.
Listing 18.4. MyAnnotation.h
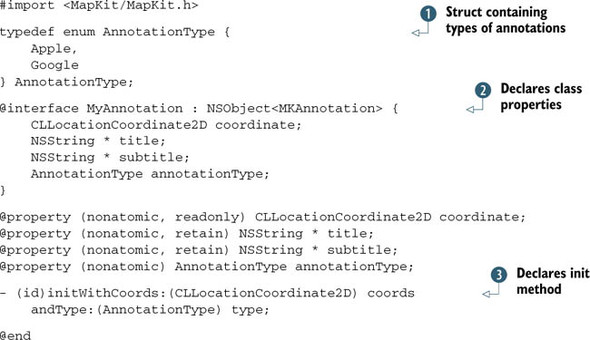
Because your map will have different annotations, you must come up with a way to specify which image to display. One solution
is to give your annotations a type. In this case, the possible types are Google and Apple. You define an enum that differentiates the annotation types ![]() .
.
The most important code for this class implements the MKAnnotation protocol ![]() . To fulfill the requirements of being an MKAnnotation, your class must have a read-only property named coordinate. This is the coordinate location of the annotation on the map and will be used to determine where to display it.
. To fulfill the requirements of being an MKAnnotation, your class must have a read-only property named coordinate. This is the coordinate location of the annotation on the map and will be used to determine where to display it.
Because the coordinate property is defined to be read-only, you need a way to set it. The best way to do this is to set it in the class init method. The code defines the init method that you use to build your objects ![]() . It takes a coordinate and an annotation type.
. It takes a coordinate and an annotation type.
In addition to the coordinate property, you can optionally define title and subtitle properties for your MKAnnotation. These are displayed in the callout when the user taps your annotation. The implementation of this class is fairly simple and is shown in the following listing.
Listing 18.5. MKAnnotation.m
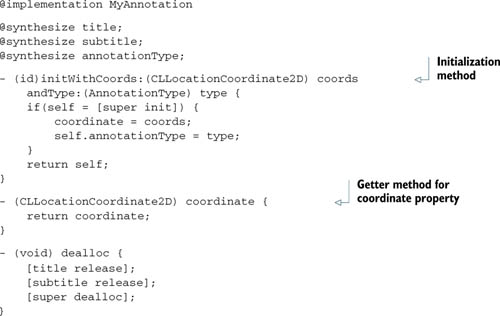
Notice that you don’t synthesize the coordinate property. This is because it’s read-only and is set only when the object is initialized. As noted earlier, this is the only required method in this class.
Now that you’ve created your custom MKAnnotation object, you need to create the view that will use it. The view must be a subclass of MKAnnotationView and doesn’t have any required methods or properties. Note that it’s a standard view, so you can add any UI components to it that you want. The header file for your view looks like this:
#import <MapKit/MapKit.h>
#import "MyAnnotation.h"
@interface MyAnnotationView : MKAnnotationView{
}
- (id)initWithAnnotation:(id )annotation reuseIdentifier:
    (NSString *)reuseIdentifier;
@end
Notice that you import MyAnnotation.h. You’ll need this in your init method to determine the type of annotation to be displayed. Other than that, there should be nothing new here. The next listing shows this class’s implementation.
Listing 18.6. MyAnnotationView.m
#import "MyAnnotationView.h"
@implementation MyAnnotationView

- (id)initWithAnnotation:(id )annotation reuseIdentifier:
    (NSString *)reuseIdentifier {
    MyAnnotation * myAnnotation = (MyAnnotation*)annotation;

    if([myAnnotation annotationType] == Apple) {
         self = [super initWithAnnotation:myAnnotation
                    reuseIdentifier:reuseIdentifier];
            self.image = [UIImage imageNamed:@"sign-apple.png"];
    } else if([myAnnotation annotationType] == Google) {
         self = [super initWithAnnotation:myAnnotation
                    reuseIdentifier:reuseIdentifier];
        self.image = [UIImage imageNamed:@"sign-google.png"];
    }

    return self;
}
@end
First, you cast the incoming annotation to the type you declared earlier. This lets you access the annotationType property. Based on this type, you set the image property of your MKAnnotationView.
You may be tempted to set the frame of your view here. This isn’t needed because the frame is automatically changed based on the size of the image.
After these classes have been created, integrating them into your map is simple. You must first add the annotations to the map, similarly to the next listing.
Listing 18.7. Adding custom annotations to the map
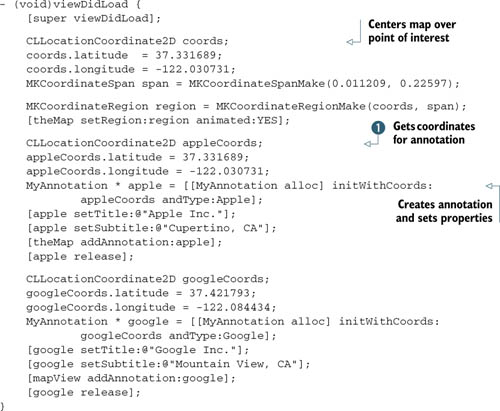
As you can see, adding custom annotations to the map isn’t much different than adding a standard annotation. You set up the
coordinates to denote the location of your annotation ![]() , and then you initialize the MKAnnotation with these coordinates along with the type of annotation to be displayed.
, and then you initialize the MKAnnotation with these coordinates along with the type of annotation to be displayed.
Next, you set the title and subtitle. As previously noted, these properties are displayed on the annotation’s callout when the user taps it. Finally, you add the annotation to the map by calling the addAnnotation method of the MKMapView.
Now that the annotations have been added to the map, the last thing you must do is implement the viewForAnnotation delegate method of the MKMapViewDelegate:
- (MKAnnotationView *)mapView:(MKMapView *)mapView viewForAnnotation:(id
    <MKAnnotation>)annotation {
    MyAnnotationView *aView = [[MyAnnotationView alloc]
             initWithAnnotation:annotation reuseIdentifier:@"location"];
    [aView setEnabled:YES];
    [aView setCanShowCallout:YES];
    return aView;
}
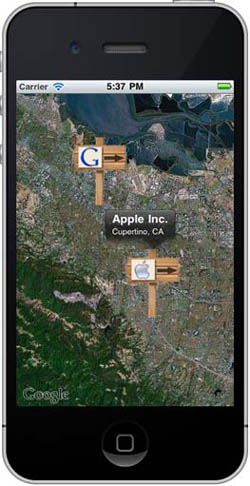
This code is similar to the code you saw earlier for this method. The only difference is, you create your custom annotation view rather than the built-in pin annotation view. This lets you display custom annotations when the map asks for them. Figure 18.7 shows what the map looks like with custom annotations.
Figure 18.7. MKMapView with custom annotations
18.4. Summary
You’ve now seen how easy it is to integrate fully functional maps into any application. The Map Kit framework is powerful but simple to use.
To add a map to any application, drag and drop it onto your view in Interface Builder and connect it using an IBOutlet. This gives you complete control over the look, feel, and behavior of the map.
If you require additional data to be added to the map, the Map Kit framework provides a great mechanism for adding annotations. These can either be the built-in pins or completely customized to suit your application’s needs.
In the next chapter, we’ll discuss the Store Kit framework and how to integrate it with your applications. It may seem complex to use, but it can be a great way to make a profit in the App Store. You’ll use it to support in-app purchases.