
Chapter 15. Securing information with Azure Key Vault
Almost every week, there’s news of a cybersecurity incident with a major company. In the same way you’ve used various forms of automation to grow or replicate your applications and data, attackers automate their own actions. It’s unlikely that a single person will manually try to compromise the security of your systems. This concept makes it difficult to defend your systems 24 hours a day, 7 days a week, 365 days a year (okay, or 366 days!).
Chapter 14 discussed how to encrypt your data and VMs. This is a great first step, and we briefly looked at how to create and use encryption keys stored with the Azure Key Vault service. Secure data, such as keys, secrets, and certificates, is best stored in a digital vault like a key vault, which can centrally manage, issue, and audit the use of your critical credentials and data. As your applications and services need access to different resources, they can automatically request, retrieve, and use these keys, secrets, and credentials. In this chapter, you learn why and how to create a secure key vault, control access, and then store and retrieve secrets and certificates.
15.1. Securing information in the cloud
As applications become more complex and the risk of cyberattacks grows, security becomes a critical part of how you design and run your services. Especially in the cloud and with internet-facing applications, making sure you minimize the risk of unauthorized data access should be one of the main design areas you focus on. There’s no point having the greatest pizza store in the world if customers don’t trust you with their payment details or personal information.
A common way to provide security for applications and services is through digital keys, secrets, and certificates, as shown in figure 15.1. Rather than using a username and password that must be manually entered time and again—or, maybe worse, written in an unencrypted configuration file—you use a digital vault to store these secure credentials and data. When an application or service requires access, they request the specific key or secret they need, and an audit trail is also created to trace any possible security misuse or breach.
Figure 15.1. Azure Key Vault provides a secure way to store digital information such as certificates, keys, and secrets. These secure items can then be accessed directly by your applications and services, or Azure resources such as VMs. With minimal human interaction, you can centrally distribute secure credentials and certificates across your application environments.

When designed and implemented correctly, these digital vaults are almost fully automated and secure. Services can request a new digital certificate, be issued one that’s then securely stored in the vault, and use it to authorize themselves against other application components. Servers can configure software by retrieving secrets such as passwords from the digital vault and then installing application components, without the credentials being stored in a text-based configuration file. An application administrator can centrally manage all the secrets, keys, and certificates for a service, and update them regularly as needed.
Azure Key Vault provides all these digital security features and allows you to tightly control which users and resources can access the secure data. Key vaults can be securely replicated for redundancy and improved application performance, and integrate with common Azure resources such as VMs, web apps, and Azure Storage accounts.
15.1.1. Software vaults and hardware security modules
Before we jump into a hands-on example of how to create and use a key vault, it’s important to understand the way your secure information is stored in a vault. As shown in figure 15.2, all the keys, secrets, and certificates in a key vault are stored in a hardware security module (HSM). These devices aren’t unique in Azure—they’re industry-wide hardware devices that provide a high level of security for any data stored on them.
Figure 15.2. Azure Key Vault is a logical resource in Azure, but any certificates, secrets, and keys are stored in a hardware security module. For development or test scenarios, a software-protected vault can be used, which then performs any cryptograph operations—such as encrypting or decrypting data—in software, and not in hardware on the HSM. For production, you should use an HSM-protected vault, where all the processing is done on hardware.

There are currently two different types of key vault you can use: software-protected and HSM-protected. It may be confusing, which is why I want to clear up the difference before we get started:
- A software-protected vault stores keys, secrets, and certificates in an HSM, but any cryptographic operations that are required to encrypt or decrypt its contents are performed by the Azure platform in software. Software-protected vaults are great for development and test scenarios, although you may decide that production workloads require a slightly more secure way to perform the cryptographic operations.
- An HSM-protected vault again stores keys, secrets, and certificates in an HSM, but cryptographic operations that are required to encrypt or decrypt its contents are performed directly on the HSM. You can also generate your own secure keys in an on-premises HSM and then import them to Azure. There are some additional tools and processes to follow, but this way you ensure that you completely control the keys and that they never leave the HSM boundary. To maximize the security and integrity of your data, hardware-protected vaults are the preferred approach for production workloads.
Regardless of which type of vault you use, it’s important to remember that all of your data is stored securely on a Federal Information Processing Standard (FIPS) 140–2 Level 2 validated (at a minimum) HSM, and that Microsoft can’t access or retrieve your keys. There’s an additional cost for HSM-protected vaults, so as with anything in Azure and cloud computing, balance the cost versus the risk of your data being compromised.
15.1.2. Creating a key vault and secret
A digital vault sounds great, but you may be a little unsure how to make use of the power that Azure Key Vault provides. Let’s build an example of a basic server that runs a database such as MySQL Server, as shown in figure 15.3.
Figure 15.3. In the next few exercises, you’ll build an example of a secret stored in a key vault that can be used as the database password for a MySQL Server install. A VM is created that has permissions to request the secret from the key vault. The retrieved secret is then used to automatically enter a secure credential during the application install process.

At the start of this book, one of the first exercises was to create a VM and then install the LAMP web server stack. You were likely prompted for a MySQL Server password, or a blank password was automatically used. Now that you know all about key vaults, you can automatically retrieve a password from the vault and dynamically use it to install and configure the server.
To create a key vault and add a secret, complete the following steps.
1. Open the Azure portal, and then launch the Cloud Shell. Create a resource group, such as azuremolchapter15:
az group create --name azuremolchapter15 --location eastus
2. Create a key vault, such as azuremol, and enable it for deployment so that you can use the vault to inject keys and certificates into a VM:
az keyvault create
--resource-group azuremolchapter15
--name azuremol
--enable-soft-delete
--enabled-for-deploymentBy default, your Azure user account is assigned full permissions to the key vault. For these exercises, this is fine, although as a security best practice you should consider limiting who can access your key vault. You can add the --no-self-perms parameter to skip permission assignment to your account.
3. Create a secret, such as databasepassword, and assign a password value, such as SecureP@ssw0rd (yep, really secure, right?) This secret can be used as the credentials for a database server, which you deploy in the following exercises:
az keyvault secret set
--name databasepassword
--vault-name azuremol
--description "Database password"
--value "SecureP@ssw0rd"
4. You have full permissions to the key vault, so you can view the contents of your secret:
az keyvault secret show
--name databasepassword
--vault-name azuremol
From a management perspective, you can also perform common actions such as backing up and restoring, downloading, updating, and deleting items stored in a key vault. One additional property that you set when the key vault was created is the option to --enable-soft-delete. If your applications and services can’t retrieve the secrets they need from the key vault, you could have a pretty large application outage to deal with! A key vault can store metadata for secrets for up to 90 days after they’re truly deleted, which allows you to recover data that’s incorrectly or maliciously deleted.
5. Delete the key you just created to simulate a mistake, or possibly someone with malicious intent:
az keyvault secret delete
--name databasepassword
--vault-name azuremol
6. Recover the secret so that you can continue to use the database password with your application and services:
az keyvault secret recover
--name databasepassword
--vault-name azuremol
If you truly want to remove a secret, there’s also the option to purge a deleted secret. This option permanently removes the secret without waiting for the default 90-day recovery period to elapse.
Feel free to use az keyvault secret show again to view the information on your secret and confirm that the password you stored is there. Now let’s move on to see how a VM can access a key vault and use the secret to install the MySQL Server.
15.2. Managed service identities
The ability to use Azure Key Vault to store secrets or keys is great, but how do you access these secrets? The Azure CLI or Azure PowerShell can access the information stored in a key vault, but it’s often more convenient to allow your VMs or applications to directly retrieve secrets or keys when they need them. One way to do this is with a managed service identity (MSI), as shown in figure 15.4.
Figure 15.4. When you create a managed service identity for a VM, a service principal is created in Azure Active Directory. This service principal is a special type of account that can be used for resources to authenticate themselves. This VM then uses the Instance Metadata Service endpoint to makes requests for access to resources. The endpoint connects to AAD to request access tokens when the VM needs to request data from other services. When an access token is returned, it can be used to request access to Azure resources, such as a key vault.

An MSI (not to be confused with the .msi Windows Installer package to install applications) lets you create a special kind of account, or identity, that identifies a VM resource. If you’ve used a directory service such as Active Directory, a computer account is often used to identify and grant access to various network resources that a computer needs. You don’t create and use regular user accounts for this type of authentication, which improves security: you can grant a restrictive set of permissions just to a computer rather than also needing to worry about user permissions and shared folder access, for example.
An MSI is like a computer account, but it’s stored in Azure Active Directory (AAD). The identity, called a service principal, is unique to each VM and can be used to assign permissions to other Azure resources, such as an Azure Storage account or key vault. The VM has permissions to access those resources, so you can script tasks (such as with Azure Automation, which we explore in chapter 18) that require no user intervention or prompts for usernames and passwords. The VMs authenticate themselves, and the Azure platform authorizes access to their assigned resources.
Let’s see how you can use an MSI to request the databasepassword secret from a key vault. Once the VM can retrieve the secret, the password can be used to automatically install a MySQL database server. With a key vault and MSIs, you can run a couple of commands to retrieve the secret from the key vault, run the MySQL Server installer, and automatically provide the secure password.
A VM that’s enabled with an MSI uses a REST endpoint through the Instance Metadata Service (IMDS) to request an access token from AAD that it can then use to request data from Azure Key Vault. But what is the Instance Metadata Service?
IMDS is a REST endpoint that’s only accessible internally to VMs. The endpoint is available at the non-routable address of 169.254.169.254. A VM can make a request to the IMDS endpoint to retrieve information about itself, such as Azure region or resource group name. This ability allows the VM to understand how and where in the Azure platform it’s running. The IMDS endpoint can be accessed from many different languages, including Python, C#, Go, Java, and PowerShell.
For maintenance events, the IMDS endpoint can also be queried so that the VM becomes aware of a pending update or reboot event. Any pre-update or reboot tasks that are required can then be carried out. Because IMDS is a REST endpoint on a non-routable IP address, there’s no agent or extension for the VM to install, and no network security or routing concerns.
For MSI purposes, the IMDS endpoint is used to relay the request for an access token to AAD. This approach provides a secure way for VMs to request access without needing to talk to AAD directly.
1. Create an Ubuntu VM. Provide your resource group, such as azuremolchapter15, and a name for the VM, such as molvm. A user account named azuremol is created, and the SSH keys that you’ve used in previous chapters are added to the VM:
az vm create
--resource-group azuremolchapter15
--name molvm
--image ubuntults
--admin-username azuremol
--generate-ssh-keys
2. As a security best practice, you shouldn’t allow accounts to access all the resources across your entire Azure subscription. Especially for MSIs, only grant the minimum amount of permissions needed. For this exercise, scope access to only your resource group, such as azuremolchapter15. You set the scope by querying for the ID of the resource group with --query id. This ID is then assigned to a variable named scope:
scope=$(az group show --resource-group azuremolchapter15
--query id --output tsv)
3. Create an MSI for the VM with the reader role so that it can only read resources, not make changes to them. Scope the identity to the resource group. The variable you created in the previous step that contains the resource group ID is provided:
az vm identity assign
--resource-group azuremolchapter15
--name molvm
--role reader
--scope $scopeThe output is similar to the following. Make a note of your own systemAssignedIdentity, because it’s used to identify your VM and set permissions in the next step:
{
"role": "reader",
"scope":"/subscriptions/8fa5cd83-7fbb-431a-af16-
"systemAssignedIdentity": "f5994eeb-4be3-4cf5-83d2-552c6ccb0bed",
}
4. Get information on the AAD service principal for your managed identity. Query on the objectId, and enter you own systemAssignedIdentity that was shown in the output from the previous step:
az ad sp list
--query "[?contains(objectId, 'f5994eeb-4be3-4cf5-83d2-The output is similar to the following condensed example. Make a note of the first servicePrincipalName. This value is used to assign permissions on Azure resources such as your key vault and is needed in the next step:
[
"887e9665-3c7d-4142-b9a3-c3b3346cd2e2",
]
5. Set the policy on the key vault such that the service principal for your VM can read secrets. Enter your servicePrincipalName from the previous step:
az keyvault set-policy
--name azuremol
--secret-permissions get
--spn 887e9665-3c7d-4142-b9a3-c3b3346cd2e2
One point to make here is that when the MSI was created and scoped to the resource group, that didn’t mean the VM could then do anything it wanted. First, the only role created for the identity was read permissions to resources. But you still had to assign permissions to the key vault itself. These layers of security and permissions give you fine-grained control over the exact resources each identity can access.
Now that you have access to a key vault, you probably want to know how to retrieve the secret, right?
15.2.1. Obtaining a secret from within a VM with managed service identity
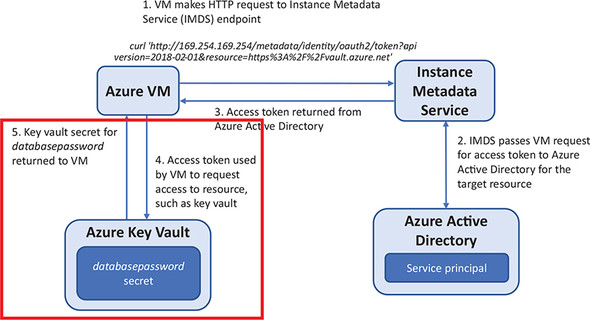
You’ve stored a secret in a key vault for a database password, and you have a VM with an MSI that provides access to read that secret from the key vault. Now what? How do you retrieve the secret and use it? Figure 15.5 shows how a VM uses the IMDS to request access to a resource, such as a key vault. Let’s go through the steps to see how the VM retrieves the secret.
To retrieve and use a secret on a VM with an MSI, complete the following steps.
1. Get the public IP address of the VM you created in the previous exercise, such as molvm:
az vm show
--resource-group azuremolchapter15
--name molvm
--show-details
--query [publicIps]
--output tsv
2. SSH to your VM, such as ssh azuremol@publicIps.
Figure 15.5. The VM uses the IMDS to request access to a key vault. The endpoint communicates with AAD to request an access token. The access token is returned to the VM, which is then used to request access from the key vault. If access is granted by the key vault, the secret for databasepassword is returned to the VM.

3. To access a key vault, you need an access token. This access token is requested from the IMDS. It’s a simple HTTP request, and on a Linux VM you can use the curl program to make the request. The IMDS passes your request on to AAD:
curl 'http://169.254.169.254/metadata/identity/oauth2/token?
4. The output is a little hard to read, because it looks like a jumble of text. It’s in the JSON Web Token (JWT) format. To process the JSON output and make things more human-readable, install a JSON parser called jq:
5. Make your curl request again, but this time view the output with jq:
curl 'http://169.254.169.254/metadata/identity/oauth2/token?
These first few steps are for you to be able to see how the requests are made and what the output looks like, as shown in figure 15.6. If you still log in to the VM and manually request an access token, what’s the point of using an MSI? You could just provide your own credentials. In production use, you’d likely use a script that runs on the VM to automatically make the request for an access token and then retrieve the secret from the key vault. Let’s keep going and see how you automate this process and retrieve the secret.
Figure 15.6. The curl request covers the first three steps on this diagram. The curl request is made, the endpoint communicates with AAD, and an access token is issued.

6. To make things easier—and if you were going to do all this in a script—you can use jq to process the curl response, extract only the access token, and set it as a variable named access_token:
access_token=$(curl
7. As a manual step to help you understand what this looks like, view the access_token variable:
8. Now the fun part! Use the access token to request your secret from the key vault. Let’s first do this manually so you understand what happens. Retrieve the secret with another curl request, and format the output with jq:
curl https://azuremol.vault.azure.net/secrets/databasepassword?
The output is similar to the following, which shows the value of the password stored in the secret, along with some additional metadata about the secret that you don’t need to worry about:
{
"value": "SecureP@ssw0rd!",
"contentType": "Database password",
"id":
}This curl request is the second part of the workflow, as shown in figure 15.7.
Figure 15.7. This second curl request covers the last two steps in the diagram. The access token is used to request the secret from the key vault. The JSON response is returned, which includes the value of the secret.
9. In the same way that you used a variable to store the access token, in a script you can assign the value of the secret to a variable as well. This time, use jq to process the response, extract only the value secret, and set it as a variable named database_password:
database_password=$(curl
10. Again, as a manual step to help you understand the process, view the contents of the database_password variable:
Hopefully, you’re following along! If you write an application in Python, ASP.NET, or Node.js, for example, the process will be similar as you make a request for the access token and then use the token to request a secret from a key vault. There are likely other libraries you could use you in your code rather than the jq utility from the command line.
As a quick recap, all these steps can be condensed down into two lines, as shown in the following listing.
Listing 15.1. Requesting an access token and then a secret from a key vault
access_token=$(curl
Now what? The MSI for your VM can retrieve a secret from a key vault; let’s see how you can use that to install and configure MySQL Server.
In Ubuntu, you can set configuration selections for package installers, such as MySQL Server. These configuration selections let you provide values such as usernames and passwords and have them automatically used at the relevant part of the install process. The manual prompts to provide a password, as you may have seen back in chapter 2, are gone:
11. Set the configuration selections for the MySQL Server passwords with the database_password variable you created in the previous steps:
sudo debconf-set-selections <<< "mysql-server mysql-server/root_password
sudo debconf-set-selections <<< "mysql-server mysql-
12. Install MySQL Server. There are no prompts, because the password is provided by configuration selections:
sudo apt-get -y install mysql-server
13. Let’s prove that all this worked! View the database_password variable so you can clearly see what your password should be:
14. Log in to MySQL Server. When prompted for a password, enter the value of database_password, which is the value of the secret from the key vault:
You’re logged in to the MySQL Server, which confirms that the secret from the key vault was used to successfully create the SQL server credentials! Type exit twice to close out of the MySQL Server command prompt, and then close your SSH session to the VM.
This was a basic example, and you’d still need to secure the MySQL Server and provide additional credentials for applications to access databases or tables, for example. The advantage of using a secret from a key vault is that you guarantee all the passwords are the same. If you use virtual machine scale sets, for example, each VM instance can automatically request the secret and install MySQL Server so it’s ready to serve your application data. Those passwords are never defined in scripts, and no one needs to see what the passwords are. You could even generate passwords at random and rotate them as secrets in a key vault.
You may be wondering: storing passwords in a key vault is great, but aren’t all the cool kids using digital certificates for authentication and security? Can you use a key vault to store certificates and retrieve them automatically from your applications or VMs? Of course you can!
15.3. Creating and injecting certificates
Digital certificates are a common form of security and authentication in web services and applications. Certificates are issued by a certificate authority (CA), which is (hopefully!) trusted by end users. The certificate allows users to verify that a website or application is indeed who it says it is. Every time you see a website with a web browser address that begins with https:// and has a padlock symbol, that means the traffic is encrypted and secured by a digital certificate.
Managing digital certificates can often become a major management task. A common problem is how to store and grant access to certificates as services and applications need them. In the previous exercises, we examined how a key vault can be used to share secure secrets and keys with services and applications, but a key vault can also do the same with certificates. As shown in figure 15.8, a key vault can be used to request, issue, and store certificates.
Figure 15.8. A user, application, or service can request a new certificate from a key vault. A certificate signing request (CSR) is sent by the key vault to a certificate authority (CA). This could be an external third-party CA or a trusted internal CA. Azure Key Vault can also act as its own CA to generate self-signed certificates. The CA then issues a signed X.509 certificate, which is stored in the key vault. Finally, the key vault returns the certificate to the original requestor.

In production use, you should always use a trusted CA to issue your certificates. For internal use, you can issue self-signed certificates that you create yourself. These self-signed certificates aren’t trusted by other services and applications, so they typically generate a warning, but self-signed certificates let you quickly get up and running and make sure your code works as expected with encrypted traffic.
Azure Key Vault can generate self-signed certificates for you. Under the hood, Key Vault acts as its own CA to request, issue, and then store certificates. Let’s use this ability to generate a self-signed certificate and see how to easily inject it into a VM. The certificate is then used for a basic web server to show you how to quickly enable SSL to secure your web traffic.
To create and inject a certificate into a VM, complete the following steps.
1. Create a self-signed certificate in Azure Key Vault, and enter a name, such as molcert. Policies are used to define properties such as expiration time periods, encryption strength, and certificate format. You can create different policies to suit the needs of your applications and services. For this exercise, use the default policy that creates a 2,048-bit certificate and is valid for one year:
az keyvault certificate create
--vault-name azuremol
--name molcert
--policy "$(az keyvault certificate get-default-policy)"
2. To see the certificate in action, create another VM, such as molwinvm. This time, create a Windows VM that uses Windows Server 2016, so you spread around the OS love! Provide your own admin username and password:
az vm create
--resource-group azuremolchapter15
--name molwinvm
--image win2016datacenter
--admin-username azuremol
--admin-password P@ssw0rd1234
3. You can automatically add the certificate to the VM straight from the Azure CLI. This approach doesn’t rely on an MSI. Add your certificate, such as molcert, to the VM you created in the previous step, such as molwinvm:
az vm secret add
--resource-group azuremolchapter15
--name molwinvm
--keyvault azuremol
--certificate molcert
4. Connect to the VM and verify that the certificate was injected correctly. To connect to your VM, first get its public IP address:
az vm show
--resource-group azuremolchapter15
--name molwinvm
--show-details
--query [publicIps]
--output tsvUse a local Microsoft Remote Desktop connection client on your computer to connect to your VM. Use the credentials to connect to localhostazuremol, not the default credentials of your local computer that your Remote Desktop client may try to use, as shown in figure 15.9.
Figure 15.9. Your Remote Desktop client may try to use your default local computer credentials. Instead, select Use a Different Account, and then provide the localhostazuremol credentials that you specified when you created the VM.

5. Once you’re logged in, select the Windows Start button, and then type mmc and open the Microsoft Management Console. Choose File > Add / Remove Snap-in, and then select to add the Certificates snap-in.
6. Choose to add certificates for the Computer account, select Next, and then select Finish. Choose OK to close the Add / Remove Snap-in window.
7. Expand the Certificates (Local Computer) > Personal > Certificates folder. The certificate from Azure Key Vault that you injected into the VM is listed, such as CLIGetDefaultPolicy, as shown in figure 15.10.
Figure 15.10. In the Microsoft Management Console, add the Certificates snap-in on the local computer. Expand the Personal > Certificates store to view installed certificates. The certificate injected from Key Vault is listed.

That’s all there is to it! Create the certificate in Key Vault, and then add the certificate to the VM. The certificate is placed into the local certificate store of the computer, which allows any service or application to access it. On a Windows VM, the certificates are stored in the local certificate cache, as seen in this exercise. On Linux VMs, .prv and .crt files for the private and public parts of the certificate are stored in /var/lib/waagent/. You can then move the certificates to wherever you need to for your application or service.
Certificates can be used both for the server, to present it for authentication to other applications or services, and with their own application or service. A common example is for a web server to use an SSL certificate, which is what you do in the end-of-chapter lab.
15.4. Lab: Configuring a secure web server
In the last exercise, you injected a self-signed certificate from Azure Key Vault into a Windows VM. For this lab, install and configure the IIS web server to use the certificate:
1. Open PowerShell on your Windows VM, and then install the IIS web server:
Add-WindowsFeature Web-Server -IncludeManagementTools
2. Open Internet Information Server (IIS) Manager. You can do this from the Tools menu in Server Manager.
3. For Default Web Site, choose to Edit Bindings.
4. Add an HTTPS binding on All Unassigned IP addresses on port 443. Select the self-signed certificate you created and injected from Key Vault, typically named something like CLIGetDefaultPolicy.
5. Open a web browser on the VM, and enter https://localhost. You generated a self-signed certificate in Key Vault, so the web browser doesn’t trust it. Accept the warning to continue, and verify that the HTTPS binding works.
6. Back in the Azure Cloud Shell or portal, create an NSG rule for the VM on TCP port 443. Enter https://yourpublicipaddress in a web browser on your local computer. This is the experience your users would receive, with a warning about an untrusted self-signed certificate. For most use cases, remember to use a trusted internal or third-party certificate authority to generate trusted certificates and store them in a key vault.