
Chapter 18. Azure Automation
Where possible, you shouldn’t manually log in to a server and make changes. Software doesn’t need to be installed by clicking buttons in a GUI, and updates don’t need to be made to configuration files in a text editor. These manual actions introduce an opportunity for errors to occur, which can result in misconfigurations and application failures. If you want to replicate the configuration of a server, can you remember all the steps that were required to get the existing server up and running? What if you need to do it again in 6 months?
In chapter 16, we touched on a way to automatically check for and apply updates to servers. This magic happened with the use of Azure Automation. In this chapter, we examine how you can create, run, and edit runbooks, and use PowerShell Desired State Configuration to automatically install applications and configure servers.
18.1. What is Azure Automation?
An Azure Automation account brings together many different elements, as shown in figure 18.1. A core feature is creating and running scripts on demand or on a defined schedule. You can create scripts in PowerShell or Python, and let the Azure platform handle the scheduling and execution of those runbooks. You can share credentials and connection objects, and automatically apply and report on desired configurations of servers. Update Management, which we examined in chapter 16, keeps your servers secure and up to date with the latest host patches and updates throughout the lifecycle of your application environment.
Figure 18.1. Azure Automation provides many related features. A shared set of resources, such as credentials, certificates, schedules, and connection objects can be used to automatically run PowerShell or Python scripts on target servers. You can define the desired state of a server, and Azure Automation installs and configures the server appropriately. Host updates and security patches can be automatically applied. All these features work across both Windows and Linux servers, in Azure and on-premises or other cloud providers.

To help simplify management across multiple runbooks or desired state configurations in an Automation account, you can share the following resources:
- Schedules let you define a set of times and recurrences that can be applied to each runbook or Update Management task. If you want to later change a regular occurrence, you can change one of the shared schedules rather than each individual runbook or Update Management task that uses it.
- Modules extend the core functionality by storing additional PowerShell modules. The base Windows PowerShell and Azure modules are already available, but additional modules, such as for Linux management, can be added and used in runbooks.
- Credentials for the different accounts that have permissions to execute various runbooks are stored as assets, not defined in each runbook. This approach lets you update and reset credentials as needed, and each runbook that uses them is automatically updated. Thus credentials aren’t stored in plain text in runbooks, which increases the security of the runbooks.
- Connections define authentication properties to AAD service principals. This is a special type of user account that allows runbooks to access your Azure resources. These connections typically use digital certificates, not usernames and passwords, to provide an additional layer of security.
- Certificates are often integrated with connection assets to provide a secure way to verify the identity of a service principal. As with basic credentials, you can regularly update these certificates in a central location, and each runbook that uses them can automatically access the new certificates. You can create and store your own certificates for use with runbooks or desired state configuration definitions.
- Variables provide a central place for runtime values such as names, location strings, and integers to be stored. When your runbooks are executed, these variables are injected. This approach limits the amount of hardcoded resources inside each runbook.
In chapter 16, we touched on how Operations Management Suite (OMS) can be used to monitor and report on servers in Azure, on-premises, or in other cloud providers. You install and configure the required agents on remote servers and then provide a way for them to connect back to the OMS infrastructure.
Azure Automation can also work across platforms and infrastructure. For example, the hybrid runbook worker can execute Automation runbooks on servers outside of Azure. You continue to use the shared Automation assets that define credentials, connections, and certificates, only this time those assets can be used to define the authentication components for the different platforms. You can also use desired state configurations on non-Azure VMs, for both Windows and Linux.
In all cases, a gateway component is installed in the remote environment to act as a proxy for the Automation commands as they’re sent to the designated targets. This gateway proxy approach provides a single connection point for Automation into the remote environments and minimizes any security concerns, because there’s no direct access to otherwise remote servers.
Runbooks and desired state configuration definitions may need to be edited slightly to run against on-premises physical servers compared to Azure VMs. As with OMS and Update Management, the advantage of Azure Automation is that it provides a single management plane and set of tools to deliver automation across all of your different infrastructures and servers.
18.1.1. Creating an Azure Automation account
Let’s jump in and create an Azure Automation account and look at the default runbooks that are included. The demo runbooks provide a great framework to build your own runbooks, and there’s also a graphical editor that you can use to drag and drop building blocks to generate automation scripts.
1. In the Azure portal, select Create a Resource in the upper-left corner. Search for and select Automation, and then select Create.
The Automation and Control option also creates an OMS workspace, as discussed in chapter 16, and configures the Automation Hybrid Worker to manage resources outside of Azure. For now, choose to create only the automation resource.
2. Enter a name, such as azuremol, and then create a new resource group, such as a azuremolchapter18. Select the most appropriate Azure region closest to you, and leave the option checked to Create Azure Run As Account.
The Create Run As Account option creates additional accounts in AAD. Security certificates are also created to allow the accounts to authenticate in an automated fashion, without the need for user prompts or saving a password. You could create and specify additional regular account credentials, defined as an Automation asset, to provide more granular control of which accounts are used to run certain runbooks.
When combined with RBACs, which we looked at in chapter 6, you can create specific Run As accounts for runbooks that provide a limited set of permissions needed to accomplish the tasks each runbook, or set of runbooks, requires. From a security perspective, this approach allows you to audit and control how and when these accounts are used. Avoid the temptation to create a single Run As account that provides admin-like permissions, because this approach provides little protection against abuse.
18.1.2. Azure Automation assets and runbooks
The Azure Automation account you created in the previous section includes some sample runbooks. Both PowerShell and Python samples are available. Connection assets and certificates are also added to the Automation account for the Run As accounts that were created. Let’s explore those shared connection assets.
To see the configured assets and sample runbooks, complete the following steps.
1. In the Azure portal, select Resource Groups at left, and then choose your group, such as azuremolchapter18. Select your Azure Automation account, such as azuremol.
2. Under Shared Resources in the menu on the left, select Connections.
3. Two Run As accounts are shown. Ignore AzureClassicRunAsAccount. As with unmanaged disks, which I mentioned as something to avoid in chapter 4, there are some traces of an older classic format of VMs in Azure. To maintain backward compatibility, some services provide management options for these classic VMs. You can no longer create classic VMs in the Azure portal, and the Azure CLI also doesn’t support classic resources. So, ignore any classic references you may still see.
4. To view information about the regular account, select AzureRunAsConnection, as shown in figure 18.2.
Figure 18.2. Information on the Run As account is shown, which includes an ApplicationId and TenantId. These are specific properties for AAD that help identify the credentials for this account. A CertificateThumbprint is shown, which matches up with a digital certificate we look at in the next step.

5. Select Certificates from the main menu on the Automation account under Shared Resources. Again, a classic certificate is also available, but ignore it, and choose the regular AzureRunAsCertificate. As shown in figure 18.3, the digital thumbprint matches RunAsConnection from the previous step.
Figure 18.3. The thumbprint of the RunAsCertificate matches that shown in RunAsConnection. In your runbooks, you define which connection asset to use. The appropriate certificate is used to log in to the Azure account.

6. Now that you understand the assets for connections and certificates, let’s look at one of the sample runbooks. Select Runbooks from menu at left in the Automation account. A few sample runbooks are available. Choose the PowerShell runbook called AzureAutomationTutorialScript.
7. Across the top of the sample runbook are options to Start, View, and Edit the runbook. These should be self-explanatory!
A couple of other options include Schedule, which lets you create or select a shared resource that defines a schedule to execute the runbook at a given time, and Webhook, that lets you create a webhook URL to execute the runbook from some other script or action.
Choose View.
Runbooks can be integrated with a source control system, such as GitHub. One of the great benefits of a source control system for your runbooks is that it provides a way for change management to be documented and to revert to earlier versions of the runbooks in the event of a problem.
Each time you save an Azure Automation runbook, a new version is committed to source control. You don’t need to leave the runbook editor for this to happen, because the Azure platform and the configured source control system are configured to work back and forth. If you run into a problem with the new runbook, you can pull a previous version from source control that allows jobs to continue to run without delay, and then troubleshoot why the updated version has an issue.
Using source control also provides a record of what changes occurred and when. If you need to audit your runbooks or understand how they have developed over time, source control systems provide a great way to see the differences with each revision.
18.2. Azure Automation sample runbook
Let’s examine how the sample PowerShell runbook, AzureAutomationTutorialScript, connects to Azure and gathers information about your resources. You can follow along with the Python sample runbook if you prefer; the layout is similar. PowerShell and Python are the only languages currently supported in Azure Automation runbooks. The following listing sets up the connection credentials in the runbook.
Listing 18.1. Setting up connection credentials
$connectionName = "AzureRunAsConnection"                            1
try                                                                 2
{
  # Get the connection "AzureRunAsConnection "
  $servicePrincipalConnection=Get-AutomationConnection -Name
$connectionName                                                   3
  "Logging in to Azure..."                                          4
  Add-AzureRmAccount `                                              4
      -ServicePrincipal `                                           4
      -TenantId $servicePrincipalConnection.TenantId `              4
      -ApplicationId $servicePrincipalConnection.ApplicationId `    4
      -CertificateThumbprint                                        4
$servicePrincipalConnection.CertificateThumbprint                 4
}
$connectionName 3
"Logging in to Azure..." 4
Add-AzureRmAccount ` 4
-ServicePrincipal ` 4
-TenantId $servicePrincipalConnection.TenantId ` 4
-ApplicationId $servicePrincipalConnection.ApplicationId ` 4
-CertificateThumbprint 4
$servicePrincipalConnection.CertificateThumbprint 4
}
- 1 Creates an object for $connectionName
- 2 Makes the connection request
- 3 Creates a service principal object
- 4 Logs in to Azure
The code begins by creating an object for $connectionName. In the “Try it now” exercise, you saw that a default connection asset for AzureRunAsConnection was created. As you create your own runbooks, you may want to create additional Run As accounts and connection assets to separate the runbooks and the credentials that they use. The connection parts and exception handling that we look at next should be common across all runbooks. As needed, you can change the Run As connection asset to use.
Next, a try statement is used to make the connection request. A service principal object named $servicePrincipalConnection is created, based on $connectionName. The runbook then logs in to Azure with Add-AzureRmAccount and uses the $servicePrincipalConnection object to obtain the TenantId, ApplicationId, and CertificateThumbprint. We discussed these parameters as part of the connection asset earlier. The certificate asset that matches the thumbprint of $servicePrincipalConnection is then used to complete the login to Azure.
The next listing shows that if the connection fails, the runbook catches the error and stops execution.
Listing 18.2. Catching an error and stopping the runbook execution
catch {
    if (!$servicePrincipalConnection)
    {
        $ErrorMessage = "Connection $connectionName not found."
        throw $ErrorMessage
    } else{
        Write-Error -Message $_.Exception
        throw $_.Exception
    }
}
The catch statement handles any errors as part of the login attempt. If a service principal connection couldn’t be found, an error is output. This error usually means the connection asset you specified can’t be found. Double-check the name and spelling of your connection.
Otherwise, the connection object was found, and the service principal was used to log in, but that authentication process was unsuccessful. This failure could come from the certificate no longer being valid or the Run As account no longer being enabled. This functionality shows how you can revoke an account in AAD and ensure that any runbooks that use the credentials can no longer successfully run.
Now the runbook gets a list of all Azure resources.
Listing 18.3. Getting a list of Azure resources
$ResourceGroups = Get-AzureRmResourceGroup

foreach ($ResourceGroup in $ResourceGroups)
{
    Write-Output ("Showing resources in resource group "
+ $ResourceGroup.ResourceGroupName)
    $Resources = Find-AzureRmResource -ResourceGroupNameContains
$ResourceGroup.ResourceGroupName |
Select ResourceName, ResourceType
    ForEach ($Resource in $Resources)
    {
        Write-Output ($Resource.ResourceName + " of type "
+  $Resource.ResourceType)
    }
    Write-Output ("")
}
The final part of the runbook is where your runbook code would go. An object is created for $ResourceGroups that gets a list of all available Azure resource groups. A foreach loop then goes through each resource group, finds a list of resources, and writes out a list of the resource names and types.
This basic example shows how you can interact with Azure once the runbook has authenticated against the subscription. If you implement RBACs on the Run As account, only the resource groups that the account has permissions to see are returned. This approach to RBAC highlights why it’s a good security principal to create and use scoped Run As accounts to limit the access the runbooks have to resources in your Azure environment. Always try to provide the least amount of privileges necessary.
If all this PowerShell or Python is new to you, don’t worry. Both provide a great, basic scripting language but also can be used to develop complex, powerful applications. As a developer, either language should be relatively easy for you to pick up and use. If you’re an IT pro, automating tasks helps free time for you to perform all the other jobs that are stacked up, and both PowerShell or Python are good places to start. Manning Publications has some other great books to help you, too!
18.2.1. Running and viewing output from a sample runbook
Now that you’ve seen what the sample runbook script contains and how the connection and certificate assets are used, let’s execute the runbook and look at the output.
To see the runbook in action, complete the following steps.
1. Close the window that shows the content of the runbook, and return to the overview of AzureAutomationScriptTutorial. Select Start at the top of the runbook window.
2. Confirm that you wish to start the runbook, and then wait a few seconds for the runbook to begin to run. Select Output, as shown in figure 18.4, and then watch the console window as the runbook logs in to Azure, gets a list of resource groups, and loops through and outputs the list of resources in each.
Figure 18.4. The output of the runbook can be viewed, along with any logs that are generated or errors and warnings. This basic example completes in a few seconds, but more complex runbooks may take longer. You can monitor the status of those longer runbooks and stop or pause their execution if needed.

Automation runbooks don’t need to exist in isolation. One runbook can execute another runbook. This ability lets you build complex, multistep automation and minimize the duplication of code. As you design and build runbooks, try to break them down into small, discrete blocks of code. Common functions that you may reuse, such as logging in to Azure and generating a list of resources or a list of VMs, should be created as small runbooks that can be included in larger runbooks. As new PowerShell cmdlets are released or parameters are changed, you can quickly update a single shared runbook that includes those cmdlets rather than needing to update multiple different runbooks.
18.3. PowerShell Desired State Configuration (DSC)
Chapter 12 introduced the concept of VM extensions. An extension is a small software component that’s installed in a VM to perform a given task. The VM diagnostics extension was installed on a VM to allow performance metrics and diagnostic logs to be reported back to the Azure platform from inside the VM. That’s great, but we also talked a little about how you can automatically install software.
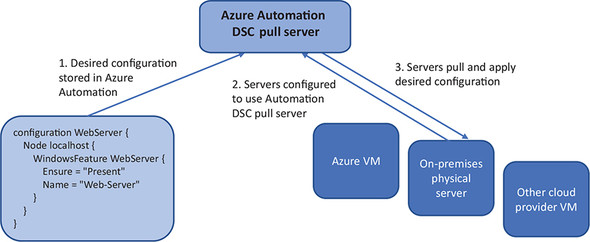
One way to install software and configure a server is to use PowerShell Desired State Configuration (DSC). With DSC, you define how you wish a server to be configured—the desired state. You can define packages to be installed, features to be configured, or files to be created, for example. What’s great about DSC is that it goes beyond the first install and configure action. Over time, servers often undergo maintenance or troubleshooting events where configurations and packages are manually changed. The server would then deviate from the desired state that you initially defined. Figure 18.5 shows how Azure Automation can act as a central server that stores the DSC definitions, allowing target servers to receive their configurations and report back on their compliance.
Figure 18.5. The desired state configuration for a server is created and stored in Azure Automation. The Automation account acts as a pull server, which allows connected servers to pull the required configuration from a central location. Different configuration modes can be set for the remediation behavior of the server if their configuration deviates from the desired state.
The Local Configuration Manager (LCM) on each target server controls the process for connecting to the Azure Automation pull server, receiving and parsing the DSC definition, and applying and reporting on compliance. The LCM engine can operate without a pull server, where you locally call the process to read and apply a DSC definition. In this mode, where you manually push the configuration to the LCM engine, you miss out on a lot of the central controls and reports that are often needed when you manage many servers.
There’s also flexibility in how the target servers process the DSC definitions received from the Azure Automation pull server. You can configure DSC to operate in one of three configuration modes:
- Apply only—Your desired state is pushed and applied to the target server, and that’s it. This is like the behavior of the Azure Custom Script Extension in that any configurations or installations are applied when first deployed, but there are no processes in place to stop those configurations manually changing over the lifecycle of the server.
- Apply and monitor—After the server has the desired state applied, DSC continues to monitor for any changes that cause the server to deviate from that initial configuration. A central report can be used to view servers that are no longer compliant with their desired state. This configuration is a good compromise between the need to keep a server compliant with the desired state and providing an element of human interaction to decide on remediation options.
- Apply and autocorrect—The most automated and self-contained configuration applies the desired state and then monitors for any deviations and automatically remediates the server should any changes occur to ensure that it remains compliant. There’s a danger that legitimate manual changes will be overwritten and instead returned to the configured desired state, but this configuration mode makes sure the settings you assign always take priority.
PowerShell DSC can be used on VMs that run in other cloud providers, as well as on-premises VMs and physical servers. Thanks to .NET Core, PowerShell DSC can also be used on Linux servers, so it’s not a Windows-only solution. This cross-provider, multi-OS support makes PowerShell a powerful choice to configure and manage servers at scale.
You can build and maintain your own DSC pull server, but the built-in features of Azure Automation provide some additional benefits:
- Credentials are centrally managed, and certificates are automatically generated.
- Communication between the DSC pull server and target servers is encrypted.
- Built-in reports are provided for DSC compliance, and there’s integration with Log Analytics to generate more detailed reports and alerts.
This is very much a crash course in PowerShell DSC—it’s a powerful component by itself and has been widely available for a few years now. When combined with Azure Automation, DSC is a great choice for automating the installation and configuration of software. Think back to the earlier chapters on virtual machine scale sets, for example. You can apply a DSC configuration to the scale set with Azure Automation, and then as each VM is created in the scale set, it will be automatically configured with the required components and application files.
18.3.1. Defining and using PowerShell DSC and an Azure Automation pull server
I hope that whirlwind tour of PowerShell DSC has given you an idea of what’s possible! Let’s use PowerShell DSC to automate the previous example of installing a basic web server on a VM.
To see PowerShell Desired State Configuration in action, complete the following steps.
1. Create a Windows Server 2016 Datacenter VM, and open TCP port 80 for HTTP traffic. No more hand holding now that we’re in chapter 18! You can create the VM in the Cloud Shell or Azure portal—your choice. Use the resource group you created in the previous exercises, such as azuremolchapter18. You can continue with the next few steps as the VM deploys.
2. On your local computer, create a file named webserver.ps1 and enter the following code:
configuration WebServer {
Node localhost {
WindowsFeature WebServer {
Ensure = "Present"
Name = "Web-Server"
}
}
}Save and close the webserver.ps1 file.
3. In the Azure portal, select your resource group, and then choose your Automation account. At left, choose DSC Configurations. At the top of the DSC configuration window, choose to Add a configuration.
4. Browse to and select your webserver.ps1 file. The configuration name must match the filename, so leave the default name of webserver, and then choose OK.
5. It takes a few moments to upload and create the configuration. When it’s ready, select the configuration from the list, and then choose Compile.
Let’s pause to talk about what happens when you compile the configuration, as shown in the following figure. To distribute the DSC definitions, your PowerShell files are converted into a Managed Object Format (MOF) file. This file type is used for more than just PowerShell DSC and allows configuration changes on Windows components in a central, well-understood way. Any DSC definition, not just in Azure Automation, must be compiled before it can be applied to a target server. The LCM engine only accepts and processes MOF files.
The Azure Automation DSC pull server automatically compiles the DSC definition you provide into a Managed Object Format (MOF) file. Digital certificates managed by Automation are used to encrypt the MOF file. DSC target servers receive the required public digital certificates and allows the LCM engine to decrypt and process the MOF file. The desired state can then be applied to the server.
Because the MOF file defines the complete state of your servers, you should protect its content. If an attacker knew all the application components installed and the location of various configuration files and custom code, it would increase the chance of your servers being compromised. Recent versions of PowerShell encrypt the entire MOF file. Azure Automation automatically generates the required digital certificates and keys when a target server is configured for DSC, which allows you to seamlessly use encrypted MOF files. Automation also then encrypts the traffic between the DSC pull server and target nodes, not just the MOF file.
The compile process in Azure Automation both converts the DSC definition you provide into an MOF file and encrypts the MOF file with the digital certificates and keys. The process to compile your DSC definition takes a few seconds but greatly secures your environment. Just another example of Azure securing your resources by default!

6. To apply the configuration to your VM, select DSC Nodes at left in your Automation account. Choose Add Azure VM, and then select the VM you created in previous steps.
7. Choose Connect. From the Node Configuration Name drop-down menu, select webserver.localhost. Set Default Configuration Mode to ApplyAndMonitor, and then select OK.
8. It takes a few moments to enable the VM to use the Azure PowerShell DSC pull server and apply the initial desired state. Once the Azure portal reports that the configuration is applied, can you remember how to add an inbound port rule for HTTP traffic (TCP port 80)? Check chapter 5 if you need a refresher; then, open the public IP of the VM in a web browser. The DSC process installed the IIS web server, and the default web page loads, as shown in figure 18.6.
Figure 18.6. After the VM has been connected to Azure Automation DSC, the desired state is applied and the IIS web server is installed.

This basic example of PowerShell DSC only installs the web server feature. You can use PowerShell DSC to configure the IIS web server or copy your application code to the VM and run the site. Complex DSC definitions can be used to get the VM ready to serve traffic to your pizza store customers with no manual interaction. Again, think back to how you should design your applications to scale automatically—the VM can’t wait for someone to log in and manually install and configure everything!
18.4. Lab: Using DSC with Linux
Just to prove that PowerShell DSC works on Linux servers, let’s create an Ubuntu VM, install the necessary prerequisites, and then install a basic NGINX web server with DSC. In production, you could use a custom VM image that already had the management components installed, and then apply PowerShell DSC definitions as normal:
1. Create an Ubuntu 16.04 LTS VM, and open port 80. When you’re ready, SSH to the VM.
2. Add the Microsoft Linux Software repo to the Ubuntu VM:
wget https://packages.microsoft.com/config/ubuntu/16.04/
sudo dpkg -i packages-microsoft-prod.deb
sudo apt-get update
3. Install the Open Management Infrastructure component from the Microsoft software repo:
4. In the Azure Automation account, select Modules from the menu on the left. Select Browse Gallery, and then search for and import the nx module for managing Linux DSC resources.
5. On your local computer, create a file name nginx.ps1, and type the following code:
configuration nginx {
Import-DSCResource -Module nx
Node localhost {
nxPackage nginx {
Name = "nginx"
Ensure = "Present"
PackageManager = "apt"
}
}
}
6. Add a DSC configuration, and upload the nginx.ps1 file. When it’s created, compile the configuration.
7. Add a DSC node, select your Ubuntu VM, and then choose your nginx.localhost Node Configuration name.
8. It takes a few moments for the VM to apply the desired configuration. You can view the list of connected VMs and their compliance status in the DSC nodes window. The VM reports Compliant when the LCM has accepted and applied the MOF file, but the apt-get install may take another minute or two.
9. Open TCP port 80 for HTTP traffic to your VM, and then enter the public IP address of your VM in a web browser to see the NGINX web server installed by DSC. If the website doesn’t load, wait a minute or two for the install process to finish, and then refresh the page.
If you want to truly experience the brave new world of Microsoft and Linux, you can install PowerShell on your Linux VM. Complete the quick setup steps at http://mng.bz/A6Mc to understand how cross-platform PowerShell scripts can now be!