
Chapter 14. Data encryption
The security of your data is important. More specifically, the security of your customers’ data is critical. We hardly go a week without a major company in the news after they encountered a data breach. Often, these incidents are caused by a lack of security, misconfiguration, or plain carelessness. In this digital age, it’s all too easy for attackers to automate their attempts to gain access to your data. The time to recover from a security incident at an application level may be nothing compared to how long it takes the business to regain the trust of its customers if their data was exposed.
Azure includes encryption features that make it hard to claim you don’t have the time or expertise to secure your data. In this chapter, we examine how to encrypt data stored in Azure Storage, on managed disks, or the complete VM. Entire books have been written about data encryption, and this chapter doesn’t dive deep into encryption methods and considerations. Instead, you see how to enable some of the core Azure features and services to secure your data throughout the application lifecycle.
14.1. What is data encryption?
When you purchase something online, do you check that there’s a little padlock icon in the address bar to indicate the website uses HTTPS? Why is it bad to send your credit details over a regular, unsecured HTTP connection? Every bit of data in a network packet that flows between devices could potentially be monitored and examined. Figure 14.1 shows how shopping online without an HTTPS connection could be bad for your credit card statement.
Figure 14.1. In this basic example, an attacker could intercept network traffic that’s sent over an unencrypted HTTP connection. Because your data isn’t encrypted, the attacker could piece together the network packets and obtain your personal and financial information. If you instead connect to the web server over an encrypted HTTPS connection, an attacker can’t read the contents of the network packets and view the data.

There’s no excuse for web servers to use unsecure connections. Every web app that you create in Azure automatically has a wildcard SSL certificate applied to it. An SSL certificate is digital component that’s used to secure the web server and allow a web browser to validate the connection. A wildcard SSL certificate can be used across an entire domain, such as *.azurewebsites.net, the default domain for web apps. When you created a web app in chapter 3, you could have added https:// to the web address and started to use encrypted communications with your web apps. That’s all there is to it!
Custom SSL certificates are relatively cheap and easy to implement. Through projects such as Let’s Encrypt (https://letsencrypt.org), you can obtain a certificate for free and automatically configure your web server in minutes. Azure doesn’t currently provide custom SSL certificates, in the same way you can’t purchase a custom domain name through Azure. You need to purchase a domain name and SSL certificate from a third party and then apply them to your web apps. You can then upload and apply the SSL certificate to your web app, as shown in figure 14.2.
Figure 14.2. You can easily upload and apply a custom SSL certificate to your web apps. A default wildcard certificate is already available at https://yourwebapp.azurewebsites.net; but if you use a custom domain name, you need to purchase and apply a custom SSL certificate.

As you design and build applications in Azure, you should implement secure communications wherever possible. This approach helps secure the data while it’s in transit, but what about when that data is written to disk? A similar process exists for disks and VMs that secures and protects your data at rest. Figure 14.3 shows how disk and VM encryption works.
Figure 14.3. When you encrypt your data, only you can decrypt and view the contents. If an attacker were to gain access to a virtual disk or individual files, they wouldn’t be able to decrypt the contents. Encryption methods can be combined: customers can connect to your web over HTTPS, you can force traffic to storage accounts to be over HTTPS, and you can then encrypt the data that’s written to disk.

These simplified examples of data encryption in Azure hopefully motivate you to implement encryption as you design and build applications in Azure. Most customers expect their data to be secured, and many companies have regulatory and compliance mandates that require encryption. Don’t think only about the potential fines to the business for a data breach, or the loss of customer trust. Consider the risk of the customers’ personal and financial data being exposed, and how that could impact their daily lives. You probably don’t like the idea of your own data being exposed, so do all you can to protect the data of your customers.
14.2. Encryption at rest
If data encryption is so important, how do you use it in Azure? Just keep doing what you’ve already learned in this book! Right at the start, I mentioned that all of your VMs should use managed disks, right? There are many good reasons for that, one of which is security. A managed disk is automatically encrypted. There’s nothing for you to configure, and there’s no performance impact when it’s enabled. There’s no opt-out here—your data is automatically encrypted at rest with managed disks.
What does it mean for the data to be encrypted at rest? When you use managed disks, your data is encrypted when it’s written to the underlying Azure storage. The data that resides on the temporary disks, or data that exists in memory on the VM, isn’t encrypted. Only once the OS or data disk’s data rests on the underlying physical disk does it become encrypted. Figure 14.4 shows how the data is encrypted as it’s written to a managed disk.
Figure 14.4. As data is written to a managed disk, it’s encrypted. In-memory data on the VM, or data on temporary disks local to the VM, isn’t encrypted unless the entire VM is enabled for encryption, which we look at later in this chapter. The automatic encryption of data written to managed disks causes no overhead to the VM. The Azure platform performs the encryption operation on the underlying storage. The VM doesn’t need to handle any encrypt/decrypt processes.

This encryption at rest for managed disks means there’s no performance impact on the VMs. There’s no additional processing for the VM to perform to encrypt and decrypt the data, so all the available CPU power can be used to run applications. In typical VM encryption scenarios, the VM uses a certain amount of compute power to process and manage the data encryption. The trade-off to the automatic managed disk encryption is that only the OS and data disks are secured. Potentially, other in-memory or temporary disk data on the VM could be exposed.
Microsoft manages the digital encryption keys within the Azure platform with the automatic encryption of managed disks. This does create another trade-off in that you can automatically encrypt your data without the need to create, manage, rotate, or revoke keys, but you have to trust in Microsoft to protect those keys.
14.3. Storage Service Encryption
Automatic managed disk encryption is great, but what if you use Azure Storage for blob or file storage? Azure Storage Service Encryption (SSE) lets you encrypt data at the storage account level. Data is encrypted as it’s written to the account. Microsoft again handles the encryption keys, so no management overhead or configuration is required. The Azure platform abstracts the key generation and management for you. If you prefer, you can create and use your own encryption keys, with a little additional management overhead.
The goal with both automatic managed disk encryption and SSE is to make it as easy as possible for you to encrypt your data and spend more time on how to design, build, and run your applications. Figure 14.5 shows how SSE protects your data and can also force secure communications when data is in transit.
Figure 14.5. When you enable SSE, Azure blobs and files are encrypted as the data is written to disk. Azure tables and queues aren’t encrypted. For additional data security, you can force all communications with a Storage account to use secure communication protocols, such as HTTPS. This protects the data in transit until the moment it’s encrypted on disk.

Along with enabling SSE, you can force all storage requests and transfers to use a secure communication method. This setting forces all REST API calls to use HTTPS, and all Azure file connections that don’t enable encryption, such as older versions of the SMB protocol, to be dropped.
Azure SDKs, such as the Python examples we examined in chapter 4, can use encrypted connections. The reference docs for each language-specific SDK provides guidance on how to implement secure communications.
The use of secure communications should be built into applications from the start. It may cause problems to enable secure communications on an existing application if some components weren’t originally configured appropriately. At the very least, test secure communications for an existing application in a development environment first.
One minor catch with SSE is that if you enable encryption on an existing storage account that already contains data, only new data written to the storage account is encrypted. If you plan your application needs carefully, enable SSE when you create the storage account to ensure that all data then written to the account is encrypted.
To create a storage account and enable both encryption and secure communications, complete the following steps.
1. Open the Azure portal, and select the Cloud Shell icon from the top menu.
2. Create a resource group. Provide a name, such as azuremolchapter14, and a location, such as eastus:
az group create --name azuremolchapter14 --location eastus
3. Create a storage account with az storage account create. Provide a unique name, such as azuremolstorage, and enter the resource group that you created in the previous step. Enter a storage account type, such as Standard_LRS for locally redundant storage.
To enable SSE, use the --encryption-services blob parameter. To force secure communications, set --https-only to true:
az storage account create
--name azuremolstorage
--resource-group azuremolchapter14
--sku standard_lrs
--encryption-services blob
--https-only true
4. Verify that the storage account is encrypted and enabled for secure communications. Query for enableHttpsTrafficOnly and the encryption parameters:
az storage account show
--name azuremolstorage
--resource-group azuremolchapter14
--query [enableHttpsTrafficOnly,encryption]The output is similar to the following:
[
true,
{
"keySource": "Microsoft.Storage",
"keyVaultProperties": null,
"services": {
"blob": {
"enabled": true,
"lastEnabledTime": "2017-11-21T04:41:05.127074+00:00"
},
"file": {
"enabled": true,
"lastEnabledTime": "2017-11-21T04:41:05.127074+00:00"
},
"queue": null,
"table": null
}
}
]
14.4. VM encryption
The automatic encryption of Azure managed disks helps provide a level of VM security. For a comprehensive approach to VM data security, you can encrypt the VM itself. This process involves more than encrypting the underlying virtual hard disks. The OS disk and all attached data disks, along with the temporary disk, are encrypted. The VM memory is also encrypted to further reduce the attack surface. You use two new Azure components to encrypt a VM:
- Azure Key Vault stores encryption keys used to encrypt VMs.
- Azure Active Directory service principals control access to the encryption keys.
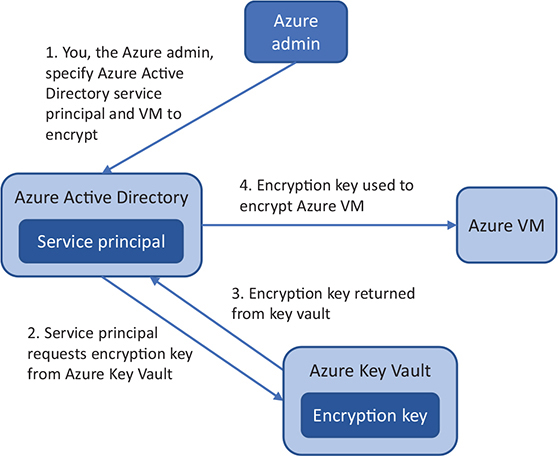
Figure 14.6 shows the VM encryption overview process.
Figure 14.6. When you encrypt a VM, you specify a service principal and encryption key to use. The credentials you provide for the service principal are used to authenticate against Azure Key Vault and request the specified key. If your credentials are valid, the encryption key is returned and used to encrypt the VM.
One advantage of encrypting the entire VM is that you manage the encryption keys. These encryption keys are securely stored in Azure Key Vault, and you can choose between using software- or hardware-generated keys. You control these keys, so you can define access to them and use role-based access controls (RBACs) and auditing to track usage. You can also rotate the encryption keys on a defined schedule, much like changing your password every 60 or 90 days. These additional controls and management tasks for encryption keys add some management overhead but provide maximum flexibility for securing your data, and they may be required for certain regulatory purposes. Let’s look a little more at Azure Key Vault and Azure Active Directory service principals.
14.4.1. Storing encryption keys in Azure Key Vault
We spend the next chapter on Azure Key Vault, but I wanted to show you the power of data encryption and VM encryption first. As a quick overview, Azure Key Vault is a digital vault that allows you to securely store encryption keys, SSL certificates, and secrets such as passwords. For redundancy, key vaults are replicated across Azure regions. This replication protects your keys and secrets, and ensures that they’re always available for use.
Only you have access to your key vaults. You generate and store objects in key vaults and then define who has access to those vaults. Microsoft manages the underlying Key Vault service but has no access to the contents of the vaults. This security boundary means when you encrypt your data in Azure, you are the only one who can decrypt and view it.
To create a key vault and encryption key, complete the following steps.
1. Open the Azure portal, and select the Cloud Shell icon from the top menu.
2. Create a key vault with the az keyvault create command. Specify the resource group you created in the previous exercise, such as azuremolchapter14, and then provide a unique name for your key vault, such as azuremolkeyvault:
az keyvault create
--resource-group azuremolchapter14
--name azuremolkeyvault
--enabled-for-disk-encryption
Let’s pause and think about why you add a parameter for --enabled-for-disk-encryption. When you encrypt a VM, the Azure platform needs to be able to start and decrypt the VM so that it can run. The Azure platform doesn’t have any permissions to access that data, and Microsoft doesn’t have access to view and use those encryption keys for anything other than starting a VM. When you enable a key vault for disk encryption, you grant permissions for Azure to access the key vault and use the encryption key associated with a VM.
Again, Microsoft doesn’t have access to these keys or your data, only the ability to start your encrypted VM. It’s pretty hard to do much with an encrypted VM when it can’t boot. Figure 14.7 shows how the Azure platform uses the encryption key to start an encrypted VM.
Figure 14.7. When a key vault is enabled for disk encryption, it grants permission for the Azure platform to request and use the encryption key to successfully start an encrypted VM.

Keys can be created and stored in software, or they can be stored in hardware security modules (HSMs) for additional security. For many purposes, software keys work great, although you may have security mandates that require the use of HSMs. We discuss this more in the next chapter.
3. To create a key, specify the vault you created in the previous step, such as azuremolkeyvault, and then provide a key name, such as azuremolencryptionkey:
az keyvault key create
--vault-name azuremolkeyvault
--name azuremolencryptionkey
--protection software
14.4.2. Controlling access to vaults and keys with Azure Active Directory
Chapter 6 looked at how you secure and control access to resources with role-based access controls (RBACs). These controls let you specify users and groups, and define granular permissions as to what they can do with each resource. At the heart of those controls is Azure Active Directory (AAD).
AAD could fill an entire book. It could probably fill an entire series of books! It builds on the enterprise-proven identity and management solution, Active Directory. With AAD, you can create and manage user or group permissions to resources in Azure, Office 365, or a hybrid scenario for on-premises file shares or network resources such as printers.
It’s hard to cover AAD in a single chapter of a Month of Lunches series book. There’s so much to cover that I’d almost certainly leave you wanting more. Hybrid scenarios with an on-premises Active Directory environment, multifactor authentication for cloud applications, and user and group management in AAD are specific administration tasks that only a small number of Azure admins may use. There’s a wealth of excellent documentation at https://docs.microsoft.com/azure/active-directory if you want to dive into AAD.
For now, you want to use AAD to authenticate with Azure Key Vault and access encryption keys. To do this, you use a special type of user account called a service principal. A service principal can’t be used to log in to a VM with a username and password like a regular user account, but it can be used to authenticate with services and resources.
To create an Azure Active Directory service principal for use with Azure Key Vault, complete the following steps.
1. Open the Azure portal, and select the Cloud Shell icon from the top menu.
2. Create a default service principal, and view the ID and secret (a password). You use these credentials to authenticate against Azure resources, such as your key vault. This service principal can be used for resources across your entire subscription. As with network resources, in the real world you should plan the long-lived key vaults you’ll need, create service principals that are assigned to them, and then use these credentials with your applications:
az ad sp create-for-rbac
--query "{spn_id:appId,secret:password}"The sample output from this command is as follows. Make a note of your own values, because you need them in the remaining steps:
{
"secret": "2575580b-3610-46b2-b3db-182d8741fd43",
"spn_id": "4d1ab719-bd14-48fd-95d0-3aba9500b12f"
}
3. Grant your service principal access to the key vault with permissions to wrap, or use, the encryption key. Specify your key vault name, such as azuremolkeyvault, and then the SPN provided in the output from the preceding step:
az keyvault set-policy
--name azuremolkeyvault
--spn 4d1ab719-bd14-48fd-95d0-3aba9500b12f
--key-permissions wrapKey
--secret-permissions set
14.4.3. Encrypting an Azure VM
Figure 14.8 repeats figure 14.6, to see how you’ve created an AAD service principal with permissions to use an encryption key that was created in an Azure key vault. This service principal and encryption key can be used to encrypt many VMs. One approach is to use the same encryption key for all the VMs within a given application deployment. This minimizes the overhead of key management and, if you use virtual machine scale sets, allows you to autoscale the number of VM instances without the need to generate encryption keys each time. In the end-of-chapter lab, you encrypt a single VM, although the same process can work with a scale set. Especially when you work with larger, autoscaling applications, be sure to design and build in security features.
Figure 14.8. (Repeats figure 14.6) You can now use your AAD service principal to request the use of an encryption key stored in a key vault. This encryption key can be used to encrypt a VM. You create and encrypt this VM in the end-of-chapter lab.

When you encrypt a VM, an Azure VM extension is installed. The extension controls the encryption of the OS disk, temporary disk, any attached data disks, and in-memory data, as shown in figure 14.9. For Windows VMs, the BitLocker encryption mechanism is used. For Linux VMs, dm-crypt is used to process the encryption. The VM extension can then report back on the status of encryption and decrypt the VM as desired.
Figure 14.9. When you encrypt a VM, the Azure disk encryption extension is installed. This extension manages the use of BitLocker on Windows VMs or dm-crypt on Linux VMs, to perform the data encryption on your VM. The extension is also used when you query the encryption status for a VM.

Because the VM disk encryption extension relies on BitLocker or dm-crypt, there are some limitations around the use of VM encryption. Most Azure Marketplace images support disk encryption, although some restrictions exist on VM sizes that support encryption or encryption of connected network file shares such as Azure files. For the most comprehensive information on supported limitations and considerations for VM encryption, read the latest Azure docs at http://mng.bz/NjPB.
This chapter has provided a quick intro to the data security and encryption features in Azure. Automatic encryption for managed disks and SSE doesn’t require much configuration, so there’s no real barrier to prevent you from using them.
14.5. Lab: Encrypting a VM
Let’s see all this in action by encrypting a VM with the encryption key you stored in your key vault:
1. Create a VM. Most Linux images in the Azure Marketplace support encryption, as do the Windows Server images from Server 2008 R2 and later. To make it quick and easy, create an Ubuntu LTS VM, just as you have for most of this book:
az vm create
--resource-group azuremolchapter14
--name molvm
--image ubuntults
--admin-username azuremol
--generate-ssh-keys
2. Enable encryption on the VM. Provide your own SPN ID and secret, which was output earlier, to create your service principal:
az vm encryption enable
--resource-group azuremolchapter14
--name molvm
--disk-encryption-keyvault azuremolkeyvault
--key-encryption-key azuremolencryptionkey
--aad-client-id 4d1ab719-bd14-48fd-95d0-3aba9500b12f
--aad-client-secret 2575580b-3610-46b2-b3db-182d8741fd43It takes a few minutes to install the Azure VM disk encryption extension and begin the process of encrypting the VM.
3. Once encryption has started, monitor the progress and be ready to restart the VM to complete the encryption process. View the status as follows:
az vm encryption show
--resource-group azuremolchapter14
--name molvmHere’s some example output of a VM in the process of being encrypted. At the start, the status for osDisk reports as EncryptionInProgress:
{
"dataDisk": "NotMounted",
"osDisk": "EncryptionInProgress",
"osDiskEncryptionSettings": {
"diskEncryptionKey": {
"secretUrl":"https://azuremolkeyvault.vault.azure.net/secrets/[CA]
"sourceVault": {
"id":
}
},
"enabled": true,
"keyEncryptionKey": {
"keyUrl":
"sourceVault": {
"id":
}
}
},
"osType": "Linux",
"progressMessage": "OS disk encryption started"
}It can take a while to complete the disk encryption, so this may be another good lab exercise to come back to in an hour or so—unless you want a long lunch break! Hey, I’m not your boss, but it gets boring looking at the same encryption status message.
4. When the encryption status reports as VMRestartPending, restart the VM:
az vm restart --resource-group azuremolchapter14 --name molvm
You can then check the status of VM encryption again with az vm encryption show to confirm that the VM reports as Encrypted.
These last two end-of-chapter labs didn’t take long to complete, but they may have taken a while to finish. Don’t forget to go back and delete resources when you’re done with them.
In chapter 13, remember that you need to disable Azure Backup or Site Recovery protection before you can delete the Recovery Services vault and resource group. Make sure you go back and clean up those lab resources before they start to use up too many of your free Azure credits.