
Chapter 2. Creating a virtual machine
Ready to see how quickly you can set up a web server in Azure? In this chapter, we dive straight into one of the most common requests when it comes to VMs: building a basic web server. This workload is a great example of the core Infrastructure as a Service (IaaS) components in Azure. Let’s assume that you work for a pizza store that wants to expand its operations and accept online orders for pizza delivery or takeout. To build an online presence, you need a website. In the first couple of parts of this book, we explore the different features and services in Azure that let you build and run both IaaS and PaaS web applications. You can start to make informed decisions as to when to build and run a VM to power a website, and when you might use PaaS to do so.
In this chapter, you create an Ubuntu Linux VM and install a basic webserver. Don’t worry about using Linux—you create a Windows VM in the end-of-chapter lab exercise! Ubuntu is a common web server platform, and it’s a great way to learn about SSH public-key authentication. You’ll then see how to open a network port for customers to access your website on the internet. A high-level overview of this basic environment is shown in figure 2.1.
Figure 2.1. In this chapter, you create a basic VM, log in to install a web server, and then open a network port to allow customers to browse to the sample website.

2.1. Creating a VM from your web browser
The Azure CLI and Azure PowerShell tools are incredibly powerful, but a big strength of Azure is how much time has gone into building a great portal experience. The Azure portal is a web-based graphical tool that lets you see how all the different components come together and do a quick visual check that all is well. The portal includes a couple of unique things that the other tools don’t provide, and it’s fast to use because you don’t have to install anything.
1. Open a web browser to https://portal.azure.com. Log in with the account you created in the previous chapter to set up your lab environment.
2. Once logged in, select Create a Resource in the upper-left corner of the dashboard.
3. Choose Compute from the list of resources you can create, and then choose See All. There are hundreds of available images, which form the basis of all VMs. Select Ubuntu Server by Canonical, and then choose Ubuntu 18.04 LTS. That’s currently the most recent version of Ubuntu, but if there’s a newer Long Term Support (LTS) version by the time you’re reading this, go ahead and select that.
4. To get started, select Create. In the settings window that opens, type a name for your VM, such as webvm.
Note the drop-down menu for VM disk type. The default option is to use an SSD disk type. The following section looks at disk types in Azure.
2.1.1. Azure storage
Storage for VMs in Azure is straightforward. How many disks do you want, how big, and what type? The first two really aren’t Azure-specific. So, what types of storage are available?
- Premium SSD disks—Uses low-latency, high-performance SSDs. Perfect for production workloads. This type is what you should mostly use for best performance for your applications.
- Standard SSD disks—Uses standard SSDs. Delivers consistent performance compared to HDDs. Great for development and testing workloads, or budget-conscious and low-demand production use.
- Standard HDD disks—Uses regular spinning disks. Ideal for infrequent data access such as archive data or backups. Not recommended for running application workloads.
You don’t need to dig much deeper into the specifics of storage to create a quick web server. You’ll learn more in chapter 4. For now, it’s enough to know that when you pick a VM size, that also helps define what type of storage you use.
The virtual disks are Azure managed disks. These disks allow you to create a VM and attach additional data disks without worrying about underlying storage accounts, resource limits, or performance quotas. Managed disks are also automatically encrypted at rest—there’s nothing you need to configure to secure your data!
2.1.2. Basic settings, continued
Let’s move on from storage and complete the Basics settings pane in the portal.
Continue with your first VM by completing the steps in this section.
5. The next option in the portal is to enter a username for a user account. This user account is created on your VM and is the name you enter to log in to the VM.
6. The default option is to use an SSH public key as the authentication type. Throughout this book, we’re going to use SSH keys. SSH keys may be totally new to you, but they’re not that complicated. See the following sidebar if you need a little more help.
Let’s create an SSH public-key pair with the Azure Cloud Shell. Select the Cloud Shell icon at the top of the dashboard, as shown in figure 2.2.
Figure 2.2. Select and launch the Cloud Shell in the Azure portal by selecting the shell icon.
Secure shell (SSH) is a protocol used to communicate securely with remote computers and is the most common way to log in to Linux VMs. It’s similar to using a Remote Desktop Protocol (RDP) connection to a Windows VM, except in Linux the SSH session is typically all console-based. With public-key cryptography, you can use a digital key pair to authenticate you with a remote Linux VM.
An SSH key pair has two parts: a public key and a private key. The public key is stored on your Linux VM in Azure. You keep a copy of the private key. When you need to log in to your Linux VM, the public key on the remote VM is matched with the private key you keep locally. If the key pairs match, you’re logged in to the VM. There’s a little more to it than that, but at its core, public-key cryptography is a great means to verify identity.
I’d like you to get into the habit of using SSH keys to log in to Linux VMs. SSH keys are a lot more secure than passwords because, among other things, they aren’t susceptible to brute-force password attacks. You should always focus on security as a central concept, especially in the cloud.

7. The first time you open the Cloud Shell, it will take a few moments to create persistent storage that’s always then connected to your sessions. This storage allows you to save and retrieve scripts, configuration files, and SSH key pairs. Accept any prompts to allow this storage to be created.
8. If needed, select Bash from the drop-down menu in the upper-left corner of the Cloud Shell, as shown in figure 2.3.
Figure 2.3. The exercises in this book mostly use the Bash version of the Cloud Shell. The first time you access the Cloud Shell, it will probably load the PowerShell shell. Select the Bash version, and then wait a few seconds for Azure to switch the shell. Each time you access the Cloud Shell after this change, the Bash version should load automatically.

9. To create a key pair, enter the following command:
Accept the default prompts by pressing the Enter key. In a couple of seconds, you have an SSH public-key pair that you can use with all your VMs! The ssh-keygen command defaults to a 2,048-bit length key and uses the RSA version 2 protocol. This is a good balance of security and is the recommended type for most use cases. Figure 2.4 shows an example of a completed SSH key pair in the Cloud Shell.
Figure 2.4. An SSH key pair created in the Azure Cloud Shell with the ssh-keygen command

10. To view your public key and use it with a VM, enter the following command:
Select the output, and copy it. Be careful when copying the output of the public key, because it’s sensitive to additional whitespace or you missing a character. An example of a complete SSH public key is as follows:
ssh-rsa AAAAB3NzaC1yc2EAAAADAQABAAABAQDPGaOBsfhJJOHAWAv+RLLR/vdUTzS9HOIj
JyzWWLsnu0ESH2M6R+YYPPNXv9X7dmVyM1zCXXEaLucpnyFjevbwPedxTgifyxgCFTgylr1
Tip
The Cloud Shell is browser-based, so the keyboard shortcuts for copy and paste may work a little differently than you’re used to. Ctrl-Insert and Shift-Insert should copy and paste, rather than the regular Ctrl-C and Ctrl-V.
11. Paste the contents of your key into the SSH Public Key box. When you do, the portal will prompt you if the key is incorrect.
Make sure Create New is selected under Resource Group, and then provide a name. I suggest naming resource groups by chapter, to help organize things as you go. For example, name the resource group in this exercise azuremolchapter2. Figure 2.5 shows the different windows, or panes, in the Azure portal as you create your first VM.
Figure 2.5. Create an Ubuntu Linux VM in the Azure portal. Provide a VM name, and then enter a username and the SSH public key you created. Create a resource group, and select your closest Azure location.

12. Select the closest location to you from the Location drop-down menu, and select OK. This location is where your VM physically runs. Azure abstracts the exact location, because multiple data centers may exist in each region. In Azure, you provide a region and let the platform place your resources based on availability, capacity, and performance needs.
2.1.3. VM sizes
There are various families of VM sizes in Azure. These families contain groups of similar virtual hardware types that are targeted for certain workloads. The sizes are sometimes updated as new hardware and workloads offerings become available, but the core families remain constant. The family types are as follows:
- General purpose—Great for development and testing, or low-use production databases or web servers.
- Compute optimized—High-performance CPUs, such as for production application servers.
- Memory optimized—Larger memory options, such as when you need to run big databases or tasks that require a lot of in-memory data processing.
- Storage optimized—Low-latency, high-disk performance for disk-intensive applications.
- GPU—Nvidia-based graphics-specialized VMs, if you need graphics rendering or video processing.
- High-performance computing (HPC)—Lots of everything! Plenty of CPU, memory, and network throughput for the most demanding of workloads.
Just how big of a VM can you create in Azure? Things are constantly improving, but at the time of writing the largest VM you can create is an M-series (part of the Memory optimized family) with 128 virtual CPUs and 3.8 TB of memory. That should make for a decent Minecraft server, don’t you think?!
The key thing to learn here is that the number of VMs and amount of CPU and memory you can request in Azure are limited only by your budget. You’d likely struggle to create VMs of this size in the traditional on-premises world.
Continue creating your VM by choosing a size in the following step.
13. In the Sizes pane of the portal, choose one of the recommended VM sizes, such as D2S_v3, and choose the Select button. This is probably way too much power for a basic web server, but it’s quick to create the VM and install the required packages!
If you changed between SSD and HDD on the previous page, the list of available VM sizes may differ. To see a full list of available VM sizes, select See All. You can see size information such as the amount of virtual CPUs and memory assigned, maximum number of data disks that can be attached, and size of local temporary disk.
The VMs created by default are often overpowered for what you need, but they’re quick to deploy and use. This helps cut down on how much time spent installing packages on your lunch break.
In production, pay attention to the memory, CPU, and storage demands of your VMs. Create appropriately sized VMs. This approach is the same as in the on-premises world, where you can end up with VMs that have much more memory or many more virtual CPUs assigned than they need.
There’s also a special type of VM in Azure: the B-series. These VM sizes use burstable CPU and memory resources, and you can bank credits for unused compute resources. If you want to save your Azure credits, you can choose this series of VMs for the book exercises. They come with a lower price point and are great for scenarios where you don’t always need a lot of CPU and memory resources.
With the VM credentials, location, and size selected, now you can configure some of the core VM settings for connectivity, backup, or identity.
2.1.4. Settings
In the Settings pane of the portal, you can review and edit the virtual network settings, as shown in figure 2.6, along with diagnostics, backup, and auto-shutdown settings. Let’s take a minute to review some of these concepts.
Figure 2.6. When you create a VM, you can change virtual network settings, add extensions, configure backups, and more. For this chapter, there’s nothing to change, but for your own deployments, you may want to configure additional settings.

It sounds obvious, but your VM needs network connectivity if you want to reach your website in a web browser. That means you need both a virtual network and external connectivity.
You can create a VM that’s only attached to a virtual network without providing external connectivity, which may be the case for backend database or application servers. To connect to these VMs for administration and maintenance, you can create a virtual private network (VPN) connection, or you can use a private, dedicated connection to Azure from your on-premises networking equipment. In Azure, this dedicated connection is called ExpressRoute.
You want to connect your web server to the public internet, so assign a public IP address to the VM. In the real world, you’d probably have more than one web server that runs your application. A load balancer would act as the gateway between your customers on the internet and distribute traffic to the actual web servers. If that starts to sound just like what you do daily, great! Keep reading! We’ll dive in to this more robust infrastructure in chapters 8 and 9. For now, we’re going to stick with a single VM that connects straight to the internet. (I know, the horror of it all.) By default, Azure creates and assigns a public IP address for you.
A virtual network in Azure is made up of the same core features as a regular physical network:
- An address space and a subnet mask, such as 10.0.0.0/16
- One or more subnets, which you can use to divide external, database, or application traffic, for example
- Virtual network interface cards (NICs) that connect VMs to a given subnet
- Virtual IP addresses that are assigned to resources such as a virtual NIC or load balancer
For your basic web server, you’re creating a specific type of virtual IP address: a public IP address. This public IP address is assigned to the virtual NIC and allows external traffic to reach your VM. You control the flow of traffic to your VM with network security groups. Think of a regular firewall that you use to open or close various ports and protocols; in Azure, network security groups lock down traffic by default and only allow the specific traffic that you define.
Also in the Settings window are a couple of other areas you can explore, including Availability Zones and Sets, and Extensions. Again, these are cool things (seriously, there’s always something new to learn about in Azure!), and I promise we’ll dive deeper in later chapters. Note the Auto-Shutdown option, which can automatically turn off VMs at a designated time. This is a great feature to make sure that you don’t accidentally leave VMs turned on that cost you money.
Review your VM settings in the Summary window, and then create your first VM!
14. Under the Network Security Group section, open a port for remote management connections. By default, VMs created in the portal are locked down and secured from the internet. From the Select Public Inbound Ports drop-down menu, choose SSH (22). We take a deeper look at network security groups and rules in chapter 5.
15. Choose OK in the Settings pane. Review the information in the Summary window, and select Create. It will take a couple of minutes to create your VM. Once the VM is ready, you can log in and start to install the web server packages.
2.2. Connecting to the VM, and installing the web server
Once your VM is up and running, you can use the SSH key you created a few minutes ago to log in to your VM. You can then begin to install and configure the web server, and you can do it all through the Cloud Shell.
2.2.1. Connecting to the VM with SSH
Let’s look at how you can quickly get the connection details for your VM.
If Linux is new to you, don’t worry! Follow along with the next few steps to log in to your VM.
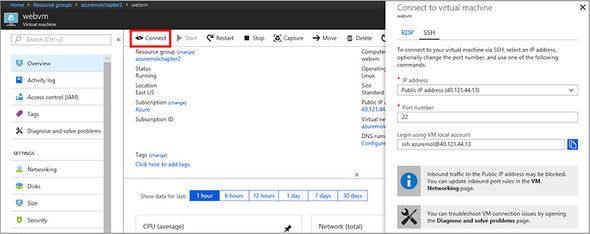
16. In the Azure portal, browse to and select Virtual Machines from the navigation bar on the left side of the screen. It takes a couple of minutes to create the VM, so select the Refresh button until the VM status shows Running, and then select your VM and select the Connect button, as shown in figure 2.7.
Figure 2.7. Select your VM in the Azure portal, and then select Connect to generate the SSH connection information.
With a Linux VM, you’re shown the SSH command that includes your username and public IP address. Copy this SSH connection command.
On a Windows VM, the Connect button downloads an RDP connection file to your computer that’s prepopulated with the public IP address of your VM.
17. If needed, open the Cloud Shell again. If you’re going to be switching between the Cloud Shell and the portal, you can minimize the Cloud Shell to keep it available in the background.
18. Paste the SSH command into the Cloud Shell, and then press Enter. The SSH key you created earlier is automatically used to authenticate.
The first time you connect to a VM with SSH, it prompts you to add it to a list of trusted hosts. This is another layer of security that SSH provides—if someone tries to intercept the traffic and direct you to a different remote VM, your local SSH client knows something has changed and warns you before connecting.
Accept the prompt to store the remote VM connection. Figure 2.8 shows the SSH connection process in the Azure Cloud Shell.
Figure 2.8. Use the connection string shown in the Azure portal to create an SSH connection to your VM from the Cloud Shell.

At this point, you’re either home away from home, or the Linux prompt is totally foreign. Don’t worry. You don’t need to know a huge number of Linux commands, and every command is explained as we go along. That said, I highly recommend that you learn at least some basic Linux administration skills. A lot of the cloud is based on Linux systems, and there’s a big move toward containers and microservices for application development and management. If you’re an old-school Windows admin, welcome! There’s something lined up for you at the end of the chapter, so bear with me.
2.2.2. Installing the web server
Create a VM? Check. Connect to the VM with SSH? Check. Now you can install the packages for a web server and get ready to see it in action.
Azure supports many different Linux distributions (distros). Package-management tools and configuration file locations vary a little between each distro. We’re going to use Ubuntu in this book because it’s one of the most popular and well-documented Linux distros for cloud computing. So, if you get stuck along the way, there should be plenty of documentation to help you out. If you’re wanting to use a different distribution that you’re already comfortable with, feel free to use that! Otherwise, stick with Ubuntu.
From your SSH session to the VM, install the web server packages with APT.
1. In Ubuntu, you install packages with an Advanced Packing Tool (APT). This is a super-powerful package-management tool that automatically installs any additional packages it needs. All you need to do is say “install a web server,” and APT installs all the required components.
For this example, install the LAMP web stack. This is probably the most common set of web components: Linux, Apache (a web server), MySQL (a database server), and PHP (a web programming language):
sudo apt-get update && sudo apt install -y lamp-server^
The first command updates the available packages, which is good practice to make sure you can install the latest and greatest packages. Once that finishes, you run the next command with &&. Why not just start a new line for the next command? The && runs the next command only if the preceding command was successful. For example, if there was no network connectivity for apt to get the latest packages (humor me, I know you must have network connectivity to connect in the first place!), then there’s no point in running the install command.
If the update command is successful, apt then determines what additional packages it needs and begins to install lamp-server. Why the caret symbol at the end (^)? That tells apt to install the entire set of packages that make up the LAMP server, not just a single package named lamp-server.
2. The installer may prompt you for a password, or default to using an empty MySQL password. That’s not very secure, and for real production use, you need to specify a strong password. In chapter 15, we get really cool and store a strong, secure password in Azure Key Vault that’s automatically injected into this MySQL install wizard.
3. It takes a minute or so to install all the packages for your LAMP web stack, and then you’re finished. Type exit to log out of your VM and return to the Cloud Shell prompt.
That’s it! Your web server is up and running, but you won’t be able to access it in a web browser just yet. To do that, you need to allow web traffic to reach the VM.
2.3. Allowing web traffic to reach the VM
Your web server is up and running, but if you enter the public IP address of your VM in a web browser, the web page doesn’t load. Why? Remember the network security groups we briefly talked about earlier? When you created the VM, a network security group was created for you. A rule was added that allows remote management: in this case, that was SSH. If you create a Windows VM, a rule is added that allows RDP. But that’s it. The rest of the VM is locked down. To allow visitors to access your web server over the internet, you need to create a rule in the network security group that allows web traffic. Otherwise, no one can order pizzas!
2.3.1. Creating a rule to allow web traffic
Let’s mix things up a little and use the Azure CLI to create a rule for web traffic. The Azure CLI is available in the Cloud Shell. There’s nothing you need to install. We cover virtual networking and network security groups in more depth in chapter 5; for now, we can check out how quick and powerful the Azure CLI is with just one command.
Open the Azure Cloud Shell, and follow along with these steps to see the Azure CLI in action.
1. If you closed your Cloud Shell window, open it again from the Azure portal. Make sure the Bash shell loads, not PowerShell. If needed, switch to the Bash version.
2. To see the Azure CLI and installed modules, type az --version. A list of modules and version numbers is shown. What’s great about the Cloud Shell is that it always has the latest and greatest version available.
Note
If you’re observant, you may have noticed that the command output information about the version of Python. Why is this important? Python is a powerful, popular programing language. The Azure CLI is written in Python, which is part of what makes it cross-platform and available for you to install locally on any computer if you don’t want to always use the Cloud Shell. To keep up with Microsoft’s drive to contribute to the open source community, the Azure CLI is made available on GitHub for anyone to make contributions, suggestions, or report problems (https://github.com/Azure/azure-cli).
3. To open a port, you specify the VM name and its resource group, along with the port number. For web traffic, you need to open port 80. Enter the resource group (-g) and VM name (-n) you specified when you created your VM:
az vm open-port -g azuremolchapter2 -n webvm --port 80
2.3.2. Viewing the web server in action
Now that you have a port open to your VM, let’s see what happens when you try to access it in a web browser:
1. In the Azure portal, select your VM if you navigated away from it.
2. The public IP address is listed in the upper-right corner of the VM overview page, as shown in figure 2.9. Select the address, and copy it.
Figure 2.9. Select your VM in the Azure portal to view its information. The public IP address is shown at lower right.

3. In your web browser, open a new tab or window and paste in the public IP address. The default Apache website loads, as shown in figure 2.10! Okay, it doesn’t look like a pizza store, but you have the foundation ready to bring in your code and start to build your application!
Figure 2.10. To see your web server in action and view the default Apache 2 page, enter the public IP address in a web browser.

2.4. Lab: Creating a Windows VM
We walked step by step through installing the LAMP stack on an Ubuntu Linux VM. This is a common platform for websites, but you may want some love and attention if you have a Windows background! Your development teams or business decision makers may want to use .NET, for example. Even so, you can run .NET Core on Linux VMs, so don’t let the language drive your decision.
From what you learned in the step-by-step example, try to create a VM that runs Internet Information Services (IIS). Here are some hints:
- You need a VM that runs Windows Server 2016.
- You use RDP, not SSH, so expect a little different connection experience.
- In Server Manager, look for an option to Add Roles and Features.
- You need to install the web server (IIS).
2.5. Cleaning up resources
As you create resources in Azure, the billing meter starts to spin. You’re charged by the minute, so it’s wise to form good habits and not leave resources such as VMs running once you’re done with them. There are two ways to stop the billing charges for running a VM:
- Deallocate a VM—You can select the Stop button from the portal to stop and deallocate a VM, which releases all held compute and network resources.
- Delete a VM—This option is rather obvious. If there’s nothing left in Azure, there’s nothing to pay for. Make sure you’re finished with the VM before you delete it. There’s no undo button in Azure!
I recommend that you create a resource group for each application deployment as you start to build things in Azure. As you walk through the exercises in this book, that’s what you’ll do. If you name your resource groups by chapter, such as azuremolchapter2, it will be easier to keep track of your resources and what to delete. This makes cleanup a little easier, because you can then delete the entire resource group at the end of each chapter. So, select Resource Groups on the navigation menu at left, open each resource group you’ve created in this chapter, and then select Delete Resource Group, as shown in figure 2.11. To confirm, you’re prompted for the resource group name.
Figure 2.11. To save costs, delete resource groups when you no longer need them.

If you get in the habit of deleting resources once you’re done with them, you can comfortably make it through this book on those free Azure credits! At the very least, deallocate your VM at the end of each lesson so you can resume the next day and stop the clock on the billing.
2.6. Houston, we have a problem
Sometimes you’ll run into problems in Azure. There, I said it. Usually the Azure platform is good about issues that come up as you create resources:
- The Azure CLI or Azure PowerShell reports back as you run commands, so it should be obvious when something goes wrong. Azure PowerShell typically uses nice, calm red text to get your attention!
- The Azure CLI can be a little more cryptic because it usually includes the actual responses to the underlying REST API calls from the server. If this is all new, it can take a few successes and failures to understand what’s going wrong. The helpful part of getting the REST responses is that you can copy and paste the error messages into your favorite search engine and usually get solid results to help you troubleshoot.
When you open a web page in your browser, your computer is communicating with a web server using HTTP. I can almost guarantee you’ve seen a 404 error message on a website before. That means the web page couldn’t be found. Other common errors you may have seen are 403, if you don’t have permissions to view the page, and 500, if the server encounters an error.
Even when things go well, under the hood your browser receives code 200 messages when the page loads fine, or code 301 messages if a page has been redirected to a new location. You don’t need to understand and keep track of all these codes; it’s just a standard way that HTTP facilitates communication between computers.
I talked about how to create and manage Azure resources through the web portal, CLI, or PowerShell. All the Azure services are accessed by Representational State Transfer (REST) application programming interfaces (APIs).
If this is new to you, REST APIs are a (somewhat ...) standardized way of exposing services via HTTP. You use standard HTTP requests such as GET and POST to request information or make a change, and once the platform accepts and processes the request, you receive a status message. Azure has a well-defined set of REST APIs.
You don’t need to understand what all this means. Just be aware that when you see an error message, it’s not always in the most human-readable, helpful format. Sometimes you get the raw HTTP response from the REST API that you must decipher by yourself. Again—paste this error into your favorite search engine, and there’s a good chance someone has already encountered the problem and has provided a more human-readable reason for what went wrong and what you need to correct!
The most common problems with VMs occur when you connect to your VM. You could be connecting for remote administration with SSH or RDP, or trying to access your applications through a web browser or desktop client. These issues are often network related. I don’t get into totally blaming the network folks until later chapters, so here are a couple of quick things to check:
- Can you connect to any other Azure VMs or applications running in Azure? If not, something local to your network is probably preventing access. If you can connect to other Azure resources, make sure you’ve opened the network security group rules I talked about in section 2.3. In chapter 5, we’ll dig more into these rules.
- For authentication problems, try the following:
- Confirm that you have the correct SSH keys. Azure should tell you when you create the VM whether the public key is invalid, but if you have more than one private key, make sure you use the correct one!
- For RDP issues, try to connect to localhost<username> and enter your password. By default, most RDP clients try to present local credentials or network credentials, which your VM won’t understand.