
Chapter 17. Machine learning and artificial intelligence
Hopefully, we won’t end up in a world where films like The Terminator and The Matrix come true. In those movies, the rise of artificial intelligence (AI) almost causes the downfall of humanity as machines fight to take control of their surroundings. One cause for concern in computing right now is how the development of AI is mostly done by large, private companies, with little or no regulation and central oversight. That’s not at all to say that AI is a bad thing! Digital assistants on smartphones can help with many day-to-day tasks, and machine learning (ML) in navigation apps and home-heating controls allows the user’s daily drive or room temperature to automatically adjust based on the outside temperature, time of day, and whether it’s summer or winter.
As you begin this final section of the book, you’ll learn about the Azure services for machine learning and artificial intelligence. In one chapter. On your lunch break. Let’s set some realistic expectations: you’re not going to become an expert in ML or AI in the next 45 minutes! You may, if you eat your sandwich quickly, learn enough about the many services that Azure offers to understand how to integrate some of these ML and AI services into your applications. Many of the Azure ML and AI services expect at least some prior experience in data algorithms, programming languages, batch processing, or language understanding, so don’t expect to become an expert in the next hour!
In this chapter, let’s go on a whirlwind tour of some of the Azure cognitive services that provide ML and AI features. You learn how to use these services to perform basic machine learning on data models, and then you use a little of the Azure Web Apps service and the Microsoft Bot Framework to apply some of the AI services that can run a pizza store bot for customers to order pizza.
17.1. Overview and relationship of AI and ML
Hold on tight, because we’re about to go from 0 to 600 mph in just a few pages! AI and ML often overlap as you build applications in Azure. Let’s explore what each is, and then worry about how they work together.
17.1.1. Artificial intelligence
AI allows computers to complete tasks with some amount of flexibility and awareness, and adjust their decisions based on external factors or without the need for human interaction. The goal isn’t usually to build a completely autonomous system that can evolve and develop thoughts for itself, but rather to use a set of data models and algorithms to help guide the decision-making process.
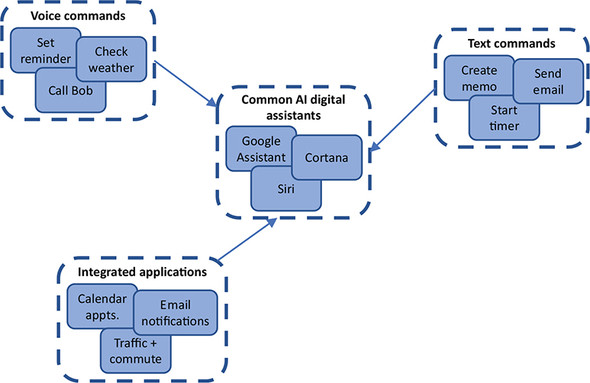
Common AI on personal computers and smartphones includes Siri, Cortana, and Google Assistant. As shown in figure 17.1, these AI resources allow you to communicate, often via voice commands, to ask for directions, set reminders, search the web, and more.
Figure 17.1. A common use of AI in everyday life is digital assistants such as Cortana, Siri, and Google Assistant. You can use voice or text commands to interact with them, and they can monitor your daily calendar and commute conditions to warn you about traffic problems.
Digital assistants like this typically don’t involve a large amount of what you may consider intelligence. They listen and respond to input you provide. But those inputs can vary and may not always be specific commands. Think about how a digital assistant lets you set a reminder. You could use one of the following phrases:
- “Remind me at 5 to pick up milk.”
- “Tell me to pick up milk on the way home.”
- “I need to get milk when I’m at the store.”
If you developed a traditional application, you’d need to write code that could handle all the possible variations of how a user might provide instructions. You could build regular expressions to help catch some of the variations, but what happens when the user comes up with a phrase that you didn’t program? Or what if they interact via text and have a typo in their request that you didn’t anticipate? These types of interactions are a great fit for AI. As shown in figure 17.2, the application is programmed for several common phrases and is then able to make an educated guess based on what it “thinks” the user is asking for.
Figure 17.2. AI can take input from the user and make decisions that best suit the anticipated action. The AI isn’t preprogrammed with all of these possible responses and decision trees. Instead, it uses data models and algorithms to apply context to the user input and interpret the meaning and appropriate outcome.

It’s not true intelligence (yet), even in complex forms of AI; instead, it’s an educated guess based on a data model that the AI has been trained with. This data model may include many different variations and phrases and may be able to learn new meanings over time. How does it learn, and where do these data models come from? That’s where ML becomes important.
17.1.2. Machine learning
A great buzzword in computing over the last few years has been big data. The concept is that computer systems, especially in the cloud, are a great resource to process large amounts of data. Really large amounts of data. These processing jobs may run for a few minutes or hours, depending on the size of the data and the calculations required, and allow you to prepare and analyze large volumes of data to determine specific patterns and correlations. These learnings form data models that other applications or AI can use to help make decisions. As shown in figure 17.3, ML involves a few different steps and includes both inputs and outputs.
Figure 17.3. Large amounts of raw data are processed and made ready for use. Different preparation techniques and data sanitization may be applied, depending on the raw inputs. ML algorithms are then applied to the prepared data to build an appropriate data model that reflects the best correlation among all the data points. Different data models may be produced and refined over time. Applications can then use the data models on their own data inputs to help guide their decision-making and understand patterns.

Here’s how the most basic form of ML works:
1. To begin the process, large amounts of raw data are provided as input.
2. This data is processed and prepared into a usable format to focus on the specific data points required for analysis.
3. ML algorithms are applied to the data. This is where the real number-crunching occurs. The algorithms are designed to detect and compute similarities or differences across the large number of data points.
4. Based on the analysis of the algorithms, a data model is produced that defines patterns within the data. These data models may be refined over time if parts of the model prove to be incorrect or incomplete when additional real-world data is applied.
5. Applications use the data models to process their own data sets. These data sets are typically much smaller than the raw data provided to the ML algorithms. If the data model is valid, then even with a small data input from the application, the correct outcome or correlation can be determined.
ML often involves complex algorithms that are designed to process all the data points provided. Hadoop and Apache Spark are two common application stacks that are used to process big data. Azure HDInsight is a managed service that allows you to analyze the large data sets processed by these application stacks. To get a little deeper into the analysis and algorithms, the R programming language is common with data scientists to help develop the models required. Don’t worry too much about what Hadoop or R is. The key point is that Azure can run the common ML tools that are widely accepted within the industry.
17.1.3. Bringing AI and ML together
A common application on a smartphone is the navigation app, as shown in figure 17.4. Your provider, such as Google, can track the route you take to work each day, what time you usually leave home, and how long it takes you to get there.
Figure 17.4. The Google Maps service receives multiple data points from users each day that record details of their commute. This data can be prepared and processed, along with the weather forecast and real-time weather during those commutes. ML algorithms can be applied to these large data sets and a data model produced. As a smaller sample of active drivers then feed their current travel conditions or weather data into the Google Maps service, the data model can be applied to predict your commute and generate a traffic alert to your smartphone that suggests an alternate route home.

This Google Maps example shows AI and ML working together. AI is applied to know when to generate a notification based on the data received after processing the ML data model. Another example of AI and ML working together is the previous idea of setting a reminder to buy milk. If the AI was trained with ML data models, the assistant would know that you probably buy milk at the grocery store, so it wouldn’t remind you if you went to the hardware store. The ML data model would also be able to help the AI understand that there’s a much great probability that you want to be reminded of something at 5:00 p.m., not 5:00 a.m., so it shouldn’t wake you at 5:00 a.m. to buy milk. If your smartphone tracks you getting in your car at 5:00 p.m. and starting to drive away from work, ML will generate a data model that predicts you’re driving home, so now’s a good time for the AI to remind you about buying milk.
These are basic but powerful examples that show how ML is used to improve AI. You train AI by providing a set of data points that are processed by ML to improve accuracy or decision making.
17.1.4. Azure ML tools for data scientists
I want to quickly cover a couple of ways that some real-world number crunching and ML work can be done. To make this chapter accessible for all, the exercises use the Microsoft Bot Framework for AI, and ML with Language Understanding Intelligent Service (LUIS). To get your hands dirty with ML, we need to focus a little more on data processing and algorithms.
In Azure, there are a couple of cool components to help you dig into data on a massive scale. First, there’s the Azure Machine Learning Studio, a web-based service that lets you visually build experiments by adding data sets and analysis models. These experiments can use data sources such as Hadoop and SQL, and Machine Learning Studio additional programming support through languages like R and Python. You can drag and drop data sources, data-preparation techniques, and ML algorithms. You can adjust those algorithms and then review and tweak the data models produced.
The goal of the Machine Learning Studio is to provide a low barrier for entry to the large-scale compute resources available in Azure. A primary benefit of performing ML data-crunching in Azure is that you can access a large amount of compute power and use it only for the time required to complete your calculations. In traditional environments, those expensive compute resources would sit idle for large periods of time between data-processing jobs.
One other cool resource that helps you perform serious ML and number-crunching in Azure is data science virtual machines (DSVMs). These VMs are available for both Linux and Windows. They come with many common applications preinstalled, including Azure Machine Learning Studio, Jupyter Notebooks, Anaconda Python, and R Server or SQL Server; see figure 17.5. There’s no need to install all the tools and dependencies on your local computer—you can create a DSVM with as much CPU and memory resources as you need to quickly process your data, and then delete the VM when your processing job is complete and you have the data models you need.
Figure 17.5. Data science virtual machines (DSVMs) are available for Windows and Linux. This Window Server 2016 DSVM comes with several data science applications preinstalled, such as R Server, Jupyter Notebooks, and Azure Machine Learning Studio. DSVMs let you quickly get up and running with processing big data and building ML algorithms.

17.2. Azure Cognitive Services
Okay, so what about AI services to make your apps smarter? In Azure, a set of related services make up the Cognitive Services suite. The services cover a few common areas of AI that let you quickly integrate these intelligent resources into your applications. The core parts of Cognitive Services are as follows:
- Vision, which includes
- Computer Vision API for image analysis, captioning, and tagging
- Face API to analyze and detect faces in images
- Content Moderator to review and moderate photos, video, and text
- Speech, which includes
- Bing Speech API to analyze and convert speech to text and vice versa
- Translator Speech API for real-time language translation
- Language, which includes
- Language Understanding Intelligent Service (LUIS) to help understand and process interaction with users. We explore LUIS later in this chapter in the lab.
- Bing Spell Check API and Translator Text API to analyze and correct spelling mistakes or perform translations
- Knowledge, which includes
- Recommendations API to analyze patterns and provide recommendations to customers
- QnA Maker API to consume a set of information or resources and be able to provide answers to customer questions
- Search, which includes
- Bing Custom Search API to implement search on your custom data and within applications
- Bing Autosuggest API to provide automatic suggestions as users enter search phrases and queries
As you can see, many Azure services combine AI and ML features. This chapter focuses on language, specifically LUIS. This service is commonly used to build an intelligent bot that can help customers on your website. You can then build an AI that can interpret phrases and questions, and provide the appropriate response to guide a user through an order process or support request.
17.3. Building an intelligent bot to help with pizza orders
A bot is an application that’s programmed to respond to tasks and input from a user. If this sounds much like any normal application, well, it pretty much is! The difference is how the bot application determines the response.
A basic, common bot is often nothing more than an application that provides some form of automation. When a user sends a message, sets a tag on an email message, or submits a search term, the bot carries out preprogrammed tasks that perform a specific action. There’s no real AI or ML here. The bot application is just responding to user input.
With the right framework, a bot can be extended and given a little more freedom and intelligence. At the start of our overview of AI, I discussed how a typical application must be preprogrammed with all the anticipated user inputs and what the corresponding output would be. But there’s no flexibility if the user provides a different input phrase or a spelling mistake, for example.
Microsoft produces the Bot Framework, which allows an Azure bot to easily integrate the Bot Builder SDKs and connect to Azure Cognitive Services. With minimal code experience, you can build intelligent bots that use the power of Azure to deliver a great customer experience. Just don’t try to build Skynet unless you know how The Terminator ends!
17.3.1. Creating an Azure web app bot
Let’s deploy a bot and integrate some AI and ML services. The bot runs in an Azure web app and uses Microsoft Bot Framework to connect to LUIS and let a customer order pizza. Figure 17.6 outlines what these exercises build and what services are used.
Figure 17.6. In the upcoming exercises, you create a web app bot that integrates multiple Azure AI and ML services to interact with a customer and help them order pizza.

1. Open the Azure portal, and select Create a Resource in the upper-left corner. Search for and select Web App Bot, and then select Create.
2. Enter a name for your bot, such as azuremol. Choose Create New Resource Group, and provide a name, such as azuremolchapter17.
3. Select the most appropriate region for you, and then choose the F0 pricing tier. Your bot won’t process a lot of messages, so the free (F0) tier is fine.
4. Select Bot Template, and then choose the Node.js template for Language Understanding. This step creates a LUIS app you can use to perform language training and ML. Choose the most appropriate region for your LUIS app.
5. Choose App Service Plan, and then select Create New. Provide a name, such as azuremol, and again, select the most appropriate region for you.
6. Leave the default option to Create a Storage Account, which is used to store the state of the bot. This state includes session and message state. Your basic bot won’t use it, but more complex bots do.
7. Turn off App Insights, because your bot won’t use it. As with earlier chapters on web apps, for production use you may want to harness the power of App Insights to gain visibility into the performance of your application by streaming data and analytics straight from the code.
8. Leave the option checked to Auto Create App ID and Password, and then accept the agreement and choose Create.
It takes a few minutes to create the web app bot and associated components. A lot happens behind the scenes:
- An Azure App Service plan is created.
- A web app is deployed, along with a sample Node.js web application.
- A LUIS app is created, and the connection keys are configured with your web app.
- A bot is created with the Microsoft Bot Connector, and the connection keys are configured from your web app.
- An Azure Storage account and table are created for your bot to persist data as it runs and interacts with customers.
17.3.2. Language and understanding intent with LUIS
One of the Azure Cognitive Service areas that we looked at earlier was language. This makes sense, because some form of language is often used to interact with an AI. You can use LUIS to process a message or phrase from the user and determine their intent. That intent then helps your app provide an appropriate response. Let’s extend your bot with LUIS.
To build a LUIS app and use ML to train it, complete the following steps.
1. Open a web browser to www.luis.ai. Sign in with the same Microsoft credentials as your Azure subscription.
2. Select Go to My Apps, and choose your app, such as azuremol. Your LUIS app name likely has some additional numerical characters appended to it from the bot name you specified in the Azure portal.
3. Some prebuilt intents were created, but you want to overwrite the LUIS app with a more pizza-store-focused sample. First, download the azuremol.json file from GitHub at http://mng.bz/Wx0Y to your local computer. To make life easier, select the Raw button in GitHub to see only the contents of the file. Back in your LUIS app, choose Settings at upper right, and then choose Import New Version. Browse to and select the azuremol.json file you downloaded, enter a version name of 1.0, and then select Done.
4. Go back to Build in the top menu to see the imported intents from the sample app. Choose one or two of the intents, such as greetings or orderFood, and look at some of the example phrases a customer could use to communicate with the bot.
5. Before you can see the app in action, you must train it. Select Train, and then wait a few seconds for the process to complete. Figure 17.7 shows the ML processes at work to train your LUIS app.
Figure 17.7. When you train the LUIS app, the intents and entities are input and processed to create a data model. This data model is then used by your web app bot to process language understanding and intent. The number of intents and entities input for processing are small, so the data model isn’t perfect. In the real world, many more intents and entities would be provided, and you’d repeatedly train, test, and refine the data model to build progressively larger data sets to build an accurate model for processing language and intent.
In a more complex, real-world application, it may take longer to complete this training process as all your intents and entities are processed by the ML algorithms to build the required data model for your app to appropriately respond to customer communication.

6. With the LUIS app trained, select Test. Enter a couple of greetings, such as hi and hello. Below each of your messages is the top-scoring intent, along with the probability that the message, or utterance, you entered matches the intent. These basic greetings should correctly match the greetings intent.
7. Try to enter a different greeting, such as (good) afternoon or (good) evening. The single-word greeting based on the time of day may return an incorrect top-scoring intent, such as orderStatus. Try some other phrases until something doesn’t line up with the expected intent, which indicates that the LUIS app doesn’t fully understand what you mean. Select one of your incorrect messages, such as morning, and choose Inspect.
8. On the Inspect menu, choose to Edit the incorrect top-scoring intent. From the Assign to Intent drop-down menu, choose greetings, or whatever the most appropriate intent is for your incorrect phrase. You’ve made a change to your app, so choose to Train the LUIS app again. Figure 17.8 shows how to provide additional inputs for the ML algorithms to then process the data model and refine the language understanding and intent.
Figure 17.8. As you reclassify the intent of messages and retrain the LUIS app, the data model is refined as additional data inputs are provided to the ML algorithms. When you enter similar greetings in the future, the data model will hopefully be improved and will respond more appropriately.

9. In the test messages window, enter the incorrect message again, such as morning. This time, the top-scoring internet should correctly be identified as greetings.
10. To make the updated LUIS app available to your web app bot, select the Publish option from the top menu. Leave all the defaults, and then select Publish to Production Slot. It takes a few seconds to complete the publish process.
Remember, your bot runs on a web app, so it has production and staging slots as you learned about way back in chapter 3. In the real world, you should publish to a staging slot, verify that everything works as expected, and then publish to the production slot. Those same PaaS features that allowed you to test and move web code between development and production lifecycles also benefits the lifecycle of your web app bot powered by LUIS.
The basic example shows that ML was able to take your data input of (good) morning being a greeting and understand that similar greetings, such as (good) evening, are also greetings. ML works best when a large set of data can be input to the data model, so it’s important to thoroughly test and help train your app. The AI, in this case the LUIS app, is only as good as the size and quality of the data provided to the ML algorithms.
17.3.3. Building and running a web app bot with LUIS
You now have a basic web app bot in Azure and a LUIS app that handles the language processing and returns the customer intent. To integrate the two, the code for your bot needs to be modified to use LUIS. SDKs are available for the C# and Node.js programming languages. I find that Node.js makes it a little quicker and easier to understand what happens in the code, if this is all new to you. If you’re familiar with C#, you’re welcome to explore the C# SDK when you’re finished with this chapter. For now, let’s use a basic Node.js app from the GitHub sample repo to see your bot in action with LUIS.
To update your web app bot with your trained LUIS bot, complete the following steps.
1. In the Azure portal, select Resource Groups from the menu at left, and then choose your resource group, such as azuremolchapter17. Select your web app bot, such as azuremol.
2. Under Bot Management at left, choose Build, and then select to Open Online Code Editor.
3. An online code editor loads the Node.js bot application that was created from the Language Understanding template in a previous exercise. If Node.js is new to you, don’t worry! You’re not going to do any real programming here; rather, you’ll use the sample LUIS dialog code from the GitHub repo.
4. In the file explorer that lists the contents of your web app bot, select app.js to open the core part of the app that handles the integration of the LUIS app that you trained earlier.
5. Select all of the existing content of the app.js file, and delete it. Copy and paste the contents from http://mng.bz/ERJD on GitHub. To make life easier, select the Raw button in GitHub to see only the contents of the file. The code automatically saves after you paste it back in the web app bot online editor. You can verify the save state in the upper-right corner of the online editor, which should indicate Saved.
There’s nothing to build or deploy: your web app automatically runs the saved version of your bot! Your web app includes application settings that define your LUIS app ID and API key, so no code modifications are required.
Note
The online code editor is a great way to make quick code changes, but for any real work, I suggest you use Visual Studio Code, which was introduced in chapter 1. VS Code is a lightweight editor that’s great for Node.js development. If you want to use C#, there’s a free Visual Studio Community edition that allows you to use the Microsoft Bot Framework and right-click-publish to Azure Web Apps (with care, for test purposes only).
Let’s look at figure 17.9 to see what you’ve deployed. The LUIS app is now trained with ML algorithms, and your data model is ready for the Node.js app to let customers interact and order pizza.
Figure 17.9. A customer can now access your bot online and ask to view the menu or order pizza. LUIS provides the language understanding, which allows the bot to process orders and send them to Azure Storage for additional processing.

Back in the Azure portal for your web app bot, select Test in Web Chat. It takes a few seconds the first time you connect to the bot, but you should then able to interact, view the list of pizzas on the menu, and create an order, as shown in figure 17.10. Try it yourself!
Figure 17.10. With your web app bot running, start a conversation and try to order a pizza. In this example dialog, you can view the menu, order a pizza, and check the order status. The app is basic and isn’t really creating orders or updating the status beyond what pizza was ordered, but the exercise (hopefully!) shows how you can quickly deploy a bot in Azure.

I hope these basic exercises have given you an idea of what Azure can offer for AI and ML. The web app bot with LUIS can be expanded to include additional Azure Cognitive Services like the Bing Spellcheck API and Translator API. These services let you interpret words and phrases if the user spells them incorrectly, or let your bot converse in multiple languages. Or, you could use the Face API and Recommendations API to detect which customer was making an order based on facial recognition from their camera and automatically suggest pizzas that they may like.
The ML was part of the LUIS app, but there are many more ML resources and tools available in Azure. The ability to process large data sets and compute ML data models on high-performance Azure compute resources lowers the entry for you to build applications backed by some serious data sets. The applications are more accurate and efficient, and there’s no hardware to buy or special tools to install, because the DSVMs include all the components required. Not all applications are a good fit for AI and ML, but as customers start to expect more what your business can offer, these Azure services can often help differentiate you.
Another area of Azure that may be of interest in terms of big-data and compute for ML are the Azure Batch and HPC services. Azure Batch lets you perform large, repetitive compute tasks without the need to manage clusters of schedulers for the work. Batch runs tasks on VMs with its own management and scheduler to help you, just as scale sets include autoscale and load balancing for VMs. Although it isn’t directly related to ML, if you need other large compute-processing tasks, Batch is a great fit.
There are also high-performance computing (HPC) components in Azure for large VM sizes or access to graphical processing unit (GPU) VMs. Specific tools and suites such as DataSynapse and Microsoft HPC Pack can also be used to run applications that demand a large amount of compute power.
Areas such as ML, Azure Batch, and HPC are great examples of how to use cloud computing providers like Azure to run large compute tasks. You only pay for the compute resources you use, so you don’t need to purchase and maintain expensive equipment that sees minimal use.
17.4. Lab: Adding channels for bot communication
In the earlier examples, you communicated with your bot through a test window in the Azure portal. Channels allow you to expand how you can interact with your bot. You can allow your bot to communicate with Skype or Facebook Messenger, or apps like Microsoft Teams and Slack. The Azure Bot Service simplifies the steps needed to integrate a bot with those external services:
1. In the Azure portal, select your web app bot, and then choose Channels. Pick a channel you like, such as Skype.
Other channels often require you to create a developer connection, such as to Facebook or Slack. Skype lets you copy and paste some HTML code to make it work.
2. Provide any required information, such as Bot Application ID. You can find this ID under Settings for Bot Management.
3. If needed, use the online code editor to create a basic HTML page, such as default.htm, in the wwwroot directory, and paste any embedded code for your channel. You can open your web app from the Azure portal and then select its URL to open the default.htm page that includes your channel code, such as http://azuremol.azurewebsites.net/default.htm.