Chapter 6. Weather Station
In this chapter, you will build a Bluetooth-LE-enabled weather station. A BME280 sensor will be used to measure temperature, humidity, and pressure. The Adafruit BME280 breakout board combines a Bosch BME280 environmental sensor with a voltage regulator and other components to make it easier to use.
The Weather Station Service is defined in Table 6-1. Bluetooth Low Energy clients can read the values of the sensors at any time. When the client first connects, it reads the characteristic values to get the initial data. The client could periodically re-read the characteristics to see if any data changed, but it is not very efficient for the client to poll the server looking for changes in values. Each sensor characteristic has the notify property set. The client can subscribe to notifications and the Arduino weather station will notify the connected client whenever a characteristic value changes.
Our weather station measures temperature, humidity, and pressure. More sophisticated weather stations measure wind speed, wind direction, rainfall, and dew point. If you’d like, you can expand your weather station with additional sensors. Additional sensors will require new characteristics in the Bluetooth service. This sketch maxes out the available memory on the Arduino, so a more sophisticated weather station may require a different Arduino board with more memory.
| Characteristic | UUID | Properties | Comment |
|---|---|---|---|
Temperature |
BBB1 |
read, notify |
Temperature (degrees C) |
Humidity |
BBB2 |
read, notify |
Percent relative humidity |
Pressure |
BBB3 |
read, notify |
Barometric pressure (pascals) |
Hardware
The hardware for this project starts with the Arduino Uno and Adafruit Bluefruit LE nRF8001 radio we have used for other projects. Refer to “Wiring Up the Adafruit Bluefruit LE Module” for more information. Wire in the BME280 breakout board sensor based on Figures 6-1 and 6-2.

Figure 6-1. Weather station wiring diagram

Figure 6-2. Weather station wiring
The BME280 can use SPI or I2C. This project uses I2C. The pin labeled SCK is the I2C clock pin and should be connected to A4 or the SCL pin on the Uno. The pin labeled SDI is a I2C data pin and should be connected to A5 or the SDA pin on the Uno.
Libraries
If you’ve done another Arduino project in this book, you should have the Arduino BLE Peripheral library installed. If not, refer to “Installing the BLE Peripheral Library” for details on how to install the library.
Install the Adafruit BME280 library (Figure 6-3) and the Adafruit Universal Sensor library (Figure 6-4) using the Arduino Library Manager. To get there, go to Sketch → Include Library → Manage Libraries….
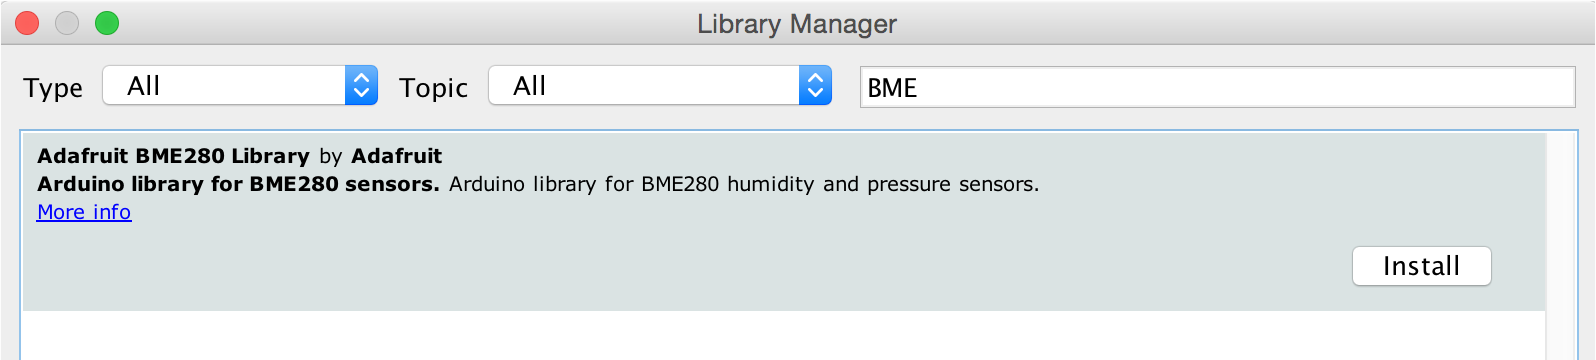
Figure 6-3. Library Manager for the BME280 Sensor library

Figure 6-4. Library Manager for the Unified Sensor library
Programming
Now that the hardware is in place, you need to write the code. Open the Arduino IDE and create a new sketch using File → New. Save the sketch as “Weather.”
At the beginning of the sketch, before setup, include the Bluetooth library, define the pins, and create a BLE peripheral.
#include <SPI.h>#include <BLEPeripheral.h>#define BLE_REQ 10#define BLE_RDY 2#define BLE_RST 9BLEPeripheralblePeripheral=BLEPeripheral(BLE_REQ,BLE_RDY,BLE_RST);
Next, create the service, characteristics, and descriptors for the weather station (Table 6-1).
BLEServiceweatherService=BLEService("BBB0");BLEFloatCharacteristictemperatureCharacteristic=BLEFloatCharacteristic("BBB1",BLERead|BLENotify);BLEDescriptortemperatureDescriptor=BLEDescriptor("2901","Temperature");BLEFloatCharacteristichumidityCharacteristic=BLEFloatCharacteristic("BBB2",BLERead|BLENotify);BLEDescriptorhumidityDescriptor=BLEDescriptor("2901","Humidity");BLEFloatCharacteristicpressureCharacteristic=BLEFloatCharacteristic("BBB3",BLERead|BLENotify);BLEDescriptorpressureDescriptor=BLEDescriptor("2901","Pressure");
Add the BME280 library to your sketch by including the headers for Wire, Adafruit_Sensor, and Adafruit_BME280. Finally, create an instance of the bme object.
#include <Wire.h>#include <Adafruit_Sensor.h>#include <Adafruit_BME280.h>Adafruit_BME280bme;
The BME280 sensor needs a short pause between readings. Many Arduino sketches will use delay(500) to slow down the processing in the loop function and read the sensor every 500 milliseconds. This works effectively in some non-Bluetooth sketches, but it’s not recommended with Bluetooth because the radio can’t work during the delay. An alternative is to use millis. The millis function tells you the number of milliseconds since the Arduino board started running the current program. You can track when you read the sensor state and ensure there is a delay before the sensor is read again. The variables previousMillis and interval will be used in the loop function to limit how often the sensor is read. A weather station really only needs to take readings every few minutes. This sketch will use a delay of two seconds so that it’s easier to see changes in temperature and humidity if you do something like touch the temperature sensor.
longpreviousMillis=0;// will store last time sensor was readlonginterval=2000;// interval at which to read sensor (milliseconds)
In the setup function, initialize Serial; set the advertised names and service; add the service, characteristic, and descriptor; and then start the peripheral. This code is very similar to the BLE Lock sketch in Chapter 4. Additionally, begin must be called for the Adafruit BME280 library.
voidsetup(){Serial.begin(9600);Serial.println(F("Bluetooth Low Energy Weather Station"));// set advertised name and serviceblePeripheral.setLocalName("Weather");blePeripheral.setDeviceName("Weather");blePeripheral.setAdvertisedServiceUuid(weatherService.uuid());// add service and characteristicblePeripheral.addAttribute(weatherService);blePeripheral.addAttribute(temperatureCharacteristic);blePeripheral.addAttribute(temperatureDescriptor);blePeripheral.begin();if(!bme.begin()){Serial.println(F("Could not find a valid BME280 sensor, check wiring!"));while(1);}}
The loop method tells the blePeripheral to poll and periodically reads the sensor value when the read interval expires. The interval ensures the sensor value is not read too often.
voidloop(){// Tell the bluetooth radio to do whatever it should be working onblePeripheral.poll();// limit how often we read the sensorif(millis()-previousMillis>interval){pollSensors();previousMillis=millis();}}
The pollSensors method reads the temperature, humidity, and pressure from the sensor and sets the values into the Bluetooth characteristics if they have changed.
voidpollSensors(){floattemperature=bme.readTemperature();floathumidity=bme.readHumidity();floatpressure=bme.readPressure();// only set the characteristic value if the temperature has changedif(!isnan(temperature)&&temperatureCharacteristic.value()!=temperature){temperatureCharacteristic.setValue(temperature);Serial.(F("Temperature "));Serial.println(temperature);}// only set the characteristic value if the humidity has changedif(!isnan(humidity)&&humidityCharacteristic.value()!=humidity){humidityCharacteristic.setValue(humidity);Serial.(F("Humidity "));Serial.println(humidity);}// only set the characteristic value if the pressure has changedif(!isnan(pressure)&&pressureCharacteristic.value()!=pressure){pressureCharacteristic.setValue(pressure);Serial.(F("Pressure "));Serial.println(pressure);}}
See Example 6-1 for the complete listing of the weather sketch.
Example 6-1. Weather.ino
#include <SPI.h>#include <BLEPeripheral.h>// define pins for Adafruit Bluefruit LE// https://github.com/sandeepmistry/arduino-BLEPeripheral#pinouts#define BLE_REQ 10#define BLE_RDY 2#define BLE_RST 9BLEPeripheralblePeripheral=BLEPeripheral(BLE_REQ,BLE_RDY,BLE_RST);BLEServiceweatherService=BLEService("BBB0");BLEFloatCharacteristictemperatureCharacteristic=BLEFloatCharacteristic("BBB1",BLERead|BLENotify);BLEDescriptortemperatureDescriptor=BLEDescriptor("2901","Temp");BLEFloatCharacteristichumidityCharacteristic=BLEFloatCharacteristic("BBB2",BLERead|BLENotify);BLEDescriptorhumidityDescriptor=BLEDescriptor("2901","Humidity");BLEFloatCharacteristicpressureCharacteristic=BLEFloatCharacteristic("BBB3",BLERead|BLENotify);BLEDescriptorpressureDescriptor=BLEDescriptor("2901","Pressure");#include <Wire.h>#include <Adafruit_Sensor.h>#include <Adafruit_BME280.h>Adafruit_BME280bme;longpreviousMillis=0;// stores the last time sensor was readlonginterval=2000;// interval at which to read sensor (milliseconds)voidsetup(){Serial.begin(9600);Serial.println(F("Bluetooth Low Energy Weather Station"));// set advertised name and serviceblePeripheral.setLocalName("Weather");blePeripheral.setDeviceName("Weather");blePeripheral.setAdvertisedServiceUuid(weatherService.uuid());// add service and characteristicblePeripheral.addAttribute(weatherService);blePeripheral.addAttribute(temperatureCharacteristic);blePeripheral.addAttribute(temperatureDescriptor);blePeripheral.addAttribute(humidityCharacteristic);blePeripheral.addAttribute(humidityDescriptor);blePeripheral.addAttribute(pressureCharacteristic);blePeripheral.addAttribute(pressureDescriptor);blePeripheral.begin();if(!bme.begin()){Serial.println(F("Could not find a valid BME280 sensor, check wiring!"));while(1);}}voidloop(){// Tell the bluetooth radio to do whatever it should be working onblePeripheral.poll();// limit how often we read the sensorif(millis()-previousMillis>interval){pollSensors();previousMillis=millis();}}voidpollSensors(){floattemperature=bme.readTemperature();floathumidity=bme.readHumidity();floatpressure=bme.readPressure();// only set the characteristic value if the temperature has changedif(!isnan(temperature)&&temperatureCharacteristic.value()!=temperature){temperatureCharacteristic.setValue(temperature);Serial.(F("Temperature "));Serial.println(temperature);}// only set the characteristic value if the humidity has changedif(!isnan(humidity)&&humidityCharacteristic.value()!=humidity){humidityCharacteristic.setValue(humidity);Serial.(F("Humidity "));Serial.println(humidity);}// only set the characteristic value if the pressure has changedif(!isnan(pressure)&&pressureCharacteristic.value()!=pressure){pressureCharacteristic.setValue(pressure);Serial.(F("Pressure "));Serial.println(pressure);}}
Compile and Upload
Compile and upload the code to your Arduino via File → Upload.
The source code for this chapter is available on GitHub.
Serial Monitor
While the sketch is running, open the Arduino serial monitor to view the temperature, humidity, and pressure as the values change (see Figure 6-5).
Tools -> Serial Monitor

Figure 6-5. Arduino IDE serial monitor
Using the Service
The serial monitor shows that data is read from the sensor and processed with your sketch. The next step is to use a generic Bluetooth client to connect to the service and read data from the Bluetooth characteristics. If you have an iOS device, continue to the next section on LightBlue. Android users should skip ahead to “Using nRF Master Control Panel on Android”.
Using LightBlue on iOS
When you first connect with LightBlue, it will be difficult to interpret the data because the UI displays hex bytes for the temperature, humidity, and pressure value. Select the temperature characteristic and tap on the Hex button on the top-right. Scroll down and select 4 Byte Float Little Endian. The UI will switch back to the characteristic view and display the temperature as a float (Figure 6-6).
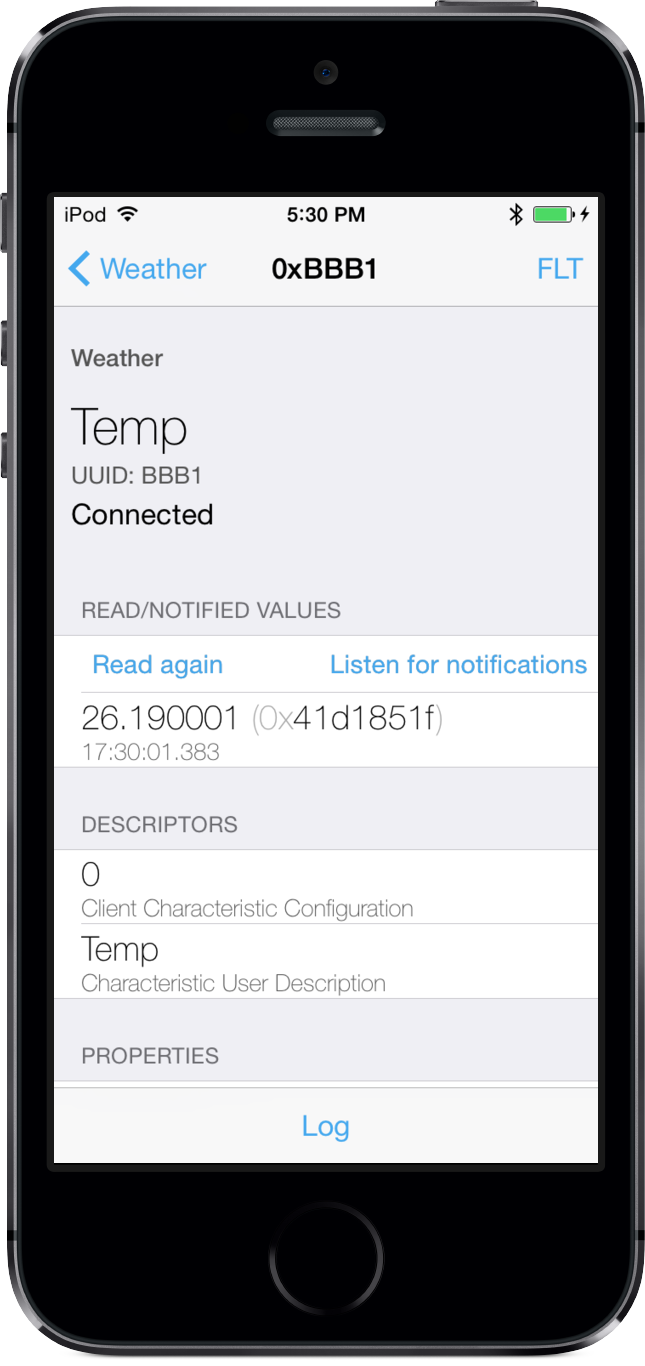
Figure 6-6. The temperature displays as a floating-point number
Using nRF Master Control Panel on Android
On Android, we read the data with nRF Master Control Panel (Figure 6-7).

Figure 6-7. Click the icon with the three down arrows to enable temperature notifications
Unfortunately, nRF Master Control Panel doesn’t translate the bytes of data into floating-point numbers. You can use the IEEE 754 Float Converter to convert the hexadecimal characteristic value to a float. Type the value in the Hexadecimal Representation input box (Figure 6-8).

Figure 6-8. Float Converter
Note that you need to reverse the byte order between nRF Master Control Panel and the Float Converter. nRF Master Control Panel displays the data in network byte order (big-endian). The Float Converter expects the most significant byte first (little-endian).
nRF Master Control Panel |
|
Hexadecimal Representation |
|
Temperature |
|
PhoneGap
Generic Bluetooth applications, like LightBlue, can read data from the weather station, but the user interface makes reading multiple values tedious. You can create a PhoneGap application that will run on iOS or Android and display the weather station values.
Refer to “Installing PhoneGap” for more information on installing the PhoneGap command-line tools on your computer.
Create the Project
Open a terminal or cmd prompt on your computer. Change to the directory where you’d like to create the project.
cd ~/bluetoothUse the phonegap command-line tool to create a new project.
phonegap create weather com.makebluetooth.weather Weather --template blank
Since you are using the PhoneGap Developer App, there’s no need to install the Bluetooth Low Energy plugin or any platform-specific code. See “Installing PhoneGap” for more details about using Apache Cordova or PhoneGap to build native applications.
Open the project in your text editor.
HTML
The index.html page builds the user interface for the mobile application. The application has two pages. The first page lists the available devices that are running the 0xBBB0 Bluetooth Weather Service. When you tap on a device in the list, you are connected to the device and taken to the detail page. The detail page shows data from the Bluetooth weather service.
Application pages are created using HTML div elements. The elements get unique ids so it is easy to access them from the JavaScript code. JavaScript functions show and hide divs as the user navigates in the application.
Add a link to the stylesheet in the head section of index.html.
<linkrel="stylesheet"type="text/css"href="css/index.css"/>
The stylesheet isn’t strictly required, but the application will look better if you add it. Create a new css directory inside the www directory. Create a file named index.css. Copy the contents of index.css into your file. This book already covers a lot of topics. Copying in some premade CSS allows us to skip the explanation and get back to building the application.
Edit the code within the body tag of index.html.
An h2 header element serves as a title bar for the application.
<h2>BLE Weather</h2>
The main page contains a list for devices and a refresh button.
<divid="mainPage"><ulid="deviceList"></ul><buttonid="refreshButton">Refresh</button></div>
The detail page is slightly more complex. It contains a series of nested div elements to display the data. JavaScript functions will fill in this data as the application runs.
<divid="detailPage"><p>Temperature</p><divid="temperatureDiv">Unknown</div><p>Humidity</p><divid="humidityDiv">Unknown</div><p>Station Pressure</p><divid="stationPressureDiv">Unknown</div><p>Sea Level Pressure</p><divid="seaLevelPressureDiv">Unknown</div><buttonid="disconnectButton">Disconnect</button></div>
Finally, ensure that both cordova.js and index.js are included just before the close body tag.
<scripttype="text/javascript"src="cordova.js"></script><scripttype="text/javascript"src="js/index.js"></script>
See Example 6-2 for the complete listing of index.html.
Example 6-2. index.html
<!DOCTYPE html><html><head><metacharset="utf-8"><metaname="viewport"content="initial-scale=1, maximum-scale=1,user-scalable=no, width=device-width"><linkrel="stylesheet"type="text/css"href="css/index.css"/><title>BLE Weather</title></head><body><h2>BLE Weather</h2><divid="mainPage"><ulid="deviceList"></ul><buttonid="refreshButton">Refresh</button></div><divid="detailPage"><p>Temperature</p><divid="temperatureDiv">Unknown</div><p>Humidity</p><divid="humidityDiv">Unknown</div><p>Station Pressure</p><divid="stationPressureDiv">Unknown</div><p>Sea Level Pressure</p><divid="seaLevelPressureDiv">Unknown</div><buttonid="disconnectButton">Disconnect</button></div><scripttype="text/javascript"src="cordova.js"></script><scripttype="text/javascript"src="js/index.js"></script></body></html>
JavaScript
PhoneGap applications are written in JavaScript. Create a new js directory inside the www directory. Create a new file named index.js. Define four constants for the Bluetooth service and characteristics at the beginning of the file.
varWEATHER_SERVICE='BBB0';varTEMPERATURE_CHARACTERISTIC='BBB1';varHUMIDITY_CHARACTERISTIC='BBB2';varPRESSURE_CHARACTERISTIC='BBB3';
Create an object literal named app. The application logic is built by adding functions to the app object.
varapp={};
The first three functions you add are common bootstrapping for most PhoneGap apps. The initialize function calls bindEvents and ensures the main page is visible. The bindEvents function adds JavaScript event listeners to the list and buttons. The onDeviceReady function is called when the deviceready event fires. PhoneGap applications must wait for the framework to initialize and fire deviceready before making any API calls.
initialize:function(){this.bindEvents();this.showMainPage();},bindEvents:function(){document.addEventListener('deviceready',this.onDeviceReady,false);deviceList.addEventListener('click',this.connect,false);refreshButton.addEventListener('click',this.refreshDeviceList,false);disconnectButton.addEventListener('click',this.disconnect,false);},onDeviceReady:function(){app.refreshDeviceList();},
Once the device is ready, the application can scan for Bluetooth devices and display the results in the user interface. Bluetooth scan results are filtered to contain only devices that are advertising the 0xBBB0 Weather Service.
refreshDeviceList:function(){deviceList.innerHTML='';// empty the listble.scan([WEATHER_SERVICE],5,app.onDiscoverDevice,app.onError);},
Warning
On Android 4.3 and 4.4, scan filtering is broken. Often you cannot filter scan results by UUID. If you are not seeing any devices while scanning, try passing an empty array [] to ble.scan instead of filtering for [WEATHER_SERVICE].
The onDiscoverDevice callback will be called for each Bluetooth device that is found. Add a li element to the unordered list that will display the device name and id. The device id is stored in the list item’s dataset so that it can be retrieved later.
onDiscoverDevice:function(device){varlistItem=document.createElement('li');listItem.innerHTML=device.name+' '+device.id;listItem.dataset.deviceId=device.id;deviceList.appendChild(listItem);},
When a user taps an item in the list, the connect function is called. The device id is retrieved from the dataset and passed to the connect function of the ble API.
connect:function(e){vardeviceId=e.target.dataset.deviceId;ble.connect(deviceId,app.onConnect,app.onError);},
When the application connects to the Bluetooth peripheral, the success callback app.onConnect is called. After a successful connection, a few things need to happen. First, save a reference to the connected peripheral in app.peripheral. You’ll need the reference to the peripheral later in the disconnect method. Next, display the detail page to the user using app.showDetailPage (you’ll write this function later.) Use ble.startNotification to subscribe to notifications when the temperature, humidity, or pressure changes. It’s also important to call ble.read for each characteristic. If the values are not changing, ble.read ensures there is data to show the user. The read and notify for each property can share the same success callback.
onConnect:function(peripheral){app.peripheral=peripheral;app.showDetailPage();varfailure=function(reason){navigator.notification.alert(reason,null,"Temperature Error");};// subscribe to be notified when the temperature changesble.startNotification(peripheral.id,WEATHER_SERVICE,TEMPERATURE_CHARACTERISTIC,app.onTemperatureChange,failure);// subscribe to be notified when the humidity changesble.startNotification(peripheral.id,WEATHER_SERVICE,HUMIDITY_CHARACTERISTIC,app.onHumidityChange,failure);// subscribe to be notified when the pressure changesble.startNotification(peripheral.id,WEATHER_SERVICE,PRESSURE_CHARACTERISTIC,app.onPressureChange,failure);// read the initial valuesble.read(peripheral.id,WEATHER_SERVICE,TEMPERATURE_CHARACTERISTIC,app.onTemperatureChange,failure);ble.read(peripheral.id,WEATHER_SERVICE,HUMIDITY_CHARACTERISTIC,app.onHumidityChange,failure);ble.read(peripheral.id,WEATHER_SERVICE,PRESSURE_CHARACTERISTIC,app.onPressureChange,failure);},
Now, implement the callback for the ble.read and ble.startNotification calls. All three characteristics are floating-point numbers. Each callback receives an ArrayBuffer of data. This buffer of raw data needs to be converted into a typed Float32Array so it can be read. Although the ArrayBuffer is converted into an array of floating-point values, the service only sends one value, so it is an array of one element.
Convert temperature into a floating-point value. Temperature is sent in Celsius. Convert this to Fahrenheit and display both values in the application. Use toFixed to truncate the number to one decimal place.
onTemperatureChange:function(buffer){vardata=newFloat32Array(buffer);vartemperature=data[0];vartemperatureF=temperature*1.8+32;varmessage=temperature.toFixed(1)+"°C<br/>"+temperatureF.toFixed(1)+"°F<br/>";temperatureDiv.innerHTML=message;},
Humidity is a floating-point value like temperature. Use toFixed to display one decimal place.
onHumidityChange:function(buffer){vardata=newFloat32Array(buffer);varhumidity=data[0];varmessage=humidity.toFixed(1)+"%";humidityDiv.innerHTML=message;},
The handler for pressure is slightly more complex. The pressure value is just a floating-point number like temperature and humidity, but there are a few more conversions that need to be done.
Data is sent in pascals, but hectoPascals (or millbars) is a better way to display pressure information. Divide by 100 to get hPa. Displaying pressure in hPa works fine for most of the world. Unfortunately, the United States still uses the antiquated unit inches of mercury to measure pressure. Use app.toInchesOfMercury helper function to do the conversion.
The pressure measured by the sensor is known as station pressure. This measured value probably does not match the value you look up on a weather website such as NOAA, GoC Weather, or BBC Weather.
Atmospheric pressure decreases as elevation increases. Barometric pressure is reported at sea-level pressure as a way to normalize pressure measurements, removing the effect of the station’s elevation. Once you know the elevation of your weather station, you can convert the pressure to theoretical pressure at sea level.
There are formulas for calculating sea-level pressure from station pressure using temperature and elevation. As a rough estimate, assume that pressure will decrease 1 hPa for every 8 meters of elevation. If you are at higher elevation or need a more accurate value, you may need to substitute a better conversion formula.
Tip
Find your current elevation using a website like What Is My Elevation?
onPressureChange:function(buffer){vardata=newFloat32Array(buffer);varpressure=data[0];// pascals// hectoPascals (or millibar) is a better unit of measurepressure=pressure/100.0;// station pressure is what we measurevarmessage=pressure.toFixed(2)+" hPa<br/>"+app.toInchesOfMercury(pressure)+" inHg<br/>";stationPressureDiv.innerHTML=message;// Pressure needs to be converted to sea-level pressure to match// the barometric pressure in weather reports.// Fort Washington, PA - adjust this for your locationvarelevationInMeters=50.438;// pressure drops approx 1 millibar for every 8 meters above sea levelvardelta=elevationInMeters/8.0;varseaLevelPressure=pressure+delta;message=seaLevelPressure.toFixed(2)+" hPa<br/>"+app.toInchesOfMercury(seaLevelPressure)+" inHg";seaLevelPressureDiv.innerHTML=message;},
Create a helper function to covert between hectoPascals and inches of mercury. This can be estimated by using the conversion factor of 0.0295300 inHg per hPa.
toInchesOfMercury:function(hPa){// http://www.srh.noaa.gov/images/epz/wxcalc/pressureConversion.pdfreturn(hPa*0.0295300).toFixed(2);},
Create a function for the disconnect button.
disconnect:function(e){if(app.peripheral&&app.peripheral.id){ble.disconnect(app.peripheral.id,app.showMainPage,app.onError);}},
Create two functions for page navigation. Navigation simply shows and hides divs.
showMainPage:function(){mainPage.hidden=false;detailPage.hidden=true;},showDetailPage:function(){mainPage.hidden=true;detailPage.hidden=false;},
The last function in the app object is the generic error handler referenced from many of the API calls. If an error occurs, a dialog box is shown to the user.
onError:function(reason){navigator.notification.alert(reason,app.showMainPage,"Error");}
The last line of the JavaScript file should initialize the application.
app.initialize();
See Example 6-3 for the complete listing of index.js.
Example 6-3. Full listing of index.js
varWEATHER_SERVICE='BBB0';varTEMPERATURE_CHARACTERISTIC='BBB1';varHUMIDITY_CHARACTERISTIC='BBB2';varPRESSURE_CHARACTERISTIC='BBB3';varapp={initialize:function(){this.bindEvents();this.showMainPage();},bindEvents:function(){document.addEventListener('deviceready',this.onDeviceReady,false);deviceList.addEventListener('click',this.connect,false);refreshButton.addEventListener('click',this.refreshDeviceList,false);disconnectButton.addEventListener('click',this.disconnect,false);},onDeviceReady:function(){app.refreshDeviceList();},refreshDeviceList:function(){deviceList.innerHTML='';// empty the listble.scan([WEATHER_SERVICE],5,app.onDiscoverDevice,app.onError);},onDiscoverDevice:function(device){varlistItem=document.createElement('li');listItem.innerHTML=device.name+' '+device.id;listItem.dataset.deviceId=device.id;deviceList.appendChild(listItem);},connect:function(e){vardeviceId=e.target.dataset.deviceId;ble.connect(deviceId,app.onConnect,app.onError);},onConnect:function(peripheral){app.peripheral=peripheral;app.showDetailPage();varfailure=function(reason){navigator.notification.alert(reason,null,"Temperature Error");};// subscribe to be notified when the temperature changesble.startNotification(peripheral.id,WEATHER_SERVICE,TEMPERATURE_CHARACTERISTIC,app.onTemperatureChange,failure);// subscribe to be notified when the humidity changesble.startNotification(peripheral.id,WEATHER_SERVICE,HUMIDITY_CHARACTERISTIC,app.onHumidityChange,failure);// subscribe to be notified when pressure changesble.startNotification(peripheral.id,WEATHER_SERVICE,PRESSURE_CHARACTERISTIC,app.onPressureChange,failure);// read the initial valuesble.read(peripheral.id,WEATHER_SERVICE,TEMPERATURE_CHARACTERISTIC,app.onTemperatureChange,failure);ble.read(peripheral.id,WEATHER_SERVICE,HUMIDITY_CHARACTERISTIC,app.onHumidityChange,failure);ble.read(peripheral.id,WEATHER_SERVICE,PRESSURE_CHARACTERISTIC,app.onPressureChange,failure);},onTemperatureChange:function(buffer){vardata=newFloat32Array(buffer);vartemperature=data[0];vartemperatureF=temperature*1.8+32;varmessage=temperature.toFixed(1)+"°C<br/>"+temperatureF.toFixed(1)+"°F<br/>";temperatureDiv.innerHTML=message;},onHumidityChange:function(buffer){vardata=newFloat32Array(buffer);varhumidity=data[0];varmessage=humidity.toFixed(1)+"%";humidityDiv.innerHTML=message;},onPressureChange:function(buffer){vardata=newFloat32Array(buffer);varpressure=data[0];// pascals// hectoPascals (or millibar) is a better unit of measurepressure=pressure/100.0;// station pressure is what we measurevarmessage=pressure.toFixed(2)+" hPa<br/>"+app.toInchesOfMercury(pressure)+" inHg<br/>";stationPressureDiv.innerHTML=message;// Pressure needs to be converted to sea-level pressure to match// the barometric pressure in weather reports.// Fort Washington, PA - adjust this for your locationvarelevationInMeters=50.438;// pressure drops approx 1 millibar for every 8 meters above sea levelvardelta=elevationInMeters/8.0;varseaLevelPressure=pressure+delta;message=seaLevelPressure.toFixed(2)+" hPa<br/>"+app.toInchesOfMercury(seaLevelPressure)+" inHg";seaLevelPressureDiv.innerHTML=message;},toInchesOfMercury:function(hPa){// http://www.srh.noaa.gov/images/epz/wxcalc/pressureConversion.pdfreturn(hPa*0.0295300).toFixed(2);},disconnect:function(e){if(app.peripheral&&app.peripheral.id){ble.disconnect(app.peripheral.id,app.showMainPage,app.onError);}},showMainPage:function(){mainPage.hidden=false;detailPage.hidden=true;},showDetailPage:function(){mainPage.hidden=true;detailPage.hidden=false;},onError:function(reason){navigator.notification.alert(reason,app.showMainPage,"Error");}};app.initialize();
Run the App
Save index.html and index.js and you’re ready to run the application. Go back to your terminal or command prompt and start the server by typing phonegap serve.
xvi:weather don(master)$phonegap serve[phonegap]starting app server...[phonegap]listening on 10.0.1.16:3000[phonegap][phonegap]ctrl-c to stop the server[phonegap]
On your phone or tablet, start the PhoneGap Developer App. Verify that the server address listed in the app matches the address from the phonegap serve command. Press Connect. You should see a list of devices offering the Weather Service. Click on your device. You should see the weather details reported on the detail screen (Figure 6-9). Click the disconnect button to go back to the device list.
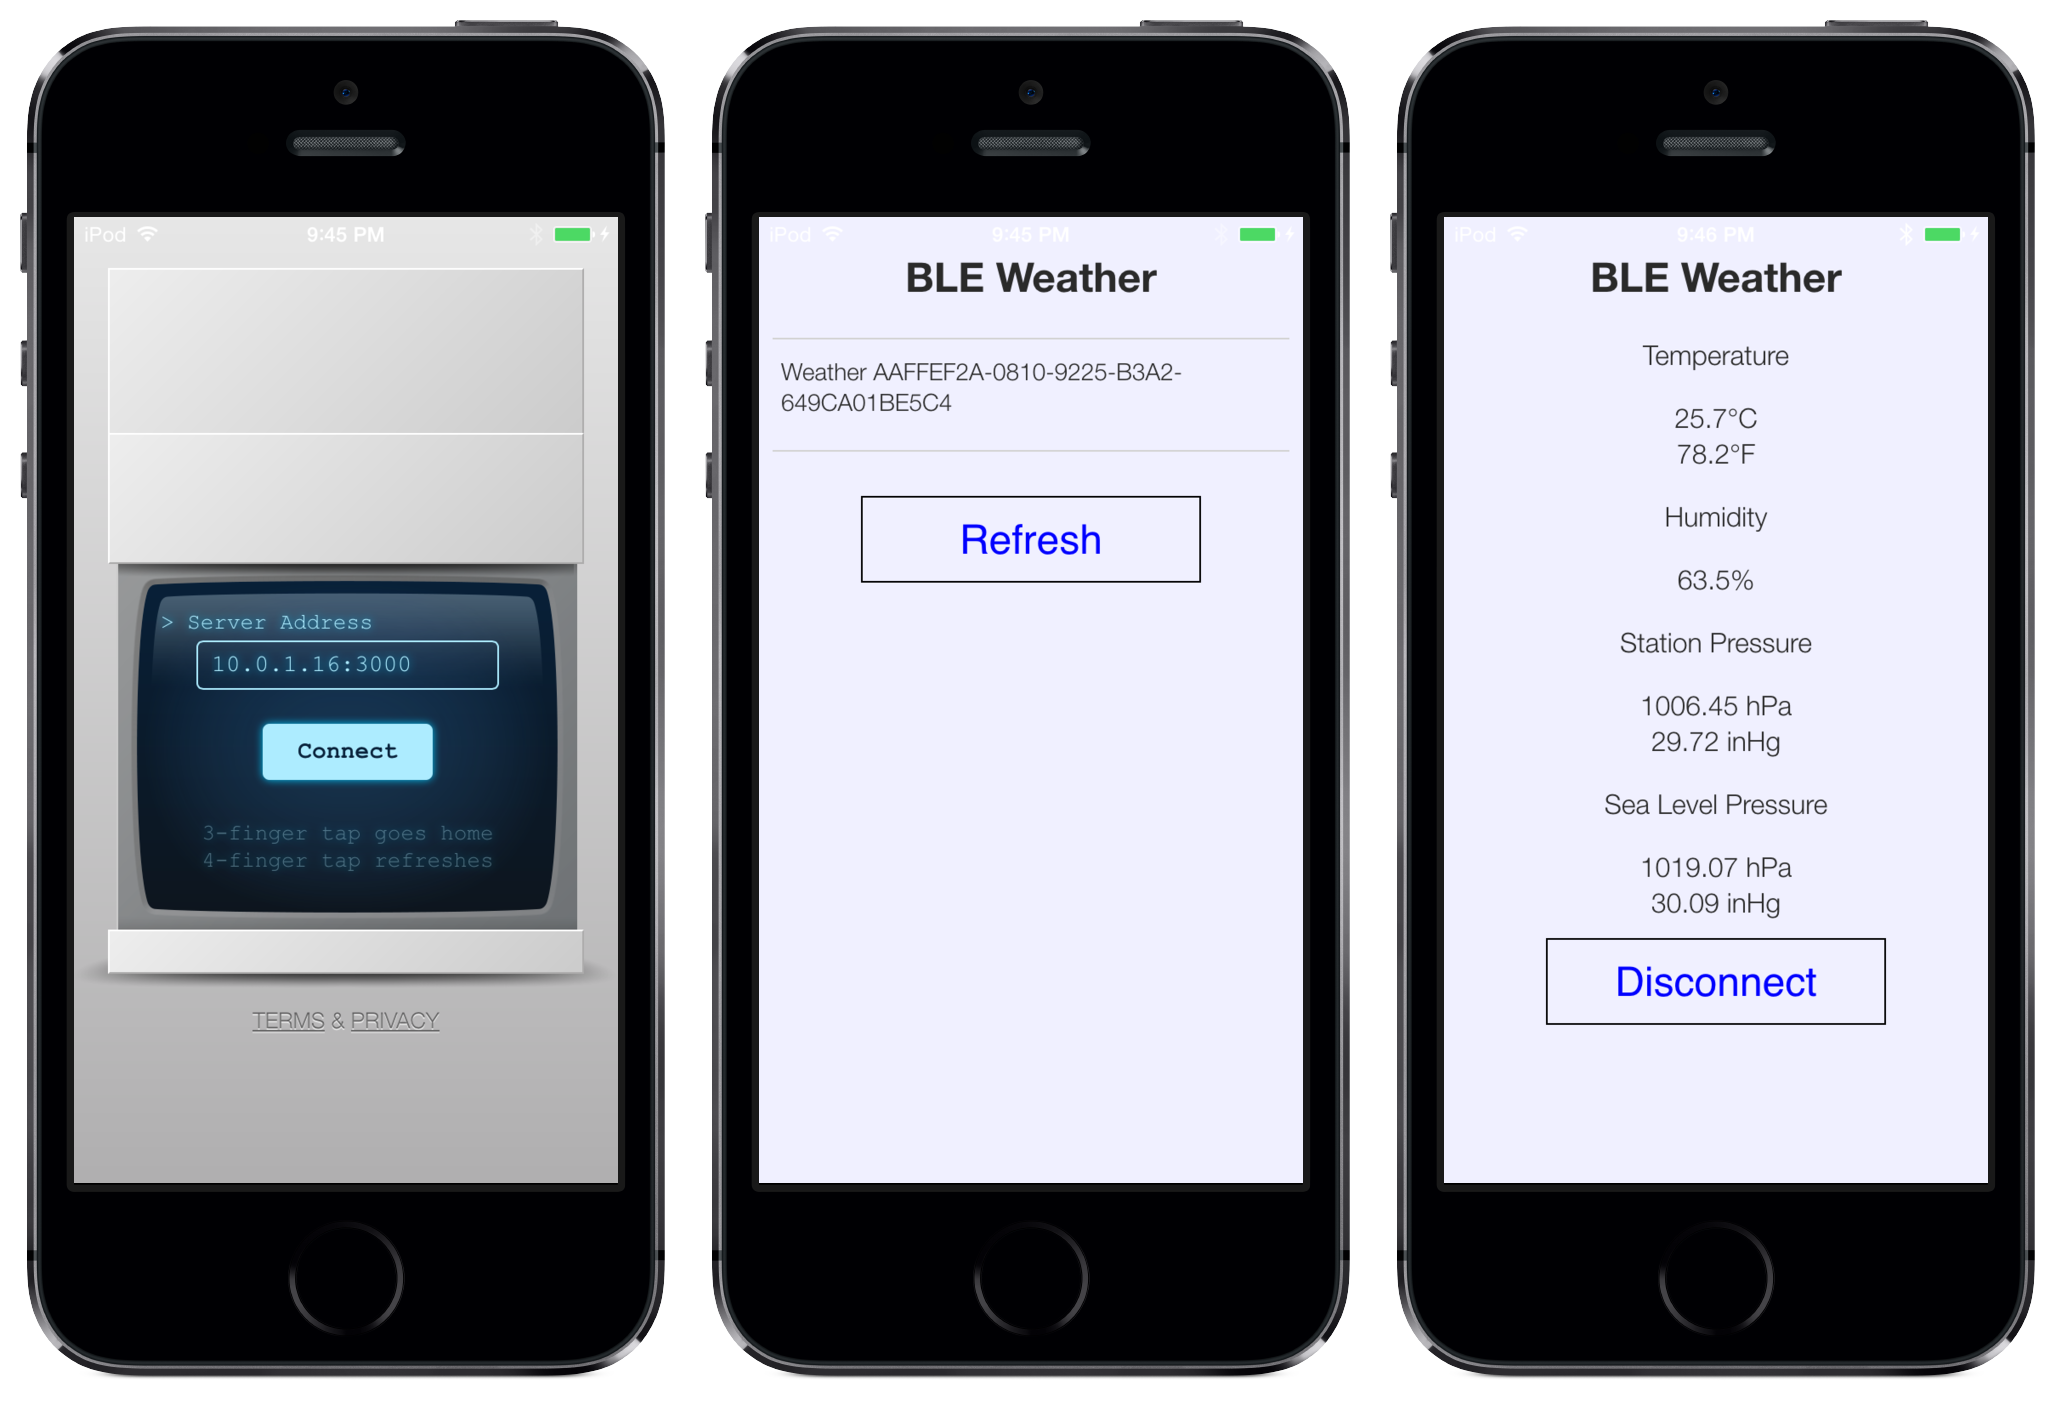
Figure 6-9. Left: PhoneGap Developer App. Center: Weather main page. Right: Weather detail page
The source code for this chapter is available on GitHub.
What’s Next?
You combined an Arduino, a BME280 breakout board, and a Bluetooth service to create a weather station that measures temperature, humidity, and pressure.
More sophisticated weather stations measure wind speed, wind direction, rainfall, and dew point. If you’d like, you can expand your weather station with additional sensors. Additional sensors will require new characteristics in the Bluetooth service. This sketch maxes out the available memory on the Arduino Uno, so a more sophisticated weather station may require a different Arduino board with more memory.
The PhoneGap application read and converted the Bluetooth data for display. If you want a more permanent record of the data, you can build a program for your computer that collects the data over Bluetooth and logs it to a file, spreadsheet, or web service.