
Custom Setting g3: OK Button
The OK button has a dual purpose in the Z6 when capturing video. There are three settings you can assign to the OK button, which we will discuss; however, anytime Movie mode is active, the OK button can be used to initiate focus tracking when Auto-area AF AF-area mode is selected. Let’s examine the three settings you can choose to assign to the OK button:
- Select center focus point: If selected, pressing the OK button causes the AF point to jump to the middle of the screen.
- Zoom on/off: If selected, you can press the OK button to zoom in on your subject before you start recording a movie. This function will not work while video is being recorded.
- Record movies: If selected, you can press the OK button to stop or start recording video.
Now let’s see how to assign a setting to the OK button for when you are recording videos.
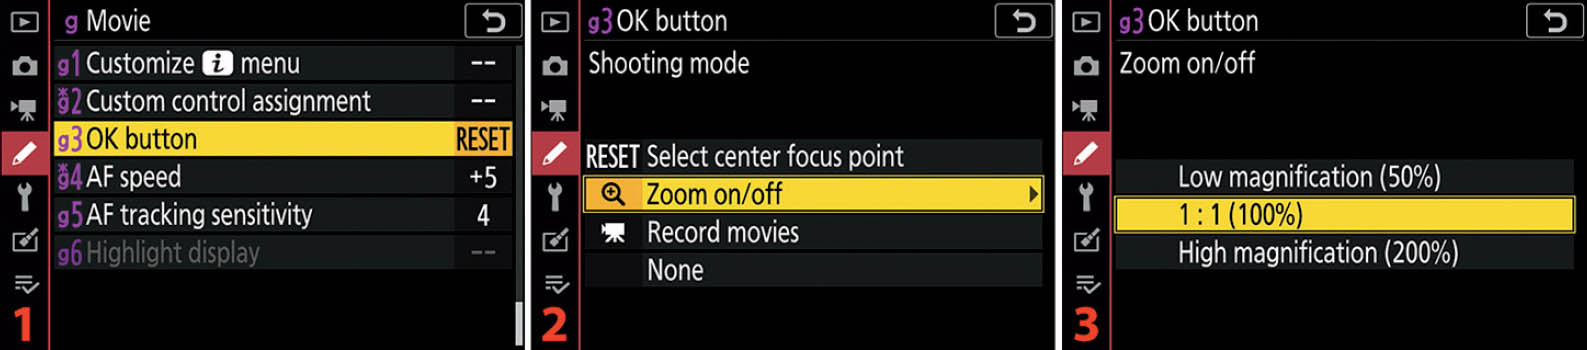
Figure 9.56A: Assigning a setting to the OK button for video
Use the following steps to assign a setting to the OK button for use while recording a movie:
- 1. Choose g3 OK button from the g Movie menu and scroll to the right (figure 9.56A, image 1).
- 2. Highlight one of the three available settings, referring to the previous list for a description of each option’s functionality. If you choose Select center focus point or Record movies, press the OK button or tap the option to use it and then skip step 3 (figure 9.56A, image 2).
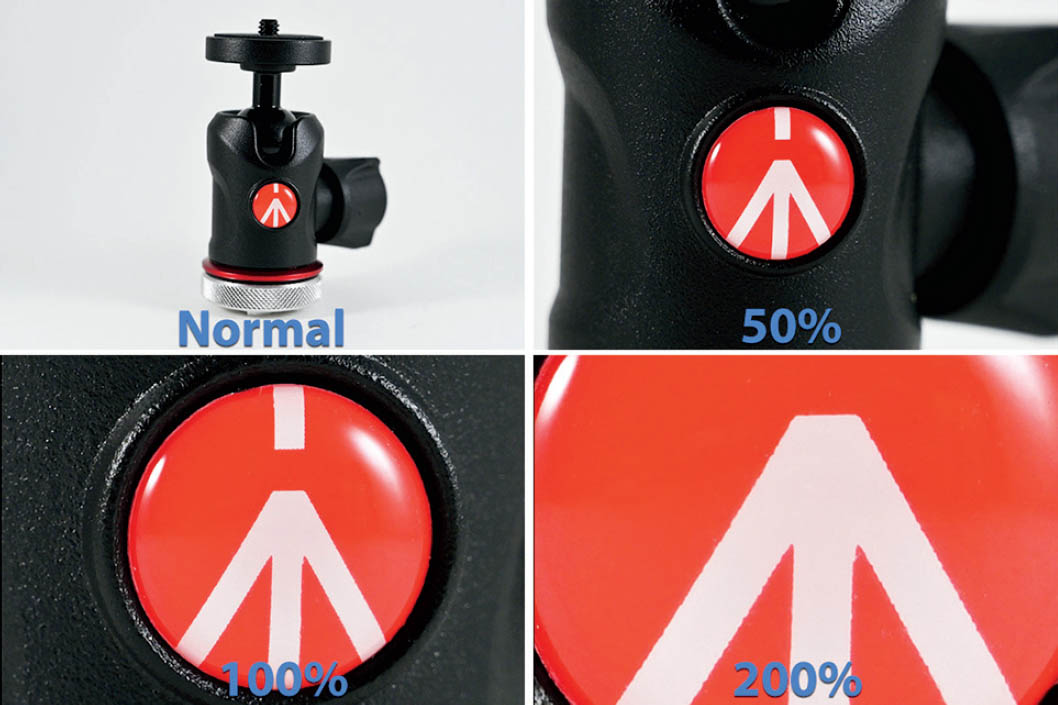
Figure 9.56B: Zoom magnification levels
- 3. If you select Zoom on/off you will need to choose a zoom magnification level. Sample zoom levels are shown in figure 9.56B—from Normal (no zoom) to 200%. This allows you to prepare the focus by examining a pixel-peeping closeup of your subject. To choose a zoom level, highlight it and press the OK button or tap the option with your fingertip.
Settings Recommendation: I set my camera to Zoom on/off at the 100% level. I have Select center focus point assigned to the Sub-selector joystick press function and prefer to use the joystick for all AF point movement in still photography and movie modes. I can then use the OK button to zoom in and make sure I have good focus set before I start the video recording session. The Zoom on/off setting will not work while a video is being recorded. Experiment with these three modes and see which works best for you.
Custom Setting g4: AF Speed
Use the AF speed function to choose how quickly the camera focuses on your subject when capturing a video and when not recording. Sometimes it can be jarring to have a subject snap into focus, such as when you are switching between two people in your video. You can control the speed with which the camera focuses on the new subject. Also, you can choose when the focus speed limitation applies:
- Always: The AF speed slider (−5 to +5) always controls how fast autofocus works during video recording and when not recording.
- Only while recording: The AF speed limitation works while you are recording a video only. When you are not recording a video the AF speed is equivalent to the +5 setting.
Let’s see how to use the AF speed control.
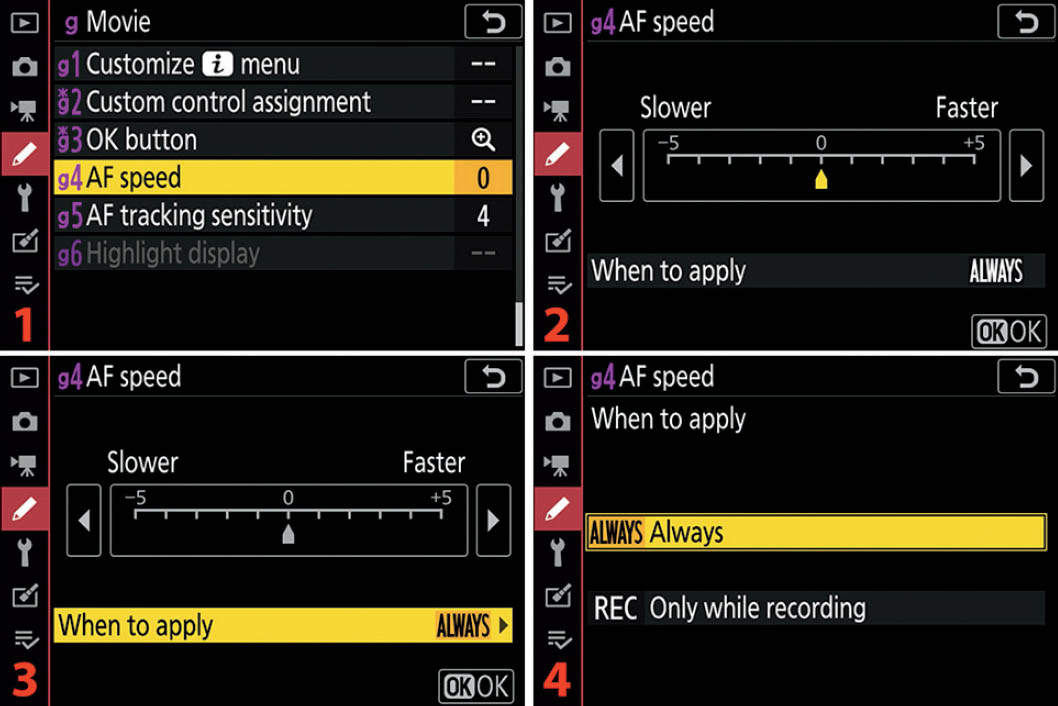
Figure 9.57: Using the AF speed control
Use the following steps to choose an AF speed and select when the AF speed limiter can control the AF speed:
- 1. Choose g4 AF speed from the g Movie menu and scroll to the right (figure 9.57, image 1).
- 2. Use the AF speed Slower/Faster slider control to set a focus speed (figure 9.57, image 2). Experiment with the speed (−5 to +5) and see which you like the best. Tap the little pointer controls on either side of the slider scale to move the yellow pointer (red arrow) to the left toward −5 or to the right toward +5. Press or touch OK to lock in the setting.
- 3. If you want to limit when the AF speed control works, scroll down to When to apply and scroll to the right, or tap the When to apply setting with your fingertip (figure 9.57, image 3).
- 4. Highlight Always or Only while recording and press the OK button or tap the option to lock it in (figure 9.57, image 4). See the previous list to help with your decision.
Settings Recommendation: I don’t shoot a lot of video where I need to control focus speed since I shoot mostly static nature videos. However, when working with people or multiple objects where I have to switch focus, I do prefer the less jarring look of a slower AF. This is very subjective and is governed by your needs. Experimentation is in order. I definitely use the Only while recording subsetting so that I can see faster AF results when I am setting up my video session initially. I leave the Slower/Faster slider set to 0 most of the time.
Custom Setting g5: AF Tracking Sensitivity
The AF tracking sensitivity function works in a similar manner to the Custom setting a3: Focus Tracking with Lock-On function (page 367) for still photography. The AF tracking sensitivity function controls how long the camera tries to maintain focus on your original subject when something passes between your camera and your subject. Let’s see how it works.
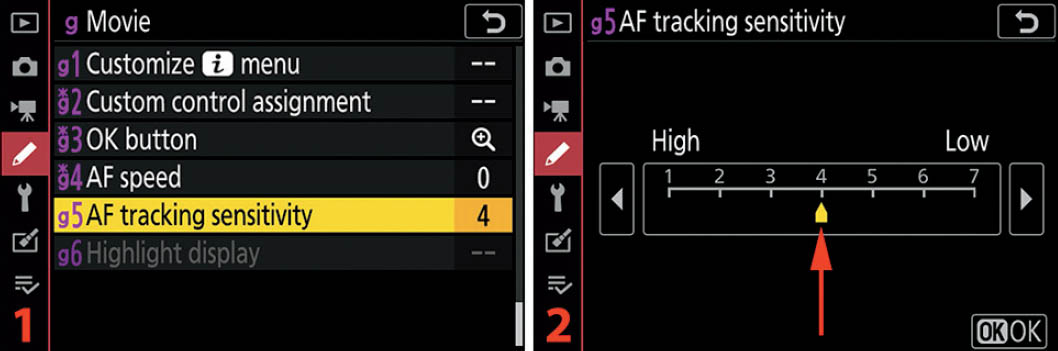
Figure 9.58: AF tracking sensitivity
Use the following steps to choose a time delay for changing focus away from your subject when an object comes between you and your subject:
- 1. Choose g5 AF tracking sensitivity from the g Movie menu and scroll to the right (figure 9.58, image 1).
- 2. You have seven settings on a sliding scale from 1 (High) to 7 (Low). The smaller numbers (High, or 1 to 3) force the camera to maintain its tracking focus on the subject for a longer period of time when something gets in the way. The larger numbers (Low, or 5 to 7) let the camera move focus to the intruding object more quickly, in a shorter period of time. Choose the setting you want by moving the yellow pointer (red arrow) toward High or Low by tapping the pointers at the ends of the scale (or scrolling with the Multi selector pad). This scale feels a little backward to me. Just remember that the bigger numbers (Low) mean faster timeouts (lock-on to your subject for a shorter time) and the smaller numbers (High) mean slower timeouts (lock-on to your subject for a longer time). When you have made your choice, press or touch OK to lock in the value.
Settings Recommendation: It has been my experience that when tracking a moving subject, it is best to ask the camera to maintain the focus on your subject for a longer period of time (High, or 1 to 3). Otherwise, an object that temporarily gets in between you and your subject may pull the focus away from your subject. For my style of static nature video capture, I leave my camera set to High (1) most of the time. However, if you are videoing multiple people and want to switch to a subject closer to the camera, a Low (7) setting may allow you to do so more quickly. Experiment with this setting so that you will be prepared to use it well.
Custom Setting g6: Highlight Display
The Highlight display function allows you to control the look and sensitivity of the Highlight “zebra stripes” display. When enabled, the Highlight display allows your Nikon Z6 to use zebra stripes to warn you about overexposed areas while you are shooting a movie. You can also check for overexposure before the video recording starts by entering the Movie mode and pointing the camera at your subject. If zebra stripes appear anywhere on your subject before or during the recording, it is an indication that the striped area does not have detail (it is overexposed).
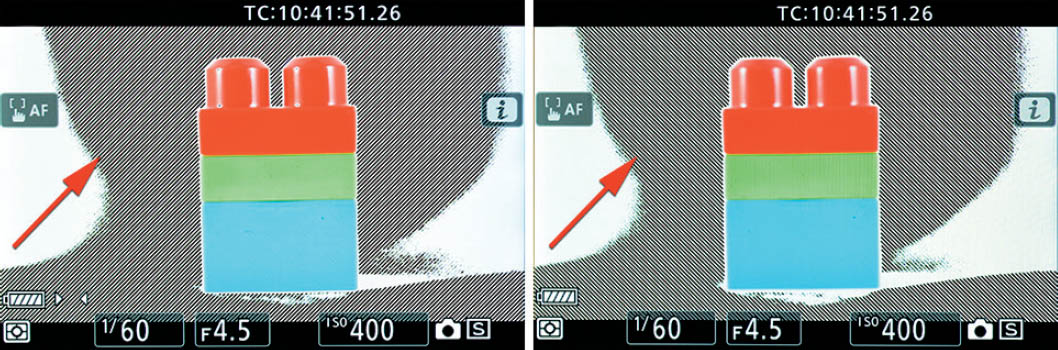
Figure 9.59A: Zebra stripes examples: Display Pattern 1 (left) and Display Pattern 2 (right).
You can see the Highlight display (zebra stripes) in the background of my camera’s Live view screen in figure 9.59A. On the left is Pattern 1, which has zebra stripes that lean to the right. On the right is Pattern 2, which has strips that lean left.
If your camera’s g6 Highlight display function is grayed out and unavailable, it likely means that you have enabled focus Peaking in Custom Setting d10: Peaking Highlights (page 409). Focus Peaking and Highlight display are mutually exclusive. One cannot be enabled unless the other is disabled (firmware version C2.00).
Let’s examine how to choose one of the stripe patterns.
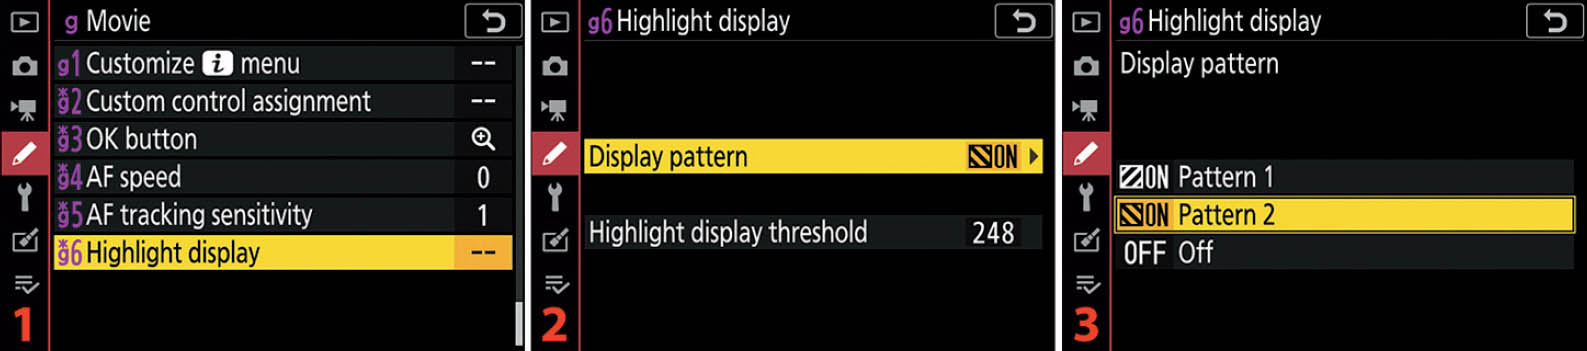
Figure 9.59B: Setting the Highlight display stripe pattern
Use the following steps to choose a Display pattern (direction in which the zebra stripes lean):
- 1. Choose g6 Highlight display from the g Movie menu and scroll to the right (figure 9.59B, image 1).
- 2. Select Display pattern and scroll to the right or tap the option to select it (figure 9.59B, image 2).
- 3. Highlight one of the two patterns (Pattern 1 or Pattern 2) or set it to Off (figure 9.59B, image 2). Refer to figure 9.59A to select the pattern you prefer. Press the OK button or tap the option to select the pattern.
Next, you can adjust the sensitivity of the Highlight display by selecting a Highlight display threshold in a range from 180 to 255. The lower the number, the more sensitive the Highlight display. Let’s see how to set the Highlight display threshold and then we’ll enable the Highlight display.
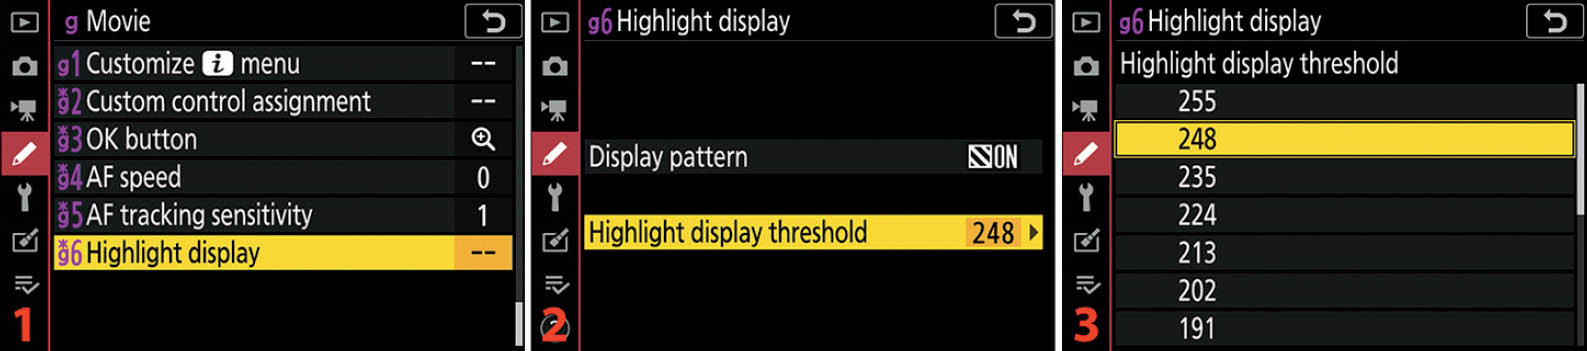
Figure 9.59C: Setting the Highlight display threshold
Use the following steps to set a Highlight display threshold:
- 1. Choose g6 Highlight display from the g Movie menu and scroll to the right (figure 9.59C, image 1).
- 2. Select Highlight display threshold and scroll to the right or tap the option with your fingertip (figure 9.59C, image 2).
- 3. Highlight one of the values on the list (figure 9.59C, image 3). You can choose from 180 to 255. The lower the Highlight display threshold number, the sooner the zebra stripes will appear. Basically, by setting 255, the camera will show zebra stripes only in areas that are fully blown out to pure white (no detail). A number lower than that will enable zebra stripes for less and less detail loss. The camera defaults to 248, which allows a zebra stripe warning to appear just before all detail is lost (at 255). To understand what these numbers mean, study the histogram on page 69. Press the OK button or tap the option to lock in your Highlight display threshold number.
Settings Recommendation: I like the zebra stripes display. I generally set my camera to 248 or 235, just so that I can get a warning when I am approaching data loss due to overexposure (when light reaches 255, see histogram on page 70). This Highlight display is a great feature for videographers. Learn to use it!
Author’s Conclusion
Your Z6 can change the way it shoots on the fly, in much less time than it takes to talk about it, by switching to a different User setting (U1, U2, or U3) on your camera’s Mode dial. Now that you’ve read this chapter over and configured the camera for a particular style of photography, save the configuration to one of the User settings (page 474). Then reconfigure the camera and set up the other two User settings. Think of the ways you most often take pictures and configure your Z6 for each of those ways. Your camera will be customized to you!
Now let’s move into the next menu system—the Setup Menu—and configure the camera’s basic setup. The Setup Menu is very important for initial camera configuration, but only a few of its functions are used after initial setup.