04Shooting Menu 2
Image © Alan Hess
Shooting Menu 2 is a continuation of Shooting Menu 1. It contains advanced functions that control how the camera takes pictures.
Figure 4.1 shows the seven main functions found in Shooting Menu 2: Bracketing, HDR, Multiple Exposure, Keystone Compensation, Anti-Shock and Silent operation, High Res Shot, and Live Neutral Density Shooting. As we proceed through this chapter, be sure to have your camera in hand and make adjustments as you work through each section.

Figure 4.1: A preview of Shooting Menu 2
Let’s consider each of the functions available under Shooting Menu 2.
Bracketing
Bracketing is when you take multiple images of the same subject using different settings, either to guarantee at least one balanced picture or to combine multiple pictures for various effects.
The E-M1III provides six bracketing methods that cover virtually all types of image bracketing: Auto Exposure (AE BKT), White Balance (WB BKT), Flash (FL BKT), ISO sensitivity (ISO BKT), Art (ART BKT), and Focus (Focus BKT).
This section describes how to configure bracketing. First, let’s consider how the camera shoots individual frames in a bracketed series.
Shooting a Bracketed Series of Images
There are several choices available for shooting a bracketed series of frames:
- [Single-Frame] shooting: If you are using [Single-Frame] shooting, one picture in the bracket series will be taken with each full press of the Shutter button.
- [Sequential] H or L: If you switch to [Sequential] H or [Sequential] L mode, you can hold down the Shutter button and the camera will shoot only the number of images in the bracket, then it will stop.
- [Self-timer] C (Custom): For hands-off bracketing while the camera is on a tripod, you may use the [Self-timer] C mode while AE BKT is enabled. You simply choose a Timer setting (e.g., 5sec delay) and an Interval Length setting (e.g., 0.5sec between frames), and set the Number of Frames (e.g., 7f) to match the number of frames in the bracket. The camera will wait for the Timer delay to expire, shoot one of the bracketed frames, wait for the Interval Time to shoot the next frame, and continue this sequence until the series is completed. [See [Self-Timer] C (Custom), on page 151, to learn how to use the self-timer.]
The shooting methods for bracketing in the previous list apply only to AE BKT and FL BKT.
For ISO BKT, the camera will repeat the series of three bracketed images over and over, for as long as you hold down the Shutter button.
For WB BKT and ART BKT, you take only one picture and the camera creates multiple copies of that picture and applies effects.
Focus BKT automatically uses [Sequential] H Silent [![]() ] mode (page 150) to fire off all the frames when you are using Focus Bracketing or Focus Stacking. You simply hold down the Shutter button until the camera stops taking pictures. This should result in sharper pictures since you are not required to press the Shutter button several times.
] mode (page 150) to fire off all the frames when you are using Focus Bracketing or Focus Stacking. You simply hold down the Shutter button until the camera stops taking pictures. This should result in sharper pictures since you are not required to press the Shutter button several times.
When you take pictures in brackets that allow you to control individual frames, the camera always shoots frames with exposure variations in this order: normal exposure > underexposure > overexposure. For example, if you choose to shoot a seven-frame bracket (7f) in AE BKT, the camera will shoot the bracket in this sequence: normal exposure > underexposure 1 > underexposure 2 > underexposure 3 > overexposure 1 > overexposure 2 > overexposure 3.
Now, let’s consider the six bracketing types in detail and see what each does.
AE BKT (Auto Exposure Bracketing)
Auto Exposure bracketing allows you to shoot from two to seven images in a bracket. The exposure of each shot varies by 0.3, 0.7, or 1.0 EV steps when using 2, 3, or 5 frames, and 0.3 or 0.7 EV steps when shooting 7 frames. Later you can select the best image from the series or combine the images into one high dynamic range (HDR) image.
Let’s examine how to select and use AE BKT.
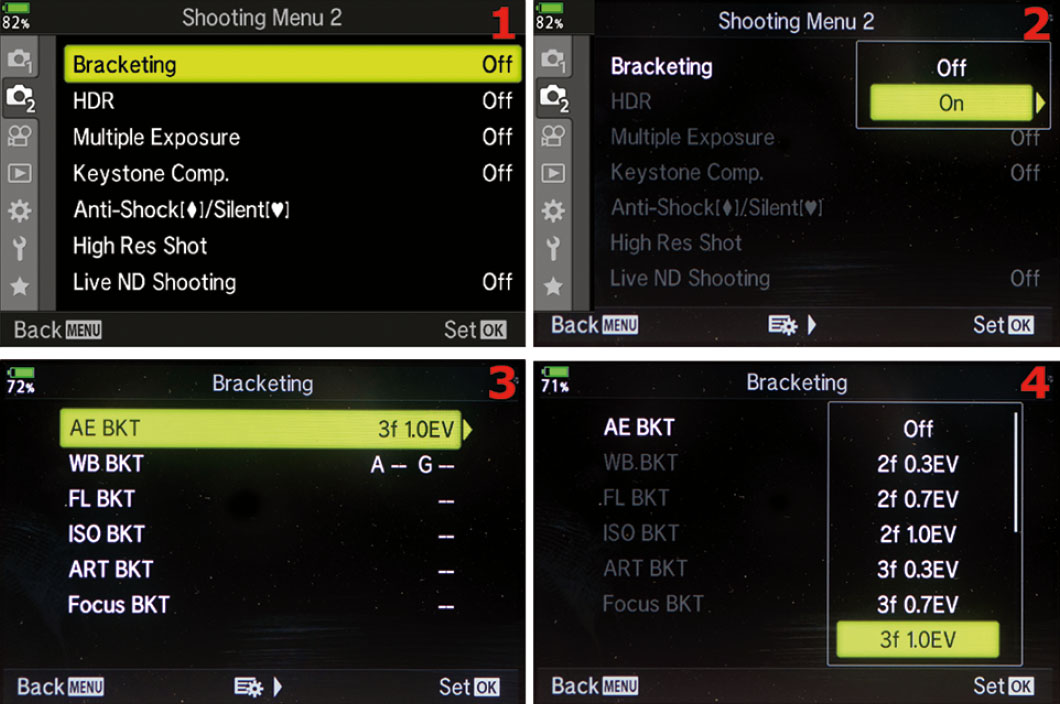
Figure 4.2: Using Auto Exposure bracketing (AE BKT)
Use these steps to configure AE BKT:
- 1. Choose Bracketing from Shooting Menu 2 and scroll to the right (figure 4.2, image 1).
- 2. A small menu will open and allow you to select Off or On. Highlight On and scroll to the right (figure 4.2, image 2). Or you can disable AE BKT by selecting Off and pressing the OK button (then skip the rest of these steps).
- 3. Highlight AE BKT and scroll to the right (figure 4.2, image 3).
- 4. A menu will open with many bracketing choices that look like this: 3f 1.0EV (figure 4.2, image 4). The first two characters represent the number of frames in the bracket, from two to seven frames (2f to 7f). The second group of characters represent the EV variation between images in the bracket. Your choices are 1/3 EV step (0.3EV), 2/3 EV step (0.7EV), or 1 EV step (1.0EV). If you choose 3f, 5f, or 7f, skip step 5 and go directly to step 6. If you choose 2f, move on to step 5 because the three 2f choices bring up an extra screen. 7f is limited to 0.3EV and 0.7EV.
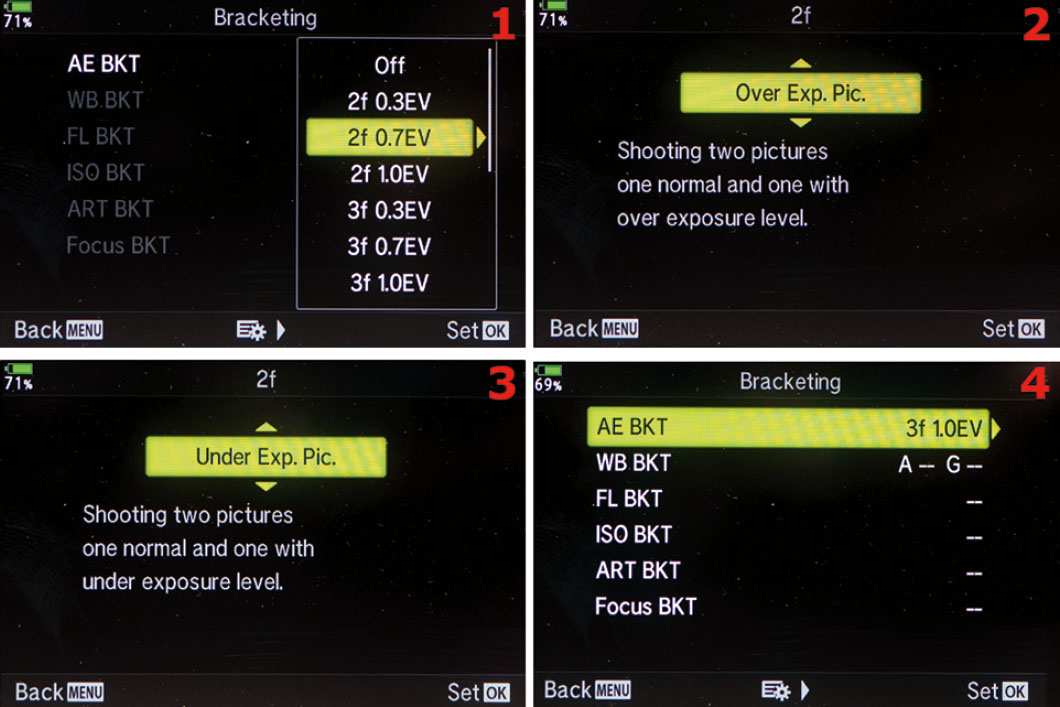
Figure 4.3: Selecting a 2f exposure variance
- 5. If you choose any of the three 2f choices, you will need to decide if the second image in the bracket will be overexposed (Over Exp. Pic.) or underexposed (Under Exp. Pic.). Figure 4.3 shows the screens you use to make your selection. Image 1 is the same as figure 4.2, image 4, except 2f has been selected. Use the up/down menu shown in figure 4.3, images 2 and 3, to make your choice for the second picture in the 2f bracket series. Press the OK button to lock in your choice, and take your pictures. If you use a 2f setting, skip step 6.
- 6. To use one of the 3f, 5f, or 7f settings, highlight the one you wish to use and press the OK button. The camera will then display your choice on the Bracketing screen next to AE BKT (figure 4.3, image 4). Press the OK button again and the popup menu will display with On and Off, as seen in figure 4.2, image 2. Select On and press the OK button again to lock in your selection. Take your pictures.
Note: Be sure to disable AE BKT (select Off) when you are done taking exposure-bracketed pictures.
Settings Recommendation: If you are shooting a two- or three-frame bracket it may be best to choose a 1.0EV setting. That will result in enough difference among the exposures to combine them or choose the best one. When you shoot a five- or seven-frame bracket, so much extra light is captured that you may get by with smaller variations between the images (e.g., 0.3EV or 0.7EV). Experiment with this to see what works for you. Auto Exposure bracketing is a useful tool for HDR shooters and people who want to have the best exposure and don’t mind the extra shots.
WB BKT (White Balance Bracketing)
White Balance (WB) bracketing lets you shoot one image and have the camera bracket the WB on the Amber–Blue (A–B) axis, the Green–Magenta (G–M) axis, or a combination of both axes (A–B + G–M).
You can select two, four, or six steps of color change for the A–B or G–M axis, or you can apply two, four, or six steps of color change to the combined A–B + G–M axes. The camera will create two WB-modified copies of the original image for each single-axis bracket (three images per axis), or eight copies plus the original image for the combined-axes bracket (nine images total). Tables 4.1–4.3 demonstrate this in an easy-to-understand pattern.
This function may seem complex, but you don’t have to fully understand it to successfully bracket the white balance of your image. You can simply fire off a bracket and look at the resulting images to choose the one you like. However, it’s more efficient to understand what happens when you use WB bracketing.
First let’s discuss how to configure WB BKT, then we will look at the WB bracket system in more detail.
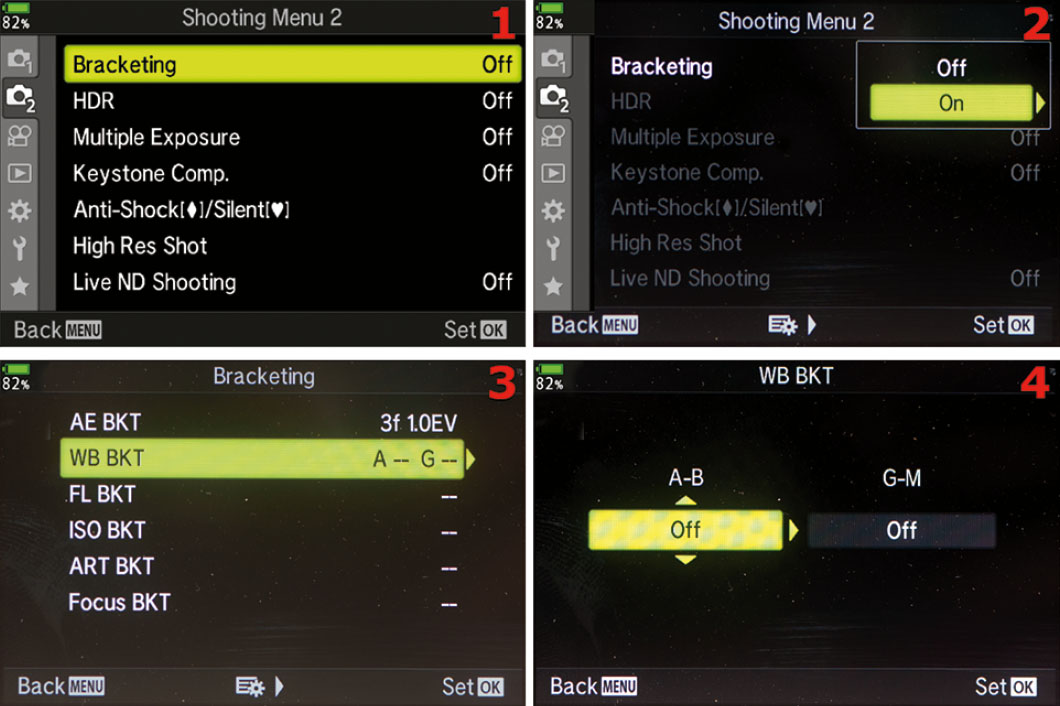
Figure 4.4: Using White Balance bracketing (WB BKT)
Use these steps to configure WB BKT:
- Choose Bracketing from Shooting Menu 2 and scroll to the right (figure 4.4, image 1).
- A small window will open where you can choose Off or On. Highlight On and scroll to the right (figure 4.4, image 2). Or you can disable WB BKT by selecting Off and pressing the OK button (and skipping the rest of these steps).
- Highlight WB BKT and scroll to the right (figure 4.4, image 3).
- You will see two up/down menus (figure 4.4, image 4). One is for the A–B axis and the other is for the G–M axis. You can choose two steps (3f 2Step), four steps (3f 4Step), or six steps (3f 6Step) of color change. The 3f simply means the camera will create three images per axis. Select a value for one or both of the axes (A–B, G–M) and press the OK button. The screen shown in figure 4.4, image 2, will reappear. Highlight On and press the OK button again to lock in your WB BKT configuration. I chose to bracket the A–B axis only, using three frames (3f), and I used six steps (6Step) of color changes for maximum color shift in the bracket.
- Take a single picture and the camera will create color-shifted copies to complete the bracketed series (refer to tables 4.1–4.3).
Note: Be sure to turn WB BKT off when you are done bracketing.
Tables 4.1–4.3 show the pattern the camera uses for White Balance bracketing. The tables demonstrate only the two-step version (3f 2Step) of WB BKT. All three bracketing variations use the same pattern with wider color steps or more intense color changes. As you increase the bracket from two steps (2Step) to four steps (4Step) to six steps (6Step), the color changes become more saturated. Therefore, you can substitute 4 or 6 for 2 in the tables and see that the 2Step, 4Step, and 6Step patterns work the same.

Table 4.1: The WB BKT A–B pattern (notice that G–M stays at 0)
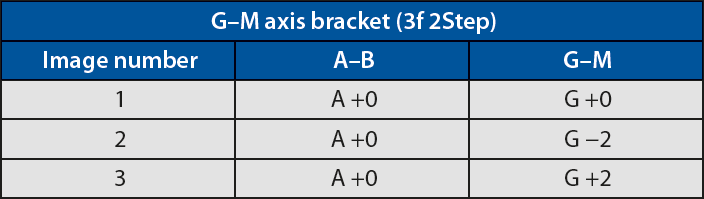
Table 4.2: The WB BKT G–M pattern (notice that A–B stays at 0)
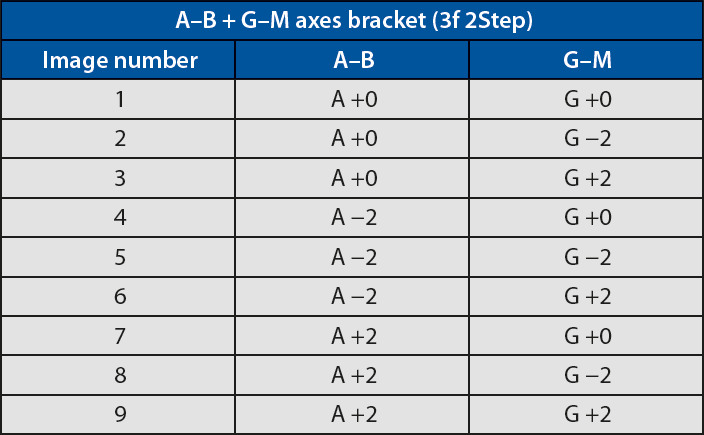
Table 4.3: The WB BKT combined A–B + G–M pattern
Settings Recommendation: This complex-sounding WB bracketing system is not as hard as it looks. Just remember that you can simply create the bracket and then select the image you like best. If none of them are color shifted enough for your liking, use more steps in the bracket—that is, switch from 3f 2Step to 3f 4Step, or even 3f 6Step. And remember, press the Shutter button only once for each WB bracketed shot!
FL BKT (Flash Bracketing)
Flash bracketing varies the light output of the flash over three frames (3f) so you can get the best exposure. You can select bracket levels of 0.3EV, 0.7EV, or 1.0EV, which gives you a difference of as little as 1/3 stop, and as much as 1 stop, between the images in the bracket.
The bracketing order for the three frames is normal > underexposed > overexposed. The camera will take a normal exposure with the flash and then two more exposures with under- and overexposure; the amount depends on the bracket levels you selected.
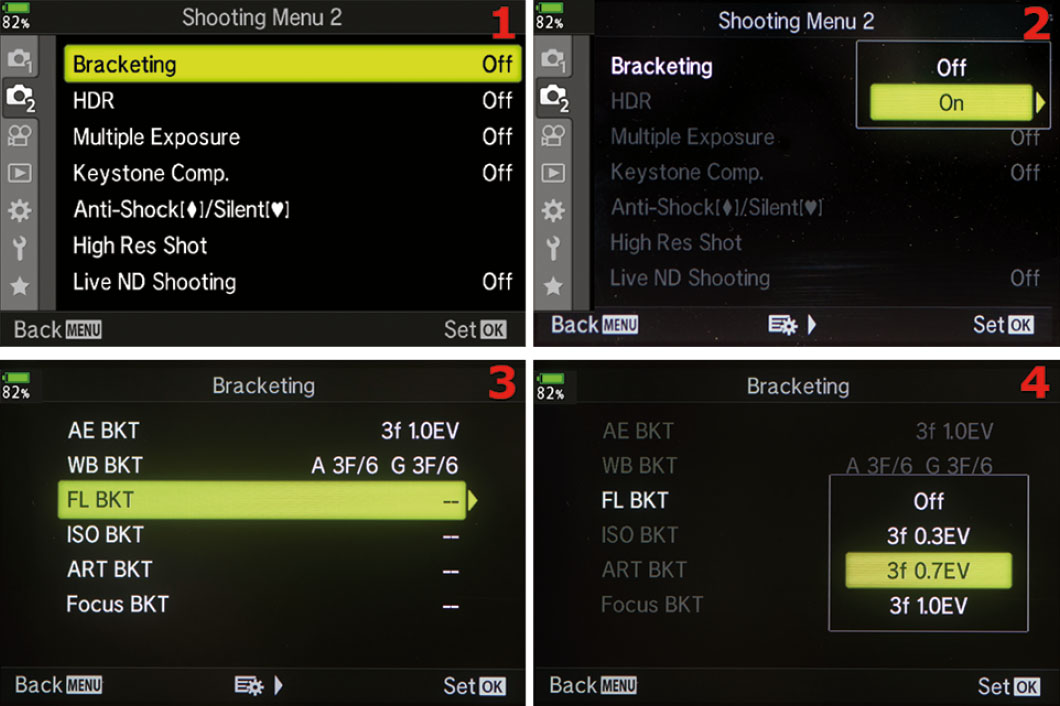
Figure 4.5: Using Flash bracketing (FL BKT)
Use these steps to configure FL BKT:
- Choose Bracketing from Shooting Menu 2 and scroll to the right (figure 4.5, image 1).
- A small window will open and allow you to select Off or On. Highlight On from the menu and scroll to the right (figure 4.5, image 2). Or you can disable FL BKT by selecting Off and pressing the OK button (and skipping the rest of these steps).
- Highlight FL BKT on the Bracketing menu and scroll to the right (figure 4.5, image 3).
- You will now see a small popup menu with four choices (figure 4.5, image 4). The available selections are Off, three frames with a variance of 1/3 EV (3f 0.3EV), three frames with a variance of 2/3 EV (3f 0.7EV), and three frames with a variance of 1 EV (3f 1.0EV). Highlight your selection and press the OK button. The camera will then display your choice on the Bracketing screen next to FL BKT (in place of the -- symbol shown in figure 4.5, image 3). Press the OK button again and the popup menu will display with On and Off, as seen in figure 4.5, image 2. Select On and press the OK button again to lock in your selection. Take your pictures.
Note: Be sure to disable FL BKT when you are done taking flash bracketed pictures.
Settings Recommendation: The recharge cycle time of your flash unit will determine how quickly you can fire the three bracketed images in the series.
A larger flash unit will perform better when you need rapid flash bracketing. If you can wait a moment between shots, the smaller flash will suffice for closer subjects.
ISO BKT (ISO Bracketing)
ISO bracketing allows you to bracket three frames with bracket levels of 0.3EV, 0.7EV, or 1.0EV for two of the pictures. The bracketing order for the three frames is normal > underexposed > overexposed.
The camera will take a picture at the ISO sensitivity you selected. You can then take two more pictures with different ISO settings: one underexposed and another overexposed. The amount of under- and overexposure depends on the EV you select.
There are two things you need to be aware of when you use ISO bracketing:
- Continuous bracketing: With other types of bracketing, when you use Sequential H or Sequential L modes and hold down the Shutter button, the E-M1III will take only the number of frames in the bracket and then stop taking pictures. However, with ISO BKT the camera will not stop taking pictures when it reaches the end of the bracket. If you hold down the Shutter button in Sequential H or Sequential L modes, the camera will continue firing at full speed until the image buffer is full, and the three-frame bracketing sequence will repeat. This feature allows you to bracket rapidly moving subjects while you track them with your camera.
- Nothing lower than Low ISO: If you have your camera set to ISO L64, which is the lowest, it will not be able to shoot the underexposed frame of the bracket. Instead, you will have two normal (L64) exposures and one overexposed image in the three-frame bracket (normal > normal > overexposed). Obviously, the camera cannot go below its lowest ISO value to capture an underexposed image.
Now, let’s see how to configure ISO bracketing.
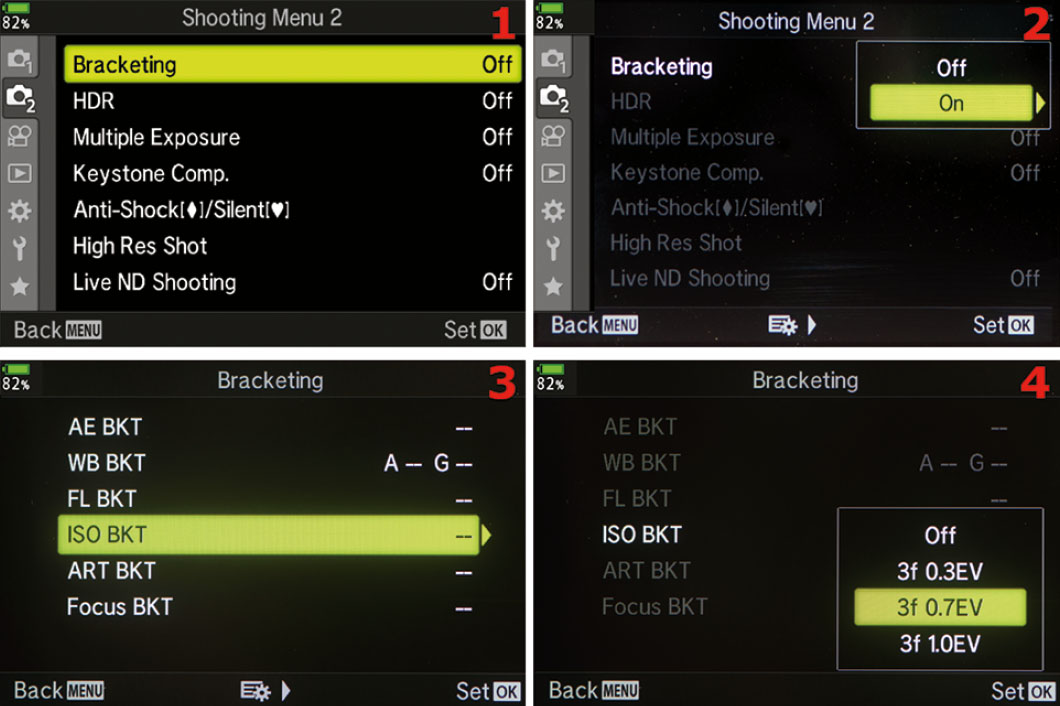
Figure 4.6: Using ISO Bracketing (ISO BKT)
Use these steps to configure ISO BKT:
- Choose Bracketing from Shooting Menu 2 and scroll to the right (figure 4.6, image 1).
- A small window will open where you can select Off or On. Highlight On and scroll to the right (figure 4.6, image 2). Or you can disable ISO BKT by selecting Off and pressing the OK button (and skipping the rest of these steps).
- Highlight ISO BKT on the Bracketing menu and scroll to the right (figure 4.6, image 3).
- You will see a small popup menu with four choices (figure 4.6, image 4). The available selections are three frames with a variance of 1/3 EV (3f 0.3EV), three frames with a variance of 2/3 EV (3f 0.7EV), and three frames with a variance of 1 EV (3f 1.0EV). Highlight your selection and press the OK button. The camera will then display your choice on the Bracketing screen next to ISO BKT (figure 4.5, image 3). Press the OK button again and the popup menu will display with On and Off, as seen in figure 4.5, image 2. Select On and press the OK button again to lock in your selection. Take your pictures.
Note: Be sure to disable ISO BKT when you are finished.
Settings Recommendation: For subjects that have a lot of contrast, you will want to use a wider range of EV in the ISO BKT, such as 3f 1.0EV. For lower-contrast subjects you may be able to fine-tune the exposure by using 3f 0.3EV. Experiment with this setting so you’ll know how to use it when you need to make sure you get a good exposure.
ART BKT (Art Bracketing)
When you use Art bracketing, the camera will make copies of a picture and apply each of the Art Picture Modes you select (shown in figure 4.7). You can take just one picture and the camera will bracket, or copy, it and apply each of the selected Art Picture Modes to the copies. This results in numerous copies of the original image with a different filter applied to each one.
You can choose from the 31 listed Art Modes (e.g., Pop Art I, Soft Focus, Grainy Film II) for ART BKT, and even add the normal Picture Modes (e.g., Vivid, Natural, Muted) and the more creative Picture Modes (e.g., Monochrome, Color Creator, Custom) to the bracket, creating up to 9 additional images. That’s up to 40 copies of a single image with all sorts of filters applied. Imagine that many pictures from a single shot—perhaps too many!
Let’s see how to select the filters you would like to use in the ART bracket.
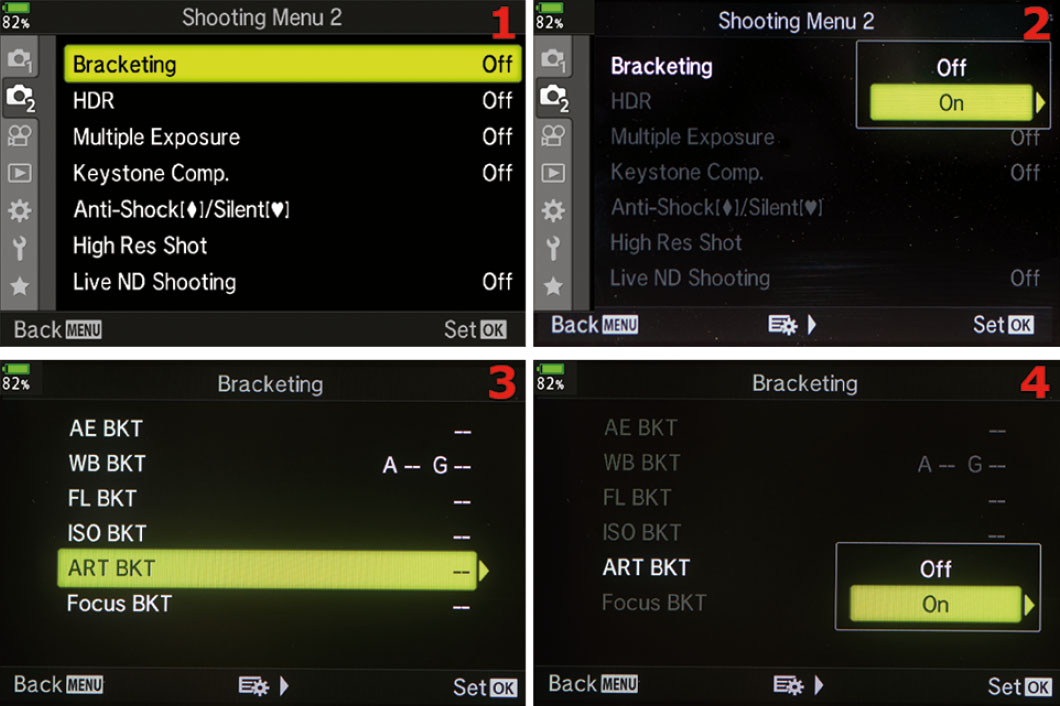
Figure 4.7: Using Art Bracketing (ART BKT)
Use these steps to configure ART BKT:
- 1. Choose Bracketing from Shooting Menu 2 and scroll to the right (figure 4.7, image 1).
- 2. A small window will open where you can select Off or On. Highlight On and scroll to the right (figure 4.7, image 2). Or you can disable ART BKT by selecting Off and pressing the OK button (and skipping the rest of these steps).
- 3. Highlight ART BKT on the Bracketing menu and scroll to the right (figure 4.7, image 3).
- 4. You will see a small popup menu with two choices: On and Off (figure 4.7, image 4). Highlight On and scroll to the right.

Figure 4.8: Choosing an ART BKT Picture Mode
- 5. The camera will display a list of 40 ART BKT choices, some checked and some not checked, as partially seen in figure 4.8, images 1 and 2. Scroll up or down and press the OK button to add or remove a check mark next to any of the Picture Modes. A check mark means that mode will be added to the Art bracket. When you are done checking and unchecking modes, press the Menu button to return to the screen in figure 4.8, image 3. Be sure On is highlighted and press the OK button again. The camera will return to the menu shown in figure 4.8, image 4, with On displayed after ART BKT. Press the OK button once more and the camera will return to the screen in figure 4.7, image 2. Select On and press the OK button a final time to enable Bracketing, and the camera is ready to use.
- 6. Take a single picture. The red card write symbol will flash in the upper-left corner of the viewfinder or monitor until all the copies (up to 40) are created.
Note: Be sure to turn off ART BKT when you are done or you will create up to 40 pictures each time you press the Shutter button.
Settings Recommendation: This bracketing method is fun a time or two, but then you might wonder why you’re using it. About the only time I use ART BKT is when I want to show off the prowess of this camera. I usually say something like, “I bet your camera won’t do this!”
Unless you want a smorgasbord of arty pictures to choose from, this function may not be too useful. Try it a time or two and see what you think.
Focus BKT (Focus Bracketing and Focus Stacking)
Focus BKT comes in two parts: Focus Bracketing and Focus Stacking. Although the two work similarly, they produce very different results. Let’s discuss each of these two powerful bracketing functions individually and then how to implement them.
Focus Bracketing and Focus Stacking
The Focus BKT function allows you to take a series of shots with different focus points. You will establish the beginning focus point by initiating autofocus. The camera will then move the focus toward infinity for each successive shot, thereby providing a range of images with different autofocus points. For example, you may focus on a subject’s eye, and then let the camera shoot several images with different points of focus, allowing you to choose from the best focus for that subject.
You will choose the number of shots (from 3 to 999), the focus differential (how far to move the focus between shots), and a flash charge time (to allow time for the flash to recycle). Let’s examine how to configure Focus Bracketing.
You can also turn on the Focus Stacking feature here, which takes all the individual images and combines them into a single photo. Focus Stacking differs from Focus Bracketing in that the camera will take only 15 shots, instead of up to 999. Also, at the end of the Focus Stacking series, the camera combines the images into one image, with virtually everything in focus.
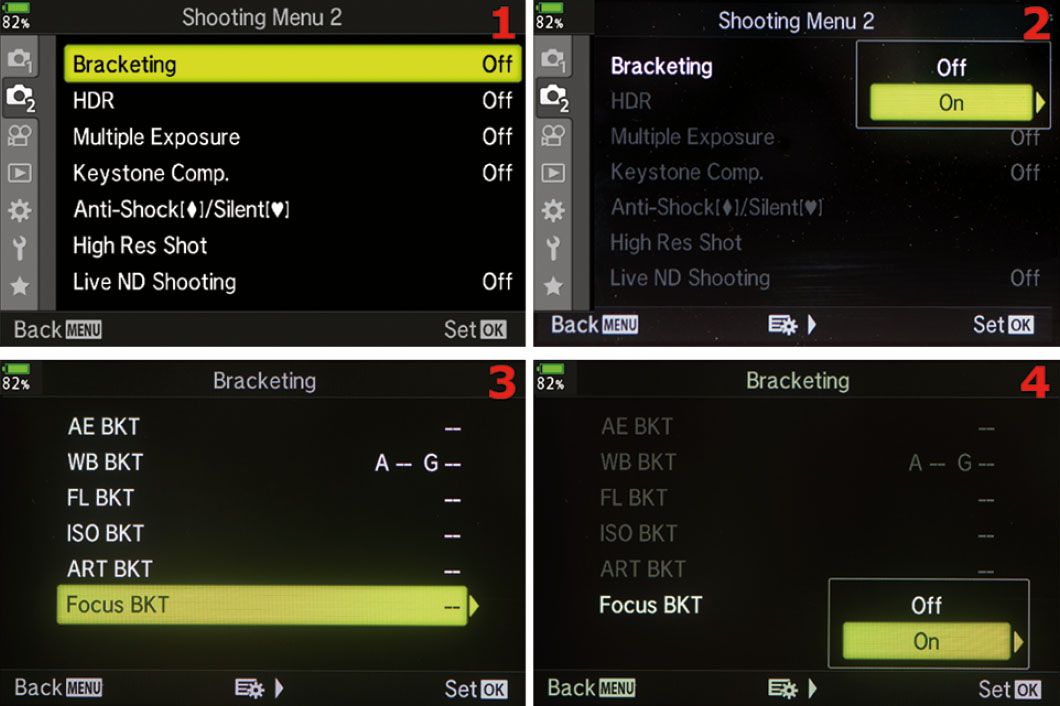
Figure 4.9: Using Focus Bracketing (Focus BKT)
Use the following steps to configure Focus Bracketing:
- 1. Choose Bracketing from Shooting Menu 2 and scroll to the right (figure 4.9, image 1).
- 2. A small window will open where you can select Off or On. Highlight On and scroll to the right (figure 4.9, image 2). Or you can disable Focus BKT by selecting Off and pressing the OK button (and skipping the rest of these steps).
- 3. Highlight Focus BKT on the Bracketing menu and scroll to the right (figure 4.9, image 3).
- 4. You will see a small popup menu with two choices: On and Off (figure 4.9, image 4). Highlight On and scroll to the right.

Figure 4.10: Selecting the number of shots for the Focus Bracketing series
- 5. Ignore the Focus Stacking item on the Focus BKT menu for now. We will consider Focus Stacking next. Choose Set number of shots and scroll to the right (figure 4.10, image 1).
- 6. The Set number of shots setting allows you to choose the number of individual images you will take in this Focus Bracketing series (figure 4.10, image 2). Use the three individual up/down menus to choose the number of shots, selecting a number between 0 and 9 for the first two up/down menus, and between 3 and 9 for the last up/down menu. You can choose anywhere from 3 (003) to 999 images for the bracketed series. You cannot take less than three shots (003) for this series.
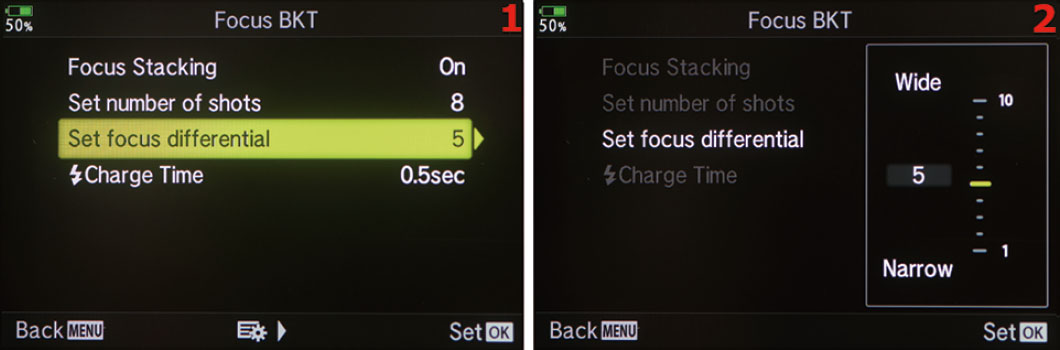
Figure 4.11: Setting a focus differential (how much to move the focus between images)
- 7. Next you must set the amount the camera will move the focus position between shots. Highlight Set focus differential and scroll to the right (figure 4.11, image 1).
- 8. Use the focus differential slider to choose a forward focus movement amount (figure 4.11, image 2). Remember, as the camera takes the Focus Bracketing series, the focus will move toward infinity only (away from you) for each shot. If you want the camera to move the focus position in a narrow band (small increments), move the yellow bar toward 1 (Narrow). If you would rather have wider spacing between the focus positions for each shot, move the yellow bar toward 10 (Wide). Press the OK button to lock in the focus differential.
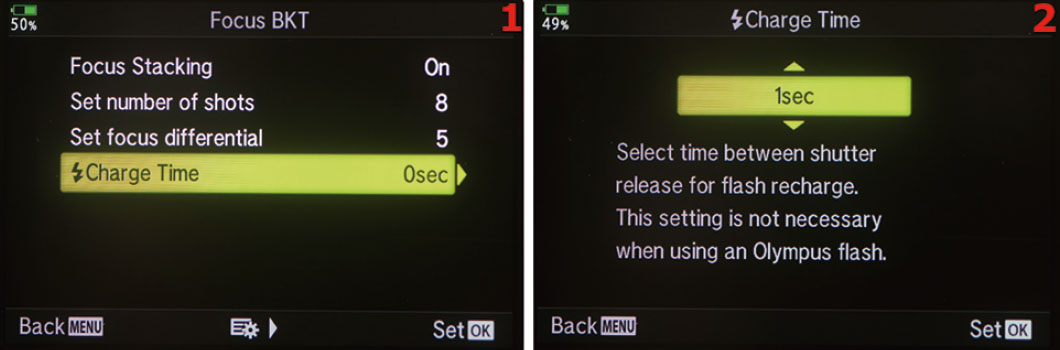
Figure 4.12: Setting a [Flash] Charge Time to allow the flash to recycle between shots
- 9. If you are using a non-Olympus flash unit, you may need to consider flash recycle time. An Olympus flash unit coordinates with the camera, so it should not require this setting. To set a flash charge time for a non-Olympus flash unit, choose [Flash] Charge Time from the Focus BKT menu and scroll to the right (figure 4.12, image 1).
- 10. Use the up/down menu to select the number of seconds the camera should wait before firing the next image in the Focus Bracketing series (figure 4.12, image 2). You can choose a time ranging from 0 seconds (0sec) to 30 seconds (30sec). When you have selected the flash charge time you want to use, press the OK button to lock in the value.
Note: The camera will use [Sequential] H Silent [![]() ] mode to release the shutter. You only need to press the Shutter button one time, and the camera will automatically take all the pictures in the bracketed series. You do not need to hold down the Shutter button.
] mode to release the shutter. You only need to press the Shutter button one time, and the camera will automatically take all the pictures in the bracketed series. You do not need to hold down the Shutter button.
A flash unit will not fire unless you have Shooting Menu 2 > Anti-Shock[![]() ]/Silent[
]/Silent[![]() ] > Silent[
] > Silent[![]() ]Mode Settings > Flash Mode (page 188) set to Allow. Therefore, if you want to use a flash unit, please configure that setting.
]Mode Settings > Flash Mode (page 188) set to Allow. Therefore, if you want to use a flash unit, please configure that setting.

Figure 4.13: Enabling Focus Stacking function
Follow the instructions above to access the Focus BKT menu, but now highlight the Focus Stacking menu option menu and scroll to the right (figure 4.13, image 1).
- Choose On from the Focus Stacking up/down menu and press the OK button to enable stacking (figure 4.13, image 2). The following steps are the same as earlier, but instead of the output being multiple files, you now get a single image.
- Now, choosing the Set number of shots allows you to select the number of individual images you will take in this Focus Bracketing series. Select a number between 3 and 15, with the default being 8.
- Next you must set the amount the camera will move the focus position between shots. Highlight Set focus differential and scroll to the right.
- Use the focus differential slider to choose a forward focus movement amount. If you want the camera to move the focus positions in a narrow band (small increments), move the yellow bar toward 1 (Narrow). If you would rather have wider spacing between the focus positions for each shot, move the yellow bar toward 10 (Wide).
- Then just follow the same flash settings as when doing the Focus BKT. Then press OK and take your photos. The camera will take a series of photos with different focus points in all the images, then it combines the photos into a single image. This works best when the camera is on a tripod and neither the camera nor the subject moves.
Settings Recommendation: Focus Bracketing is good for those who absolutely must have the proper focus on their subject. Portraiture and even things like product shooting may benefit from bracketing the focus. It’s well worth it to experiment with this function!
Focus Stacking is a wonderful function for those who shoot a lot of macro (closeup) images. Any time you need a deeper depth of field for a non-moving subject, this function can help you. Please take the time to learn how to use this powerful function. Your photography will benefit and you will make images that others simply cannot make.
Bracketing Chaos
Be sure to disable all forms of bracketing within their respective configuration screens when you are done with that bracketing type. If you don’t, the camera will stack the bracketing methods and use them at the same time.
Suppose you have AE BKT and ART BKT enabled simultaneously. The camera will create three AE BKT pictures with the normal > underexposure > overexposure AE bracketing, and it will also create up to 40 ART BKT images for each of the three AE BKT images. The camera will apply each AE BKT to every ART BKT image, and you could end up with dozens of images. Imagine what would happen if you have several bracketing methods turned on at the same time and take pictures—bracketing chaos!
Some forms of bracketing are mutually exclusive to other forms of bracketing. If you have a certain bracketing type enabled, another bracketing type will disable the previously selected type. Experiment by trying to enable multiple bracketing types and you will see what I mean.
Be careful with these bracketing methods. I have not seen any warnings when multiple bracketing types are enabled at the same time. This could be useful if that is your intention, but I am afraid that many people will forget to turn them off and will get results they never expected. Be aware that bracketing chaos is entirely possible!
HDR
High dynamic range (HDR) imaging allows you to shoot several images of the same scene, with different exposures, and combine them into one image, either immediately in-camera or later during post-processing. The result is an image with a massive dynamic range that is more like what the human eye can see than what a camera can normally capture in just one image. For example, in figure 4.14, notice how the combined five-image HDR picture shows more detail in the shadow and highlight areas
The camera offers two modes that automatically combine four images in-camera (HDR1 and HDR2). Five other modes shoot three, five, or seven images with different exposure values that are then combined into a single HDR image in the camera. If you want to combine the separate images yourself during post-processing on your computer, you need to use the Bracketing function described earlier in this chapter. The HDR mode results in a single JPEG image.
HDR can be quite useful for static subjects when maximum shadow and highlight detail are important. However, it’s important to be careful with HDR because it can make an image look artificial and gaudy if overdone. Some people like the no-shadow effect, but others just roll their eyes at the shadowless look. With the wide range of HDR capability in the E-M1III, you have choices.
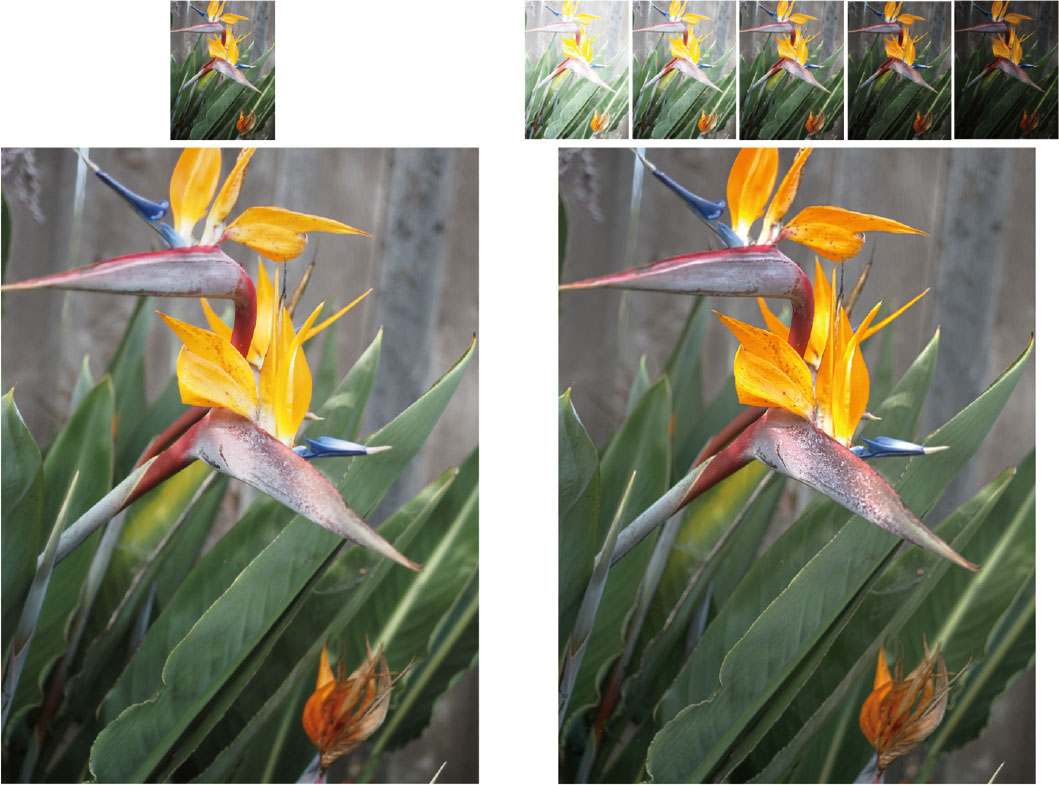
Figure 4.14: A single frame compared to a five-image HDR picture
HDR1 and HDR2
If you have the camera set to RAW and enable the HDR1 or HDR2 setting, the camera will switch to a JPEG+RAW mode and will not capture a normal RAW image; it will combine the separate JPEG images into one HDR image and the result is one combined HDR JPEG.
If the camera is set to a JPEG mode, it will take four pictures as JPEGs only and combine them into a single HDR JPEG.
Following are descriptions of each in-camera, automatic HDR mode:
- HDR1: The camera takes four images in rapid succession and combines them, in-camera, to create an HDR image that does not overdo the HDR look. It keeps some shadow contrast so the image does not look overprocessed. It looks more like a well-exposed image with a wider dynamic range than normal.
- HDR2: The camera takes four images in rapid succession and combines them, in-camera, to create a painterly, overprocessed HDR image with very light shadows that contain much more detail than normal.
The Other Five HDR Modes
In addition to the two automatic HDR modes, five other HDR modes create individual images with various exposure levels so you can combine them yourself in software like Adobe Photoshop.
- 3f 2.0EV: Creates three frames (3f) with 2 EV steps between each frame (2.0EV). It uses the normal > underexposure > overexposure method of exposing the images.
- 5f 2.0EV: Creates five frames (5f) with 2 EV steps between each frame (2.0EV). It uses the normal > underexposure > underexposure > overexposure > overexposure method of exposing the images.
- 7f 2.0EV: Creates seven frames (7f) with 2 EV steps between each frame (2.0EV). It uses the normal > underexposure > underexposure > underexposure > overexposure > overexposure > overexposure method of exposing the images.
- 3f 3.0EV: Creates three frames (3f) with 3 EV steps between each frame (3.0EV). It uses the normal > underexposure > overexposure method of exposing the images.
- 5f 3.0EV: Creates five frames (5f) with 3 EV steps between each frame (3.0EV). It uses the normal > underexposure > underexposure > overexposure > overexposure method of exposing the images.
The camera will use whichever image quality mode you select—RAW or JPEG—to create the individual files.
If you are shooting in a JPEG+RAW mode, the camera will create all the HDR images for each mode. If you select 3f 2.0EV and shoot in JPEG+RAW mode, the camera will create two normally exposed images (one JPEG and one RAW), two underexposed images (one JPEG and one RAW), and two overexposed images (one JPEG and one RAW).
Let’s examine how to configure the HDR system.

Figure 4.15: Selecting and using an HDR mode
Use the following steps to enable an HDR mode:
- Choose HDR from Shooting Menu 2 and scroll to the right (figure 4.15, image 1).
- Use the up/down menu to select one of the HDR types (figure 4.15, image 2–4). Your choices include HDR1 and HDR2, the five other HDR modes discussed in the previous list, and Off.
- Press the OK button to lock in the HDR mode of your choice. When you are ready to take your HDR images, set the camera up on a tripod and press the Shutter button once. The camera will use [Sequential] H mode to automatically capture all the frames in the HDR series.
Note: The HDR mode will remain enabled until you select Off from the up/down menu and press the OK button. Be sure to turn off HDR mode when you are done.
Also, you cannot use the Self-timer to start capturing the HDR image series.
Settings Recommendation: You can let the camera combine the images for you, or you can combine them yourself in your computer. I find myself using the HDR1 or HDR2 automatic modes when I am just enjoying photography and want extra range in a certain image. It is very convenient to have the camera do it for you. However, when I am shooting landscapes and am concerned about maximum image quality, I prefer to do my own image combining and tone mapping with Photoshop.
Fortunately, the camera lets us choose how we use HDR—for fun or for professional results.
Multiple Exposure
Multiple Exposure in the E-M1III lets you shoot two separate images and combine them into one image. This process differs from HDR because the exposures of the two images are the same.
There are three ways to use Multiple Exposure:
- Multiple Exposure without Auto Gain: Two images are taken with a standard exposure for each, then they are combined in-camera.
- Multiple Exposure with Auto Gain: Two images are taken at one-half exposure for each, then they are combined in-camera.
- Multiple Exposure with Overlay: You choose a RAW image from the memory card and then take another picture. The camera combines the image from the memory card with the new picture. You can repeat this action to add new exposures to the combined image. Just choose the combined image from the memory card again and shoot another new picture.
Standard Multiple Exposure with and without Auto Gain
The process is harder to describe than to perform. You take the first image, then the camera shows you what was captured as an overlay allowing you to line up the second shot. Then you take the second photo and the camera combines the two images into a single frame. After you learn about the Multiple Exposure options, the process is easy.

Figure 4.16: Combining two images in-camera
Figure 4.16 shows what happens when the camera combines two images. Image 1 is the first exposure and image 2 is the second exposure—image 1 still shows up as a shadowy figure that overlays the live image. Image 3 is the combined image after you press the Shutter button. While you are shooting image 2, you can still see image 1 in your viewfinder or on the camera monitor, so it is easy to align the elements before you press the Shutter button. Use the following steps to try it.
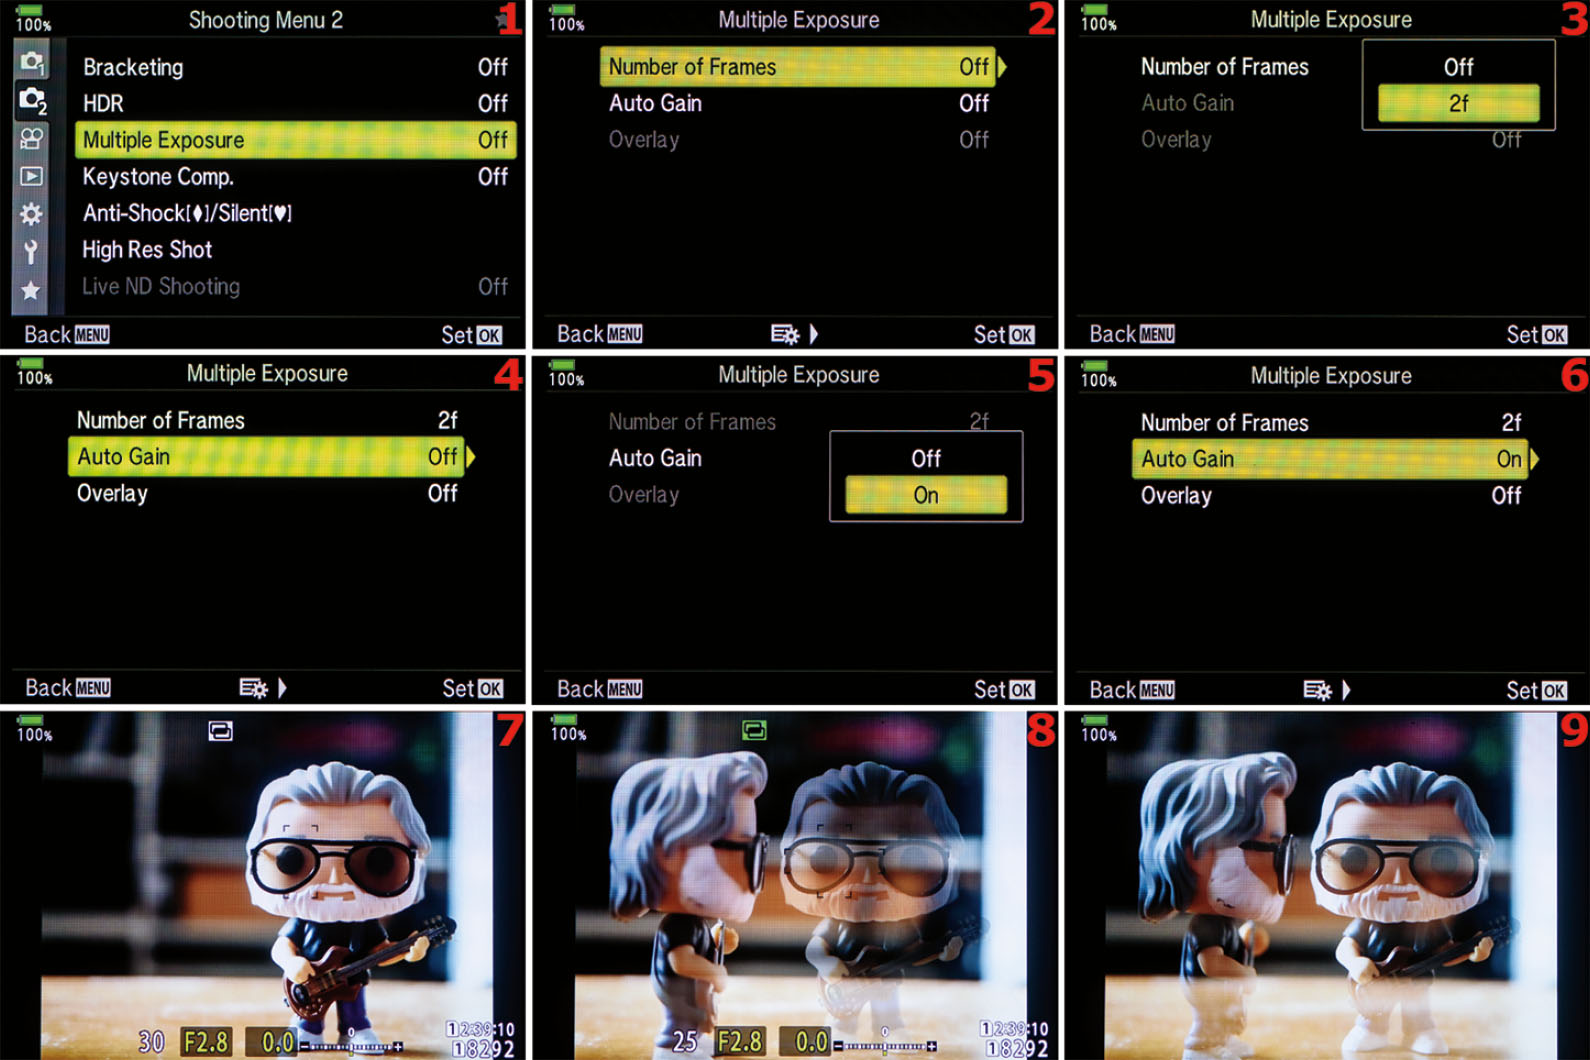
Figure 4.17: Combining two images in-camera
Use these steps to create a Multiple Exposure:
- Choose Multiple Exposure from Shooting Menu 2 and scroll to the right (figure 4.17, image 1).
- Select Number of Frames from the Multiple Exposure menu and scroll to the right (figure 4.17, image 2).
- A small window will open where you can choose Off or 2f (figure 4.17, image 3). Activate the Multiple Exposure system by highlighting 2f and pressing the OK button. The camera is now ready to take two frames (2f) that will be combined.
- Select Auto Gain from the Multiple Exposure menu and scroll to the right (figure 4.17, image 4).
- A small window will open with two choices: Off and On (figure 4.17, image 5). Auto Gain affects how the exposure for the two images is made. If you enable Auto Gain (On), the camera will take the two images at half their normal exposure, which will make the background look normal after the two images are combined (because each image has half the needed exposure), and the subjects may be a little transparent. If you do not enable Auto Gain (Off), the camera exposes the two images normally, which will create a much brighter background in the final combined image. Choose On or Off and press the OK button (figure 4.17, image 6).
- Now you can take the two pictures that the camera will combine. Figure 4.17, image 7, shows what was displayed in my viewfinder and on my camera monitor for the first picture. I snapped the picture.
- Figure 4.17, image 8, shows what was displayed in my viewfinder and on my camera monitor, including the shadowy figure of the first picture, as I framed the next shot. I moved my camera around until the two images were lined up the way I wanted them, and then I pressed the Shutter button.
- The camera overlaid the two images and combined them (figure 4.17 image 9).

Figure 4.18: Multiple Exposures without Auto Gain (image 1) and with Auto Gain (image 2)
In a printed book it is difficult to accurately simulate the steps because you cannot see the images being created. However, figure 4.18 shows the results of a Multiple Exposure operation without Auto Gain (image 1) and with Auto Gain (image 2).
Next, let’s consider how to use the Multiple Exposure Overlay system.
Multiple Exposure with Overlay
The Multiple Exposure Overlay function allows you to choose a RAW image from the memory card and take a new picture that overlays it. The two exposures are then combined (figure 4.19).
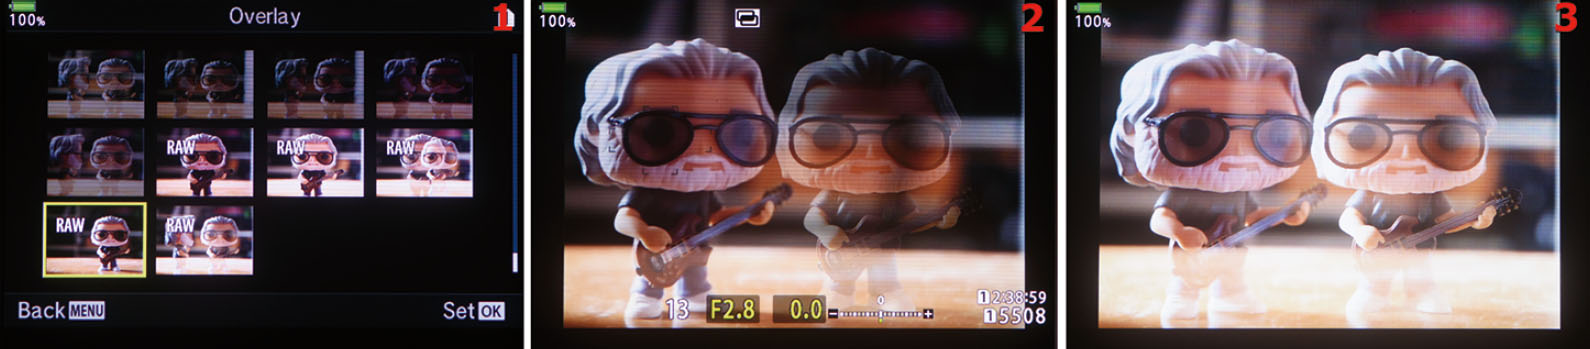
Figure 4.19: Choosing a RAW image and then overlaying a new picture
This is similar to a normal Multiple Exposure, except the first image already resides in RAW format on the memory card. You choose from a list of images on the camera monitor, and then take the second image for the Multiple Exposure.

Figure 4.20: Using the Multiple Exposure Overlay system
Use the following steps to overlay an existing RAW image with a new exposure. Make sure you shoot in RAW mode!
- Choose Multiple Exposure from Shooting Menu 2 and scroll to the right (figure 4.20, image 1).
- Select Number of Frames from the Multiple Exposure menu and scroll to the right (figure 4.20, image 2).
- A small window will open and allow you to choose Off or 2f (figure 4.20, image 3). Activate the Multiple Exposure system by highlighting 2f and pressing the OK button. The camera is now ready to combine two frames (2f).
- Select Auto Gain from the Multiple Exposure menu and scroll to the right (figure 4.20, image 4). I left out the next two screens to keep the figure to a manageable size, but choose On or Off, depending on whether you want to use Auto Gain.
- Scroll down and select Overlay from the Multiple Exposure menu then scroll to the right (figure 4.20, image 5).
- Enable Overlay by selecting On from the small window, then press the OK button (figure 4.20, image 6).
- Now you will see a list of all the RAW images on your memory card (figure 4.20, image 7). A yellow rectangle will surround one of the RAW images. Move the rectangle to the image you want to use as the base for the overlay to select it.
- The RAW image you selected in step 7 will be faintly displayed on the monitor or in the viewfinder (figure 4.20, image 8). You will also see the current scene in front of your lens, similar to my simulation in image 8. Compose the current subject in relation to the RAW image and press the Shutter button.
- The camera will combine the current subject with the RAW image (figure 4.20, image 9). You can keep taking pictures and the camera will continue to combine them. You can see the combined image on the monitor or in the viewfinder before you press the Shutter button, so you can make some creative compositions.
Note: Remember that you can combine many exposures into one image. Start at step 7 (figure 4.20, image 7) and choose a previously combined RAW image to be the base for the Multiple Exposure Overlay, then take a new picture to add to the Multiple Exposure.
Settings Recommendation: Multiple Exposures and Overlays are a lot of fun. You could take a picture of one person and create a twin using Multiple Exposure. Or you could take a RAW picture and later overlay a different subject (or two).
Keystone Comp.
Keystone Comp. makes your E-M1III act like one of those big view cameras, with its tilts, swings, and excellent distortion correction. You use the function while you view the subject on the monitor, not later in post-processing. Keystone Comp. allows you to correct the odd leaning-backward perspective distortion you see when you point a wide-angle lens upward to capture a tall subject (vertical plane tilt). Additionally, you can use this function to correct perspective distortion on a horizontal plane (swing). The results of this powerful function are easier to see than describe, so let’s examine how it works.
In figure 4.21 you can see the Jerry Garcia bobblehead in a normal, straight-on configuration. Notice that there are two adjustable indicators on the screen (red arrows). The top red arrow points to the tilt control, which allows you to tilt the top or bottom of the image toward or away from you. Tilt correction is applied with the Rear Dial. The bottom red arrow points to the swing control, which allows you to swing the left or right side of the image toward or away from you. Swing correction is applied with the Front Dial.

Figure 4.21: Normal subject view with Keystone comp. function set to On
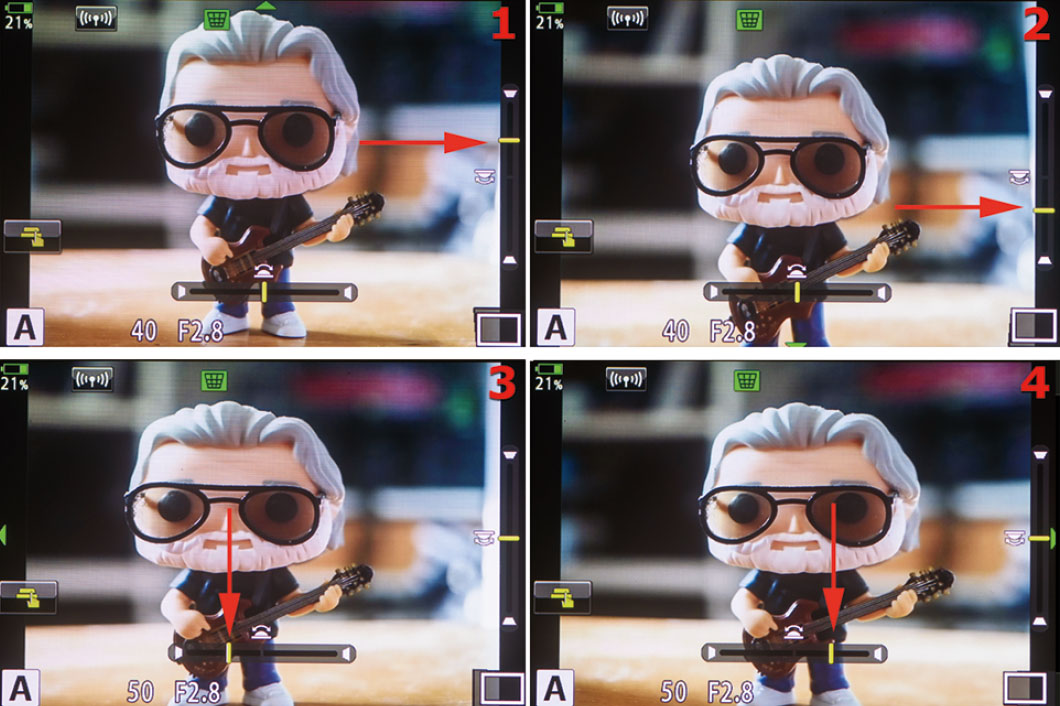
Figure 4.22: Making adjustments to the subject with the Keystone Comp. function
In figure 4.22 I used the tilt-swing features of the Keystone Comp. function to make the subject swing left and right or tilt front to back—without moving the camera.
In image 1 the tilt indicator is at the top of the scale, and the camera is tilting the top edge of the image toward you. The bottom of the image stays the same.
In image 2 the tilt indicator is at the bottom of the scale, and the camera is tilting the bottom edge of the image toward you. The top of the image stays the same.
In image 3 the swing indicator is at the left side of the scale, and the camera is swinging the left side of the image toward you. The right side of the image stays the same.
In image 4 the swing indicator is at the right side of the scale, and the camera is swinging the right side of the image toward you. The left side of the image stays the same.
Keystone Comp. Correction
In figure 4.23, you can see a picture in which I used some vertical Keystone Comp. correction to make the tower stand up straighter. I was standing below the tower with my wide-angle lens pointed upward.
In the first frame the tower seems to be leaning away at the top. That’s because the wide-angle lens is magnifying closer objects (the base of the tower) more than distant objects (the top of the tower).
In the second frame, notice how the camera has pulled the top of the image forward, cutting off the edges of the frame to compensate, and thus enlarging the subject a little. When you use this live function, you can see if the subject is cut off due to cropping, and you can make composition adjustments before you take the picture.
In the second frame, the tower is straighter, with a more normal perspective. I enjoyed using Keystone Comp. much more than I expected. It corrects distortion without blurring the subject.

Figure 4.23: Keystone comp. correction in action
Now let’s examine how to enable and disable Keystone Comp.
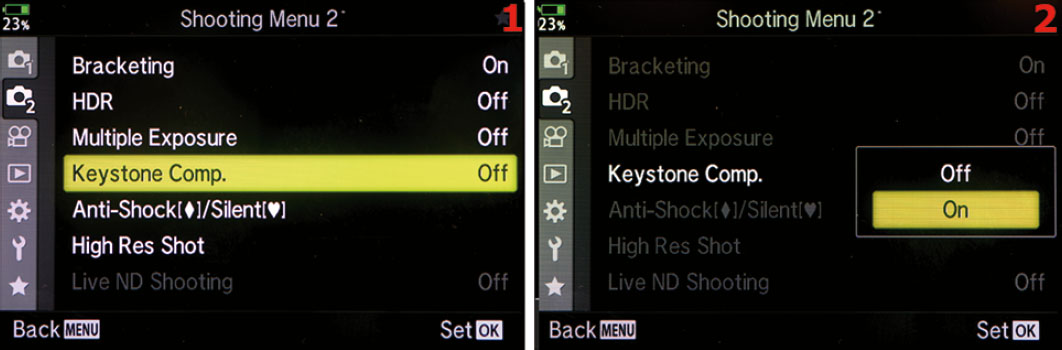
Figure 4.24: Enabling or disabling Keystone Comp.
Use the following steps to use the Keystone Comp. function:
- Select Keystone Comp. from Shooting Menu 2 and scroll to the right (figure 4.24, image 1).
- A menu will open (figure 4.24, image 2). Scroll to choose Off or On. Select On, then press OK. You will be back on the Shooting Menu 2 screen with the Keystone Comp marked as On. Press Menu or just lightly press the Shutter button to get back to taking photos. The Keystone Comp. mode is now activated, with the tilt-swing indicators shown (figure 4.22). When the camera is in this mode, you can’t easily change the exposure because the Front Dial and Rear Dial are tied up with Keystone Comp. adjustments. Therefore, it’s important to set the exposure correctly before you enter Keystone Comp. mode to take a picture.
Settings Recommendation: Although this tilt and swing method is not quite up to the standards of a camera’s tilt and swing system or an optical tilt-shift lens, it is a quick way to add some distortion correction on the fly. It tends to stretch the edges of images, so I don’t use this function for large adjustments. However, for a little tweaking, it’s fun to use.
Anti-Shock [ ]/Silent [
 ]
]
The Anti-Shock [![]() ] function is designed to cut down on sharpness-robbing vibrations caused by small camera movements at the time of exposure. The act of pressing the Shutter button with your finger causes camera vibrations that can produce image blurring at slow shutter speeds. If you have your camera on a tripod, you can set a delay value before the shutter fires, allowing time for vibrations to die down after you have pressed the Shutter button. You can choose delay values from the Anti-Shock [
] function is designed to cut down on sharpness-robbing vibrations caused by small camera movements at the time of exposure. The act of pressing the Shutter button with your finger causes camera vibrations that can produce image blurring at slow shutter speeds. If you have your camera on a tripod, you can set a delay value before the shutter fires, allowing time for vibrations to die down after you have pressed the Shutter button. You can choose delay values from the Anti-Shock [![]() ] menu from 0 seconds to 30 seconds.
] menu from 0 seconds to 30 seconds.
The Silent [![]() ] function causes the camera to use its silent electronic shutter instead of its somewhat noisier and more shock-prone mechanical shutter. You can also choose a delay time for the Silent [
] function causes the camera to use its silent electronic shutter instead of its somewhat noisier and more shock-prone mechanical shutter. You can also choose a delay time for the Silent [![]() ] function to prevent blurring of the image by photographer- or camera-induced vibrations.
] function to prevent blurring of the image by photographer- or camera-induced vibrations.
Anti-Shock [![]() ] and Silent [
] and Silent [![]() ] are mutually exclusive. You cannot select both modes at the same time.
] are mutually exclusive. You cannot select both modes at the same time.
Let’s examine how to use these two functions and a couple of related subfunctions to create very sharp images at slow shutter speeds.
Anti-Shock []
When you are capturing images using a shutter speed slower than 1/320 second and you have Anti-Shock [![]() ] enabled, the camera uses electronic first-curtain shutter release mode to help stop vibrations. You can set a timeout from 0 seconds to 30 seconds before the shutter fires, allowing time for vibrations to die down after you press the Shutter button.
] enabled, the camera uses electronic first-curtain shutter release mode to help stop vibrations. You can set a timeout from 0 seconds to 30 seconds before the shutter fires, allowing time for vibrations to die down after you press the Shutter button.
Note: To use Anti-Shock [![]() ] mode, you must have enabled its use in Custom Menu > D1. Disp/[Sound]/PC > [Sequential]/[Self-timer] Settings (figure 4.25). There you will find several [Sequential]/[Self-timer] settings that normally do not show on the camera’s selection screens. If you select the extra anti-shock settings, they will immediately appear in the [Sequential]/[Self-timer] selection screens along with the normal [Sequential]/[Self-Timer] settings. Enabling these extra settings will be discussed in the Custom Menu chapter, under the [Sequential]/[Self-Timer] Settings subheading (page 372). In this chapter, we will enable the [
] mode, you must have enabled its use in Custom Menu > D1. Disp/[Sound]/PC > [Sequential]/[Self-timer] Settings (figure 4.25). There you will find several [Sequential]/[Self-timer] settings that normally do not show on the camera’s selection screens. If you select the extra anti-shock settings, they will immediately appear in the [Sequential]/[Self-timer] selection screens along with the normal [Sequential]/[Self-Timer] settings. Enabling these extra settings will be discussed in the Custom Menu chapter, under the [Sequential]/[Self-Timer] Settings subheading (page 372). In this chapter, we will enable the [![]() ] [Single] mode so that we can take pictures with an Anti-Shock [
] [Single] mode so that we can take pictures with an Anti-Shock [![]() ] delay enabled.
] delay enabled.
Please note that in addition to [![]() ] [Single] mode, there are also four other Anti-Shock [
] [Single] mode, there are also four other Anti-Shock [![]() ] modes: [
] modes: [![]() ] [Sequential] L, [
] [Sequential] L, [![]() ] [Self-timer] 2s, [
] [Self-timer] 2s, [![]() ] [Self-timer] 12s, and [
] [Self-timer] 12s, and [![]() ] [Self-timer] C. Again, you won’t see any of the Anti-Shock [
] [Self-timer] C. Again, you won’t see any of the Anti-Shock [![]() ] modes on the [Sequential]/[Self-timer] settings screens until you have enabled them in Custom Menu D1 (figure 4.25). Let’s see how.
] modes on the [Sequential]/[Self-timer] settings screens until you have enabled them in Custom Menu D1 (figure 4.25). Let’s see how.

Figure 4.25: Adding [![]() ] [Single] mode to the [Sequential]/[Self-timer] screens
] [Single] mode to the [Sequential]/[Self-timer] screens
Use these steps to add [Sequential]/[Self-timer] [![]() ] [Single] mode (or up to four others) to the [Sequential]/[Self-timer] settings and to use an Anti-Shock [
] [Single] mode (or up to four others) to the [Sequential]/[Self-timer] settings and to use an Anti-Shock [![]() ] delay to prevent vibrations:
] delay to prevent vibrations:
- 1. Highlight [Sequential]/[Self-timer] Settings on the D1. Disp/[Sound]/PC screen in the Custom Menu and scroll to the right (figure 4.25, image 1).
- 2. On the [Sequential]/[Self-timer] Settings menu, you will find 19 items (figure 4.25, image 2). Only some of them will have a check mark on a new E-M1III camera. The items that do not have check marks will not show in the [Sequential]/[Self-timer] selection screens. Highlight the top item, which represents the [
 ] [Single] mode, and press the OK button to place a check mark in the box (figure 4.25, image 3).

Figure 4.26: Selecting [![]() ] [Single] mode from the Super Control Panel or Live Control
] [Single] mode from the Super Control Panel or Live Control
- 3. In figure 4.26, image 1, I selected the Anti-Shock [] [Single] mode on the Super Control Panel. In image 2, you can see the same selection on the Live Control. The Anti-Shock [] [Single] mode would not be available for selection on either of these two [Sequential]/[Self-timer] selection screens, or on the screen opened with the [Sequential]/[Self-timer]/[Flash] button on top of the camera, if I had not put a check mark in the box in Custom Menu D1 (figure 4.25, image 3). Select Anti-Shock [] [Single] mode from your [Sequential]/[Self-timer] screen of choice (figure 4.26). Now let’s enable the Anti-Shock [] delay.

Figure 4.27: Choosing a shutter-release delay or anti-shock setting
- 4. Select Anti-Shock []/Silent [
 ] from Shooting Menu 2 and scroll to the right (figure 4.27, image 1).
 - 5. Highlight Anti-Shock [] from the Anti-Shock []/Silent [] menu and scroll to the right (figure 4.27, image 2).
- 6. A small menu will pop up with two selections: Off and a time value ([]0sec for first-time use; figure 4.27, image 3). Choose the []0sec value and scroll to the right to select a new time value, or select Off to disable Anti-Shock [].
- 7. As seen in figure 4.27, image 4, you will use the up/down menu to select a vibration-suppressing shutter delay, from []0sec (0 seconds) to []30sec (30 seconds). I chose []2sec (2 seconds) in image 4.
- 8. Press the OK button to Set your chosen value.
Now you have enabled the Anti-Shock [![]() ] Single setting on the Super Control Panel (and Live Control), and you have selected the Anti-Shock [
] Single setting on the Super Control Panel (and Live Control), and you have selected the Anti-Shock [![]() ] shutter delay. You may take your pictures with a multi-second delay for vibration suppression.
] shutter delay. You may take your pictures with a multi-second delay for vibration suppression.
Silent []
When you are using Silent [![]() ] mode, you can introduce a delay starting from the time you press the Shutter button. The shutter will not fire until the delay expires. This will help you get sharper pictures while using Silent [
] mode, you can introduce a delay starting from the time you press the Shutter button. The shutter will not fire until the delay expires. This will help you get sharper pictures while using Silent [![]() ] mode.
] mode.
Please note that in addition to [![]() ] [Single] mode, there are also four other available Silent [
] [Single] mode, there are also four other available Silent [![]() ] modes: [
] modes: [![]() ] [Sequential] L, [
] [Sequential] L, [![]() ] [Self-timer] 2s, [
] [Self-timer] 2s, [![]() ] [Self-timer] 12s, and [
] [Self-timer] 12s, and [![]() ] [Self-timer] C. You won’t see any of the Silent [
] [Self-timer] C. You won’t see any of the Silent [![]() ] modes on the [Sequential]/[Self-timer] Settings screens until you have enabled them in Custom Menu D1 (figure 4.28). Let’s see how.
] modes on the [Sequential]/[Self-timer] Settings screens until you have enabled them in Custom Menu D1 (figure 4.28). Let’s see how.
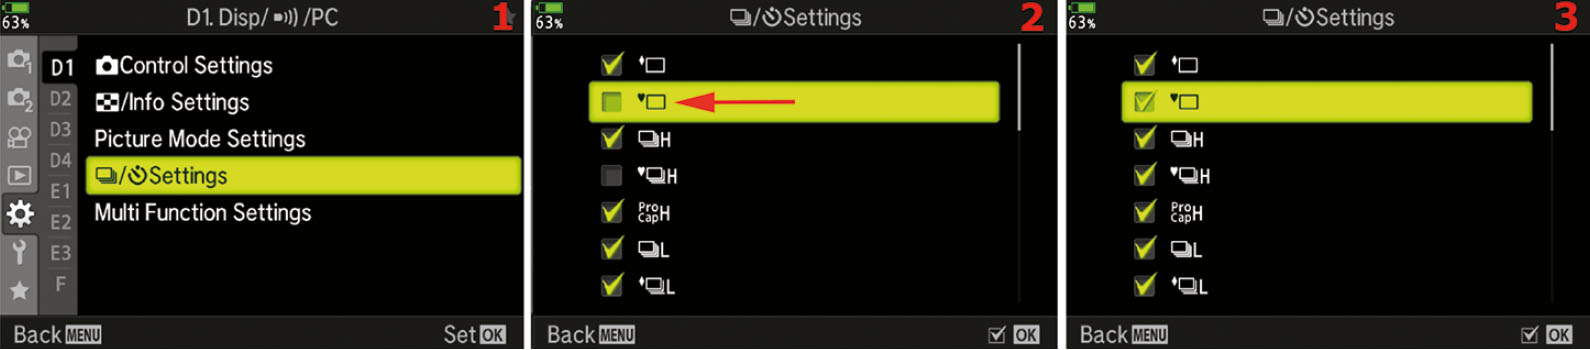
Figure 4.28: Adding [![]() ] [Single] mode to the [Sequential]/[Self-timer] screens
] [Single] mode to the [Sequential]/[Self-timer] screens
Use these steps to add [Sequential]/[Self-timer] [![]() ] [Single] mode (or up to four others) to the [Sequential]/[Self-timer] Settings and to use a Silent [
] [Single] mode (or up to four others) to the [Sequential]/[Self-timer] Settings and to use a Silent [![]() ] delay to prevent vibrations:
] delay to prevent vibrations:
- 1. Highlight [Sequential]/[Self-timer] Settings on the D1. Disp/[Sound]/PC screen in the Custom Menu and scroll to the right (figure 4.28, image 1).
- 2. On the [Sequential]/[Self-timer] Settings menu, you will find 19 items (figure 4.28, image 2). Only some of them will have a check mark on a new E-M1III camera. The items that do not have check marks will not show in the [Sequential]/[Self-timer] selection screens. Highlight the second item on the list, which represents the Silent [] [Single] mode, and press the OK button to place a check mark in the box (figure 4.28, image 3).
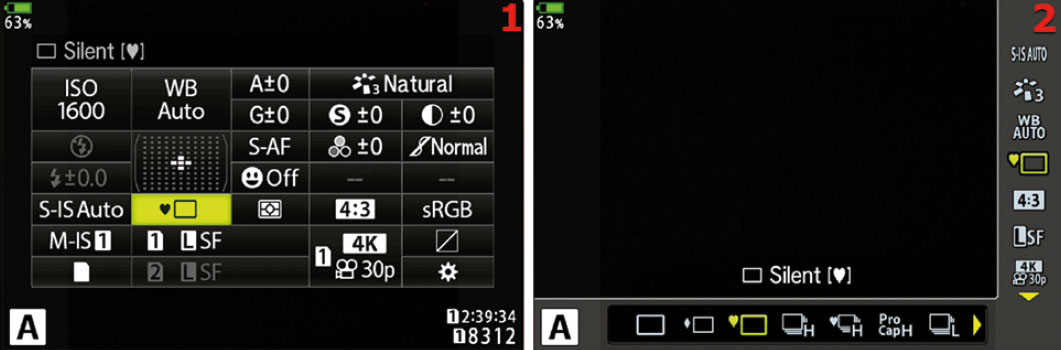
Figure 4.29: Selecting [![]() ] [Single] mode from the Super Control Panel or Live Control
] [Single] mode from the Super Control Panel or Live Control
- 3. In figure 4.29, image 1, I selected the Silent [] [Single] mode on the Super Control Panel. In image 2, you can see the same selection on the Live Control screen. The Silent [] [Single] mode would not be available for selection on either of these two [Sequential]/[Self-timer] selection screens, or on the screen opened with the [Sequential]/[Self-timer]/[Flash] button on top of the camera, if I had not put a check mark in the box in Custom menu D1 (figure 4.28, image 3). Select Silent [] [Single] mode from your [Sequential]/[Self-timer] screen of choice (figure 4.29). Now let’s enable the Silent [] delay.
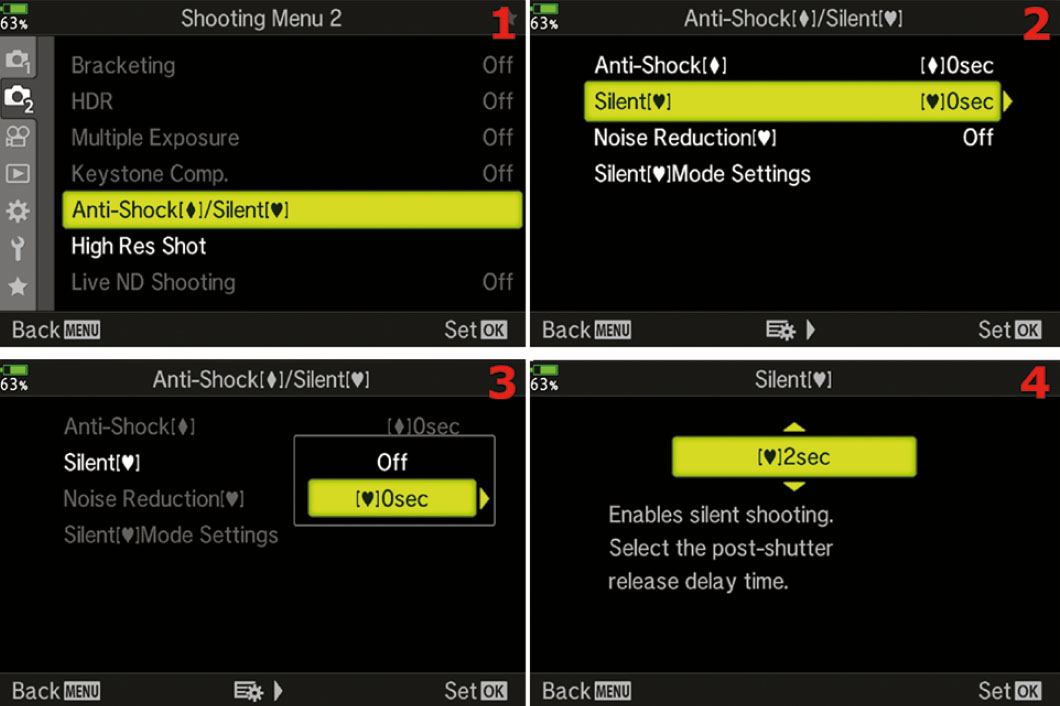
Figure 4.30: Choosing a shutter-release delay or silent mode setting
- 4. Select Anti-Shock []/Silent [] from Shooting Menu 2 and scroll to the right (figure 4.30, image 1).
- 5. Highlight Silent [] from the Anti-Shock []/Silent [] menu and scroll to the right (figure 4.30, image 2).
- 6. A small menu will pop up with two selections: Off and a time value ([]0sec for first time use; figure 4.30, image 3). Choose the []0sec value and scroll to the right, or select Off to disable Silent [].
- 7. As seen in figure 4.30, image 4, you will use the up/down menu to select an electronic shutter delay, from []0sec (0 seconds) to []30sec (30 seconds). I chose []2sec (2 seconds) in image 4.
- 8. Press the OK button to Set your chosen value.
Now you have enabled the Silent [![]() ] [Single] setting on the Super Control Panel (and Live Control), and you have selected the Silent [
] [Single] setting on the Super Control Panel (and Live Control), and you have selected the Silent [![]() ] shutter delay. You may take your pictures with a multi-second delay for vibration suppression.
] shutter delay. You may take your pictures with a multi-second delay for vibration suppression.
Noise Reduction []
If you are using Silent [![]() ] mode and shooting long exposures, you might end up with some noise in your images due to the sensor getting warm (fog), or some bright spots (often red) in the picture from a few hot pixels. If you enable Noise Reduction [
] mode and shooting long exposures, you might end up with some noise in your images due to the sensor getting warm (fog), or some bright spots (often red) in the picture from a few hot pixels. If you enable Noise Reduction [![]() ], the camera will use the black-frame subtraction noise-reduction method to remove noise from your images. Long-exposure noise is not the same as the noise that results from high-ISO shooting. It is safe to leave long-exposure noise reduction turned on all the time because it does not blur the image to reduce noise. We will discuss this type of noise reduction in greater detail in a later chapter (page 397).
], the camera will use the black-frame subtraction noise-reduction method to remove noise from your images. Long-exposure noise is not the same as the noise that results from high-ISO shooting. It is safe to leave long-exposure noise reduction turned on all the time because it does not blur the image to reduce noise. We will discuss this type of noise reduction in greater detail in a later chapter (page 397).
Unfortunately, when you’re using this Noise Reduction [![]() ] function in combination with slow shutter speeds, you will hear mild shutter sounds as the camera uses the black-frame subtraction method to shoot a second image with the shutter closed.
] function in combination with slow shutter speeds, you will hear mild shutter sounds as the camera uses the black-frame subtraction method to shoot a second image with the shutter closed.
Let’s examine how to enable long-exposure Noise Reduction [![]() ].
].
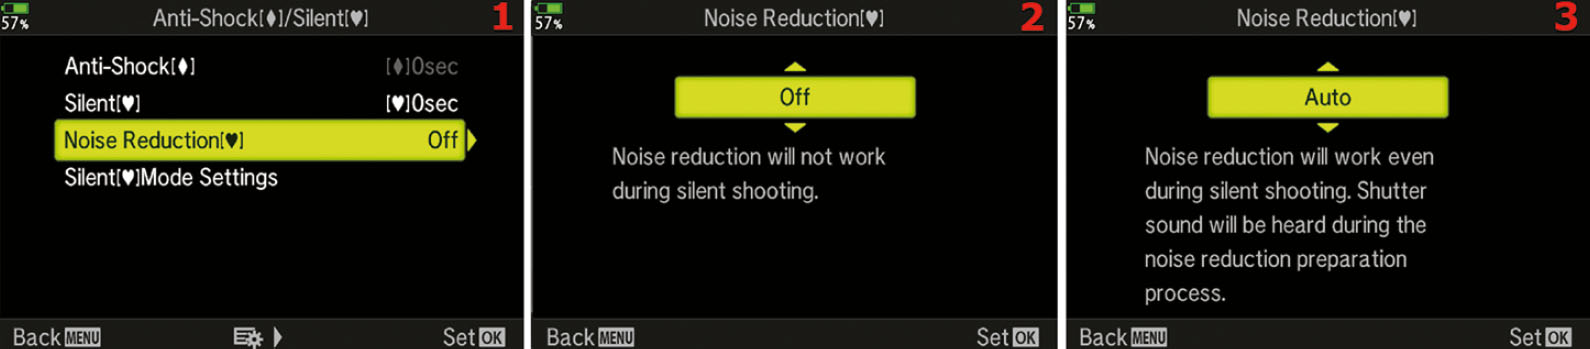
Figure 4.31: Enabling long-exposure Noise Reduction [![]() ]
]
Use the following steps to select automatic long-exposure noise reduction in Silent [![]() ] mode:
] mode:
- Choose Noise Reduction [] from the Anti-Shock []/Silent [] menu and scroll to the right (figure 4.31, image 1).
- Use the up/down menu to select Auto for automatic long-exposure noise reduction in Silent [] mode, or Off to disable it (figure 4.31, image 2 and 3).
- Press the OK button to lock in the setting.
Settings Recommendation: I leave the Noise Reduction [![]() ] function turned on all the time. That way, if I decide to do some star trails or other long exposures in Silent [
] function turned on all the time. That way, if I decide to do some star trails or other long exposures in Silent [![]() ] mode, I know my camera is ready to reduce the foggy amp noise and remove the hot pixels that generally appear in digital images during long exposures.
] mode, I know my camera is ready to reduce the foggy amp noise and remove the hot pixels that generally appear in digital images during long exposures.
Silent [] Mode Settings
This function allows you to get serious about reducing noise or light that might attract a raging beast (or bride) to you for disturbing the quiet. Not only can you turn off sound, but you can also disable the focus assist light and any non-Olympus flash you might have forgotten to dismount. Let’s see how.
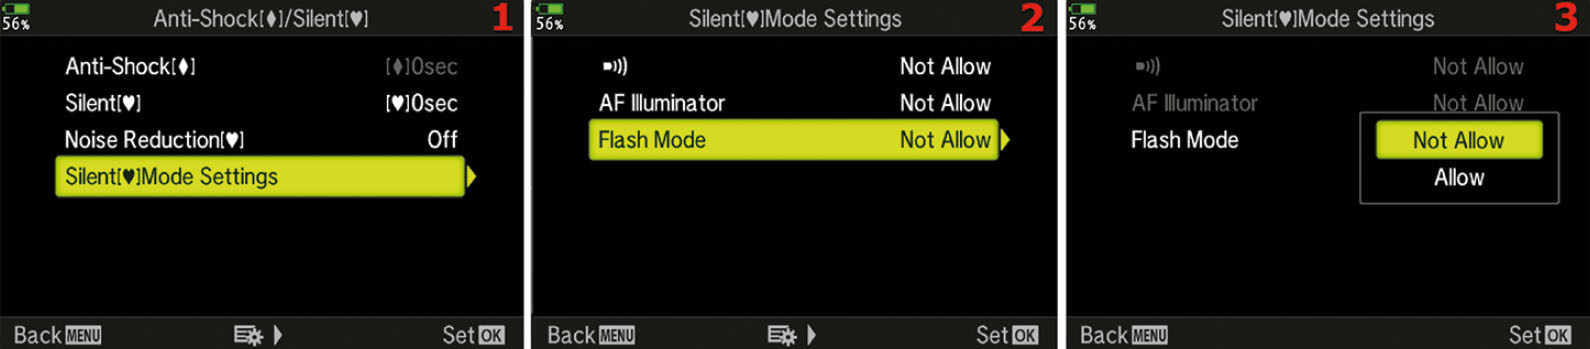
Figure 4.32: Disable all light and sound when using Silent [![]() ] mode
] mode
Use the following steps to disable light and sound that might call attention to you or disturb those around you while the camera is in Silent [![]() ] mode:
] mode:
- Choose Silent [] Mode Settings from the Anti-Shock []/Silent [] menu and scroll to the right (figure 4.32, image 1).
- Highlight [Sound], AF Illuminator, or Flash Mode on the Silent [] Mode Settings menu and scroll to the right (figure 4.32, image 2). They all work the same way. I used Flash Mode as the example.
- You will now see a popup menu with two choices: Not Allow and Allow (figure 4.32, image 3). Select Not Allow to disable a particular feature, or Allow to enable it, according to your needs.
- Press the OK button to Set the value.
Settings Recommendation: If I am shooting macro shots or handheld shots with slow shutter speeds that are especially prone to being degraded by camera vibrations, I often use an Anti-Shock [![]() ] delay to reduce or eliminate vibrations. Silent [
] delay to reduce or eliminate vibrations. Silent [![]() ] works in a similar manner to Anti-Shock [
] works in a similar manner to Anti-Shock [![]() ] mode, except that it uses the silent electronic first-curtain shutter in all situations. There may be even less vibration when the camera uses the silent electronic shutter, compared to the mechanical shutter; however, in all situations, pressing the Shutter button is a major cause of vibrations. Using Anti-Shock [
] mode, except that it uses the silent electronic first-curtain shutter in all situations. There may be even less vibration when the camera uses the silent electronic shutter, compared to the mechanical shutter; however, in all situations, pressing the Shutter button is a major cause of vibrations. Using Anti-Shock [![]() ] mode—or Silent [
] mode—or Silent [![]() ] mode when no shutter noise is wanted—will help you keep your images sharp at slow shutter speeds. Be sure to use a tripod!
] mode when no shutter noise is wanted—will help you keep your images sharp at slow shutter speeds. Be sure to use a tripod!
When I am shooting on a tripod I use an electronic cable release, such as the Olympus RM-CB2 Remote Cable Release, to prevent camera vibrations from damaging my shot. I also like to use at least a 2-second delay to allow camera vibrations to die down before I release the shutter. Although a mirrorless camera is not as susceptible to vibrations as a DSLR, it is still wise to use a tripod and hands-off shutter release to make the sharpest possible pictures.
I leave Noise Reduction [![]() ] turned on all the time because I like long-exposure noise reduction when I shoot images with a shutter speed longer than 5 seconds.
] turned on all the time because I like long-exposure noise reduction when I shoot images with a shutter speed longer than 5 seconds.
I use the Silent [![]() ] Mode Settings functions according to my needs at the time. When I am shooting pictures of a bear, I certainly don’t want my camera drawing attention to me.
] Mode Settings functions according to my needs at the time. When I am shooting pictures of a bear, I certainly don’t want my camera drawing attention to me.
High Res Shot
High Res Shot mode allows you to create extra-large files up to 80 megapixels. This menu allows you to set the time the camera waits to begin shooting after the Shutter button is pressed all the way down to help reduce any camera shake. You can also set how long the camera waits for the flash to charge when using a flash for High Res shots. The final option on this menu allows you to choose between Tripod mode and Handheld mode, which affects the resolution and other settings discussed a bit later.
Now let’s examine the steps to set up a High Res Shot.
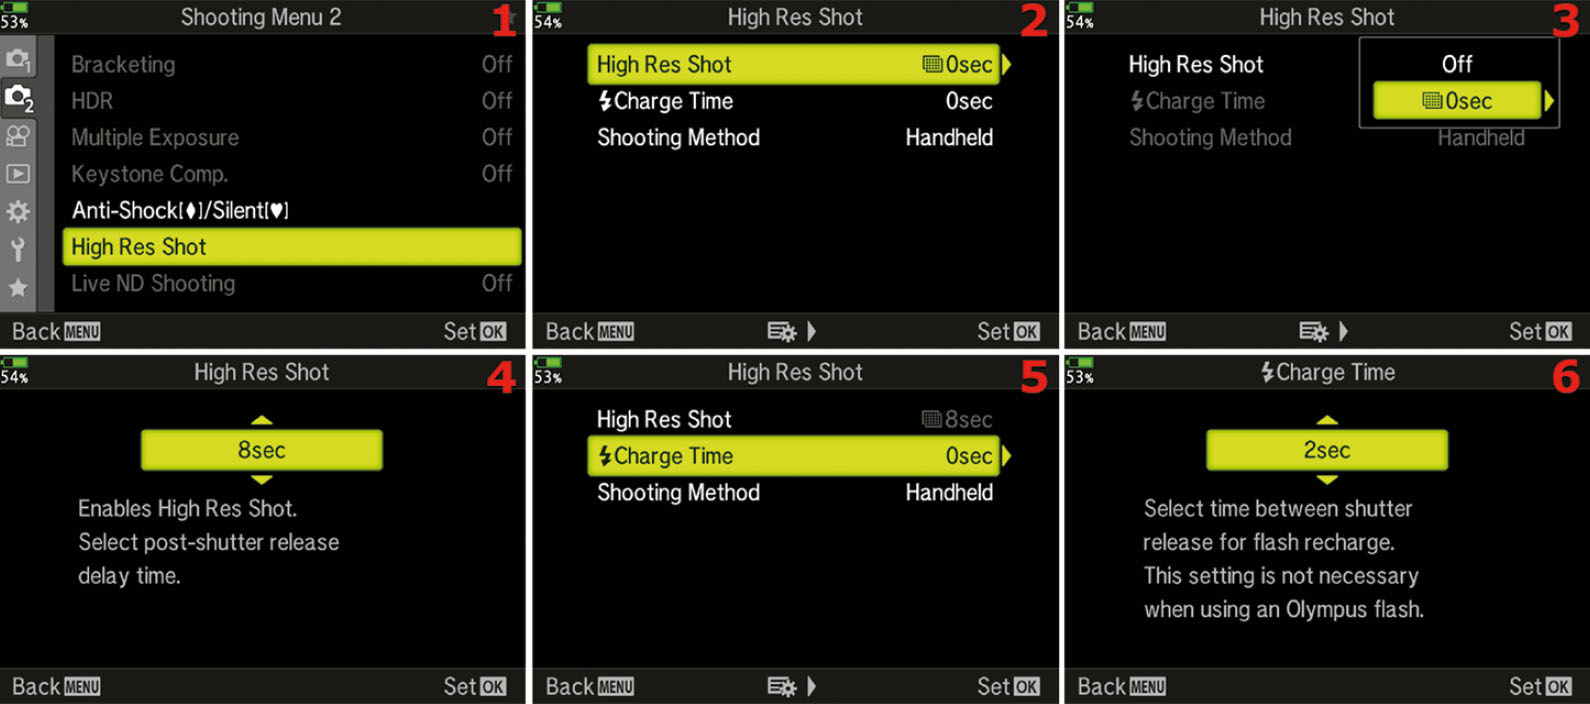
Figure 4.33: Selecting High Res Shot
Use the following steps to configure your E-M1III for making a High Res Shot:
- Select High Res Shot from Shooting Menu 2 and scroll to the right (figure 4.33, image 1).
- Highlight High Res Shot on the High Res Shot menu and scroll to the right (figure 4.33, image 2).
- Choose [High Res Shot] 0sec from the popup menu and scroll to the right to select a delay value (figure 4.33, image 3). Or, if you would rather not use a delay value to reduce vibrations, simply highlight 0sec, press the OK button, and skip step 4. (Note: Since High Res Shot is all about getting maximum image detail, it would be a shame to limit that detail by shaking the camera. It’s a good idea to use some delay time to allow vibrations to dissipate before the shutter fires.)
- Select a delay time from the up/down menu (figure 4.33, image 4). This delay time will allow any camera vibrations to settle down after you have pressed the Shutter button and before the camera takes the picture. You can select from no delay (0sec) to 30 seconds (30sec), with several intermediate delay values. In the example, an 8-second delay (8sec) is selected.
- If you are using a non-Olympus flash unit, you may need to consider flash charge time. An Olympus flash unit coordinates with the camera, so it should not require the use of this setting. If you do not need time for the flash to recharge, skip to step 7. To set a flash charge time for a non-Olympus flash unit, choose [Flash] Charge Time from the High Res Shot menu and scroll to the right (figure 4.33, image 5).
- Use the up/down menu to select the number of seconds that the camera should wait before capturing the image, so that the flash has time to recycle (figure 4.33, image 6). You can choose from 0 seconds (0sec) to 30 seconds (30sec). When you have selected the [Flash] Charge Time you want to use, press the OK button to lock in the value.

Figure 4.34: Choosing between Tripod and Handheld modes
Use the following steps to configure your E-M1III for choosing between Handheld and Tripod High Res Shot:
- 1. Select High Res Shot from Shooting Menu 2 and scroll to the right (figure 4.34, image 1).
- 2. Highlight Shooting Method on the High Res Shot menu and scroll to the right (figure 4.34, image 2).
- 3. Select between Tripod (figure 4.34, image 3) and Handheld (figure 4.34, image 4), then press OK to lock in your choice. When you pick Handheld, the size for the High Res shot is 50 megapixels and you cannot use a flash. When you pick Tripod mode, you can use a flash and the size is 80 Megapixels.
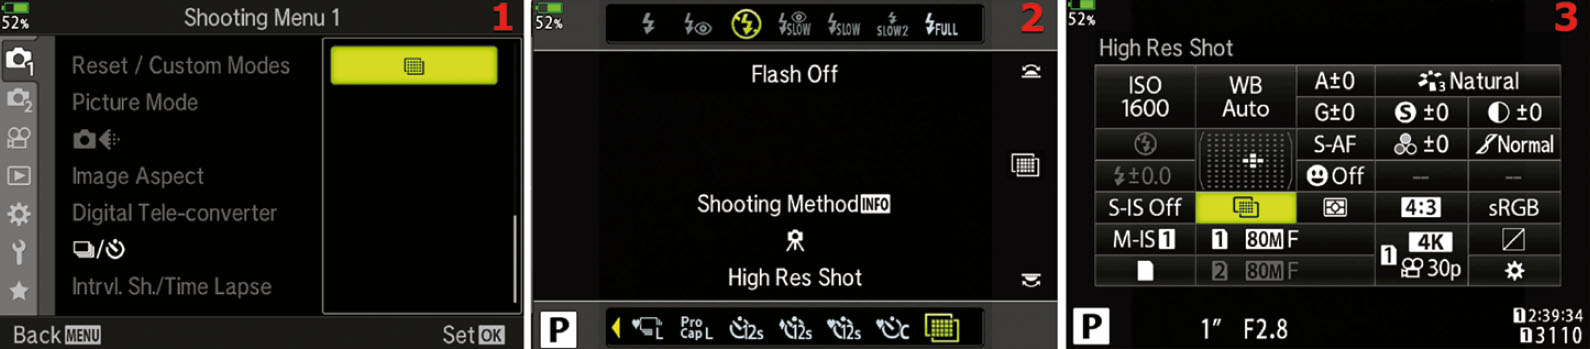
Figure 4.35: Selecting High Res Shot mode
- 4. Figure 4.35 shows the various ways you can choose High Res Shot mode via different camera screens. First, let’s use Shooting Menu 1 to choose the mode. Highlight [Sequential]/[Self-timer] on Shooting Menu 1 and scroll to the right. Choose the High Res Shot mode symbol from the bottom of the popup menu and press the OK button to lock in your choice (figure 4.35, image 1). If you used Shooting Menu 1 to select High Res Shot mode, you can skip steps 10 and 11, which describe how to use other camera screens to do the same.
- 5. Figure 4.35, image 2, shows the screen that appears when you press the [Sequential]/Self-timer]/[Flash] button on top of the camera. You will find the High Res Shot symbol at the far right end of the menu bar on the bottom of the screen. Turn the Rear Dial or use the Arrow Pad keys to make your selection. Press INFO then use the Front or Rear Dial to switch between Tripod and Handheld mode.
- 6. Figure 4.35, image 3, shows the Super Control Panel (page 18), or the Live SCP (page 61), to access the same High Res Shot mode symbol). Simply turn the Front Dial to change the symbols until the High Res Shot symbol appears. Following are the screens you will see while capturing a High Res Shot.
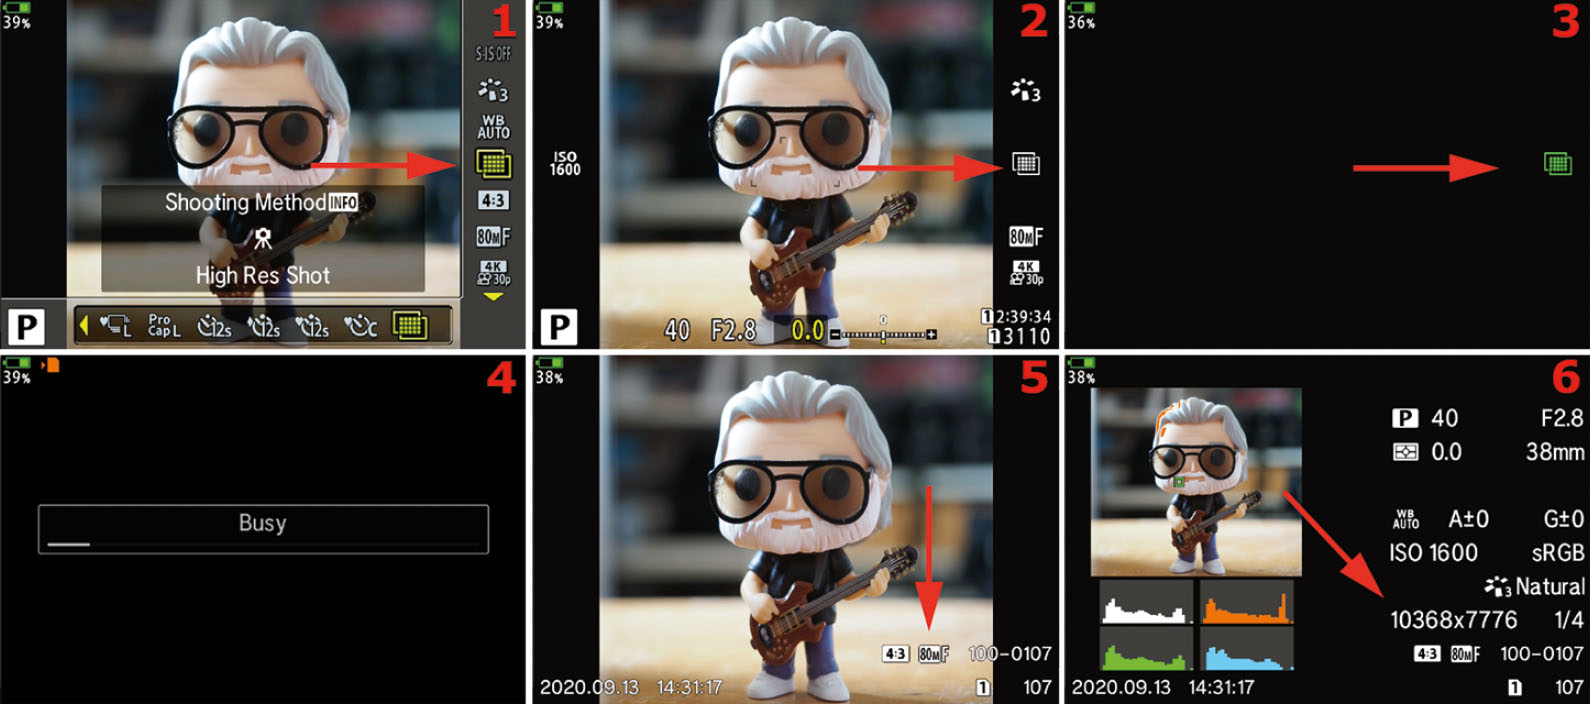
Figure 4.36: Capturing a High Res Shot image
- 7. Figure 4.36, image 1, shows the Live Control screen with the High Res Shot mode symbol selected (red arrow). Use Live Control, the Super Control Panel, Live SCP, [Sequential]/[Self-timer]/Flash button, or Shooting Menu 1 to select the High Res Shot symbol, as described in previous steps.
- 8. It is very important that the camera is mounted on a solid tripod or held as still as possible, or you will be unable to use High Res Shot effectively. In figure 4.36, image 2, the red arrow is pointing at the High Res Shot symbol. If this symbol is blinking, the camera is not stable enough to create a High Res Shot. Stabilize the camera until the symbol stops blinking.
- 9. Once you have pressed the Shutter button, your camera will start its High Res Shot delay countdown (see figure 4.33 to set the delay). While the delay is counting down, the screen will go black, except for the green High Res Shot symbol seen in figure 4.36, image 3, red arrow. Once the High Res Shot delay has expired, you will see the screen shown in figure 4.36, image 3, with your subject in the background, of course. This screen is displayed while the camera captures the frames needed to make the High Res Shot. Do not move the camera during image capture, which can last for several seconds.
- 10. As soon as the frames have been captured, the camera starts merging them into the final High Res Shot. During the merge process, the camera will display a Busy screen with a progress bar (figure 4.36, image 4).
- 11. Following the Busy screen, it will return to the normal shooting screen, ready to take more High Res Shot images. Be sure to select a mode other than High Res Shot when you are finished.
- 12. Figure 4.36, images 5 and 6, show the Playback screen in information mode (press the INFO button when a picture is displayed on the monitor to use the image information screen). Notice that the camera shows you the High Res Shot pixel ratio, along with normal shooting information.
Settings Recommendation: I love the High Res Shot mode for landscapes (unless the wind is blowing hard, which can cause blurring). There are many types of static photography that will benefit from added image resolution. Although it may seem a little complex in the beginning, after you have taken a few High Res Shots, it will become second nature. While this mode might not fully match the resolution of a true 80 MP sensor, it can add lots of extra detail for many subjects. Try it out—I think you’ll like it.
Live ND Shooting
The E-M1III has this great feature which takes a series of exposures and combines them in a way that mimics the use of a traditional Neutral Density filter. This allows you to capture scenes that look as if they were captured using a much slower shutter speed in bright lighting. You can only use this mode when the Mode Dial is set to M or S, so if the menu is grayed out, check the Mode Dial first.
This menu turns Live ND shooting on and allows you to pick the ND setting along with turning the live preview on or off.

Figure 4.37: Enabling Live ND shooting
Use the following steps to configure Live ND shooting:
- Select Live ND Shooting from Shooting Menu 2 and scroll to the right (figure 4.37, image 1).
- Select On from the popup menu and press the right Arrow to open up the Live ND Shooting menu (figure 4.37, image 2). This now allows you to pick the Filter and turn the LV simulation on or off.
- Select ND Number and press the right Arrow key to open the list of available Live ND Filters (figure 4.37, image 3). You can pick from ND2(1EV), ND4(2EV), ND8(3EV), ND16(4EV), and ND32(5EV). Select the ND setting you want and press OK. You can now press the down Arrow and select LV Simulation, then press the right Arrow and choose between On or Off (figure 4.37, image 4). When this is turned on, the slow shutter effect can be seen in Live View or through the viewfinder; if it is turned off, you will not see the effect until you look at the photo you have taken.
Author’s Conclusions
Have you ever seen so many functions in one camera? I have never seen a camera with so many configuration possibilities. The advantage is that all of these functions let you do almost any type of photography you can think of. And all of this power is packed into such a diminutive camera. Do you like your E-M1III as much as I like mine?
The next chapter discusses the seven primary video functions used to control the powerful video recording capability built into your camera. Let’s make some movies!