
In earlier chapters, we downloaded static web pages that always return the same content. Now, in this chapter, we will interact with web pages that depend on user input and state to return relevant content. This chapter will cover the following topics:
- Sending a
POSTrequest to submit a form - Using cookies to log in to a website
- The high-level Mechanize module for easier form submissions
To interact with these forms, you will need a user account to log in to the website. You can register an account manually at http://example.webscraping.com/user/register. Unfortunately, we can not yet automate the registration form until the next chapter, which deals with CAPTCHA.
Note
Form methods
HTML forms define two methods for submitting data to the server—GET and POST. With the
GET method, data like ?name1=value1&name2=value2 is appended to the URL, which is known as a "query string". The browser sets a limit on the URL length, so this is only useful for small amounts of data. Additionally, this method is intended only to retrieve data from the server and not make changes to it, but sometimes this is ignored. With POST requests, the data is sent in the request body, which is separate from the URL. Sensitive data should only be sent in a POST request to avoid exposing it in the URL. How the POST data is represented in the body depends on the encoding type.
Servers can also support other HTTP methods, such as PUT and DELETE, however, these are not supported in forms.
The first form that we will automate is the Login form, which is available at http://example.webscraping.com/user/login. To understand the form, we will use Firebug Lite. With the full version of Firebug or Chrome DevTools, it is possible to just submit the form and check what data was transmitted in the network tab. However, the Lite version is restricted to viewing the structure, as follows:
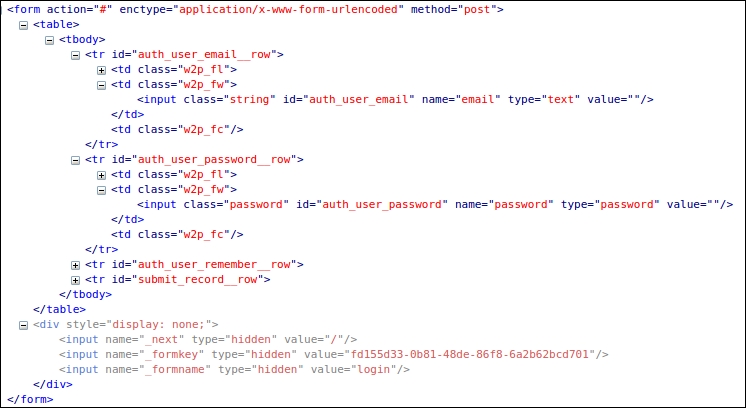
The important parts here are the action, enctype, and method attributes of the form tag, and the two input fields. The action attribute sets the location where the form data will be submitted, in this case, #, which means the same URL as the Login form. The enctype attribute sets the encoding used for the submitted data, in this case, application/x-www-form-urlencoded. Also, the method attribute is set to post to submit form data in the body to the server. For the input tags, the important attribute is name, which sets the name of the field when submitted to the server.
Note
Form encoding
When a form uses the POST method, there are two useful choices for how the form data is encoded before being submitted to the server. The default is application/x-www-form-urlencoded, which specifies that all non-alphanumeric characters must be converted to ASCII Hex values. However, this is inefficient for forms that contain a large amount of non-alphanumeric data, such as a binary file upload, so multipart/form-data encoding was defined. Here, the input is not encoded but sent as multiple parts using the MIME protocol, which is the same standard used for e-mail.
The official details of this standard can be viewed at http://www.w3.org/TR/html5/forms.html#selecting-a-form-submission-encoding.
When regular users open this web page in their browser, they will enter their e-mail and password, and click on the Login button to submit their details to the server. Then, if the login process on the server is successful, they will be redirected to the home page; otherwise, they will return to the Login page to try again. Here is an initial attempt to automate this process:
>>> import urllib, urllib2
>>> LOGIN_URL = 'http://example.webscraping.com/user/login'
>>> LOGIN_EMAIL = '[email protected]'
>>> LOGIN_PASSWORD = 'example'
>>> data = {'email': LOGIN_EMAIL, 'password': LOGIN_PASSWORD}
>>> encoded_data = urllib.urlencode(data)
>>> request = urllib2.Request(LOGIN_URL, encoded_data)
>>> response = urllib2.urlopen(request)
>>> response.geturl()
'http://example.webscraping.com/user/login'
This example sets the e-mail and password fields, encodes them with urlencode, and then submits them to the server. When the final print statement is executed, it will output the URL of the Login page, which means that the login process has failed.
This Login form is particularly strict and requires some additional fields to be submitted along with the e-mail and password. These additional fields can be found at the bottom of the preceding screenshot, but are set to hidden and so are not displayed in the browser. To access these hidden fields, here is a function using the lxml library covered in Chapter 2, Scraping the Data, to extract all the input tag details in a form:
import lxml.html
def parse_form(html):
    tree = lxml.html.fromstring(html)
    data = {}
    for e in tree.cssselect('form input'):
        if e.get('name'):
            data[e.get('name')] = e.get('value')
    return data
The function in the preceding code uses lxml CSS selectors to iterate all the input tags in a form and return their name and value attributes in a dictionary. Here is the result when the code is run on the Login page:
>>> import pprint
>>> html = urllib2.urlopen(LOGIN_URL).read()
>>> form = parse_form(html)
>>> pprint.pprint(form)
{
    '_next': '/',
    '_formkey': '0291ec65-9332-426e-b6a1-d97b3a2b12f8',
    '_formname': 'login',
    'email': '',
    'password': '',
    'remember': 'on'
}
The _formkey attribute is the crucial part here, which is a unique ID used by the server to prevent multiple form submissions. Each time the web page is loaded, a different ID is used, and then the server can tell whether a form with a given ID has already been submitted. Here is an updated version of the login process that submits _formkey and other hidden values:
>>> html = urllib2.urlopen(LOGIN_URL).read()
>>> data = parse_form(html)
>>> data['email'] = LOGIN_EMAIL
>>> data['password'] = LOGIN_PASSWORD
>>> encoded_data = urllib.urlencode(data)
>>> request = urllib2.Request(LOGIN_URL, encoded_data)
>>> response = urllib2.urlopen(request)
>>> response.geturl()
'http://example.webscraping.com/user/login'
Unfortunately, this version did not work either, and when run the login URL was printed again. We are missing a crucial component—cookies. When a regular user loads the Login form, this _formkey value will be stored in a cookie, which is then compared to the _formkey value in the submitted Login form data. Here is an updated version using the urllib2.HTTPCookieProcessor class to add support for cookies:
>>> import cookielib
>>> cj = cookielib.CookieJar()
>>> opener = urllib2.build_opener(urllib2.HTTPCookieProcessor(cj))
>>> html = opener.open(LOGIN_URL).read()
>>> data = parse_form(html)
>>> data['email'] = LOGIN_EMAIL
>>> data['password'] = LOGIN_PASSWORD
>>> encoded_data = urllib.urlencode(data)
>>> request = urllib2.Request(LOGIN_URL, encoded_data)
>>> response = opener.open(request)
>>> response.geturl()
'http://example.webscraping.com'
Note
What are cookies?
Cookies are small amounts of data sent by a website in the HTTP response headers, which look like this: Set-Cookie: session_id=example;. The web browser will store them, and then include them in the headers of subsequent requests to that website. This allows a website to identify and track users.
Success! The submitted form values have been accepted and the response URL is the home page. This snippet and the other login examples in this chapter are available for download at https://bitbucket.org/wswp/code/src/tip/chapter06/login.py.
Working out how to submit the login details as expected by the server can be quite complex, as the previous example demonstrated. Fortunately, there is a workaround for difficult websites—we can log in to the website manually in our web browser, and then have our Python script load and reuse these cookies to be automatically logged in. Each web browser stores their cookies in a different format, so we will focus on just the Firefox browser in this example.
FireFox stores its cookies in a sqlite database and its sessions in a JSON file, which can be connected to directly from Python. For the login, we only need the sessions, which are stored in this structure:
{"windows": [...
  "cookies": [
    {"host":"example.webscraping.com",
     "value":"514315085594624:e5e9a0db-5b1f-4c66-a864",
     "path":"/",
     "name":"session_id_places"}
  ...]
]}
Here is a function that can be used to parse these sessions into a CookieJar object:
def load_ff_sessions(session_filename):
    cj = cookielib.CookieJar()
    if os.path.exists(session_filename):
        json_data = json.loads(open(session_filename, 'rb').read())
        for window in json_data.get('windows', []):
            for cookie in window.get('cookies', []):
                c = cookielib.Cookie(0,
                    cookie.get('name', ''),
                    cookie.get('value', ''), None, False,
                    cookie.get('host', ''),
                    cookie.get('host', '').startswith('.'),
                    cookie.get('host', '').startswith('.'),
                    cookie.get('path', ''), False, False,
                    str(int(time.time()) + 3600 * 24 * 7),
                    False, None, None, {})
                cj.set_cookie(c)
    else:
        print 'Session filename does not exist:', session_filename
    return cj
One complexity is that the location of the FireFox sessions file will vary, depending on the operating system. On Linux, it should be located at this path:
~/.mozilla/firefox/*.default/sessionstore.js
In OS X, it should be located at:
~/Library/Application Support/Firefox/Profiles/*.default/
   sessionstore.js
Also, for Windows Vista and above, it should be located at:
%APPDATA%/Roaming/Mozilla/Firefox/Profiles/*.default/sessionstore.js
Here is a helper function to return the path to the session file:
import os, glob
def find_ff_sessions():
    paths = [
        '~/.mozilla/firefox/*.default',
        '~/Library/Application Support/Firefox/Profiles/*.default',
        '%APPDATA%/Roaming/Mozilla/Firefox/Profiles/*.default'
    ]
    for path in paths:
        filename = os.path.join(path, 'sessionstore.js')
        matches = glob.glob(os.path.expanduser(filename))
        if matches:
            return matches[0]
Note that the glob module used here will return all the matching files for the given path. Now here is an updated snippet using the browser cookies to log in:
    >>> session_filename = find_ff_sessions()
    >>> cj = load_ff_sessions(session_filename)
    >>> processor = urllib2.HTTPCookieProcessor(cj)
    >>> opener = urllib2.build_opener(processor)
    >>> url = 'http://example.webscraping.com'
    >>> html = opener.open(url).read()
To check whether the session was loaded successfully, we cannot rely on the login redirect this time. Instead, we will scrape the resulting HTML to check whether the logged in user label exists. If the result here is Login, the sessions have failed to load correctly. If this is the case, make sure you are already logged in to the example website in FireFox. Here is the structure of the user label in Firebug:
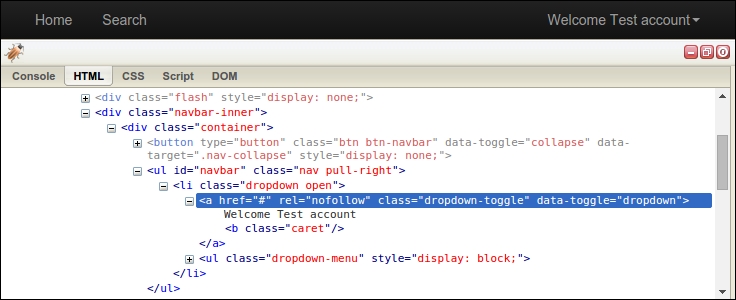
Firebug shows that this label is located within a <ul> tag of ID "navbar", which can easily be extracted with the lxml library used in Chapter 2, Scraping the Data:
>>> tree = lxml.html.fromstring(html)
>>> tree.cssselect('ul#navbar li a')[0].text_content()
Welcome Test account
The code in this section was quite complex and only supports loading sessions from the Firefox browser. If you want support for all cookies as well as other web browsers try the browsercookie module, which can be installed with pip install browsercookie and is documented at https://pypi.python.org/pypi/browsercookie.