This chapter lists the specific installation and configuration steps to set up the development environment that you need to create in mobile applications with IBM Worklight. It guides you through the steps of installing the software prerequisites and the Eclipse-based IBM Worklight Studio.
In this chapter, we will cover the installation steps for both the IBM Worklight Consumer and Developer Editions with the intention of giving you a complete step-through guide to prepare your development environment for both editions as per your target requirement.
Before starting with the consumer edition installation, we need to have the required software installed in your operating system:
- Java Runtime Environment (JRE)
- IBM Installation Manager
To install JRE, please download the setup files from http://www.oracle.com/technetwork/java/javase/downloads/java-archive-downloads-javase7-521261.html.
To review the list of supported operating systems and system requirements for IBM Worklight for various versions, please visit http://www-01.ibm.com/support/docview.wss?uid=swg27024838.
IBM Installation Manager is an enterprise deployment tool used to install, modify, and uninstall IBM products. You might already have the Installation Manager installed; if not, you can download this from IBM's website by visiting http://pic.dhe.ibm.com/infocenter/install/v1r5/index.jsp.
At this step, assume that you have the IBM Installation Manager installed in your system. Perform the following steps in the Installation Manager after the installation:
- Now start the IBM Installation Manager to install the IBM product.
- Navigate to File | Preferences... to open the Preference window, and use the Add Repository... button to add the repository location; you can use physical media or download the product to install it using search services.
- Click on OK to add the repository and return to the main Installation Manager window to start the setup.
As already covered in Chapter 1, Getting Started with IBM Worklight, IBM Worklight Studio is used to implement runtime skins for building apps that automatically suppress the environment, which will be seamlessly deployable using the IBM Worklight Server. IBM Worklight Server provides leverage to its defined resources and infrastructure. Now, we are moving on to the installation of IBM Worklight components with details of their setup files.
To install IBM Worklight Consumer 5.0.5, you must have following IBM Worklight Studio, Server, and Eclipse plugin files to step forward:
IM_Rep_Worklight_Server_wce_5.0.5.zipIM_Rep_Worklight_Studio_wce_5.0.5.zipworklight_studio_wce_5.0.5.zip
To download Worklight Consumer Edition files, you must have an IBM ID to access and download these files for the desired operating system. Please use the following URL to find the details:
http://www-01.ibm.com/support/docview.wss?uid=swg24033643
The listed files are installation sources to set up IBM Worklight Server and Worklight Studio, and the last file is used to set up IBM Worklight Studio plugin which can be installed separately with any Eclipse version.
Installing via an archive file provides several options depending on the operating system and package being installed. The use of the IBM Installation Manager applies to Worklight Studio and Worklight Server packages but is not supported on Mac platforms. The use of the Eclipse update site applies to Worklight Studio that is supported on all platforms. The following sections show you how to install each of the available packages.
Use the following steps to install the packages:
- Unzip the listed server archive file into a temporary directory.
- Start the IBM Installation Manager.
- Click on Preferences in the File menu.
- Click on Add Repository.
- Enter the fully qualified path to the following directory:
unzip-directory/IWS/disk1/ - Click on OK in the Add Repository window.
- Click on OK in the Preferences window.
- Once you return to the main IBM Installation Manager window, click on Install.
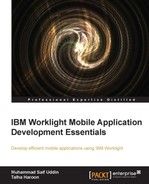
- Tick the IBM Worklight Consumer Edition checkbox as shown in the following screenshot:
IBM Installation Manager and installation package selection
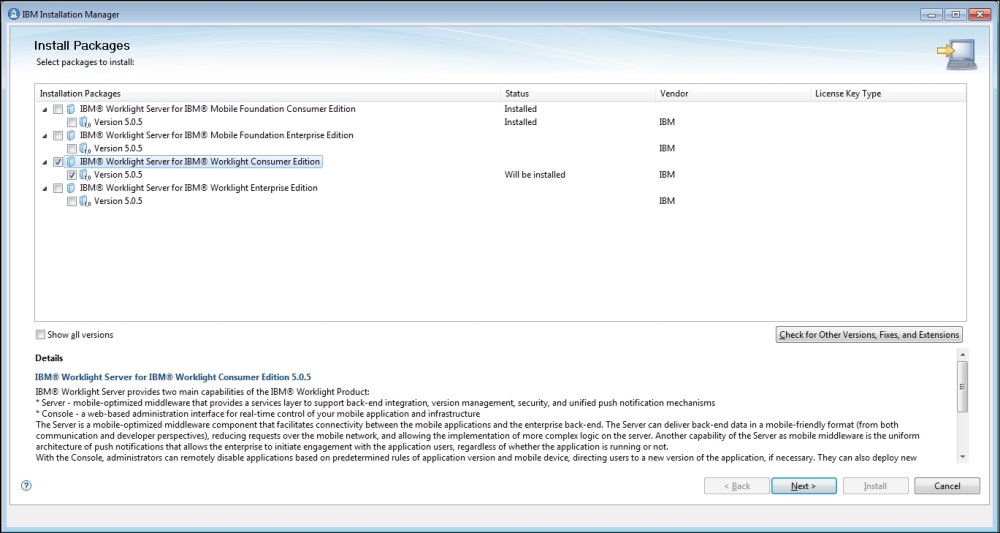
- In the following screenshot, you need to define the installation directory for IBM Worklight and Windows operating system and then click on Next.
IBM Installation Manager and package path
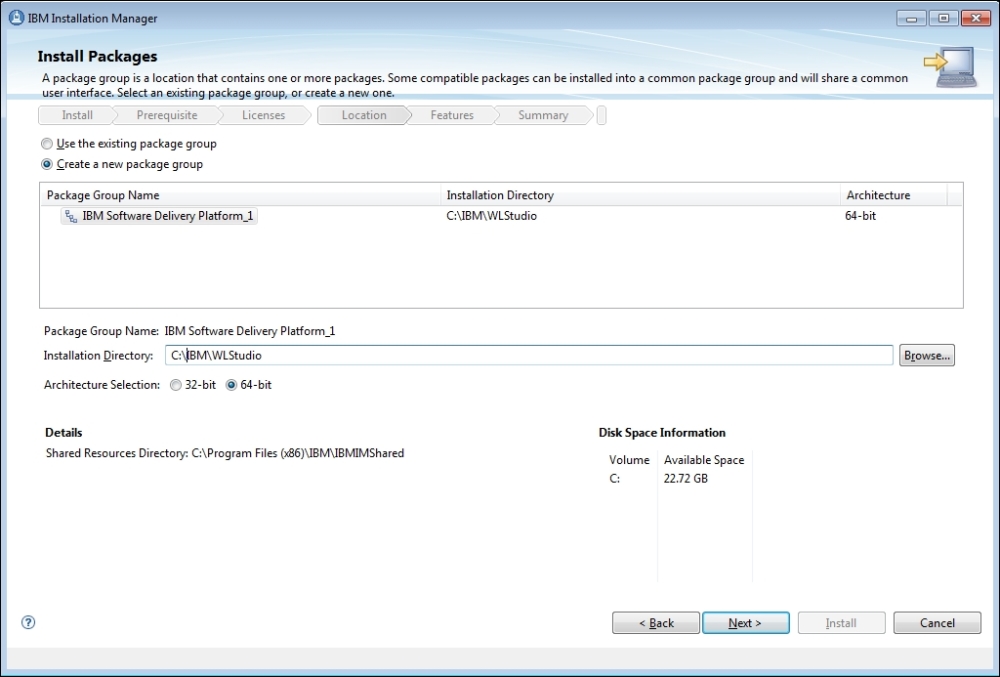
The installation wizard will now request for a database connection to prepare the different schema for Worklight Server as shown in the following screenshot. In this book, we have used MySQL database, Version 5, for backend. After you have made your selection, click on Next.
Database selection for IBM Worklight
Now define the parameters for the database connection, including host, port, and credentials followed by the respective database library (the .jar file). The following screenshot illustrates the required parameters such as database running host, port, and .jar file path to build connection between Worklight Server and Database Server. After you fill it, click on Next to move on to the next step:
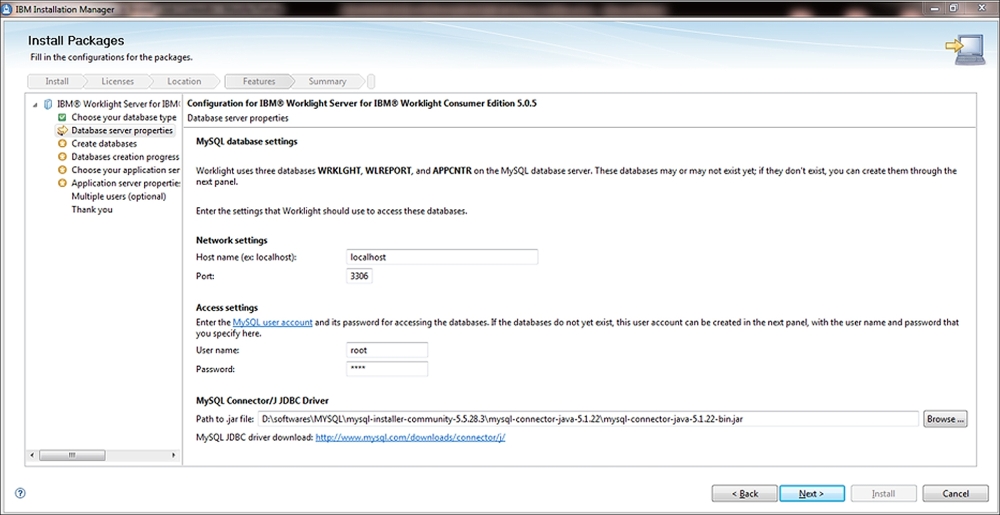
Database connection parameters
When the connection is successful, as the following screenshot shows, we start with the preparation of three different schemas for Worklight Server.
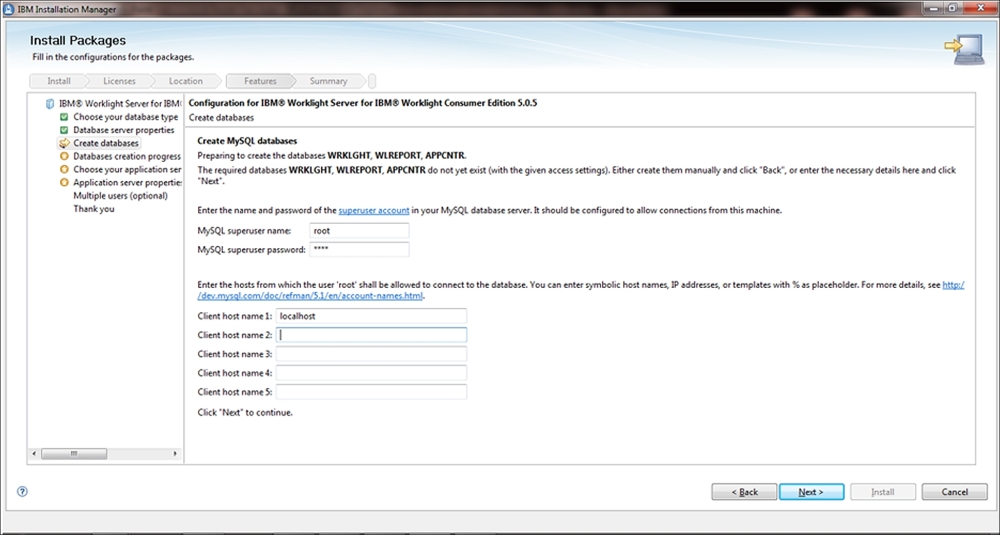
Clicking on the Next button will create these schemes in the connected database and show you the status of these SQL queries with their status in the next section.
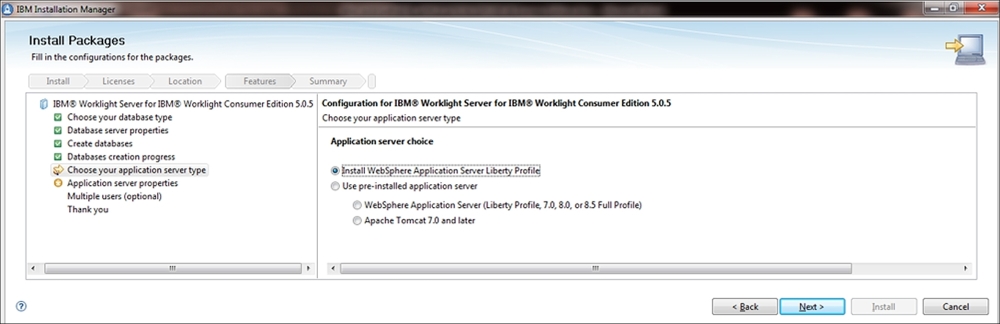
We will now configure the WebSphere Application Server. On the server panel, specify the application server on which IBM Worklight will be used. We have chosen the WebSphere Application Server Liberty profile as shown in following screenshot. This means no additional parameters are required, and the application server is created and configured automatically. If this sounds good to you, then click on Next to follow the next step.
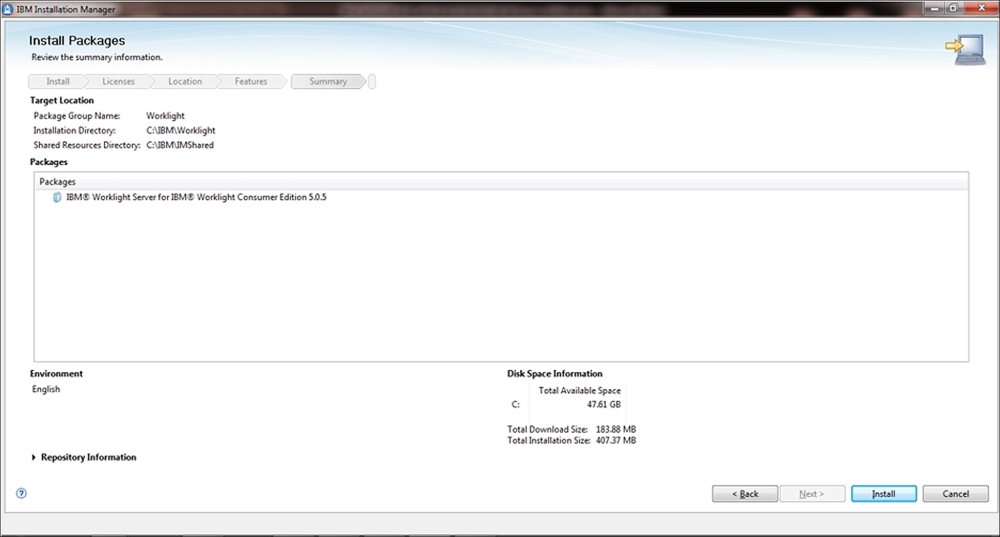
On the next screen, as seen in the following screenshot, review the directory and server to be selected and finally click on Install:
After you are done with the IBM Worklight Server installation, you will see the screen that indicates the installation of WAS (Liberty profile) is complete. Now click on Finish to close this window.
It's time to verify the installation of IBM Worklight Server once the installation is complete. We must confirm it by starting the IBM Worklight Server.
For Windows OS, open the command prompt by pressing Ctrl + R, type cmd in the Run window, and click on OK.
Now navigate to the installation directory of IBM Worklight, <WorklightInstallDirectory>/server/wlp/bin, and run the following command, according to the operating system, under the black screen:
- Linux:
sudo ./server start worklightServer - Windows:
server.bat start worklightServer
The following screenshot shows the confirmation message you receive when the Worklight Server starts successfully:

You can also verify whether the IBM Worklight Server started successfully by using the Worklight console as shown in the following screenshot. The Worklight console installed with the IBM Worklight Server can be accessed by opening a browser and navigating to the URL shown in the following screenshot, where <server_host_name> is replaced with the hostname on which IBM Worklight Server is installed:

IBM Worklight console
To install IBM Worklight Studio, use the IBM installation Manager to add the repository like we did for IBM Worklight Server—just follow the wizard and keep clicking on the next button. Another way to install Eclipse IDE, which is the latest version of Java EE Developer, is to download from eclipse.org and install the IBM Worklight Studio plugin in two simple steps:
- Under the heading of archive files, overview of IBM Worklight Studio's repository file is used to install with IBM Installation Manager
- The third file is also the IBM Worklight Studio, but this is a plugin file that can load in the Eclipse IDE
Follow the ensuing steps to install the Worklight Studio plugin in Eclipse IDE:
- Start the already installed Eclipse (JEE or Classic) Version 4.2.2.
- Click on Install New Software in the Help menu.
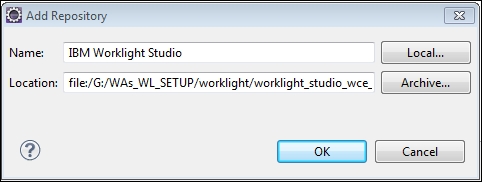
- Click on Add to open the Add Repository window.
- Click on Archive and enter the fully qualified path to the archive file as shown in the following screenshot:
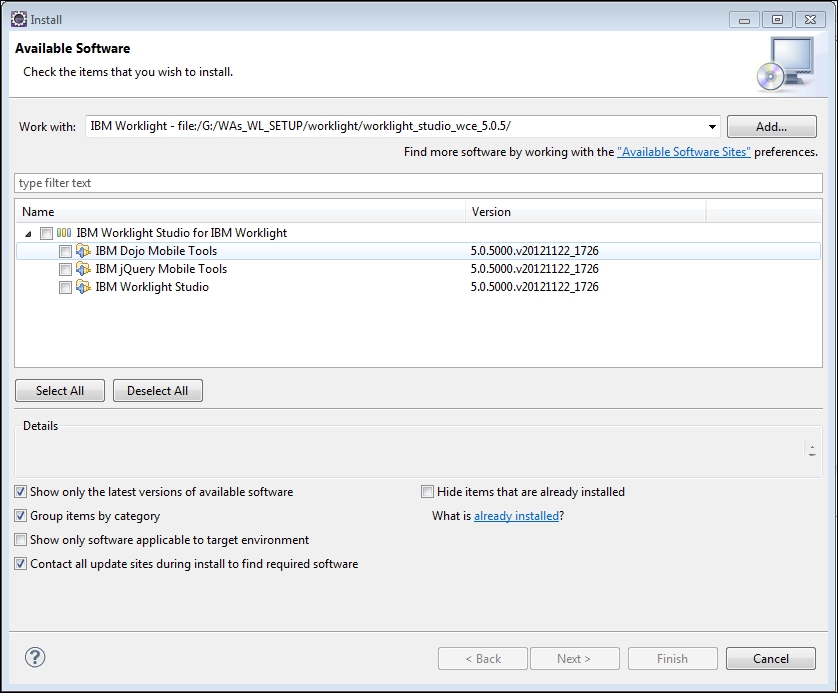
- Select the items to install as shown in the following screenshot:
- Click on Next and review the selected tools for installation and accept the license agreement. Click on Finish to begin.
- When the installation is complete, IDE prompts to restart the Eclipse IDE. Click on Restart.
If you are using Eclipse in IDE and need to use the IBM Worklight Developer Edition, use the following steps:
- Install Eclipse Juno 4.2.2 or Eclipse IDE for Java EE Developers.
- Download the
.zipfile from the given URL and make sure that file name isiws_update_site_wde.5.0.6.2.zipas we are targeting IBM Worklight v5: http://public.dhe.ibm.com/ibmdl/export/pub/software/mobile-solutions/worklight/ - Start Eclipse and then navigate to Help | Install New Software...
- Click on Add to open the Add Repository window.
- Click on Archive and enter the fully qualified path to the archive file you just downloaded using the preceding URL.
- Select IBM Worklight Studio Development Tools and click on Next.
- On the Install Details page, select the features of Worklight Studio that you want to install and then click on Next.
- You should always select IBM Worklight Studio. The IBM Dojo Mobile Tools and IBM jQuery Mobile Tools are optional; select them based on your anticipated use.
- Click on Next, review and accept the license terms, and then click on Finish to begin with the installation.
- Follow the prompts to complete the installation.