
Adapter-based authentication is the simplest form of authentication provided in Worklight. It uses the adapter procedure/function to validate and authenticate the users and create their sessions. Plus, it provides all the features of the Worklight authentication framework.
Please use the following simple steps to implement adapter-based authentication:
- Create a new Worklight project with the name
ABADemo; for the application, use the namemyAdapterBasedAuthentication. - Add an adapter and give it a name:
myAuthAdapter. Paste the following sample function code into theadapter.jsfile:function onAuthRequired(headers, errorMessage){ errorMessage = errorMessage ? errorMessage : null; return { authRequired: true, errorMessage: errorMessage }; } function submitUserAuthentication(username, password){ if (username==="adapter" && password === "adapter"){ var userIdentity = { userId: username, displayName: username, attributes: { foo: "abc" } }; WL.Server.setActiveUser("myAuthRealm", userIdentity); return { authRequired: false }; } return onAuthRequired(null, "Invalid login credentials, please try again"); } function getSomeData(){ return { secretData: "This is sample data retruned after user session creation" }; } function onLogout(){ WL.Server.setActiveUser("myAuthRealm", null); WL.Logger.debug("Logged out"); }I hope that the preceding code with so many function names make sense to you. If it doesn't, lets go through each function in detail:
submitUserAuthentication: This function is used to authenticate the users and create sessions (user identity objects). The username and password are received from the application as parameters. If a validation is successfully passed, aWL.Server.setActiveUserAPI is called to create an authenticated session formyAuthRealmwith a user data stored in theuserIdentityobject. Note, you can add your own custom properties to user identity attributes.onAuthRequired: This function is used to return a success or failure response back to the client. Note theauthRequired: trueproperty. You need this property in the challenge handler to detect that either the server is requesting authentication or not.getSomeData: This is a function that is protected with a security test and only authenticated users can access it. So, in this case, once the user has successfully passed the authentication defined in the preceding function, then this function will be called.onLogout: This function will be called when the session times out, either explicitly by the user or once the session timeout duration has finished.
- Locate the
authenticationconfig.xmlfile and add the following entries into it.- Add a new realm and login module as follows:
<realms>
  <realm loginModule="myAuthLoginModule" name="myAdapterAuthRealm">
   <className>com.worklight.integration.auth.AdapterAuthenticator</className>
   <parameter name="login-function" value="myAuthAdapter.onAuthRequired"/>
   <parameter name="logout-function" value="myAuthAdapter.onLogout"/>
  </realm>
</realms>
<loginModules>
  <loginModule name="myAuthLoginModule">
   <className>com.worklight.core.auth.ext.NonValidatingLoginModule</className>
  </loginModule>
</loginModules>
myAdapterAuthRealm: This is the realm that we have created. The class type of this realm isAdapterAuthentication. There are two parameters defined, one islogin-functionthat is called at the time of user login (authentication step) and the second function,logout-functionis called when session is going to expire.myAuthLoginModule: This is the login module that we will use. The type of module isNonValidatingLoginModule, and it means it will not further validates user's credentials and the developer will take the whole responsibility of validating credentials inside the adapter.
- Add a new realm and login module as follows:
- Add the security test as follows:
- Add the following security test to the
authenticationconfig.xmlfile. You must use this security test to protect the adapter procedure, so convert it into<customSecurityTest>:<securityTests> <customSecurityTest name="myAuthAdapter-securityTest"> <test isInternalUserID="true" realm="myAuthRealm"/> </customSecurityTest> </securityTests>
- Add the following security test to the
- Now open the adapter XML file
myAuthAdapter.xmland add the security test as follows:<procedure name="submitUserAuthentication"/> <procedure name="getSomeData" securityTest="myAuthAdapter-securityTest"/>
- The
submitUserAuthenticationprocedure is used to trigger the authentication process, and authentication is not required in order to invoke it. - The second procedure is accessible to authenticated users only because we have protected it with a security test.
- The
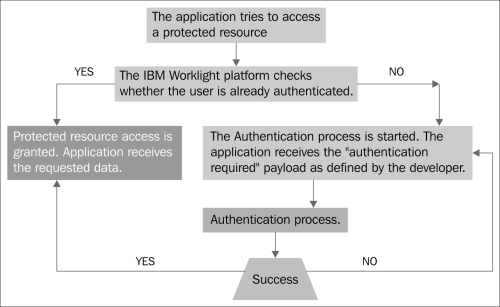
The following diagram shows the adapter-based authentication process:
In this section, we are going to create a client-side interface to manipulate this authentication concept:
- Create an app, give it the name
myAdapterBasedAuthentication, and paste the following code in the HTML file in thecommonfolder under thebodytag:<div id="MainAppDiv"> <div class="header"> <h1>my Adapter Based Authentication App</h1> </div> </div> <div id="AuthDiv" style="display:none"> </div>The page contains two div elements: the
MainAppDivis used to display the application content, and theAuthDivis used for the authentication form purposes.When the app starts, it will hide
MainAppDivand will only showAuthDivbecause the user has not logged in to access the protected data from the server. So, once the user enters the correct credentials,AuthDivgets hidden andMainAppDivbecomes visible. - Let's create two buttons. One button will access the protected adapter function to get protected data and the second button will log out the user. Add the following lines inside the
MainAppDiv:<input type="button" value="Get personal details" onclick="getSomeData()" /> <input type="button" value="Logout" onclick="WL.Client.logout('myAuthRealm', {onSuccess:WL.Client.reloadApp})" /> <div id="ResponseDiv"></div> - The div with the ID
ResponseDivis used to display thegetSomeDataresponse. Add the following lines toAuthDiv:<p id="AuthInfo"></p> <hr /> <input type="text" placeholder="Enter username" id="AuthUsername"/><br /> <input type="password" placeholder="Enter password" id="AuthPassword"/><br /> <input type="button" value="Submit" id="AuthSubmitButton" /> <input type="button" value="Cancel" id="AuthCancelButton" />
- The
AuthInfotag is used to display error messages - The
AuthUsernameandAuthPasswordtags are used to input username and password respectively - The
AuthSubmitButtontag is used to trigger the login click event, and theAuthCancelButtontag is used to cancel the login event
- The
In the next section, we will be creating a challenge handler component.
A challenge handler is a client-side component, located on the device. It is responsible for detecting an authentication challenge from a server, or when an authentication request from the server allows a developer to create a customized authentication process by collecting credentials and sending them back to the server as its response. Each challenge handler identifies the authentication realm to which it applies. To create a challenge handler, refer to the following section.
Create a JavaScript file that contains the following piece of code. This is the challenge handler component, and it is responsible to bring data from the server and handle the authentication challenge response whenever it arrives from the server:
var myAuthRealmChallengeHandler = WL.Client.createChallengeHandler("myAuthRealm"); //line# 01

myAuthRealmChallengeHandler.isCustomResponse = function(response) { //line# 03
  if (!response || !response.responseJSON  || response.responseText === null) {
    return false;
  }
  if (typeof(response.responseJSON.authRequired) !== 'undefined'){
    return true;
  } else {
    return false;
  }
};

myAuthRealmChallengeHandler.handleChallenge = function(response){ //line# 15
  var authRequired = response.responseJSON.authRequired;

  if (authRequired == true){ //line# 18
    $("#MainAppDiv").hide();
    $("#AuthDiv").show();
    $("#AuthPassword").empty();
    $("#AuthInfo").empty();

    if (response.responseJSON.errorMessage)
        $("#AuthInfo").html(new Date() + " :: " + response.responseJSON.errorMessage);

  } else if (authRequired == false){
    $("#MainAppDiv").show();
    $("#AuthDiv").hide();
    myAuthRealmChallengeHandler.submitSuccess();//line# 30
  }
};

$("#AuthSubmitButton").bind('click', function () {
  var username = $("#AuthUsername").val();
  var password = $("#AuthPassword").val();

  var invocationData = {
    adapter : "myAuthAdapter",
    procedure : "submitUserAuthentication",
    parameters : [ username, password ]
  };
  myAuthRealmChallengeHandler.submitAdapterAuthentication(invocationData, {}); //line# 42
});

$("#AuthCancelButton").bind('click', function () {
  $("#MainAppDiv").show();
  $("#AuthDiv").hide();
  myAuthRealmChallengeHandler.submitFailure();//line# 48
});
Now let's examine the preceding code:
- The first line
# 01is about creating a challenge handler object, and it is achieved via theWL.Client.createChallengeHandler()API call. A realm name must be supplied as a parameter. In our case, we have created the realmmyAuthRealm. - The defined
isCustomResponsefunction on line# 03of the challenge handler is called each time a response is received from the server. It is used to detect whether the response contains data that is related to this challenge handler. It returns eithertrueorfalse. - If the
isCustomResponsefunction returnstrue, the framework calls thehandleChallenge()function defined on the line# 15. This function is used to perform the required actions, such as hiding the application screen and showing the login screen. The challenge handler provides the following functionalities that you may need to use:- The
myChallengeHandler.submitAdapterAuthentication()function coded on line# 42is used to send the collected credentials to a specific adapter procedure. It has the same signature as theWL.Client.invokeProcedure()API. - The
myChallengeHandler.submitSuccess()function call on line# 30is used to notify the Worklight framework that the authentication has finished successfully. The Worklight framework then automatically issues the original request that triggers the authentication. - The
myChallengeHandler.submitFailure()function call on line# 48is used to notify the Worklight framework that the authentication has failed. The Worklight framework then disposes the original request that triggers the authentication.
- The
- On line
# 18, ifauthRequiresistrue, it shows a login screen, cleans up the password field, and shows anerrorMessage(if present). - If
authRequiredisfalse, it showsMainAppDiv, hidesAuthDiv, and it notifies the Worklight framework that the authentication is successfully completed.
When the user clicks on the login button, it triggers the function that collects the username and the password from the HTML input fields and submits them to the adapter. Notice that we have used the submitAdapterAuthentication method of the challenge handler.