
Decision making for AI can be handled in many different ways, and one common way is to use a Finite State Machine (FSM). An FSM contains a number of predefined states. Each state has a set of functionality and behavior tied to it. Each state also has a number of conditions for when it can change to another state.
In this recipe, we'll define a state machine that will emulate a common AI behavior in games. In fact, it will be more advanced than many games, which usually have AI that can only either move around on a path, or attack. Our AI will have three states, Patrol, Attack, and Retreat, as shown in the following diagram:.
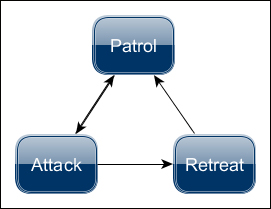
State diagram
The PatrolState will be the default and fallback state. It will perform random movement and will switch to AttackState if it spots an enemy.
The AttackState will handle firing and ammunition and will attack a target as long as it's visible and it has ammunition left. Then it will either return to PatrolState or flee using RetreatState.
The RetreatState will try to get away from a target for a set amount of time. After this, it will return to PatrolState, forgetting any fears it might previously have had.
All of our states will extend an abstract class called AIState, which we will also create in this recipe. This class in turn extends AbstractControl.
Worth noting is that all AI decision making and actions are handled from within the states. The states only relies on the AI control class to supply it with sensing updates (although this could also be handled by the states themselves).
We will start by creating the AIState class. This will have two steps, as follows:
- We add a field to store
AIControland give it two abstract methods calledstateEnterandstateExit. - These should be triggered when enabling and disabling the class, respectively. We override
setEnabledto achieve this, as shown in the following code:public void setEnabled(boolean enabled) { if(enabled && !this.enabled){ stateEnter(); }else if(!enabled && this.enabled){ stateExit(); } this.enabled = enabled; }
With AIState done, we can look at the first behavior, PatrolState. We can implement this by performing the following steps:
- First of all we add a
Vector3ffield calledmoveTarget. This is the position it will try to reach, relative to the current position. - We add an
ifstatement with three outcomes in thecontrolUpdatemethod, which is the main bulk of the logic in the class. The first clause should disable it and enable theAttackStateifAIControlhas found a suitable target using the following code:if(aiControl.getTarget() != null){ this.setEnabled(false); Vector3f direction = aiControl.getTarget().getWorldTranslation().subtract(spatial.getWorldTranslation()); this.spatial.getControl(BetterCharacterControl.class).setViewDirection(direction); this.spatial.getControl(AttackState.class).setEnabled(true); } - If its location is close enough to the
moveTargetvector, it should pick a new one nearby, as shown in the following code:else if(moveTarget == null || this.spatial.getWorldTranslation().distance(moveTarget) < 1f){ float x = (FastMath.nextRandomFloat() - 0.5f) * 2f; moveTarget = new Vector3f(x, 0, (1f - FastMath.abs(x)) - 0.5f).multLocal(5f); moveTarget.addLocal(this.spatial.getWorldTranslation()); } - Otherwise, it should keep moving towards the target, as shown in the following code:
else { Vector3f direction = moveTarget.subtract(this.spatial.getWorldTranslation()).normalizeLocal(); aiControl.move(direction, true); } - Finally, in the
stateExitmethod, we should make it stop moving using the following code:aiControl.move(Vector3f.ZERO, false);
That's one state out of three; let's look at the AttackState. We can implement this by performing the following steps:
- The
AttackStatekeeps track of values related to firing. It needs to have a float forfireDistance, which is how far the AI can fire; an integer calledclip, which is how many rounds it has in the current clip; another integer calledammo, which defines how many rounds it has in total; and finally, a float calledfireCooldown, which defines the time between each shot the AI fires. - In the
stateEntermethod, we give the AI some ammunition. This is mostly for testing purposes, as shown in the following code:clip = 5; ammo = 10;
- In the state's
controlUpdatemethod, we do a number of checks. First we check whetherclipis0. If this is true, we check whetherammois also0. If this is also true, the AI must flee! We disable this state and enableRetreatStateinstead using the following code:if(clip == 0){ if(ammo == 0){ this.setEnabled(false); this.spatial.getControl(RetreatState.class).setEnabled(true); } - If the state still has ammo, it should refill the clip. We also set a longer time until it can fire again, as shown in the following code:
else { clip += 5; ammo -= 5; fireCooldown = 5f; } - In the main
ifstatement, if the state has lost the target, it should disable the state and switch toPatrolState, as shown in the following code:else if(aiControl.getTarget() == null){ this.setEnabled(false); this.spatial.getControl(PatrolState.class).setEnabled(true); } - If it still has a target and is in a position to fire, it should fire, as shown in the following code:
else if(fireCooldown <= 0f && aiControl.getSpatial().getWorldTranslation().distance(aiControl.getTarget().getWorldTranslation()) < fireDistance){ clip--; fireCooldown = 2f; } - Finally, if it is still waiting for the weapon to cool down since the last shot, it should keep waiting, as shown in the following code:
else if(fireCooldown > 0f){
  fireCooldown -= tpf;
}
The third and final state for our AI is RetreatState. We can implement this by performing the following steps:
- Like the
PatrolState, it should have amoveTargetfield that it tries to reach. - We also add a float called
fleeTimerthat defines for how long it will try to get away. - In its
controlUpdatemethod, iffleeTimerhas not reached0yet, and it still feels a threat, it will pick a location opposite from the target and move towards it, as shown in the following code:Vector3f worldTranslation = this.spatial.getWorldTranslation(); if (fleeTimer > 0f && aiControl.getTarget() != null) { if (moveTarget == null || worldTranslation.distance(moveTarget) < 1f) { moveTarget = worldTranslation.subtract(aiControl.getTarget().getWorldTranslation()); moveTarget.addLocal(worldTranslation); } fleeTimer -= tpf; Vector3f direction = moveTarget.subtract(worldTranslation).normalizeLocal(); aiControl.move(direction, true); } - Otherwise, it's all clear, and it will switch to
PatrolState.
The first thing we did was define an abstract class called AIState. It's convenient to use the control pattern since it means we have access to the spatial and familiar ways to attach/detach states and turn them on and off.
The stateEnter and stateExit methods are called when the state is enabled and disabled, and happens on transition from and to other states. The class also expects there to be some kind of AI control class.
The first state extending AIState was the PatrolState. Its update method has three outcomes. If the AI has spotted something it can attack, it will change to the AttackState. Otherwise, if it's close to the place it has selected to move to, it will select a new target. Or, if it still has some way to go, it will just continue moving towards it.
The AttackState has a bit more functionality, as it also handles firing and ammunition management. Remember, if it has come here, the AI has already decided it should attack something. Hence, if it has no ammunition, it will switch to the RetreatState (although we generously give it some ammo every time it enters the state). Otherwise, it will attack or try attacking.
The RetreatState only has one goal: to try to get as far away from the threat as possible. Once it has lost sight of the target, or has fled for the specified amount of time, it will switch to PatrolState.
As we can see, the logic is all contained within the associated state, which can be very convenient. The flow of the states will also always make sure the AI ends up in the PatrolState in the end.