
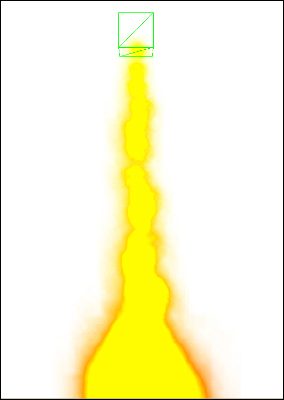
A rocket engine is crucial for most space-based games and many 2D games as well. In this recipe, we'll cover the minimum that is required to create a thruster that can be used in many different contexts. The following figure shows a thruster with ParticleEmitter:
For this recipe, we need to make sure that we see the debug shapes of physics. To do this, we need to call the bulletAppState.setDebugEnabled(true); statement.
We will begin by setting up some things that are not strictly needed for the rocket engine but will aid the testing. Perform the following steps to build a rocket engine:
- First of all we add a floor mesh. For this, we create a new
Nodeclass calledground. - To do this, we add
RigidBodyControlwithPlaneCollisionShape. The plane should face upwards like floors normally do, as follows:RigidBodyControl floorControl = new RigidBodyControl(new PlaneCollisionShape(new Plane(new Vector3f(0, 1, 0), 0)), 0); ground.addControl(floorControl); floorControl.setPhysicsLocation(new Vector3f(0f, -10, 0f));
- We then attach them both to
rootNodeof the application andphysicsSpaceofbulletAppState. - Finally, we need to add a key to control the booster. For this, we implement an
AnalogListenerinterface in our application. - Then, add the application to
inputManageralong with a mapping object called boost that is bound to the Space bar:inputManager.addListener(this, "boost"); inputManager.addMapping("boost", new KeyTrigger(KeyInput.KEY_SPACE)); - Most of this recipe will be implemented in a class that extends
SimpleApplication. - We begin by defining a
Nodeclass calledspaceShipthat will be our spaceship's representation. - We then create a
RigidBodyControlinstance withBoxCollisionShapeand add it to thespaceShipnode as follows:RigidBodyControl control = new RigidBodyControl(new BoxCollisionShape(new Vector3f(1, 1, 1)), 1); spaceShip.addControl(control);
- Now, we create another
Node, which will be our thruster. Give it the nameThrusterto be able to identify it more easily later, as follows:Node thruster = new Node("Thruster"); - We set
localTranslationof this so that it will end up at the bottom of the spaceship, as shown in the following line of code:thruster.setLocalTranslation(0, -1, 0);
- Then, we attach it to the
spaceShipnode. - Now, we have to attach the
spaceShipnode to both therootNodeandphysicsSpaceofbulletAppState. - To control the thruster and make it more reusable, we will create a class called
ThrusterControl, extendingAbstractControl. - It'll have one field, a
Spatialfield calledthruster, that will store thethrusternode. - We will override the
setSpatialmethod and set it by callinggetChild("Thruster")on the supplied spatial. - Lastly, we define a new method called
fireBooster(). - Inside this, we subtract the thruster's location from the spaceship's location and store it in a new
Vector3ffield calleddirectionas follows:Vector3f direction = spatial.getWorldTranslation().subtract(thruster.getWorldTranslation());
- Then, we find the
RigidBodyControlclass in the spatial and callapplyImpulsewith the direction vector. We use the inverted direction as the relative position that the impulse should originate from. This can be implemented as follows:spatial.getControl(RigidBodyControl.class).applyImpulse(direction, direction.negate());
- In the application class, we have to make it call the
fireBoostermethod. We do this in theonAnalogmethod that was added when we implemented theAnalogListenerinterface:if(name.equals("boost") && value > 0){ spaceShip.getControl(ThrusterControl.class).fireBooster(); }
The graphics in this recipe are very minimalistic and mostly rely on the debug mode of BulletAppState to draw them. The physics shapes don't normally have a visual representation since they're not part of the scene graph. Using the debug mode can be very useful during early prototypes.
The RigidBodyControl instance of the spaceship makes sure it's affected by gravity and other forces.
The sole purpose of a thruster is to be able to easily retrieve the position that is relative to the spaceship from where the boosting force needs to be applied. This is why we place it at the bottom of the spaceship. The benefit of using the Control pattern to control a Thruster is that we can apply it to other geometries easily (and even use it in SceneComposer).
The fireBooster method of ThrusterControl takes the position of spaceShip and subtracts the position of the thruster node to get the direction of the force to apply. The relative position of the force is the direct opposite of this direction.