
In this recipe, we'll create an inventory screen, which is very common, mostly in RPGs. To do this, we'll use the Droppable and Draggable components in Nifty and create an InventoryItem class to help us differentiate different the types of items (and hence, where they can be attached). This time, we'll use both XML to create the static components and the Java Builder interface to build the inventory (or backpack) slots. The reason is that in many games, the amount of inventory a character has varies.
We begin by creating the controls, which are the key components of this method. This can be done by performing the following four steps:
- First, we create a new controls file,
inventoryControls.xml, with the<nifty-controls>tag. - Inside this, we first define
<controlDefinition name="itemSlot">with the following content:<control name="droppable" backgroundColor="#fff5" width="64px" height="64px" margin="1px" childLayout="center"/>
- Then similarly, we create a draggable control to be the item, and name it
<controlDefinition name="item" >. - This item contains both the draggable component and a label with the item's name:
<control name="draggable" backgroundColor="#aaaf" width="64px" height="64px" childLayout="center" valign="top">
  <text id="#itemLabel" text="" color="#000f" valign="center" width="100%" style="nifty-label"/>
</control>
Next, we can turn our attention to the screen itself. It can be created by performing the following five steps:
- First, we make sure that the styles we want to use are loaded, and add our
inventoryControls.xmlfile is loaded with<useControls>. - Then, we add a
<screen>element with a link to our controller file:<screen id="inventoryScreen" controller="gui.controller.InventoryScreenController">
- Inside this, we need a
<layer>element:<layer id="layer0" childLayout="center" backgroundColor="#0000">
- Inside the
<layer>element, we need a<panel>element that will contain the rest of our layout:<panel id="inventoryPanel" childLayout="horizontal">
- The next element is a panel that will keep our dynamically created
itemSlots:<panel id="inventorySlots" childLayout="horizontal"/>
The following screenshot shows us the dynamically created item slots:
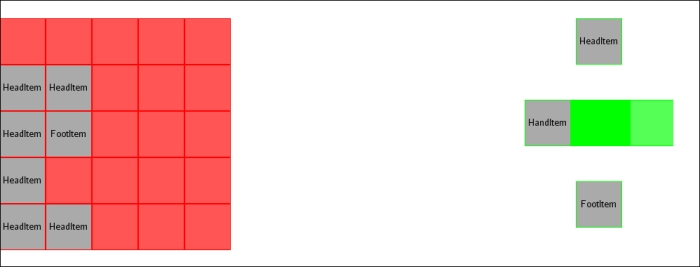
After this, we create a simple representation of a humanoid with two hands and feet, using the
itemSlotcontrol. We usealignandchildLayoutto make the components appear where we want them to. - First, add a panel to contain the components:
<panel id="characterPanel" childLayout="vertical">
- Then, add the head using the following command:
<panel id="character" backgroundColor="#000f" childLayout="center" align="center" valign="top">
  <control name="itemSlot" id="Head"/>
</panel>
- Add one left and right hand using the following command:
<panel id="hands" backgroundColor="#000f" childLayout="horizontal" width="25%" align="center" valign="bottom">
  <control name="itemSlot" id="HandLeft" align="left" />
  <panel width="*" height="1px"/>
  <control name="itemSlot" id="HandRight" align="right" />
</panel>
- Finally, we have one
itemSlotfor the legs/feet:<panel id="legs" backgroundColor="#000f" childLayout="horizontal" align="center" valign="bottom"> <control name="itemSlot" id="Foot"/> </panel>
With the XML elements done, we can turn to the Java code. The following nine steps are necessary:
- We create a class called
InventoryItem. This has an enum (enumeration) for different body parts: head, hand, foot, and a name. - Next, we'll create the
Controllerclass,InventoryScreenController, and have it extendNiftyController; also, implementDroppableDropFilter. - We need to add a map to contain our
InventoryItems, with the name as the key. It can be calleditemMap. - The
bindmethod should be overridden, and in here, we should find differentDropControlsin theInventoryScreenand add this class as a filter using the following code:screen.findNiftyControl("HandLeft", Droppable.class).addFilter(this);Now, we can generate the item slots in the inventory in a 5 x 5 grid.
- We define two builders:
ControlBuilderfor the itemSlot controls andPanelBuilderto make columns that will contain five itemSlots each. - We can use a
forloop to iterate five times over the following block:panelBuilder = new PanelBuilder("") {{ id("inventoryColumn"+posX); childLayoutVertical(); }}; panelBuilder.build(nifty, screen, screen.findElementByName("inventorySlots")); - While still inside this
forloop, we run anotherforloop, generating the five item slots for that column:slotBuilder = new ControlBuilder("itemSlot") {{ id("itemSlot"+index); }}; Element e = slotBuilder.build(nifty, screen, screen.findElementByName("inventoryColumn"+posY)); - For each of the item slots, we also need to add the following class as a DropFilter:
e.findNiftyControl("itemSlot"+index, Droppable.class).addFilter(this); - The implemented method that is accepted needs some logic. Once an item has been dropped on an
itemSlot, we should check whether it's allowed, and we can do it with the following lines of code:InventoryItem item = itemMap.get(drgbl.getId()); if(drpbl1.getId().startsWith(item.getType().name()) || drpbl1.getId().startsWith("itemSlot")){ return true;With the item slots done, we can generate some items for testing.
- First we use a
forloop to create 10InventoryItemswith different types and names. - For each of these, we create a Nifty control using
ControlBuilderand the item control we defined earlier, as shown in the following code:itemBuilder = new ControlBuilder("item") {{ id("item"+index); visibleToMouse(true); }}; Element e = itemBuilder.build(nifty, screen, screen.findElementByName("itemSlot"+index)); e.findElementByName("#itemLabel").getRenderer(TextRenderer.class).setText(item.getName()); - Then, we put each of the inventory items in the itemMap with the ID of the control as the key. This ensures we can easily find out the link to the inventory item where a nifty item has been dragged or dropped.
The Java Builder interface we use to create item slots takes a while to get used to, but it's a really powerful tool when we have the need to create nifty elements dynamically. In this case, we still use a predefined control. This saves us a couple of lines of code and allows someone else than a coder to edit the layout and style of the component since it's exposed in the XML file.
By default, a Droppable control will always accept the Draggable control that is being dropped. The accept method in DroppableDropFilter enables us to define what should be accepted or not. It's illustrated in this recipe by only accepting InventoryItems of a certain type. The method parameters for the accept method can be described, as the first Droppable is the control that the draggable control is being picked up from. The Draggable control is the item that is being moved. The second Droppable control is the target where Draggable has been dropped.