
Professional 2D artists use programs, such as Adobe Photoshop, to create 2D assets for a game. Unfortunately, we can't take the time to teach you how to use a program as sophisticated as Photoshop.
If you want to play around with creating your own assets, then you might try the Paint program that comes installed on any Windows based computer. If you really want to dig deep into 2D art creation without digging deeply into your bank account, then you can download GIMP (http://www.gimp.org), a free, full-features 2D image manipulation program.
In the previous chapter, we loaded and rendered a bitmap file. It turns out that bitmaps aren't the best format to work with sprites because they take more file space (and therefore, more memory) than PNGs, and bitmaps do not support transparency.
Tip
Before we had image formats that allowed transparency to be directly encoded as part of the image, we used a specific background color, and then expected our image library to remove that color when it handled the image. Magenta was often used as the background because it is a color rarely used in images.
Bitmaps are larger in file size than PNGs because they are not stored in a compressed format. Compression allows an image to be stored in less space, and this can be very important on devices, such as mobile phones.
PNGs are stored using a lossless compression algorithm. Lossless means that the image quality is not sacrificed to achieve the compression. Other formats, such as JPEG, can be stored in a compressed format, but use a lossy algorithm that degrades the image quality.
PNGs also support transparency using an alpha channel. In addition to storing the red, green, and blue component of each pixel (RGB), PNGs also store each pixel's transparency in the alpha channel (RGBA).
You will recall from the previous chapter that all textures are represented as rectangles in a game. However, real shapes aren't rectangular. Trees, cars, and robots all have much more complex shapes.
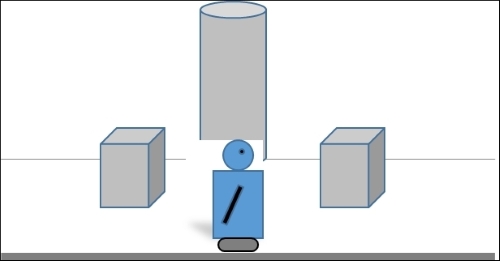
If we used bitmaps for all of our images, then the full rectangle of the texture would be rendered blocking out everything behind the sprite. In the following image, our robot is passing in front of a pipe, and part of the pipe is occluded by the blank space in the bitmap.
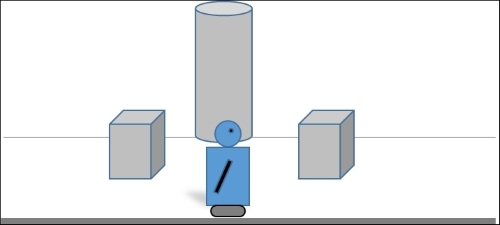
In a PNG image, we set the blank space to be transparent. In the following image, the pipe is no longer occluded by the transparent parts of the image of the robot:
In the previous chapter, we wrote a code to load a BMP file. Normally, we would have to write different code to load a PNG file. In fact, we would have to write a loader for each different type of image we wanted to work with.
Fortunately, someone has already done all of this work and made it available in a library known as SOIL: Simple OpenGL Image Library. You can download your copy from http://www.lonesock.net/soil.html.
There are several advantages to using the SOIL library:
- We no longer have to worry about writing our own loader for every type of image that we want to use. SOIL supports BMP, PNG, and many other formats.
- File loading is not completely abstracted. You don't have to worry about how the code works, only that it does.
- SOIL has other features that may be useful (such as the ability to write out image files).
The download comes as a zipped folder. Once you unzip the folder, you will see a folder named Simple OpenGL Image Library. This folder contains a lot of files, but we only need soil.h.
Now, it is time to add the SOIL library to our project:
- Find the folder where you unzipped the SOIL code.
- Open the
libfolder and findlibSOIL.a. - Copy
libSOIL.ato the folder that contains the RoboRacer2D source code. - Open the RoboRacer2D project.
- Right-click on the RoboRacer2D project in the Solution Explorer panel and choose Properties.
- For the Configuration drop-down box, make sure that you select All Configurations.
- Open the Configuration Properties branch, then the Linker branch.
- Select the Input option.
- Click the dropdown for Additional Dependencies and choose <Edit…>.
- Enter
opengl32.libandglu32.libon separate lines in the dialog window and click OK.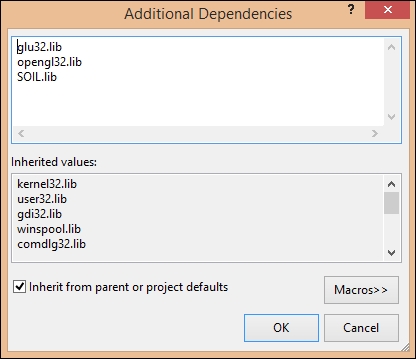
Tip
Library files for Windows usually end in .lib, while those written for UNIX end in .a. The standard SOIL distribution comes with the UNIX library; you need to use the Windows library. You can either find SOIL.lib online, use the SOIL source code to create your own Windows library file, or download SOIL.lib from the book's website.
Next, we need to copy the SOIL header file into our project and include it in our code:
- Find the folder where you unzipped the SOIL code.
- Open the
srcfolder and findSOIL.h. - Copy
SOIL.hto the folder that contains the RoboRacer2D source code. - Open the RoboRacer2D project.
- Open
RoboRacer2D.cpp. - Add
#include "SOIL.h"to the list of includes.
Now, we are ready to write a function that loads an image file. We will pass in the name of the file, and the function will return an integer representing a handle on the OpenGL texture.
The following lines of code uses SOIL to load an image:
GLuint texture = SOIL_load_OGL_texture
(
  imageName,
  SOIL_LOAD_AUTO,
  SOIL_CREATE_NEW_ID,
  0
);
All of the work is done by the call to SOIL_load_OGL_texture. The four parameters are the most generic settings:
- The first parameter is the path and filename to the image file.
- The second parameter tells SOIL how to load the image (and in this case, we indicate that we want SOIL to figure things out automatically).
- The third parameter tells SOIL to create an OpenGL texture ID for us.
- The fourth parameter, if used, can be set to several flag bits that tell SOIL to perform some custom processing. We are not using this, so we just send a 0.
We will use code, such as this one, to load images into our sprite class.
In order to easily incorporate sprites into our game, we will create a class specifically for dealing with sprites.
Let's think about the features that we want:
- An array of images.
- An index that represents the current frame.
- A variable that holds the total number of frames.
- Variables to store the current x and y position of the sprite. For this game, this will be the upper-left corner of the image.
- A variable that stores the x and y components of the current velocity of the sprite (
0if it isn't moving). - Variables that store the width and height of the image. Note that if the sprite has multiple images, they must all be the same size.
- A Boolean that tells us if this sprite collides with other sprites.
- A Boolean that tells us if this sprite should be rendered normal or flipped.
- A Boolean that tells us if this sprite is visible right now.
- A Boolean that tells us if this sprite is active right now.
In addition to these properties, we would also like to be able to manipulate the sprite in several ways. We may add methods to:
- Add an image to the sprite
- Update the position of the sprite
- Update the animation frame for the sprite
- Render the sprite to the screen
Open your game project, and add a new class called Sprite.cpp with a header file called Sprite.h.
Use the following code for Sprite.h:
#pragma once:
#include <glgl.h>

class Sprite
{
  public:
struct Point
{
  GLfloat x;
  GLfloat y;
};

   struct Size
 {
  GLfloat width;
  GLfloat height;
 };
 struct Rect
 {
  GLfloat top;
  GLfloat bottom;
  GLfloat left;
  GLfloat right;
 };

  protected:
  GLuint* m_textures;
  unsigned int m_textureIndex;
  unsigned int m_currentFrame;
  unsigned int m_numberOfFrames;
  GLfloat m_animationDelay;
  GLfloat m_animationElapsed;

  Point m_position;
  Size m_size;
  GLfloat m_velocity;

  bool m_isCollideable;
  bool m_flipHorizontal;
  bool m_flipVertical;
  bool m_isVisible;
  bool m_isActive;
  bool m_useTransparency;
  bool m_isSpriteSheet;

  public:
  Sprite(const unsigned int m_pNumberOfTextures);
  ~Sprite();

  void Update(const float p_deltaTime);
  void Render();

  const bool AddTexture(const char* p_fileName, const bool p_useTransparency = true);
   const GLuint GetCurrentFrame() {
  if (m_isSpriteSheet)
  {
   return m_textures[0];
  }
  else
  {
   return m_textures[m_currentFrame];
  }
 }

  void SetPosition(const GLfloat p_x, const GLfloat p_y) { m_position.x = p_x; m_position.y = p_y; }
   void SetPosition(const Point p_position) { m_position = p_position; }
 const Point GetPosition() { return m_position; }
 const Size GetSize() const { return m_size; }
void SetFrameSize(const GLfloat p_width, const GLfloat p_height) {
m_size.width = p_width; m_size.height = p_height; }
  void SetVelocity(const GLfloat p_velocity) { m_velocity = p_velocity; }
  void SetNumberOfFrames(const unsigned int p_frames) { m_numberOfFrames = p_frames;  }

  const bool isCollideable() const { return m_isCollideable; }
void IsCollideable(const bool p_value) { m_isCollideable = p_value;  }
  void FlipHorizontal(const bool p_value) { m_flipHorizontal = p_value; }
  void FlipVertical(const bool p_value) { m_flipVertical = p_value; }
  void IsActive(const bool p_value) { m_isActive = p_value; }
  const bool IsActive() const { return m_isActive; }
void IsVisible(const bool p_value) { m_isVisible = p_value; }
const bool IsVisible() const { return m_isVisible; }
void UseTransparency(const bool p_value) { m_useTransparency = p_value; }
};
I know, it's a lot of code! This is a typical object-oriented class, consisting of protected properties and public methods. Let's take a look at the features of this class:
#pragma once: This is a C++ directive telling Visual Studio to only include files once if they are included in several source files.- We include
gl.hin this header file because we need access to the standard OpenGL variable types. - Inside the class, we define two very useful structures: point and rect. We work with points and rectangles so much that it makes sense to have simple structures that hold their values.
- The member variables are as follows:
m_texturesis aGLuintarray that will dynamically hold all of the OpenGL texture handles that make up this sprite.m_textureIndexstarts at zero, and is incremented each time a texture is added to the sprite.m_currentFramestarts at zero, and is incremented each time we want to advance the frame of the animation.m_numberOfFramesstores the total number of frames that make up our animation.m_animationDelayis the number of seconds that we want to pass before the animation frame advances. This allows us to control the speed of the animation.m_animationElapsedwill hold the amount of time that has elapsed since the last animation frame was changed.m_positionholds thexandypositions of the sprite.m_sizeholds thewidthandheightof the sprite.m_velocityholds the velocity of the sprite. Larger values will cause the sprite to move more quickly across the screen.m_isCollideableis a flag that tells us whether or not this sprite collides with other objects on the screen. When set tofalse, the sprite will pass through other objects on the screen.m_flipHorizontalis a flag that tells the class whether or not the sprite image should be horizontally flipped when it is rendered. This technique can be used to save texture memory by reusing a single texture for both right and left movement.m_flipVerticalis a flag that tells the class whether or not the sprite image should be vertically flipped when it is rendered.m_isVisibleis a flag that indicates whether the sprite is currently visible in the game. If this is set to false, then the sprite will not be rendered.m_isActiveis a flag that indicates whether the sprite is currently active. If this is set to false, then the sprite animation frame and sprite position will not be updated.m_useTransparencyis a flag that tells the sprite class whether or not to use the alpha channel in the sprite. As alpha checking is costly, we set this to false for images that don't have any transparency (such as the game background).
m_isSpriteSheetis a flat that tells the sprite class if a single texture is used to hold all of the frames for this sprite. If set totrue, then each frame is loaded as a separate texture.- Next, we have the methods:
Spriteis a constructor that takes a single parameter,p_numberOfTextures. We have to tell the class the number of textures that will be used when the sprite is created so that the correct amount of memory can be allocated for the textures dynamic array.~Spriteis the class destructor.Updatewill be used to update the current animation frame and the current position of the sprite.Renderwill be used to actually display the sprite on the screen.AddTextureis used once the sprite is created to add the required textures.GetCurrentFrameis used when the sprite is rendered to determine which frame of the sprite to render.
- The remaining methods are simply accessor methods that allow you to modify the class properties.
Next, let's start the class implementation. Open Sprite.cpp and add the following code:
#include "stdafx.h"
#include "Sprite.h"
#include "SOIL.h"

Sprite::Sprite(const unsigned int p_numberOfTextures)
{

  m_textures = new GLuint[p_numberOfTextures];
  m_textureIndex = 0;
  m_currentFrame = 0;
  m_numberOfFrames = 0;
  m_animationDelay = 0.25f;
  m_animationElapsed = 0.0f;
  m_position.x = 0.0f;
  m_position.y = 0.0f;
  m_size.height = 0.0f;
  m_size.width = 0.0f;
  m_velocity = 0.0f;

  m_isCollideable = true;
  m_flipHorizontal = false;
  m_flipVertical = false;
  m_isVisible = false;
  m_isActive = false;
  m_isSpriteSheet = false;
}

Sprite::~Sprite()
{
  delete[] m_textures;
}
Here are some details about the implementation code:
- Along with
stdafx.handSprite.h, we includeSOIL.hbecause this is the actual code block that we will use to load textures - The
Spriteconstructor:- Dynamically allocates space for the
m_texturesarray based onp_numberOfTextures. - Initializes all of other class properties. Note that most of the Boolean properties are set to
false. The result is that a newly created sprite will not be active or visible until we specifically set it to be active and visible.
- Dynamically allocates space for the
- The
~Spritedestructor deallocates the memory used for them_texturesarray
We will implement the Update, Render, and AddTexture methods next.
Tip
You probably noticed that I prefix many of the variables in my code with either m_ or p_. m_ is always used to prefix the name of class properties (or member variables), and p_ is used to prefix variables used as parameters in functions. If a variable does not have a prefix, it is usually a local variable.
We already discussed how 2D animations are created by drawing multiple frames of the image with each frame being slightly different. The key points that must be remembered are:
- Each frame must have exactly the same dimensions
- The placement of the image within the frame must be consistent
- Only the parts of the image that are supposed to move should change from frame to frame
One technique to save your frames is to save each frame as its own image. As you will eventually have a lot of sprites and frames to work with, it is important to come up with a consistent naming convention for all of your images. For example, with our three frame robot animation that were illustrated previously, we might use the following filenames:
robot_left_00.pngrobot_left_01.pngrobot_left_02.pngrobot_left_03.pngrobot_right_00.pngrobot_right_01.pngrobot_right_02.pngrobot_right_03.png
Every image in the game should use the same naming mechanism. This will save you endless headaches when coding the animation system.
Let's take a look the code to load a sprite that has each frame saved as an individual file:
robot_right = new Sprite(4);
 robot_right->SetFrameSize(100.0f, 125.0f);
 robot_right->SetNumberOfFrames(4);
 robot_right->SetPosition(0, screen_height - 130.0f);
 robot_right->AddTexture("resources/robot_right_00.png");
 robot_right->AddTexture("resources/robot_right_01.png");
 robot_right->AddTexture("resources/robot_right_02.png");
 robot_right->AddTexture("resources/robot_right_03.png");
The important points to notice about the preceding code are:
- We create a new instance of our sprite class to store the information. We have to tell the sprite class to allocate space for 4 textures for this sprite.
- We first store the width and height of each frame. In this case, this happens to be the width and height of each texture that makes up this sprite. As every texture that makes up a particular sprite must have the same dimensions, we only have to make this call once.
- We then store the number of frames in this sprite. This might seem to duplicate the number of textures that we specified in the constructor. However, as you will see in the next section, the number of textures does not always equal the number of frames.
- We now add each texture to the sprite. The sprite class takes care of allocating the necessary memory for us.
An alternative method to store your sprites is to use a sprite sheet. A sprite sheet holds all of the sprites for a particular animation in a single file. The sprites are often organized into a strip.

As the dimensions of each frame are identical, we can calculate the position of each frame in a particular animation as an offset from the first frame in the sprite sheet.
Tip
You can download a cool little program called GlueIt at http://www.varcade.com/blog/glueit-sprite-sheet-maker-download/. This small program allows you to specify several individual images, and then it glues them into a sprite sheet for you.
The following code loads a sprite that has been stored as a sprite sheet:
 robot_right_strip = new Sprite(1);
 robot_right_strip->SetFrameSize(125.0f, 100.0f);
 robot_right_strip->SetNumberOfFrames(4);
 robot_right_strip->SetPosition(0, screen_height - 130.0f);
 robot_right_strip->AddTexture("resources/robot_right_strip.png");
This code is very similar to the code that we used to create a sprite with individual textures previously. However, there are important differences:
- We only need to allocate space for one texture because we only load one texture. This is the main advantage of using a sprite sheet because it is much more efficient to load a single large texture than it is to load several smaller textures.
- Again, we set the width and height of each frame. Note that these are the same values as when loading individual textures because the important information is the width and height of each frame, not the width and height of the texture.
- Again, we store the number of frames for this sprite. This sprite still has four frames, although all of the four frames are stored in a single image.
- We then add a single image to the sprite.
The following code shows the full code that we will use to load the sprites into our game. Open the RoboRacer2D project and open RoboRacer.cpp. First we need to include the Sprite header:
#include "Sprite.h"
Next, we need some global variables to hold our sprites. Add this code in the variable declarations section of the code (before any functions):
Sprite* robot_left;
Sprite* robot_right;
Sprite* robot_right_strip;
Sprite* robot_left_strip;
Sprite* background;
Sprite* player;
We created pointers for each sprite that we will need in the game until this point:
- A sprite to move the robot left
- A sprite to move the robot right
- A sprite for the background
Tip
In order to make it easy for you to work with both types of sprites, I defined two sprites for each robot direction. For example, robot_left will define a sprite made up of individual textures, while robot_left_strip will define a sprite made up of a single sprite sheet. Normally, you would not use both in a single game!
Now, add the LoadTextures function:
const bool LoadTextures()
{
  background = new Sprite(1);
  background->SetFrameSize(1877.0f, 600.0f);
  background->SetNumberOfFrames(1);
  background->AddTexture("resources/background.png", false);

  robot_right = new Sprite(4);
  robot_right->SetFrameSize(100.0f, 125.0f);
  robot_right->SetNumberOfFrames(4);
  robot_right->SetPosition(0, screen_height - 130.0f);
  robot_right->AddTexture("resources/robot_right_00.png");
  robot_right->AddTexture("resources/robot_right_01.png");
  robot_right->AddTexture("resources/robot_right_02.png");
  robot_right->AddTexture("resources/robot_right_03.png");

  robot_left = new Sprite(4);
  robot_left->SetFrameSize(100.0f, 125.0f);
  robot_left->SetNumberOfFrames(4);
  robot_left->SetPosition(0, screen_height - 130.0f);
  robot_left->AddTexture("resources/robot_left_00.png");
  robot_left->AddTexture("resources/robot_left_01.png");
  robot_left->AddTexture("resources/robot_left_02.png");
  robot_left->AddTexture("resources/robot_left_03.png");

  robot_right_strip = new Sprite(1);
  robot_right_strip->SetFrameSize(125.0f, 100.0f);
  robot_right_strip->SetNumberOfFrames(4);
  robot_right_strip->SetPosition(0, screen_height - 130.0f);
  robot_right_strip->AddTexture("resources/robot_right_strip.png");

  robot_left_strip = new Sprite(1);
  robot_left_strip->SetFrameSize(125.0f, 100.0f);
  robot_left_strip->SetNumberOfFrames(4);
  robot_right_strip->SetPosition(0, screen_height - 130.0f);
  robot_left_strip->AddTexture("resources/robot_left_strip.png");

  background->IsVisible(true);
  background->IsActive(true);
  background->SetVelocity(-50.0f);

  robot_right->IsActive(true);
  robot_right->IsVisible(true);
  robot_right->SetVelocity(50.0f);

  player = robot_right;
  player->IsActive(true);
  player->IsVisible(true);
  player->SetVelocity(50.0f);

  return true;
}
This code is exactly the same as the code that I showed you earlier to load sprites. It is simply more comprehensive:
LoadTexuresloads all of the sprites needed in the game (including duplicate strip versions so that you can see the difference between using sprite sheets versus individual textures).SetPositionis used to set the initial position for the robot sprites. Notice that we don't do this for the background sprite because its position starts at(0, 0), which is the default.SetVisibleandSetActiveare used to set thebackgroundsprite and therobot_left_stripsprite as active and visible. All of the other sprites will remain inactive and invisible.
As the loading of textures only needs to occur once in the game, we will add the call to do this to the StartGame function. Modify the StartGame function in RoboRacer.cpp:
void StartGame()
{
  LoadTextures();
}
The final step in getting our textures loaded is to implement the AddTexture method in our sprite class. Open Sprite.cpp and add the following code:
const bool Sprite::AddTexture(const char* p_imageName, const bool p_useTransparency)
{
  GLuint texture = SOIL_load_OGL_texture( p_imageName, SOIL_LOAD_AUTO, SOIL_CREATE_NEW_ID, 0 );
  if (texture == 0)
  {
    return false;
  }

  m_textures[m_textureIndex] = texture;
  m_textureIndex++;
  if (m_textureIndex == 1 && m_numberOfFrames > 1)
  {
    m_isSpriteSheet= true;
  }
  else
  {
    m_isSpriteSheet = false;
  }
  m_useTransparency = p_useTransparency;
  return true;
}
AddTexture is used after a new sprite has been created. It adds the required textures to the m_textures array. Here's how it works:
p_imageNameholds the name and path of the image to load.p_useTransparencyis used to tell the sprite class whether this image uses an alpha channel. As most of our sprites will use transparency, this is coded to default totrue. However, if we setp_useTransparencytofalse, then any transparency information will be ignored.SOIL_load_OGL_texturedoes all of the work of loading the texture. The parameters for this call were described earlier in this chapter. Note that SOIL is smart enough to load image types based on the file extension.- If the texture was successfully loaded,
SOIL_load_OGL_texturewill return an OpenGL texture handle. If not, it will return0. Generally, we would test this value and use some kind of error handling, or quit if any texture did not load correctly. - As the
m_texturesarray is allocated in the constructor, we can simply store texture in them_textureIndexslot. - We then increment
m_textureIndex. - We use a little trick to determine if this sprite uses a sprite sheet or individual sprites. Basically, if there is only one texture but many frames, then we assume that this sprite uses a sprite sheet and set
m_isSpriteSheettotrue. - Finally, we set
m_useTransparencyto the value that was passed in. This will be used later in theRendermethod.