
In this chapter, we will put some finishing touches on Space Racer 3D by adding some features that you would see in almost any game. Many of these features are similar to the finishing touches that we put on our Robo Racer 2D game, though there are some special considerations now that we are working in 3D. The topics that we will cover include the following:
- 2D in a 3D world: So far, we learned how to render in 2D and how to render in 3D. However, there are special considerations to create 2D in a 3D world. As our user interface is typically created in 2D, we will learn how to mix the two types of rendering.
- Creating a heads-up-display (HUD): It is very typical for first-person 3D games to have a continuous status showing information that is relevant to the game. We will learn how to create a basic heads-up-display or HUD.
- More game state: Just as we did in Robo Racer 2D, we will create a basic state manager to handle the various modes in our completed game.
- Scoring: We need a way to keep score in our game, and we need to set up the basic win and lose conditions.
- Game over: When the game is over, we'll give some credit with a 3D twist.
Now that we are rendering in 3D, it isn't immediately obvious how we will render things in 2D. This is especially true of our user interface, which must be rendered on top of the 3D-scene and does not move or rotate with the rest of the world.
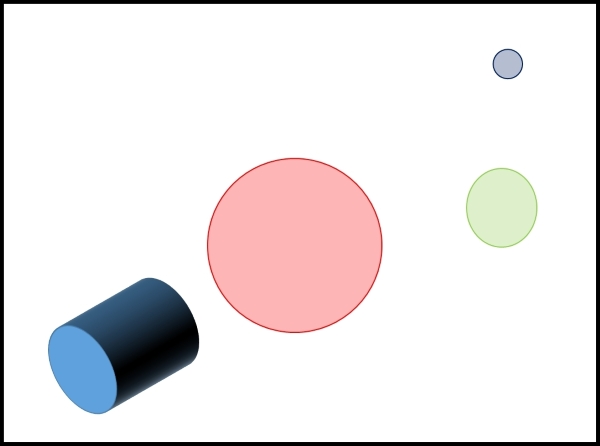
The trick to creating a 2D interface in a 3D world is to first render the 3D world, then switch modes in OpenGL, and then render the 2D content. The following image represents the 3D content that we need to render:
The next image represents the 2D text that we want to render:

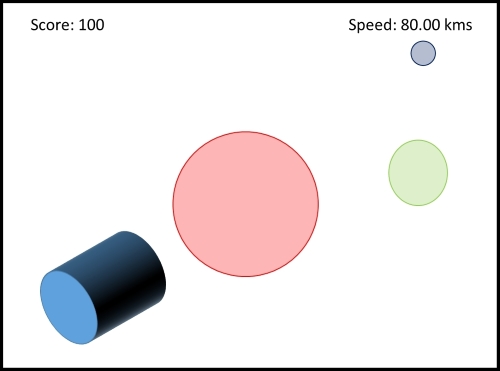
We want the final result to be the combination of the 3D and 2D content, as shown in the following figure:
State is a term that is used in many different ways in game programming. For example, we will create a state manager later in the chapter that will manage different states, or modes, in the game. Another way to define state is a set of conditions. For example, when we set things up to render in 3D, this is one set of conditions or state. When we set up things to render in 2D, this is another set of conditions or state.
The trick to being able to render in both 2D and 3D is to be able to set up one state, and then change to another state. OpenGL saves state in matrices. In order to change from one state to another, we need a way to save the current matrix, set up another matrix, and then return to the previous matrix once we are done.
OpenGL provides two methods to save the current state and then retrieve it later:
A stack is a structure that allows you to put data on the top of it (a push), and then later retrieve the item from the top of it (a pop). A stack is useful when you want to save data in order, then later retrieve it in reverse order.
Let's say that we start with an initial set of conditions called State A:
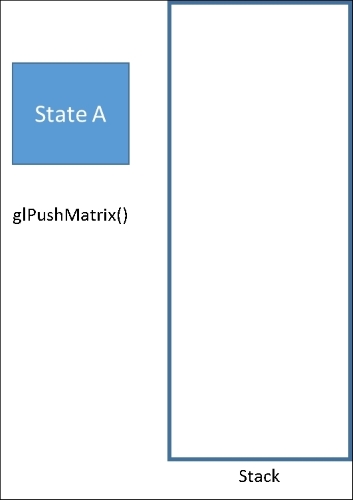
A call to glPushMatrix() will put State A on the stack:
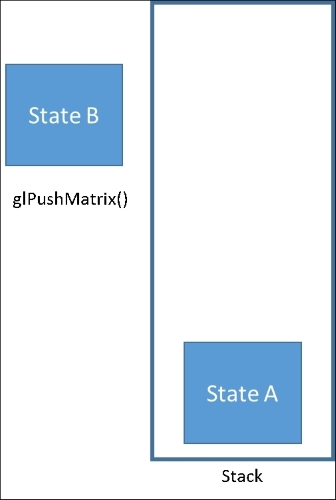
Next, we set up the conditions for State B. If we want to save this state, we issue another glPushMatrix() call:
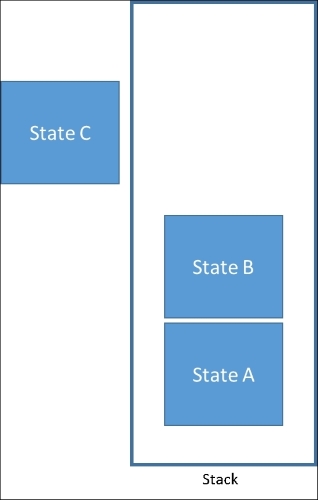
Now we have two items on the stack, and it should also be very clear why it is called a stack! We could then define State C. This sequence of steps can continue on as needed, creating a render state and then pushing it to the stack. In general, we want to unload the stack in the reverse order that we loaded it in. This is known as a FILO stack: first in, last out.
We take things off of the stack with the glPopMatrix() command:
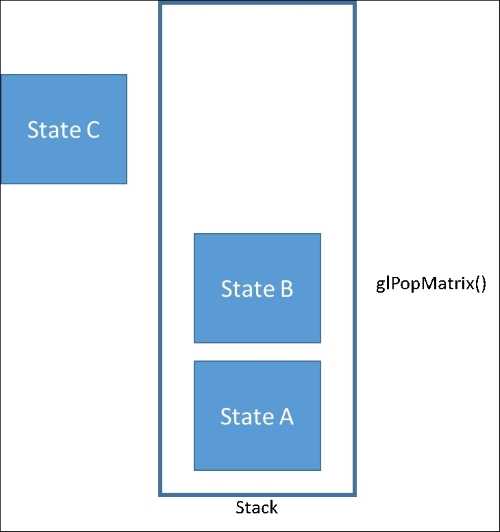
The result replaces State C, restoring the rendering settings to State B:
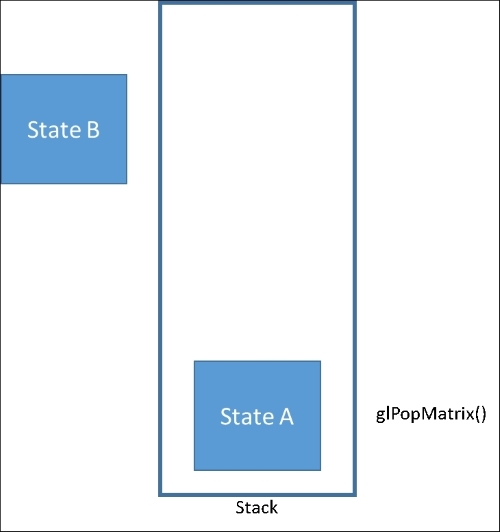
Another call to glPopMatrix() empties the stack and restores the rendering settings to
State A:
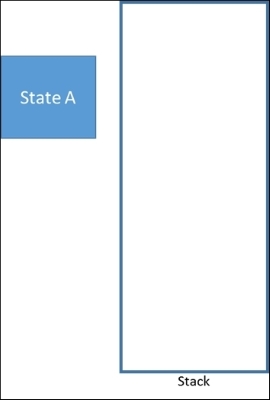
The model view allows 32 matrices to be put onto the stack. Each view has its own stack, so the projection view has a separate stack from the model view. Also, if you issue glPopMatrix and there is no matrix on the stack, you will receive an error. In other words, don't try to pop more than you have pushed!
We are now going to set up our code to be able to render in both 3D and 2D. Open SpaceRacer3D.cpp. We are going to split up the rendering into two functions: Render3D, and Render2D. Then, we are going to call these from the main Render function. Let's start with Render3D. Add the following code just above the Render function (you can just cut it from the Render function):
void Render3D()
{
 if (gameState == GS_Running)
 {
  for (unsigned int i = 0; i < asteroids.size(); i++)
  {
   asteroids[i]->Render();
  }
  ship->Render();
 }
}
Next, we will create two support functions to turn 2D rendering on and off. The first will be Enable2D. Add the following function above the Render3D function:
void Enable2D()
{
  glColor3f(1.0f, 1.0f, 1.0f);
  glEnable(GL_TEXTURE_2D);

  glMatrixMode(GL_PROJECTION);
  glPushMatrix();
  glLoadIdentity();
  glOrtho(0, SCREEN_WIDTH, SCREEN_HEIGHT, 0, 0, 1);

  glMatrixMode(GL_MODELVIEW);
  glPushMatrix();
  glLoadIdentity();

  glPushAttrib(GL_DEPTH_BUFFER_BIT);
  glDisable(GL_DEPTH_TEST);
}
Enable2D performs the tasks that are necessary to change the rendering mode to 2D:
- The call to
glColor3fsets the current drawing color to white. This takes some explanation. We will always render 3D first, then switch to 2D. If we didn't set the color to white, then all of the colors in the 2D content would be blended with the last color that was used by the 3D rendering. Setting the render color to white essentially clears the render color so that the 2D content will be rendered accurately. Setting the color to white doesn't actually mean everything will be drawn in white. It means that no additional coloring will be added to the objects that we render in 2D. - The
glEnable(GL_TEXTURE_2D)call is essential if you want to render 2D textures. If this were left out, then any 2D textures would not render correctly. - The next four lines save the 3D projection matrix and set up the projection matrix to render in 2D.
glPushMatrixpushes the current projection matrix to the stack. We then initialize the projection matrix withglLoadIdentity. Finally, we set up an orthographic projection with the call toglOrtho. Take a look at RoboRacer2D, and you will notice that it uses the sameglOrthocall to set up 2D rendering! - The next three lines save the 3D model view matrix and initialize it for our 2D drawing.
glPushMatrixpushes the current model view matrix to the stack. We then initialize the model view matrix with the call toglLoadIdentity. - Finally, we need to turn off checking on the depth buffer. The depth buffer check is only required for 3D rendering, and interferes with 2D rendering.
glPushAttribworks just likeglPushMatrix, except that it only pushes a single OpenGL attribute to the stack. In this case, we are pushing the currentGL_DEPTH_BUFFER_BITto the attribute stack, thus saving the current state of this bit from the previous 3D rendering. Next, we turn off depth checking with theglDisablecall.
So, setting things up for 2D rendering involves four steps:
- Reset the render color and enable 2D textures.
- Save the 3D project matrix and set up the 2D projection matrix.
- Save the 3D model view matrix and initialize the 2D model view matrix.
- Save the 3D depth bit and turn off depth checking in 2D.
Now, we are ready to code the Disable2D function. Create this new function just below the Enable2D function that we just created:
void Disable2D()
{
  glPopAttrib();

  glMatrixMode(GL_PROJECTION);
  glPopMatrix();

  glMatrixMode(GL_MODELVIEW);
  glPopMatrix();

  glDisable(GL_TEXTURE_2D);
}
It shouldn't be too surprising that Disable2D performs actions in the reverse order that we performed them in Enable2D:
- First, we restore depth checking by calling
glPopAttrib(), which takes the last attribute that was pushed to the attribute stack off the stack and restores that attribute in the current render state. This will restore depth checking to the state that it was in just before we started our 2D rendering. - The next two lines restore the projection matrix to the 3D state it was in. Again, the call to
glPopMatrixtakes the item on the top of the stack and applies it to the current render state. - The next two lines pop the model view matrix.
- The final line disables 2D textures.
Now, it is time to create our Render2D function. Add the following code just above the Render3D function:
void Render2D()
{
  Enable2D();
  // Future 2D rendering code here
  Disable2D();
}
The funny thing is that we don't have any 2D content to render yet! Later in the chapter, we will fill in the rest of the content of this function. The important thing to note here is that this function will take care of enabling 2D rendering with the call to Enable2D. Then the code will be added to render our 2D content. Finally, we will turn off 2D rendering with the call to Disable2D.
Now that we have all of the necessary supporting code to render in 2D and 3D, we will modify the Render function:
void Render()
{
  glClear(GL_COLOR_BUFFER_BIT | GL_DEPTH_BUFFER_BIT);
  glMatrixMode(GL_MODELVIEW);
  glLoadIdentity();
  Render3D();
  Render2D();
  SwapBuffers(hDC);
}
You will notice how simple this is now:
- First, we clear the color buffer and reset the matrix. We always do this once before each frame of rendering.
- Next, we render the 3D content.
- Then we render the 2D content.
- Finally, we swap the buffers, which renders all of our content to the screen.
If you run the game now, you should notice that nothing has changed. As we haven't created any 2D content to render, the 3D content will display just as it did before. Now we are ready add our 2D content. Along the way we will flesh out some additional features to make a more complete game.