
Now that you have a better understanding of how audio works in your computer, it's time to write some code to bring audio into your game. We generally don't work with audio directly. Instead, there are audio engines that do all of the hard work for us, and one of the most popular ones is FMOD.
FMOD is a C and C++ API that allows us to load, manage, and play audio sources. FMOD is free to use for student and independent projects, so it is the perfect audio engine for our game. To use FMOD, you will have to go to the FMOD website, download the appropriate version of the API, and install it on your system:
- To download FMOD, go to http://www.FMOD.org/download/.
- There several downloads to choose from. Scroll down to the FMOD Ex Programmer's API, and click the Download button for Windows.
- You will have to locate the exe file that you just downloaded and install it. Make a note of the folder that FMOD is installed in.
- Once you have downloaded FMOD, you will have to incorporate it into the game project. Start by opening the
RoboRacer2Dproject.
Now, it's time to set up our game to use FMOD. Similar to most third-party libraries, there are three steps to hooking things up:
- Accessing the
.dllfile. - Linking to the library.
- Point to the include files.
Let' walk through this process.
There are several .dll files that are included with FMOD, and it is important to use the correct file. The following table summarizes the dll files that come with FMOD and their associated library file:
|
Dll |
Description |
Library |
|---|---|---|
|
|
32 bit FMOD API |
|
|
|
32 bit FMOD API with debug logging |
|
|
|
64 bit FMOD API |
|
|
|
64 bit FMOD API with debug logging |
|
It's up to you to decide whether or not to use the 32-bit or 64-bit versions of the library. The debug versions of the library write logging information out to a file. You can find more information in the documentation.
We are going to use the 32-bit file in our game. There are several places where we can place the file, but the simplest method is to simply copy the .dll file into our project:
The next step is to tell Visual Studio that we want to access the FMOD library. This is done by adding the library to the project properties:
- Right-click on the project and choose Properties.
- Open the Linker branch under Configuration Properties and click on Input.

- Click in the Addition Dependencies entry, then click the drop-down arrow and choose <Edit…>.
- Add
fmodex_vc.libto the list of dependencies.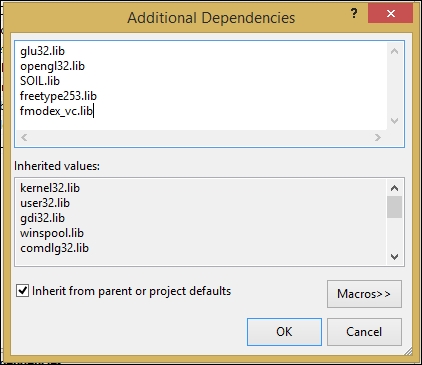
- Click OK to close the
Additional Dependencieswindow. - Click OK to close the
Property Pageswindow.
Now, we have to tell Visual Studio where to find the library:
- Right-click on the project and choose Properties.

- Open the Linker branch under Configuration Properties and click on General.
- Click in the Additional Library Directories entry, then click the drop-down arrow and choose <Edit…>:
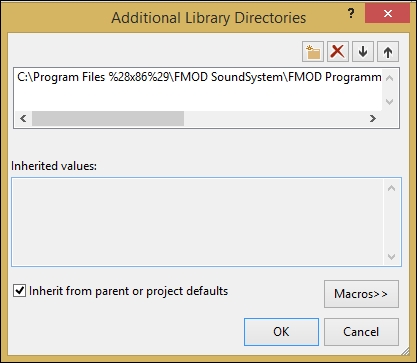
- Click on the New Line icon, and then click the ellipses (…) that appear.
- Navigate to
C:Program Files (x86)FMOD SoundSystemFMOD Programmers API Windowsapiliband click Select Folder. - Click on OK to close the Additional Library Directories window.
- Click on OK to close the Property Pages window.
Whenever you use third-party code, you generally have to include C++ header files in your code. Sometimes, we just copy the relevant header files into the project folder (for example, this is what we did with SOIL.h).
With larger code bases, such as FMOD, we point Visual Studio to the location where the header files are installed:
- Right-click on the project and choose Properties.
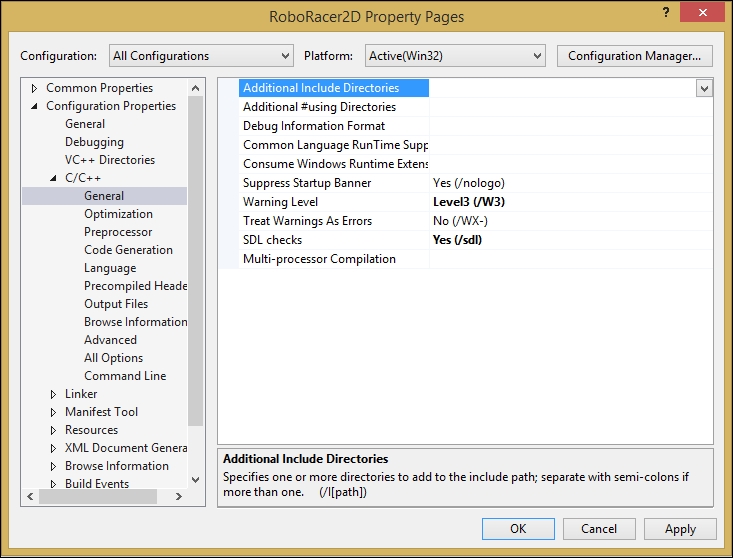
- Open the C/C++ branch under Configuration Properties and click on General.
- Click on the Additional Include Directories entry, then click the drop-down arrow, and choose <Edit…>.
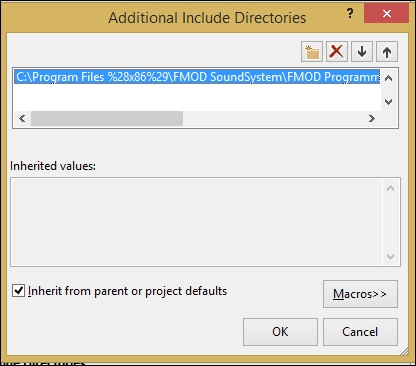
- Click the New Line icon, and then click the ellipses (…) that appear.
- Navigate to
C:Program Files (x86)FMOD SoundSystemFMOD Programmers API Windowsapiincand click Select Folder. - Click OK to close the Additional Include Directories window.
- Click OK to close the Property Pages window.
The final step is to include the header files into our program. Open RoboRacer2D.cpp and add the following line to include the header file:
#include "fmod.hpp"
You are finally ready to use our audio engine!