
Until now, all of our shapes and models used color, but a whole new world awaits us when we start applying textures to our models. Adding a 2D texture to a 3D model is known as texture mapping, or in some cases texture wrapping. Let's see what it takes to add a little texture to our 3D models. We are going to start with a simple cube.
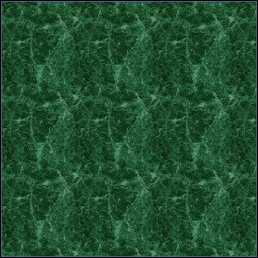
First, use your favorite image editing software to create a 256 x 256 pixel square and give it some kind of texture. I will be using the following one:
Save this texture as a bitmap (BMP). We are going to use bitmaps, as opposed to PNGs, for texture mapping because the internal data structure of a bitmap happens to coincide with the data structure that is expected by OpenGL. In other words, it is easier!
I always create a folder called resources for my images. It is also a good idea to include these as resources in the Visual Studio project (right-click on the Resources folder in the Solution Explorer panel and choose Add Existing…, then navigate to the image).
If you recall, we created a sprite class for our previous projects. We use the AddTexture method of the Sprite class to make a call to the SOIL library to load the image. We won't be using the Sprite class for these textures. The Sprite class has a lot of methods and properties that don't apply to texturing 3D models, so we are going to write our own texture loader for this use. Add the following code somewhere above render functions:
void LoadTexture(const char* filepath, GLsizei height, GLsizei width, unsigned int colordepth, GLuint &texture)
{
  unsigned char* data;
  FILE* file;

  file = fopen(filepath, "r");
  data = (unsigned char*)malloc(width * height * colordepth);
  fread(data, width * height * colordepth, 1, file);
  fclose(file);

  texture = SOIL_load_OGL_texture(filepath, SOIL_LOAD_AUTO, SOIL_CREATE_NEW_ID, 0);
  glBindTexture(GL_TEXTURE_2D, texture);
  glTexImage2D(GL_TEXTURE_2D, 0, colordepth == 3 ? GL_RGB:GL_RGBA, width, height, 0, colordepth == 3 ? GL_RGB:GL_RGBA, GL_UNSIGNED_BYTE, data);
  glTexParameteri(GL_TEXTURE_2D, GL_TEXTURE_MIN_FILTER, GL_LINEAR);
  glTexParameteri(GL_TEXTURE_2D, GL_TEXTURE_MAG_FILTER, GL_LINEAR);
  free(data);
}
The purpose of LoadTexture is to load a texture into memory, and then set it up to be a texture map for a 3D object. In order to accomplish this, we actually need to load the texture twice. First, we directly open the file and read it as a binary file into a buffer called data. We use the char datatype because we want to store the binary data as unsigned integers and char does a really great job of this. So, our first few lines of code:
- Define the data array
- Create a file handle
- Allocate memory for the data
- Read the file into the data buffer
- Close the file (but not the buffer)
Now, read the image a second time, though this time we use the SOIL library to read it as an OpenGL texture and use SOIL to load the texture and assign it to the OpenGL referenced by texture.
Then, we perform some fancy OpenGL operations on it to set it up as a model texture:
GL_BindTexturesimply tells OpenGL that we want this texture to be the current texture, to which we will apply the settings that follow.glTexImage2Dtells OpenGL how to interpret the data that we have read in. We are telling OpenGL to treat the data as a 2D texture of the type RGB or RGBA (controlled by thecolordepthparameter), and that the data is stored as unsigned integers (thus, thechardata type).- The next two functions, both calls to
glTexParameteri, tell OpenGL how to handle the texture as it gets nearer to or farther away from the camera. They are both set up to use linear filtering to handle this level of detail. - Finally, we close the data buffer as it is no longer needed.
We have set the LoadTexture function up so that you can call it for different textures based on your needs. In our case, we are first going to set up a handle to this texture. At the top of the code, add this line to the global variables section:
GLuint texMarble;
Next, we will place the call to load the texture in the StartGame function:
LoadTexture("resources/marble.bmp", 256, 256, 4, texMarble);This call tells the program:
- The location of the file
- The width and height of the image
- The color depth of the image (in this case
4= RGBA) - The OpenGL texture handle
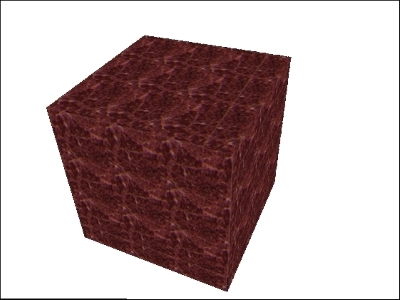
We are all set up now with a texture, but we need a model to texture. To keep things simple, we are going to use quads to create a cube and apply the marble texture to each face of the cube.
Just before we get started, we need to add three variables to track rotation. Add these lines to the global variables section:
float xrot = 1.0f;
float yrot = 1.0f;
float zrot = 1.0f;
Now, create the following function just below the LoadTexture function:
int DrawTexturedCube(GLvoid)
{
  glEnable(GL_TEXTURE_2D);

  glLoadIdentity();
  glTranslatef(0.0f, 0.0f, -5.0f);

  glRotatef(xrot, 1.0f, 0.0f, 0.0f);
  glRotatef(yrot, 0.0f, 1.0f, 0.0f);
  glRotatef(zrot, 0.0f, 0.0f, 1.0f);

  glBindTexture(GL_TEXTURE_2D, texMarble);

  glBegin(GL_QUADS);
  // Font Face
  glTexCoord2f(0.0f, 0.0f); glVertex3f(-1.0f, -1.0f, 1.0f);
  glTexCoord2f(1.0f, 0.0f); glVertex3f(1.0f, -1.0f, 1.0f);
  glTexCoord2f(1.0f, 1.0f); glVertex3f(1.0f, 1.0f, 1.0f);
  glTexCoord2f(0.0f, 1.0f); glVertex3f(-1.0f, 1.0f, 1.0f);
  // Back Face
  glTexCoord2f(1.0f, 0.0f); glVertex3f(-1.0f, -1.0f, -1.0f);
  glTexCoord2f(1.0f, 1.0f); glVertex3f(-1.0f, 1.0f, -1.0f);
  glTexCoord2f(0.0f, 1.0f); glVertex3f(1.0f, 1.0f, -1.0f);
  glTexCoord2f(0.0f, 0.0f); glVertex3f(1.0f, -1.0f, -1.0f);
  // Top Face
  glTexCoord2f(0.0f, 1.0f); glVertex3f(-1.0f, 1.0f, -1.0f);
  glTexCoord2f(0.0f, 0.0f); glVertex3f(-1.0f, 1.0f, 1.0f);
  glTexCoord2f(1.0f, 0.0f); glVertex3f(1.0f, 1.0f, 1.0f);
  glTexCoord2f(1.0f, 1.0f); glVertex3f(1.0f, 1.0f, -1.0f);
  // Bottom Face
  glTexCoord2f(1.0f, 1.0f); glVertex3f(-1.0f, -1.0f, -1.0f);
  glTexCoord2f(0.0f, 1.0f); glVertex3f(1.0f, -1.0f, -1.0f);
  glTexCoord2f(0.0f, 0.0f); glVertex3f(1.0f, -1.0f, 1.0f);
  glTexCoord2f(1.0f, 0.0f); glVertex3f(-1.0f, -1.0f, 1.0f);
  // Right face
  glTexCoord2f(1.0f, 0.0f); glVertex3f(1.0f, -1.0f, -1.0f);
  glTexCoord2f(1.0f, 1.0f); glVertex3f(1.0f, 1.0f, -1.0f);
  glTexCoord2f(0.0f, 1.0f); glVertex3f(1.0f, 1.0f, 1.0f);
  glTexCoord2f(0.0f, 0.0f); glVertex3f(1.0f, -1.0f, 1.0f);
  // Left Face
  glTexCoord2f(0.0f, 0.0f); glVertex3f(-1.0f, -1.0f, -1.0f);
  glTexCoord2f(1.0f, 0.0f); glVertex3f(-1.0f, -1.0f, 1.0f);
  glTexCoord2f(1.0f, 1.0f); glVertex3f(-1.0f, 1.0f, 1.0f);
  glTexCoord2f(0.0f, 1.0f); glVertex3f(-1.0f, 1.0f, -1.0f);
  glEnd();

  xrot += 0.01f;
  yrot += 0.02f;
  zrot += 0.03f;
  return TRUE;
}
This code is very similar to the code that we used to draw a cube in a previous chapter. However, when we drew that cube, we applied color to each vertex. Now, we will apply our texture to each face. First, we set things up:
- The first thing that we do is use
glEnable(GL_TEXTURE_2D)to enable 2D textures. In our initial setup, we disabled 2D textures. If we did not enable them here, then our texture would not show up! - Next, we use
glLoadIdentity()to initialize the current matrix. - We call
glTranslatef(0.0f, 0.0f, -5.0f)to move the camera back (so that we will be outside the cube). - Three calls to
glRotate3fwill rotate the cube for us. - Then, we use
glBindTexture(GL_TEXTURE_2D, texMarble)to inform OpenGL that for the next draw operations we will be using the texture referenced bytexMarble.
With this setup completed, we are ready to get drawing:
- We start with
glBegin(GL_QUADS)to tell OpenGL that we will be drawing quads. - Now, each call comes in a pair. First a call to
glTexCoord2fis followed by a call toglVertex3f. The call toglTexCoord2ftells OpenGL which part of the texture to put at the location specified byglVertex3f. In this way, we can map any point in the texture to any point in the quad. OpenGL takes care of figuring out which parts of the texture go between vertices. - When we are done drawing the cube, we issue the
glEnd()command. - The last three lines update the rotation variables.
- Finally, we have to make a call to
DrawTexturedCubein theRender3Dfunction:DrawTexturedCube();
- Run the program and see the cube in its textured glory!
I owe you a little more explanation as to how texture mapping works. Take a look at these four lines of code from DrawTexturedCube:
glTexCoord2f(0.0f, 0.0f); glVertex3f(-1.0f, -1.0f, 1.0f);
glTexCoord2f(1.0f, 0.0f); glVertex3f(1.0f, -1.0f, 1.0f);
glTexCoord2f(1.0f, 1.0f); glVertex3f(1.0f, 1.0f, 1.0f);
glTexCoord2f(0.0f, 1.0f); glVertex3f(-1.0f, 1.0f, 1.0f);
These four lines define one quad. Each vertex consists of a texture coordinate (glTexCoord2f) and a vertex coordinate (glVertex3f). When OpenGL looks at a texture, here is what it sees:

No matter how big a texture is in pixels, in texture coordinates, the texture is exactly one unit wide and one unit tall. So, the first line of the preceding code tells OpenGL to take the point (0,0) of the texture (the upper-left corner) and map it to the next vertex that is defined (which is the upper-left hand corner of the quad, in this example). You will notice that the third line maps the coordinate (1,1) of the texture to the lower-right corner of the quad. In effect, we are stretching the texture across the face of the quad! However, OpenGL also adapts the mapping so that the texture doesn't look smeared, so this isn't exactly what happens. Instead, you will see some tiling in our case.