
It is now time to turn our attention to the graphical user interface, or GUI. The GUI allows us to control other elements of the game, such as starting or stopping the game, or setting various options.
In this section, you will learn how to create buttons on the screen that can be clicked by the mouse. We'll keep it simple by adding a single button to pause the game. While we are at it, we will learn important lessons about game state.
A button is nothing more than a texture that is being displayed on the screen. However, we have to perform some special coding to detect whether or not the button is being clicked. We will add this functionality to the sprite class so that our buttons are being handled by the same class that handles other image in our game.
We will actually create two buttons: one to Pause and one to Resume. I have used a simple graphics program to create the following two buttons:
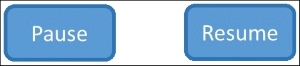
I have saved these buttons as, you guessed it, pause.png and resume.png in the resources folder.
In order to integrate UI into our existing Input class, we are going to have to add some additional features. We will add a dynamic array to the Input class to hold a list of UI elements that we need to check for input.
Start by adding the following line to the includes for Input.h:
#include "Sprite.h"
We need to include the Sprite class so that we can work with sprites in the Input class.
Next, we add a new command. Modify the Command enum so that it looks like the following list:
enum Command
{
CM_INVALID,
CM_LEFT,
  CM_RIGHT,
  CM_STOP,
  CM_UP,
  CM_DOWN,
  CM_QUIT,
  CM_UI
};
We have added CM_UI, which will be set as the current command if any UI element is clicked.
Now, we define a member variable to hold the list of UI elements. Add this line of code to the member variables in Input.h:
Sprite** m_uiElements;
unsigned int m_uiCount;
m_uiElements will be a dynamic list of pointers to our elements, while m_uiCount will keep track of the number of elements in the list.
The final change to Input.h is to add the following line in the public methods:
void AddUiElement(Sprite* m_pElement);
We need to be able to add a list of elements to our Input class so that they can be checked during the input handling.
First, we have to allocate memory for our list of elements. Add the following lines to the Input constructor in Input.cpp:
m_uiElements = new Sprite*[10];
m_uiCount = 0;
I could probably get cleverer than this, but for now, we will allocate enough memory to hold 10 UI elements. We then initialize m_uiCount to 0. Now, we need to add the following method to Input.cpp:
void Input::AddUiElement(Sprite* p_element)
{
  m_uiElements[m_uiCount] = p_element;
  m_uiCount++;
}
This method allows us to add a UI element to our list (internally, each UI element is a pointer to a sprite). We add the element to the m_uiElements array at the current index and then increment m_uiCount.
Eventually, the Input class will contain a list of all UI elements that it is supposed to check. We will need to iterate through that list to see if any of the active elements have been clicked (if we want to ignore a particular element, we simply set its active flat to false).
Open Input.cpp and add the following code to Update above the existing code:
for (unsigned int i = 0; i < m_uiCount; i++)
{
  Sprite* element = m_uiElements[i];
  if (element->IsActive() == true)
  {
    if (CheckForClick(element))
    {
      element->IsClicked(true);
      m_command = Input::Command::CM_UI;
      return;
    }
  }
}
This code iterates through each item in the m_uiElements array. If the element is active, then CheckForClick is called to see if this element has been clicked. If the element has been clicked, the IsClicked property of the element is set to true and m_command is set to CM_UI.
We put this code above the existing code because we want checking the UI to take priority over checking for game input. Notice in the preceding code that we exit the function if we find a UI element that has been clicked.
In order to see if an element has been clicked, we need to see if the left mouse button is down while the mouse pointer is inside the area bounded by the UI element.
First, open Input.cpp and add the following code:
const bool Input::CheckForClick(Sprite* p_element) const
{
  if (KEYDOWN(Key::K_LB))
  {
    POINT cursorPosition;
    GetCursorPos(&cursorPosition);
    ScreenToClient(m_hWnd, &cursorPosition);
    float left = p_element->GetPosition().x;
    float right = p_element->GetPosition().x + p_element->GetSize().width;
    float top = p_element->GetPosition().y;
    float bottom = p_element->GetPosition().y + p_element->GetSize().height;

    if (cursorPosition.x >= left  &&
      cursorPosition.x <= right &&
    cursorPosition.y >= top &&
    cursorPosition.y <= bottom)
    {
      return true;
    }
    else
    {
      return false;
    }
  }
  return false;
}- We first make sure that the left mouse button is down.
- We need to store the current position of the mouse. To do this, we create a
POINTcalledcursorPosition, then pass that by reference intoGetCursorPos. This will setcursorPositionto the current mouse position in screen coordinates. - We actually need the mouse position in client coordinates (the actual area that we have to work with, ignoring windows borders and fluff). To get this, we pass
cursorPositionalong with a handle to the current window intoScreenToClient. - Now that we have the
cursorPosition, want to test to see if it is inside the rectangle that bounds our UI element. We calculate the left, right, top, and bottom coordinates of the sprite. - Finally, we check to see if
cursorPositionis within the boundaries of the UI element. If so, we returntrue; otherwise, we returnfalse.
Ensure to add the following declaration to Sprite.h:
const bool CheckForClick(Sprite* p_element) const;
We now need to add the code to our game to create and monitor our pause and resume buttons.
First, we will add two variables for our two new sprites. Add the following two lines to the variable declaration block of RoboRacer.cpp:
Sprite* pauseButton;
Sprite* resumeButton;
Then, add the following lines to LoadTextures (just before the return statement):
pauseButton = new Sprite(1);
pauseButton->SetFrameSize(75.0f, 38.0f);
pauseButton->SetNumberOfFrames(1);
pauseButton->SetPosition(5.0f, 5.0f);
pauseButton->AddTexture("resources/pauseButton.png");
pauseButton->IsVisible(true);
pauseButton->IsActive(true);
inputManager->AddUiElement(pauseButton);

resumeButton = new Sprite(1);
resumeButton->SetFrameSize(75.0f, 38.0f);
resumeButton->SetNumberOfFrames(1);
 resumeButton->SetPosition(80.0f, 5.0f);
resumeButton->AddTexture("resources/resumeButton.png");
inputManager->AddUiElement(resumeButton);
This code sets up the pause and resume sprites exactly like we set up the other sprites in our game. Only the pause sprite is set to be active and visible.
You will notice one important addition: we add each sprite to the Input class with a call to AddUiElement. This adds the sprite to the list of UI elements that need to be checked for input.
We must also add code to the Update function in RoboRacer.cpp:
pauseButton->Update(p_deltaTime);
resumeButton->Update(p_deltaTime);
Similarly, we must add code to the Render function in RoboRacer.cpp (just before the call to SwapBuffers):
pauseButton->Render();
resumeButton->Render();
That's it! If you run the game now, you should see the new pause button in the upper-left corner. Unfortunately, it doesn't do anything yet (other than change the button from Pause to Resume. Before we can actually pause the game, we need to learn about state management.