
The code that we created until this point creates a basic scene with our robot and a background. Now, it's time to bring our robot to life using the power of animation.
Animation actually has two components. First, the sprite itself will appear to animate because we will play each frame of the sprite in sequence. If you use the stock files that were made for this book, you will see the robot's eyes and arms move.
The second component is movement across the screen. It is the combination of the robot's horizontal movement and body movements that will make a convincing animation.
As with rendering, we start by adding an Update call to the GameLoop function. Modify the GameLoop function in RoboRacer.cpp:
void GameLoop(const float p_deltatTime)
{
  Update(p_deltatTime);
  Render();
}
We now have two new features:
- We added
p_deltaTimeas a parameter. This represents the amount of time that has passed in milliseconds since the last frame. We will see how this is calculated in the following section. - We added a call to the main
Updatefunction (defined in the following section). Every object in the game will also have anUpdatemethod. In this way, the call to update the game will cascade down through every object in the game. We passp_deltatTimeso that every subsequent call toUpdatewill know how much time has passed in the game.
Our first task is to implement the Update function in RoboRacer.cpp. Add the following function to RoboRacer.cpp:
void Update(const float p_deltaTime)
{
  background->Update(p_deltaTime);
  robot_left->Update(p_deltaTime);
  robot_right->Update(p_deltaTime);
  robot_left_strip->Update(p_deltaTime);
  robot_right_strip->Update(p_deltaTime);
}
Notice that we make an Update call to every sprite. At this point, we don't care if the sprite really needs to be updated. This decision will be made inside the Sprite class.
Now it's time to implement the Update method in our Sprite class. This method does all of the work required to both position the sprite and update the sprite's internal animation. Add this code to Sprite.h:
void Sprite::Update(const float p_deltaTime)
{
  float dt = p_deltaTime;

  if (m_isActive)
  {
    m_animationElapsed += dt;
    if (m_animationElapsed >= m_animationDelay)
    {
      m_currentFrame++;
      if (m_currentFrame >= m_numberOfFrames) m_currentFrame = 0;
      m_animationElapsed = 0.0f;
    }
    m_position.x = m_position.x + m_velocity * dt;
  }
}
Here is what this code does:
- We store
p_deltaTimeinto a local variabledtfor convenience. This is useful because you sometimes want to hardcode the value ofdtduring testing. - Next, we test
m_active. If this iffalse, then we bypass the entire update. - We now handle the sprite's internal animation. We first add
dttom_animationElapsedto see how much time has elapsed since the last frame change. Ifm_animationElapsedexceedsm_animationDelay, then it is time to increment to the next frame. This means that the higher the value ofm_animationDelay, the slower the sprite will animate. - If necessary, we increment
m_currentFramemaking sure that once we have exceeded the total number of frame, we reset to0. - If we just did a frame increment, we also want to reset
m_animationElapsedto0. - Now ,we move the sprite based on
m_velocityanddt. Look at the details on using delta time to calculate movement in the upcoming sections.
In this version of the game, we programmed our robot to move across the screen from left to right. The key to making our character move is the velocity property. The velocity property tells the program how many pixels to move our robot each game cycle.
As the frames come pretty fast, the velocity is typically pretty small. For example, in a game running at 60 fps, a velocity of 1 would move the robot 60 pixels each game frame. The sprite would probably be moving too fast to interact with.
There is a small problem with setting the velocity as a fixed value. Obviously, some computers are faster than other computers. With a fixed velocity, the robot will move faster on faster computers. This is a problem because it means that people on faster computers will have to be much better at playing the game!
We can use the computer's clock to solve this problem. The computer keeps track of the time that has passed since the start of the previous frame. In game terminology, this is called delta time, and we assign this to a variable that we can access in the Update loop:
void Update(float deltaTime);
In the preceding function definition, deltaTime is a floating value. Remember, our game is typically running at 60 fps, so deltaTime is going to be a very small number.
Let's take a closer look at how we use velocity to position our sprites:
m_position.x += m_velocity * dt;
We multiply m_velocity times dt, and then add this to the current position. This technique automatically adjusts the velocity based on the amount of time that has passed since the last frame. If the last frame took a little less time to process, then the robot will move a little less. If the last frame took a little longer to process, then our robot will move a little further. The end result is that the robot moves consistently now on both faster and slower computers.
As dt is a very small number, we will now have to use a larger number for our velocity. The current code uses a value of 50. Of course, in the full game this value will change based on what is happening to our robot.
We already have all of the code in place except the actual code to calculate delta time. In order to calculate the time that has elapsed during each frame of the game, we must:
- Store the time before the frame.
- Store the time after the frame.
- Calculate the difference between the two.
Open RoboRacer.cpp and add the following code right after the call to StartGame:
int previousTime = glutGet(GLUT_ELAPSED_TIME);
Notice that we are using GLUT to get the current elapsed time. Each call to glutGet(GLUT_ELAPSED_TIME) will give us the number of milliseconds that have elapsed since the game started.
Next, add the following lines directly above the call to GameLoop:
int currentTime = glutGet(GLUT_ELAPSED_TIME);
float deltaTime = (float)(currentTime - previousTime) / 1000;
previousTime= currentTime;
GameLoop(deltaTime);
- First, we captured the current elapsed time and stored that in
m_currentTime. - We then calculated the time that elapsed since the last frame by subtracting
m_currentTimefromm_previousTime. We converted this to seconds to make it easier to deal with. - We then set
previousTimeto equal current time so that we have a benchmark for our next calculation. - Finally, we modified the call to
GameLoopto pass the value ofdeltaTime. This will subsequently be passed to everyUpdatecall in the game.
Today's games can be created for and played on a wide variety of devices, ranging from supercharged PCs to mobile phones. Each of these devices has its own set of advantages and disadvantages. However, one rule of thumb is that as the device gets smaller its capabilities become more limited.
One area where these limitations become critical is texture memory. Texture memory is the location in the memory that stores the textures that are being used in the game. Mobile devices, in particular, are very limited by the amount of available texture memory, and game programmers have to be very careful not to exceed this limitation.
2D games tend to use a lot of texture memory. This is because each frame of every animation has to be stored in the memory to bring the 2D images to life. It is typical for a 2D game to have thousands of frames of textures that have to be loaded into memory.
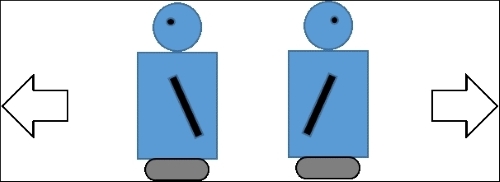
One simple way to almost cut the required amount of texture memory in half is to utilize texture flipping. Simply put, our robot moving to the left is a mirror image of our robot moving to the right. Instead of using one set of textures to move to the left and another to move to the right, we can use code to flip the texture when it is rendered.
If you want to try it out sometime, flipping would be implemented by changing the way you mapped the sprite's uv coordinates to the texture.
You may be wondering why we set up our background as a sprite. After all, we defined sprites as objects that the player interacts with in the game, and the background is basically ignored by the robot.
The main reason to set up the background as a sprite is that this allows us to handle all of our textures in a uniform manner. The advantage of this is that we can then apply the same properties to all of our images. For example, what if we decided that we wanted our background to move?
Scrolling backgrounds are used in 2D games to give the impression of a continuously changing background. In fact, the 2D side-scrolling game is considered its own genre. There are basically two requirements to create a scrolling background:
- Create a large texture that is wider than the screen.
- Assign a velocity to the texture so that it moves sideways.
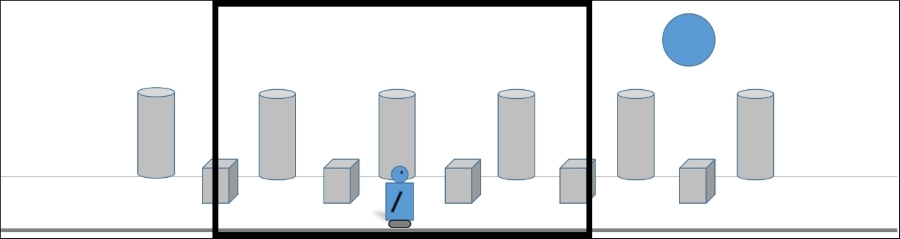
The parts of the texture background that exceeds the screen width will not be rendered. As the image moves, the background appears to slide either to the left or the right. If you set the velocity of the background image to be exactly the same as the velocity of the player, you get the illusion of a background that is flying by as the robot runs left or right.
As we already implemented our background image as a sprite, the only thing that we have to do to make it scroll is to set its velocity. This was already done in the code for AddTextures:
background->SetVelocity(-50.0f);
By setting the background velocity to -50, the background scrolls to the left as the robot moves to the right.