Now, it's time to actually write some code to implement input for our game. It turns out that some rudimentary input has already been implemented. This is because Windows is an event driven operating system and is already looking for input to occur. From a simplistic point of view, the main task of Windows (or any modern operating system) is to listen for events, and then do something based on those events.
So, whenever you hit a key on your keyboard, an event is triggered that wakes up Windows and says, "Hey, someone hit the keyboard!" Windows then passes that information to any programs that happen to be listening to keyboard events. The same occurs when you use the mouse.
We have already told our program that we want it to listen to events. Open RoboRacer.cpp and locate the WndProc function. WndProc is part of the code that was created for us when use used the Win32 Project template to start our game. WndProc is known as a callback function.
Here is how a callback function works:
- First, the function name is registered with the operating system. In our case, this occurs in
CreateGLWindow:wc.lpfnWndProc = (WNDPROC)WndProc;
This line tells our window class to register a function called
WndProcas the event handler for our program. - Now, any events that are caught by Windows are passed to the
WndProcfunction. The code inWndProcthen decides which events to handle. Any events that aren't handled byWndProcare simply ignored by the program.
As WndProc was created for a typical Windows application, it contains some things that we don't need, while there are some things that we can use:
LRESULT CALLBACK WndProc(HWND hWnd, UINT message, WPARAM wParam, LPARAM lParam)
{
  int wmId, wmEvent;
  PAINTSTRUCT ps;
  HDC hdc;

  switch (message)
  {
    case WM_COMMAND:
    wmId    = LOWORD(wParam);
    wmEvent = HIWORD(wParam);
    // Parse the menu selections:
    switch (wmId)
    {
      case IDM_ABOUT:
      DialogBox(hInstance, MAKEINTRESOURCE(IDD_ABOUTBOX), hWnd, About);
      break;
      case IDM_EXIT:
      DestroyWindow(hWnd);
      break;
      default:
      return DefWindowProc(hWnd, message, wParam, lParam);
    }
    break;
    case WM_PAINT:
    hdc = BeginPaint(hWnd, &ps);
    // TODO: Add any drawing code here...
    EndPaint(hWnd, &ps);
    break;
    case WM_DESTROY:
    PostQuitMessage(0);
    break;
    default:
    return DefWindowProc(hWnd, message, wParam, lParam);
  }
  return 0;
}
The main work is done by switch, which handles various windows events (all prefixed by WM, which is an abbreviation for Windows Message):
- The
WM_COMMANDevents can all be ignored. In a typical Windows application, you would create a menu and then assign various command events to be triggered when the user clicks on a command on the menu (for example,IDM_ABOUTto click on the About command). Games almost never use the standard Windows menu structure (and so, neither do we). - We also ignore the
WM_PAINTevent. This event is triggered whenever the window containing the program needs to be redrawn. However, we are constantly redrawing our window using OpenGL via theRenderfunction, so we don't need to add code to do that here. - We are already handling the
WM_DESTROYevent. This event is triggered when you click the close icon (X) in the upper-right corner of the Windows. Our handler responds to this by posting its own message usingPostQuitMessage(0). This tells our program that it is time to quit.
We discussed the Windows messaging system in Chapter 1, Building the Foundation but this discussion warrants a recap. If you take a look at the _wWinMain function, you will see this block of code that sets up the main messaging loop:
bool done = false;
while (!done)
{
  if (PeekMessage(&msg, NULL, 0, 0, PM_REMOVE))
  {
    if (msg.message == WM_QUIT)
    {
      done = true;
    }
    else
    {
      TranslateMessage(&msg);
      DispatchMessage(&msg);
    }
  }
  else
  {
    int currentTime = glutGet(GLUT_ELAPSED_TIME);
    float deltaTime = (float)(currentTime - previousTime) / 1000;
    previousTime= currentTime;
    GameLoop(deltaTime);
  }
}
The relevant part of this discussion is the call to PeekMessage. PeekMessage queries the message queue. In our case, if the WM_QUIT message has been posted (by PostQuitMessage), then done is set to true and the while loop exits, ending the game. As long as WM_QUIT has not been posted, the while loop will continue and GameLoop will be called.
The event driven system is a great way to handle input and other actions for most programs, but it doesn't work well with games. Unlike games, most programs just sit around waiting for some kind of input to occur. For example, a word processing program waits for either a keystroke, a mouse button click, or a command to be issued. With this type of system, it makes sense to wake up the program every time an event happens so that the event can be processed.
Games, on the other hand, do not sleep! Whether or not you are pressing a button, the game is still running. Furthermore, we need to be able to control the process so that an input is only processed when we are ready for it to be handled. For example, we don't want input to interrupt our render loop.
The following diagram shows how Windows is currently rigged to handle input:
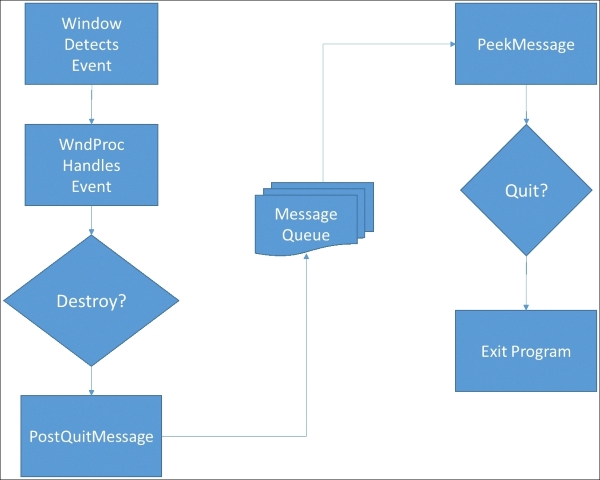
We could expand WndProc to handle all of the input events. However, this is a terribly inefficient way to handle input, especially in a real-time program, such as a game. We will let Windows handle the case when the user closes the Window. For everything else, we are going to create our own input class that directly polls for input.
There are many different ways to design an input system, and I am not going to presume that this is the best system. However, our input system accomplishes two important tasks:
- We define a consistent input interface that handles both mouse and keyboard input
- We handle input by directly polling for mouse and keyboard events during each frame (instead of waiting for Windows to send them to us)
Create a new class called Input. Then add the following code into Input.h:
#pragma once
#include <Windows.h>

class Input
{
  public:
  enum Key
  {
    K_ESC = VK_ESCAPE,
    K_SPACE = VK_SPACE,
    K_LEFT = VK_LEFT,
    K_RIGHT = VK_RIGHT,
    K_UP = VK_UP,
    K_DOWN = VK_DOWN,
    K_W = 87,
    K_A = 65,
    K_S = 83,
    K_D = 68,
    K_Q = 81,
    K_ENTER = VK_RETURN,
    K_LB = VK_LBUTTON,
    K_RB = VK_RBUTTON

  };

  enum Command
  {
    CM_LEFT,
    CM_RIGHT,
    CM_STOP,
    CM_UP,
    CM_DOWN,
    CM_QUIT
  };

  #define KEYDOWN(vk_code) ((GetAsyncKeyState(vk_code) & 0x8000) ? 1 : 0)

  protected:
  Command m_command;
HWND m_hWnd;

  public:
  Input(const HWND m_hWnd);
  ~Input();

  void Update(const float p_detlaTime);

  const Command GetCommand() const { return m_command; }
};
As with all of our code, let's take a close look to see how this is designed:
- We include
Windows.hbecause we want access to the Windows API virtual key constants. These are constants that have been defined to represent special keys on the keyboard and mouse. - We create the
Keyenum so that we can easily define values to poll the keys that we want to handle. - We create the
Commandenum so that we can easily map input to command actions that we want to support. - We define a C++ macro named
KEYDOWN. This greatly simplifies our future code (see the next step for details). - The class only has one member variable,
m_command, which will be used to hold the last action that was requested. - We define three member functions: the constructor, the destructor,
Update, andGetCommand.
In order to understand how our input system works, you must first understand virtual key codes. There are a lot of keys on a keyboard. In addition to letters and numbers, there are special keys, including shift, control, escape, enter, arrow keys, and function keys. Coming up with a simple way to identify each key is quite a task!
Windows uses two techniques to identify keys; for the normal keys (letters and numbers), each key is identified by the ASCII code of the value that is being tested. The following table shows the ASCII value for the keys that we use in our game:
|
ASCII Value |
Key |
|---|---|
|
87 |
W |
|
65 |
A |
|
83 |
S |
|
68 |
D |
|
81 |
Q |
For special keys, Windows defines integer constants to make them easier to work with. These are known as virtual key codes. The following table shows the virtual key codes that we will work with in our game:
|
Virtual key code |
Key |
|---|---|
|
|
Esc |
|
|
Spacebar |
|
|
Left arrow |
|
|
Right arrow |
|
|
Up arrow |
|
|
Down arrow |
|
|
Enter |
|
|
Left mouse button |
|
|
Right mouse button |
Notice that there are even virtual key codes for the mouse buttons!
The GetAsyncKeyState function is used to query the system for both keyboard and mouse input. Here is an example of that command:
if ( (getAsyncKeyState(VK_ESC) & 0x8000) == true )
{
  PostQuitMessage(0);
}
First, we pass in a virtual key code (or ASCII value), then we do a logical and with the hex value 8000 to strip out information that we don't need. If the result of this call is true, then the queried key is being pressed.
It's a pretty awkward command to have to use over and over again! So, we create a C++ macro to make things simpler:
#define KEYDOWN(vk_code) ((GetAsyncKeyState(vk_code) & 0x8000) ? 1 : 0)
KEYDOWN executes the GetAsyncKeyState command. The macro accepts a key code as a parameter, and returns true if that key is being pressed or false if that key is not being pressed.
All of the actual work is for our input system is done in the Update function, so let's implement the Input class. Open Input.cpp and enter the following code:
#include "stdafx.h"
#include "Input.h"

Input::Input(const HWND p_hWnd)
{
  m_command = Command::CM_STOP;
m_hWnd = p_hWnd;
}

Input::~Input()
{
}

void Input::Update(const float p_deltaTime)
{
  m_command = Command::CM_STOP;
  if (KEYDOWN(Key::K_LEFT) || KEYDOWN(Key::K_A))
  {
    m_command = Command::CM_LEFT;
  }
  if (KEYDOWN(Key::K_RIGHT) || KEYDOWN(Key::K_D))
  {
    m_command = Command::CM_RIGHT;
  }
  if (KEYDOWN(Key::K_UP) || KEYDOWN(Key::K_LB))
  {
    m_command = Command::CM_UP;
  }
  if (KEYDOWN(Key::K_DOWN) || KEYDOWN(Key::K_RB))
  {
    m_command = Command::CM_DOWN;
  }
  if (KEYDOWN(Key::K_ESC) || KEYDOWN(Key::K_Q))
  {
    m_command = Command::CM_QUIT;
  }
}
In a nutshell, the Update function queries all of the keys that we want to check simultaneously, and then maps those keys to one of the command enums that we have defined in the class header. The program then calls the class GetCommand method to determine the current action that has to be taken.
If you are really paying attention, then you may have realized that we only store a single command result into m_command, yet we are querying many keys. We can get away with this for two reasons:
- This is an infinitely simple input system with few demands
- The computer cycles through the input at 60 frames per second, so the process of the player pressing and releasing keys is infinitely slow in comparison
Basically, the last key detected will have its command stored in m_command, and that's good enough for us.
Also, notice that we set the initial command to Input::Command::STOP. As a result, if no key is currently being held down, then the STOP command will be the final value of m_command. The result of this is that if we are not pressing keys to make our robot move, then he will stop.
Now that we have an input class, we will implement it in our game. We will handle input by adding it to Update. This gives us total control over when and how we handle input. We will only rely on the Windows event listener to tell us if the Window has been closed (so that we can still shut the game down properly).
Open RoboRacer.cpp and modify the Update function so that it looks like the following code:
void Update(const float p_deltaTime)
{
  inputManager->Update(p_deltaTime);
  ProcessInput (p_deltaTime);

  background->Update(p_deltaTime);
  robot_left->Update(p_deltaTime);
  robot_right->Update(p_deltaTime);
  robot_left_strip->Update(p_deltaTime);
  robot_right_strip->Update(p_deltaTime);
}
Before now, our Update function only updated the game's sprites. If you recall, the sprite Update method modifies the position of the sprites. So, it makes sense to perform the input before we update the sprites. The Update method of the Input class queries the system for input, and then we run a ProcessInput to decide what to do.
Just before we update all of our sprites, we need to process the input. Remember, the Input class Update method only queries the input and stores a command. It doesn't actually change anything. This is because the Input class does not have access to our sprites.
First, open RoboRacer.cpp and include the Input header file:
include "Input.h"
We need to add a variable to point to our Input class. Add the following line in the variable declarations section:
Input* inputManager;
Then, modify StartGame to instantiate the Input class:
void StartGame()
{
  inputManager = new Input(hWnd);
  LoadTextures();
}
Now, we will create a function to process the input. Add the following function to RoboRacer.cpp:
void ProcessInput (const float p_deltaTime);
{
  switch (inputManager->GetCommand())
  {
    case Input::Command::CM_STOP:
    player->SetVelocity(0.0f);
    background->SetVelocity(0.0f);
    break;

    case Input::Command::CM_LEFT:
    if (player == robot_right)
    {
      robot_right->IsActive(false);
      robot_right->IsVisible(false);
      robot_left->SetPosition(robot_right->GetPosition());
    }

    player = robot_left;
    player->IsActive(true);
    player->IsVisible(true);
    player->SetVelocity(-50.0f);
    background->SetVelocity(50.0f);
    break;

    case Input::Command::CM_RIGHT:
    if (player == robot_left)
    {
      robot_left->IsActive(false);
      robot_left->IsVisible(false);
      robot_right->SetPosition(robot_left->GetPosition());
    }

    player = robot_right;
    player->IsActive(true);
    player->IsVisible(true);
    player->SetVelocity(50.0f);
    background->SetVelocity(-50.0f);
    break;

    case Input::Command::CM_UP:
    player->Jump(Sprite::SpriteState::UP);
    break;

    case Input::Command::CM_DOWN:
    player->Jump(Sprite::SpriteState::DOWN);
    break;

    case Input::Command::CM_QUIT:
    PostQuitMessage(0);
    break;
  }
}
ProcessInput is where the changes to our game actually take place. Although it seems like a lot of code, there are really only two things that are happening:
- We query the input system for the latest command using
inputManager->GetCommand() - Based on that command we perform the required actions
The following table shows the commands that we have defined, followed by a description of how this affects the game:
|
Command |
Actions |
|---|---|
|
|
|
|
|
|
|
|
|
|
|
|
|
|
|
|
|
|
Now that the robot can jump, we need to add a new method to the Sprite class to give the robot the ability to jump:
First, we will add an enum to Sprite.h to track the sprite state:
 enum SpriteState
 {
  UP,
  DOWN
 };
Next, we need a new member variable to track if an element has been clicked. Add:
bool m_isClicked;
Now go to the constructor in Sprite.cpp and add a line to initialize the new variable:
m_isClicked = false;
Add the following code to Sprite.h:
void Jump(SpriteState p_state);
void IsClicked(const bool p_value) { m_isClicked = p_value; }
 const bool IsClicked() const { return m_isClicked; }
Then add the following code to Sprite.cpp:
void Sprite::Jump(SpriteState p_state)
{
  if (p_state == SpriteState::DOWN )
  {
    if (m_position.y < 470.0f) m_position.y += 75.0f;
  }
  else if (p_state == SpriteState::UP)
  {
    if (m_position.y >= 470.0f) m_position.y -= 75.0f;
  }
}
Our robot is a little unique. When he jumps, he hovers at an elevated level until we tell him to come back down. The Jump method moves the robot 75 pixels higher when the player presses the up arrow, and moves him 75 pixels back down when the player presses the down arrow. However, we want to make sure that we don't allow a double-jump up or a double-jump down, so we check the current y position before we apply the change.
Now that we are going to use input to control our robot, we no longer need to set the initial velocity as we did in the previous chapter. Locate the following two lines of code in LoadTextures and delete them:
background->SetVelocity(-50.0f);
player->SetVelocity(50.0f);
Run the game. You should now be able to control the robot with the arrow keys, moving him left and right, up and down. Congratulations, you're a control freak!