I'm sure that you are as excited as I am about the progress that you have made on your game. It's almost ready to publish, right? Well, not quite! There is a lot of work that goes into polishing your game before it is ready, and that's what this chapter is all about.
Many people have a great idea for a game, and lots of enthusiastic coders, such as you, actually code their game to the point where we have reached so far. Unfortunately, this is where a lot of projects die. For some reason, many first-time game coders don't take the time to really finish their game. There are lots of things that still need to be done to make your game presentable:
- Game state: We already touched on game state a little bit when you learned how to pause your game. This chapter will continue the discussion of how you use game state to manage your game at various stages of gameplay.
- Splash screen: Most games display one or more screens before the game starts. These screens, known as splash screens, often display the logo and name of the studios that were involved in creating the game. A splash screen shows that you went the extra mile in polishing your game.
- Menu screen: Most games start with a menu of choices for the player. We will create a simple menu that loads after our splash screen and gives the player a few options.
- Scoring and statistics: You probably noticed that our game currently doesn't keep score. Although it is possible to design a game that doesn't involve scoring, most players want to know how they are doing in the game.
- Winning and losing: Again, while there are certainly games out there where no one wins or loses, most games have win-or-lose conditions that signal that the game is over.
- Game progression: Most games allow the player to continue playing as long as the player has achieved certain goals. Many games are broken down into a series of levels, with each level becoming a little more difficult than the previous one. You will learn how to add this type of progression to your game.
- Credits: Everyone likes to get credit for their work! Just like the movies, it is traditional to include a screen that shows each person that was involved in creating the game and what their role was. I'll show you how to create a simple credits screen.
Remember when we coded the pause button back in Chapter 4, Control Freak? We had to add some code that told the game whether it was active or paused. In fact, we defined the following enums:
enum GameState
{
  GS_Running,
  GS_Paused
};
These enums defined two game states: GS_Running, and GS_Paused. We then set the default game state to GS_Running in the StartGame function:
void StartGame()
{
  inputManager = new Input(hWnd);
  LoadTextures();
  m_gameState = GS_Running;

  srand(time(NULL));
  pickupSpawnThreshold = 5.0f;
  pickupSpawnTimer = 0.0f;
}
As long as the game state is set to GS_Running, then the game continues to cycle through the game loop, processing updates, and rendering the scene. However, when you click the pause button, the game state is set to GS_Paused. When the game is paused, we no longer update the game objects (that is, the robot, pickups, and enemies), but we do continue to render the scene and process the UI (user interface) so that buttons can be clicked.
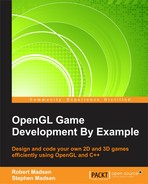
The mechanism used to set up and control game states is known as a state machine. A state machine sets up separate and distinct stages (or states) for the game. Each state defines a certain set of rules for what is supposed to happen or not happen during each state. For example, our simple state machine has two states with the following rules, illustrated by the following matrix:
|
GS_Running |
GS_Paused | |
|---|---|---|
|
Input |
All input |
Only UI input |
|
Objects Updating |
All objects |
Only UI objects |
|
Collision Detection |
All collideables |
No need to check for collisions |
|
Spawning |
All spawnables |
No spawning |
|
Rendering |
All objects |
All objects |
The state machine also defines the progression from one state to another. Here is a simple diagram showing the progression in our current state machine:
This state diagram is pretty simple. If you are in the running state, then it is legal to go to the paused state. If you are in the paused state, then it is legal to go to the running state. As we will see, most games are much more complex than this!
At first glance, you may wonder why we even need a state machine. You could, for example, set up several Boolean flags (maybe one called running and one called paused), and then insert them into the code in the same way that we are using our enums.
This solution may work considering that our current game only has two states, but even then, it starts to get complicated if you choose to use Booleans. For example, to change the state from running to paused, I would always have to make sure to properly set both Booleans:
running = false;
paused = true;
When I went from the running state to the paused state, I would have to set both Booleans again:
running = true;
paused = false;
Imagine the problem if I forgot to change both Booleans and left the game in a state where it was both running and paused! Then imagine how complicated this becomes if my game has three, four, or ten states!
Using enums is not the only way to set up a state engine, but it does have immediate advantages over using Booleans:
- Enums have a descriptive name associated with their value (for example,
GS_Paused), whereas Booleans only havetrueandfalse. - Enums are already mutually exclusive. In order to make a set of Booleans mutually exclusive, I have to set one to
trueand all the others tofalse.
The next consideration as to why we need a state machine is that it simplifies the coding of the control of the game. Most games have several game states, and it is important that we are able to easily manage which code runs in which state. An example of game states that are common to most games includes:
- Loading
- Starting
- Running
- Paused
- Ending
- GameWon
- GameLost
- GameOver
- NextLevel
- Exiting
Of course, this is just a representative list, and each coder picks his or her own names for their game states. But I think that you get the idea: there are a lot of states that a game can be in, and that means it is important to be able to manage what happens during each state. Players tend to get angry if their character dies while the game was paused!
We are going to expand our simple state machine to include several more game states. This is going to help us to better organize the processing of the game, and better define which processes should be running at any particular time.
The following table shows the game states that we are going to define for our game:
|
State |
Description |
|---|---|
|
Loading |
The game is loading and the Splash screen should be displayed |
|
Menu |
The main menu is showing |
|
Running |
The game is actively running |
|
Paused |
The game is paused |
|
NextLevel |
The game is loading the next level |
|
GameOver |
The game is over and the stats are being displayed |
|
Credits |
Showing the Credits screen |
Here is our state diagram machine:
|
Splash |
Loading |
Menu |
Running |
Paused |
Next |
GameOver |
Credits | |
|---|---|---|---|---|---|---|---|---|
|
Input |
None |
None |
UI |
All |
UI |
UI |
UI |
UI |
|
Updating |
Splash |
Splash |
UI |
All |
UI |
UI |
UI |
UI |
|
Collision Detection |
None |
None |
None |
All |
None |
None |
None |
None |
|
Spawning |
None |
None |
None |
All |
None |
None |
None |
None |
|
Rendering |
Splash |
Splash |
Menu |
Game |
Game |
Game |
GameOver |
Credits |
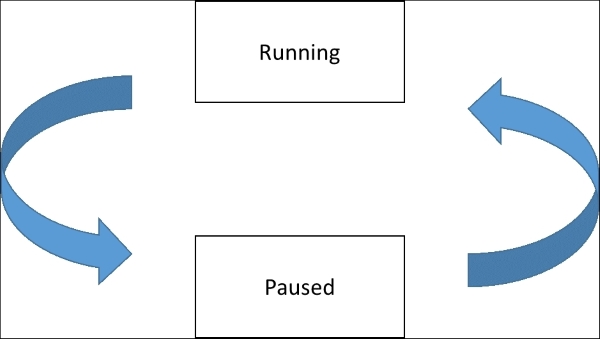
Finally, here is our state diagram:
It turns out that our state diagram will also double as a UI diagram. A UI diagram is a diagram of all of the screens in a program and how they interact with each other. It turns out that each time that we want to change to a different screen in our game, we are also changing to a different screen. This isn't exactly the case—when the game is paused, it doesn't launch a completely new screen. However, there is often a very close correlation between the UI diagram and the state diagram.
Looking at the state diagram, you can easily see the legal state changes versus the illegal state changes. For example, it is legal to change the state from playing to paused, but you can't change the state from playing to credits.
Having this structure in place will guide us as we implement all of the final polish features that we want to add to our game.
The first step in expanding our game state machine is adding the required enums. Replace the GameState enum code with the following code:
enum GameState
{
  GS_Splash,
  GS_Loading,
  GS_Menu,
  GS_Credits,
  GS_Running,
  GS_NextLevel,
  GS_Paused,
  GS_GameOver,
};
As we implement the polish features covered in this chapter, we will implement code that uses these game states.
In order for our state machine to have any effect, we need to modify the code so that key decisions are made based on the game state. There are three functions that game state affects in a big way:
It should come as no surprise then that we will be changing the Update, Render, and ProcessInput functions.
First, let's modify the Update function. Change the Update function in RoboRacer2D.cpp to match the following code:
void Update(const float p_deltaTime)
{
 switch (m_gameState)
 {
 case GameState::GS_Splash:
 case GameState::GS_Loading:
 {
 }
 break;
 case GameState::GS_Menu:
 {
  inputManager->Update(p_deltaTime);
  ProcessInput(p_deltaTime);
 }
 break;

 case GameState::GS_Credits:
 {
  inputManager->Update(p_deltaTime);
  ProcessInput(p_deltaTime);
 }
 break;
 case GameState::GS_Running:
 {
  inputManager->Update(p_deltaTime);
  ProcessInput(p_deltaTime);
  CheckBoundaries(player);
  CheckBackground();
  background->Update(p_deltaTime);
  robot_left->Update(p_deltaTime);
  robot_right->Update(p_deltaTime);
  robot_left_strip->Update(p_deltaTime);
  robot_right_strip->Update(p_deltaTime);
  pauseButton->Update(p_deltaTime);
  resumeButton->Update(p_deltaTime);
  pickup->Update(p_deltaTime);
  SpawnPickup(p_deltaTime);
  SpawnEnemy(p_deltaTime);
  enemy->Update(p_deltaTime);
  CheckCollisions();
 }
 break;
 case GameState::GS_Paused:
 {
  inputManager->Update(p_deltaTime);
  ProcessInput(p_deltaTime);
 }
 break;
 case GameState::GS_NextLevel:
 {
  inputManager->Update(p_deltaTime);
  ProcessInput(p_deltaTime);
 }
 break;
 case GameState::GS_GameOver:
 {
  inputManager->Update(p_deltaTime);
  ProcessInput(p_deltaTime);
 }
 break;
 }
}
As you can see, we are now using a switch statement to handle each game state. This is a whole lot more readable than using if statements, and it keeps the code much more structured. If we need to add another game state, we just add another case to the switch statement.
Notice that each case has its code to run specific to that game state. Some lines of code are duplicated (almost every state has some input), but this is a small price to pay for clarity. GS_Running has the most work to do, while GS_Loading has the least work to do. We will be adding code to each switch as we add polish features.
Now, let's give the Render function an upgrade. Replace the Render function with the following code:
switch (m_gameState)
 {
 case GameState::GS_Splash:
 case GameState::GS_Loading:
 {
 }
 break;
 case GameState::GS_Menu:
 {
 }
 break;
 case GameState::GS_Credits:
 {
 }
 break;
 case GameState::GS_Running:
 case GameState::GS_Paused:
 {
  background->Render();
  robot_left->Render();
  robot_right->Render();
  robot_left_strip->Render();
  robot_right_strip->Render();
  pauseButton->Render();
  resumeButton->Render();
  pickup->Render();
  enemy->Render();
  DrawScore();
 }
 break;
 case GameState::GS_NextLevel:
 {
 }
 break;
 case GameState::GS_GameOver:
 {
 }
 break;
 }

  SwapBuffers(hDC);
}
In this case, we have some work that needs to be done regardless of the game state. We need to clear the OpenGL buffer, and set the matrix to identity. Then we decide which items to render based on the game state, and finally, we swap the buffers.
If you look closely, GS_Running and GS_Paused render the same items. This is because the pause and render buttons are rendered over the top of the gameplay screen, so we still need to render the entire game even when we are paused. We will be adding code to each switch as we add polish features.
Finally, we need to apply our state machine to the ProcessInput function. As the function is so long, I am only showing the top lines of the function. Change all of the lines above the uiTimer += p_deltaTime; statement to the following code:
Replace highlighted code with:

 switch (m_gameState)
 {
 case GameState::GS_Splash:
 case GameState::GS_Loading:
 {
  return;
 }
 break;
 case GameState::GS_Menu:
 case GameState::GS_Credits:
 case GameState::GS_Paused:
 case GameState::GS_NextLevel:
 case GameState::GS_GameOver:
 {
  command = Input::Command::CM_UI;
 }
 break;
 case GameState::GS_Running:
 {
 }
  break;
 }

}

uiTimer += p_deltaTime;
First, we get the latest command. Then, depending on the game state, we perform the following actions:
- Ignore and return if we are still in the loading state
- Reset the command to only handle UI commands if the game state is menu, paused, next level, or game over
- Leave the command unchanged if we are in the running game state
This is exactly what we did in the prior versions, except we only had two game states to deal with in the prior versions. Once the command is handled, we move on to the uiTimer += p_deltaTime; (everything after this line is unchanged from the prior versions).