
When you consider the amount of code that is required to create even the most basic shapes, you might despair of ever coding a complicated 3D game! Fortunately, there are better tools available to create 3D objects. 3D modeling software allows a 3D modeler to create 3D object similar to how an artist uses drawing software to create 2D images.
The process of getting 3D objects into our game typically has three steps:
- Creating the 3D object in a 3D modeling tool.
- Exporting the model as a data file.
- Loading the data file into our game.
There are many popular tools that are used by professionals to create 3D models. Two of the most popular ones are 3D Max and Maya. However, these tools are also relatively expensive. It turns out that there is a very capable 3D modeling tool called Blender that is available for free. We will install Blender and then learn how to use it to create 3D models for our game.
Blender is a 3D modeling and animation suite that is perfect for beginners who want to try 3D modeling. Blender is open-source software created by Blender Organization, and it is available at no cost (although Blender Organization will be glad to accept your donations). Install Blender on your computer using the following steps:
- Go to http://www.Blender.Org and hit Enter.
- Click the Download link at the top of the page.
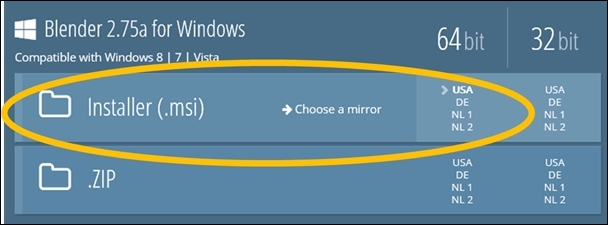
- Download the files that are compatible with your computer. For my 64-bit Windows computer, I made the selection circled in the following screenshot:
- Once Blender is downloaded, run the installer program and accept all of the default values to install Blender on your computer.
Once you have installed Blender on your computer, open it up and you should see something like the following screen:
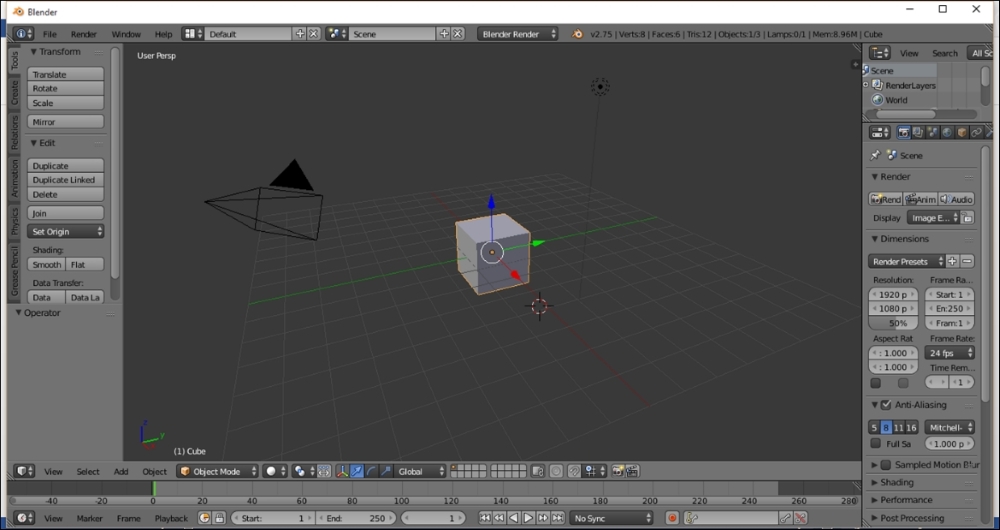
Don't let the complexity of the screen scare you. Blender has a lot of features that you will learn with time, and they have tried to put many of the features right at your fingertips (well, mouse tips). They have even created a model of a cube for you so that you can get started right away.
The middle of the screen is where the action takes place. This is the 3D view. The grid gives you a reference, but is not part of the model. In the preceding screenshot, the only model is the cube.
The panels surrounding the middle offer a host of options to create and manipulate your objects. We won't have time to cover most of these, but there are many tutorials available online.
Just like we did in the 2D portion of the book, we are going to build a simple 3D spaceship so that we can fly it around in our universe. As I am a programmer and not a modeler, it will be a ridiculously simple space ship. Let's build it out of a cylinder.
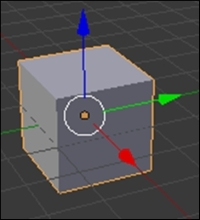
To build our space ship, we first want to get rid of the cube. Use your right mouse button to select the cube. You can tell that it is selected because it will have three arrows coming from it:
Now press the Delete key on your keyboard, and the cube will disappear.
You will probably notice two other objects in the 3D View:
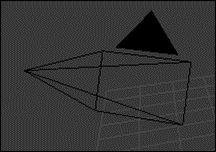
The object in the preceding image represents the camera. This is not a part of your game object, but rather it represents the angle of the camera as viewed from inside Blender. You can hide this by right-clicking on it and pressing H.

The object in the preceding image represents the light source. This is not a part of your game object, but rather it represents the light source that Blender is using. You can hide this by right-clicking on it and pressing H.
Now, let's create that cylinder. Locate the Create tab in the left panel and use your left mouse button to click on it:
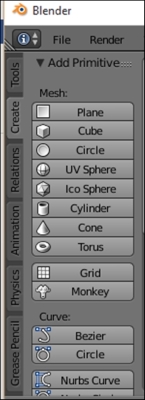
Next, click on the cylinder button. Blender will create a cylinder in the 3D view:
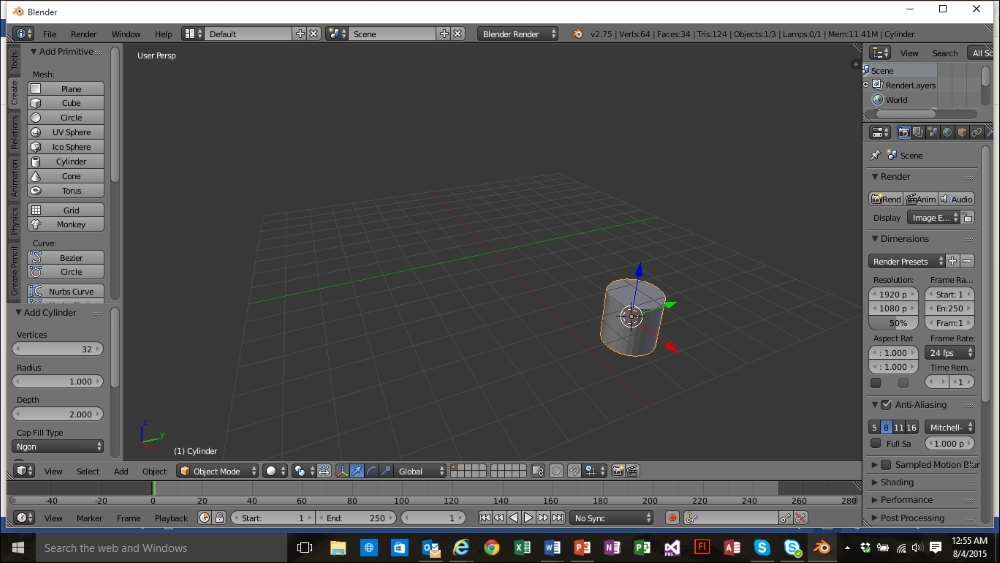
Notice the three arrows. These indicate that the cylinder is the selected object. The arrows are used to move, size, and rotate objects, but we won't be doing any of that today.
You should also notice a circle with a concentric dashed circle inside the cylinder. This indicates the origin of the object, which is the point around which the object will move, size, and rotate.
There are many more things that we would do if we were modeling a real object. As this is a coding book and not a modeling book, we won't do those things, but here are some ideas for future study:
- We could continue creating more and more objects and use them to build a much more complex spaceship
- We could use textures and materials to give our spaceship a skin
In order to bring the spaceship into our game, we must first export the object into a data file that can be read into the game. There are many different formats that we could use, but for this game, we will use the .obj export type. To export the object, perform the following action:

Congratulations! You are now one step away from bringing this object into your game.
The .obj file is simply a text file that stores all of the vertices and other data that is used to render this object in OpenGL. The following screenshot shows the ship.obj file opened in Notepad:

We will now write the code to load this data into our game. Open the SpaceRacer3D project into Visual Studio. Then add the following headers:
#include #include #include enum Primitive
{
 Triangles = 0,
 Quads = 1
};

struct Vec2
{
 Vec2()
 {
  x = 0.0f;
  y = 0.0f;
 }
 Vec2(const float p_x, const float p_y)
 {
  x = p_x;
  y = p_y;
 }

 float x;
 float y;
};

struct Vec3
{
 Vec3()
 {
  x = 0.0f;
  y = 0.0f;
  z = 0.0f;
 }
 Vec3(const float p_x, const float p_y, const float p_z)
 {
  x = p_x;
  y = p_y;
  z = p_z;
 }

 float x;
 float y;
 float z;
};

const bool LoadObj(
 const char * filepath,
 std::vectortemp_vertices;
 std::vectortemp_normals;
 FILE * file = fopen(filepath, "r");
 if (file == NULL)
 {
  return false;
 }
 bool finished = false;
 while (!finished)
 {
  char line[128];
  int check = fscanf(file, "%s", line);
  if (check == EOF)
  {
   finished = true;
  }
  else
  {
   if (strcmp(line, "v") == 0)
   {
    Vec3 vertex;
    fscanf(file, "%f %f %f
",  vertices.size(); i++)
 {
  unsigned int vertexIndex = vertices[i];
  unsigned int normalIndex = normals[i];
  Vec3 vertex = temp_vertices[vertexIndex - 1];
  Vec3 normal = temp_normals[normalIndex - 1];
  o_vertices.push_back(vertex);
  o_normals.push_back(normal);
 }
 return true;
}

Before you can compile the code you will need a to add a pre-processor definition. Open the project properties, and navigate to the C/C++ branch of the Configuration Properties. Add _CRT_SECURE_NO_WARNINGS to the Preprocessor Definitions.
Here is what the loader is doing:
The loader accepts for parameters (one input and three output):
- A filename.
- A pointer to an array of vertices.
- A pointer to an array of uvs.
- A pointer to an array of normal vectors.
- Three vectors (a type of array in C++) are created to hold the data that is parsed from the file. One to hold the vertices, one to hold the uvs, and one to hold the normals. A fourth vector is created to pair each vertex with a uv coordinate.
- Three temporary vectors are created to use as input buffers as the data is read.
- The
fbxfile is now read. The program looks for the flags that indicate what type of data is being read. For our purposes now, we are only concerned with the vertex data. - When each piece of data is read, it is put into the appropriate vector.
- The vectors are returned so that they can be processed by the program.
Simple enough, eh? But, there's a lot of code because parsing is always fun! The most important data that is extracted from the model for our purposes is the array of vertices.
Tip
We haven't discussed uvs and normal vectors because I don't want to this to be a whole book on modeling. Uvs are used to add textures to an object. as we didn't add any textures, we won't have uv data. Normal vectors tell OpenGL which side of an object is facing out. This data is used to properly render and light an object.
In the next chapter, we will use this loader to load our model into the game.