Now that you know how to build your 3D world, it is time to do stuff! As we are building a space racing game, we need to be able to move our space ship around. We will also put some obstacles in the game so that we have something to race against. In this chapter, you will learn about the following topics:
- Placing game objects: We will take some 3D objects, load them into our game, and place them in 3D space.
- Transformations: We need to learn how to move in 3D. Moving in 2D was easy. In 3D, we have another dimension, and we will now also want to account for rotation as we move around.
- Point of view: We will learn how the point of view affects how we play the game. Do you want to be in the pilot's seat or just outside the ship?
- Collisions: We performed some collision detection in our 2D game. Collision detection in 3D is more complicated because we now have to consider all three spatial dimensions in our checks.
Our first task is to load our world. We need a few basic components. First, we need a universe. This universe will contain stars, asteroids, and our space ship. Open up SpaceRacer3D and let's get coding!
Before we get going, we will need to move some code over from our 2D project. Copy the following files and settings from RoboRacer2D to SpaceRacer3D:
- Copy
Input.cppandInput.h—we will use these classes to handle user input. - Copy
Sprite.cpp,Sprite.h,SOIL.h, andSOIL.lib—we will use them to support the user interface in the next chapter. You may need to remove the line#include "stdafx.h"fromSprite.cpp. - Copy
fmodex.dll—we need this for audio support. - Copy the settings from the project
Configuration Properties/C/C++/General/Additional Include Directoriessetting—this is necessary to provide access to FMOD library: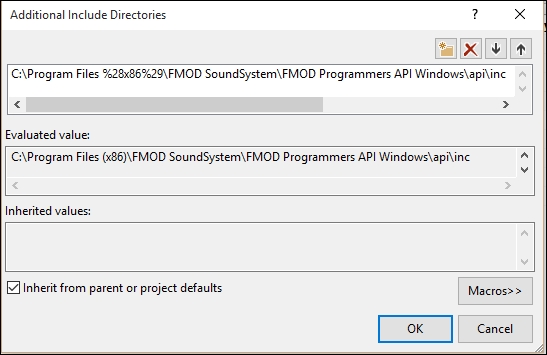
- Copy the settings from the project
Configuration Properties/Linker/Input/ Additional Dependenciessetting—this is necessary to provide access to the OpenGL, FMOD, and SOIL libraries: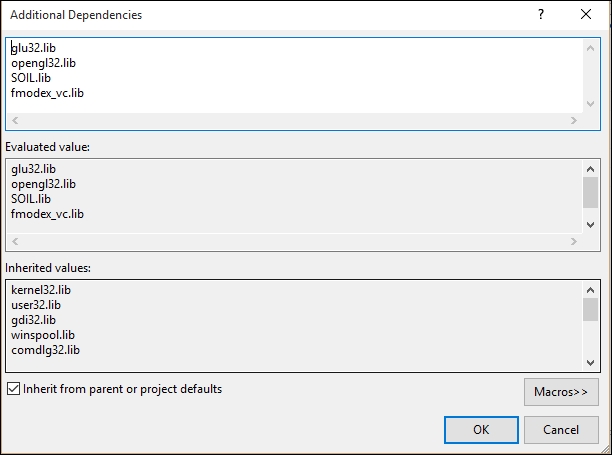
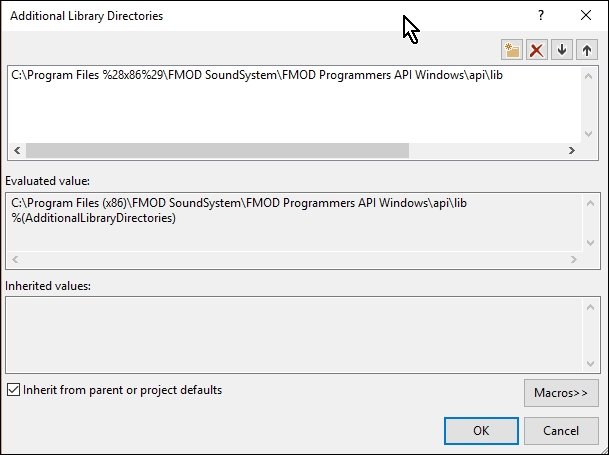
- Copy the settings from the project Configuration Properties/Linker/ General/Additional Library Directories setting—this is also necessary to provide access to FMOD library:
In the previous chapter, we learned how to create 3D objects in Blender and export them as obj files. We then added code to our project to load the obj data. Now, we will use that code to load some models into our game.
We are going to load four models into our game: the space ship, and three asteroids. The idea will be to race through the asteroid field. As our loader holds the model data as three arrays (vertices, uvs, and normals), we will create a model class that defines these arrays and then use this class for each model that we want to load into the game.
Create a new class and header file named Model.cpp and Model.h, respectively. Open Model.h. First, let's get the header set up:
#pragma once
#include <stdlib.h>
#include <math.h>
#include "LoadObj.h"
#include "glut.h"
We need to use some constants defined in math.h, so we need to add a preprocessor directive. Add _USE_MATH_DEFINES to Configuration Properties/C/C++/Preprocessor/Preprocessor Definitions. Also, notice that we include LoadObj.h because we will load the model from inside this class. Now, let's create the class:
class Model
{

  public:

  struct Color
  {
    Color()
    {
      r = 0.0f;
      g = 0.0f;
      b = 0.0f;
    }
    Color(const float p_r, const float p_g, const float p_b)
    {
      r = p_r;
      g = p_g;
      b = p_b;
    }
    float r;
    float g;
    float b;
  };
};
We will be using color a lot, so we are defining a struct to hold the r, g, and b values to make things more convenient. Now, for our methods we use the following code:
 Model(const char* p_filepath, const Color p_color);
 ~Model();
 void Update(const float p_deltaTime);
 void Render();
 void SetPosition(const float p_x, const float p_y, const float p_z);
 void SetPosition(const Vec3 p_position);
 const Vec3 GetPosition() const;
 void SetHeading(const float p_x, const float p_y, const float p_z);
 void SetHeading(const Vec3 p_heading);
 const Vec3 GetHeading() const;
 void SetColor(const float p_red, const float p_green, const float p_blue);
 void SetColor(const Color p_color);
 void SetBaseRotation(const float p_x, const float p_y, const float p_z);
 void SetBaseRotation(const Vec3 p_rotation);
 const Vec3 GetBaseRotation() const;
 void SetHeadingRotation(const float p_x, const float p_y, const float p_z);
 void SetHeadingRotation(const Vec3 p_rotation);
 const Vec3 GetHeadingRotation() const;
 void SetVelocity(const float p_velocity);
 const float GetVelocity() const;
 const bool IsShip();
 void IsShip(const bool p_IsShip);
 const bool IsVisible() const { return m_isVisible; };
 void IsVisible(const bool p_isVisible) { m_isVisible = p_isVisible; };
};
Here is a short description of each method:
Modelis the constructor. It takes a filename and a color. As our models are simple shapes, we will use color to give them some pizzazz.SetPositionandGetPositionmanage the object's position in world space.SetHeadingandGetHeadingmanage the direction the object is heading.SetColorandGetColormanage the objects color.SetBaseRotationandGetBaseRotationmanage any local rotation applied to the object.SetHeadingRotationandGetHeadingRotationmanage the orientation of the object in world space.SetVelocityandGetVelocitymanage the speed of the object.
Now, for the variables, we use the following code:
m_vertices;
 std::vectorm_normals;
 Vec3 m_position;
 Vec3 m_heading;
 Vec3 m_baseRotation;
 Vec3 m_headingRotation;
 Color m_color;
 Primitive m_primitive;
 float m_velocity;

 bool m_isVisible;
 bool m_loaded;
 bool m_IsShip;

 float m_radius;
 bool m_collideable;
These are self-explanatory because they directly correspond to the methods described previously. This header is a good structure for everything that we will need to do to place objects in our world and move them around.
Now let's implement the class. Open Model.cpp and let's get started. First, we implement the header, constructor, and destructor:
#include "Model.h"

Model::Model(const char* p_filepath, const Color p_color)
{
 m_filepath = p_filepath;
 m_loaded = LoadObj(m_filepath, m_vertices, m_normals, m_primitive);
 SetPosition(0.0f, 0.0f, 0.0f);
 SetHeading(0.0f, 0.0f, 0.0f);
 SetHeadingRotation(0.0f, 0.0f, 0.0f);
 SetBaseRotation(0.0f, 0.0f, 0.0f);
 IsShip(false);
 SetVelocity(0.0f);
 SetColor(p_color.r, p_color.g, p_color.b);
 SetRadius(1.0f);
 IsCollideable(true);
 IsVisible(true);
}
Model::~Model()
{
 m_vertices.clear();
 m_normals.clear();
}
The constructor sets everything up. Notice that we call LoadObj from the constructor to actually load the object into the class. The results will be stored into member arrays m_vertices and m_normals. m_primitive will hold an enum telling us whether this object is defined by quads or triangles. The remaining variables are set to default values. These can be defined at any time in the game by using the appropriate accessor method:
float Deg2Rad(const float p_degrees)
{
  return p_degrees * (M_PI / 180.0f);

}
Deg2Rad is a helper function that will convert degrees to radians. As we move the ship around, we keep track of the heading angle in degrees, but we often need to use radians in OpenGL functions:
void Model::Update(const float p_deltaTime)
{
 Vec3 targetRotation = GetHeadingRotation();
 Vec3 currentPosition = GetPosition();
 Vec3 targetPosition = GetPosition();

 float distance = m_velocity * p_deltaTime;
 Vec3 deltaPosition;

 deltaPosition.y = cos(Deg2Rad(targetRotation.z)) * distance;
 deltaPosition.x = -sin(Deg2Rad(targetRotation.z)) * distance;
 deltaPosition.z = sin(Deg2Rad(targetRotation.x)) * distance;

 targetPosition.x += deltaPosition.x;
 targetPosition.y += deltaPosition.y;
 targetPosition.z += deltaPosition.z;
 SetPosition(targetPosition);
}
The Update function updates the position of the object based on the object's velocity. Finally, we update m_heading, which will be used to orient the world camera during the render. Then update the object's position in world space:
void Model::Render()
{
 if (IsVisible())
 {
  glRotatef(-m_baseRotation.x, 1.0f, 0.0f, 0.0f);
  glRotatef(-m_baseRotation.y, 0.0f, 1.0f, 0.0f);
  glRotatef(-m_baseRotation.z, 0.0f, 0.0f, 1.0f);

  Vec3 targetRotation = GetHeadingRotation();
  Vec3 currentPosition = GetPosition();

  if (m_IsShip)
  {
   glPushMatrix();
   glLoadIdentity();
   glRotatef(targetRotation.x, 1.0f, 0.0f, 0.0f);
   glRotatef(targetRotation.y, 0.0f, 1.0f, 0.0f);
   glRotatef(targetRotation.z, 0.0f, 0.0f, 1.0f);
   GLfloat matrix[16];
   glGetFloatv(GL_MODELVIEW_MATRIX, matrix);
   glPopMatrix();
   glTranslatef(currentPosition.x, currentPosition.y, currentPosition.z);
   glMultMatrixf(matrix);
  }

  switch (m_primitive)
  {
  case Primitive::Quads:
   glBegin(GL_QUADS);
   break;
  case Primitive::Triangles:
   glBegin(GL_TRIANGLES);
   break;
  }
  glColor3f(m_color.r, m_color.g, m_color.b);
  for (unsigned int i = 0; i < m_vertices.size(); i++)
  {
   if (m_IsShip)
   {
    glVertex3f(m_vertices[i].x, m_vertices[i].y, m_vertices[i].z);
   }
   else
   {
    glVertex3f(m_vertices[i].x + m_position.x, m_vertices[i].y + m_position.y, m_vertices[i].z + m_position.z);
   }
  }
  glEnd();
 }
}
The Render function takes care of rendering this particular object. The setup for the world matrix will happen in the game code. Then each object in the game will be rendered.
Remember the camera? The camera is a virtual object that is used to view the scene. In our case, the camera is the ship. Wherever the ship goes, the camera will go. Whatever the ship points at, the camera will point at.
Now for the real mind-blower; OpenGL doesn't really have a camera. That is, there really isn't a camera that you move around in the scene. Instead, the camera is always located at coordinates (0.0, 0.0, 0.0), or the world's origin. This means that our ship will always be located at the origin. Instead of moving the ship, we will actually move the other objects in the opposite direction. When we turn the ship, we will actually rotate the world in the opposite direction.
Now look at the code for the Render function:
- First, we use
glRotateto rotate everything the object's base rotation. This comes in useful if we need to orient the object. For example, the cylinder that we modeled in the previous chapter is standing up, and it works better in the game lying on its side. You will see later that we apply a 90 degree rotation to the cylinder to achieve this. - Next, we have to decide whether we are going to render quads or triangles. When Blender exports a model, it exports it as either quads or triangles. The loader figures out whether a model is defined as quads or triangles and stores the result in
m_primitive. We then use that to determine whether this particular object must be rendered using triangles or quads. - We use
glColorto set the color of the object. At this point we haven't assigned any textures to our models, so color gives us a simple way to give each object a personality.
Now for the real work! We need to draw each vertex of the object in world space. To do this, we loop through each point in the vertices array, and we use glVertex3f to place each point.
The catch is this; the points in the vertices array are in local coordinates. If we drew every object using these points, then they would all be drawn at the origin. You will recall that we want to place each object in the game relative to the ship. So, we draw the ship at the origin, and we draw every other object in the game based on the position of the ship. We move the universe, not the ship.
When the ship moves, the entire coordinate system moves with it. Actually, the coordinate system stays put and the entire universe moves past it!
If we happen to be rendering the ship, we just draw it using its local coordinates and it is rendered at the origin. All of the other objects are drawn at a distance away from the ship based on the ships position.
Now, for the rest of the class implementation, use the following code:
void Model::SetPosition(const float p_x, const float p_y, const float p_z)
{
  m_position.x = p_x;
  m_position.y = p_y;
  m_position.z = p_z;
}

void Model::SetPosition(const Vec3 p_position)
{
  m_position.x = p_position.x;
  m_position.y = p_position.y;
  m_position.z = p_position.z;
}

const Vec3 Model::GetPosition() const
{
  return m_position;
}
These methods set and retrieve the object's position. The position is changed based on the object's velocity in the Update method:
void Model::SetHeading(const float p_x, const float p_y, const float p_z)
{
  m_heading.x = p_x;
  m_heading.y = p_y;
  m_heading.z = p_z;
}

void Model::SetHeading(const Vec3 p_heading)
{
  m_heading.x = p_heading.x;
  m_heading.y = p_heading.y;
  m_heading.z = p_heading.z;
}
const Vec3 Model::GetHeading() const
{
  return m_heading;
}
These methods set and retrieve the object's heading. The heading is changed based on the object's heading rotations in the Update method. Heading is the direction that the ship is headed in, and is used to rotate the world so that the ship appears to be heading in the correct direction:
void Model::SetColor(const float p_red, const float p_green, const float p_blue)
{
  m_color.r = p_red;
  m_color.g = p_green;
  m_color.b = p_blue;
}

void Model::SetColor(const Color p_color)
{
  m_color.r = p_color.r;
  m_color.g = p_color.g;
  m_color.b = p_color.b;
}
These methods are used to manage the object's color:
void Model::SetVelocity(const float p_velocity)
{
  m_velocity = p_velocity;
}

const float Model::GetVelocity() const
{
  return m_velocity;
}
These methods are used to manage the object's velocity. The velocity is set in the game code during the input phase:
void Model::SetBaseRotation(const float p_x, const float p_y, const float p_z)
{
  m_baseRotation.x = p_x;
  m_baseRotation.y = p_y;
  m_baseRotation.z = p_z;
}

void Model::SetBaseRotation(const Vec3 p_rotation)
{
  m_baseRotation.x = p_rotation.x;
  m_baseRotation.y = p_rotation.y;
  m_baseRotation.z = p_rotation.z;
}

const Vec3 Model::GetBaseRotation() const
{
  return m_baseRotation;
}
These methods are used to manage the object's base rotation. The base rotation is used to rotate the object in local space:
void Model::SetHeadingRotation(const float p_x, const float p_y, const float p_z)
{
  m_headingRotation.x = p_x;
  m_headingRotation.y = p_y;
  m_headingRotation.z = p_z;
}

void Model::SetHeadingRotation(const Vec3 p_rotation)
{
  m_headingRotation.x = p_rotation.x;
  m_headingRotation.y = p_rotation.y;
  m_headingRotation.z = p_rotation.z;
}

const Vec3 Model::GetHeadingRotation() const
{
  return m_headingRotation;
}
These methods are used to manage the object's heading rotation. The heading rotation is used to rotate the world around the object so that the object appears to be heading in a particular direction. Only one object (the ship) will have a heading rotation. Another way to think about this is that the heading rotation is the rotation of the camera, which in our game is attached to the ship.
Now it's time to modify our game code so that it can load and manipulate game models. Open SpaceRacer3D.cpp.
We'll start by adding the appropriate headers. At the top of the code, modify the header definitions so that they look like the following code:
#include <windows.h>
#include "Model.h"
#include "Sprite.h"
#include "Input.h"
#include "glut.h"
Notice that we have added Model.h to load our models. We also included Sprite.h and Input.h from RoboRacer2D so that we can use those classes in our new game when necessary.
Now, we need to define some global variables to manage model loading. Just under any global variables that are already defined, add the following code:
Model* ship;
std::vector<Model*> asteroids;
These variables defined pointers to our game objects. As the ship is kind of special, we give it its own pointer. We want to be able to have an arbitrary number of asteroids; we set up a vector (a nice dynamic array) of pointers called asteroids.
Move down to the StartGame function, which we use to initialize all of our game models. Modify the StartGame function to look like the following code:
void StartGame()
{
 //Ship
 Model::Color c(0.0f, 0.0f, 1.0f);
 ship = new Model("ship.obj", c);
 Vec3 rotation(90.0f, 0.0f, 0.0f);
 ship->SetBaseRotation(rotation);
 ship->IsShip(true);
 ship->SetVelocity(1.0f);

 //Asteroid 1
 c.r = 1.0f;
 c.g = 0.0f;
 c.b = 0.0f;
 Model* asteroid = new Model("asteroid.obj", c);
 Vec3 position(0.0f, 0.0f, -10.0f);
 asteroid->SetPosition(position);
 asteroids.push_back(asteroid);

 //Asteroid 2
 c.r = 0.0f;
 c.g = 1.0f;
 c.b = 0.0f;
 asteroid = new Model("asteroid.obj", c);
 position.x = 5.0f;
 position.y = 0.0f;
 position.z = -15.0f;
 asteroid->SetPosition(position);
 asteroids.push_back(asteroid);

 //Asteroid 3
 c.r = 0.0f;
 c.g = 1.0f;
 c.b = 1.0f;
 asteroid = new Model("asteroid.obj", c);
 position.x = 5.0f;
 position.y = 5.0f;
 position.z = -20.0f;
 asteroid->SetPosition(position);
 asteroids.push_back(asteroid);
}
We are going to create one object for the ship and three asteroids. For each object, we first define a color, then we create a new Model passing the filename of the object and the color. The Model class will load the object file exported from Blender.
Notice that we set the ship to be the camera with the IsCamera(true) call. We also attach the ship as the camera for every game object using the AttachCamera(ship) call.
We also set a position for each object. This will set the position in world space. This way we don't end up drawing every object at the origin!
Each asteroid is put in the asteroids array using the push.back method.
Now, we move to the Update function. Modify the Update function so that it looks like the following code:
void Update(const float p_deltaTime)
{

  ship->Update(p_deltaTime);

  for (unsigned int i = 0; i < asteroids.size(); i++)
  {
    asteroids[i]->Update(p_deltaTime);
  }
}
The update simply calls the Update method for every object in the game. As always, the update is based on the amount of time that has passed in the game, so we pass in p_deltaTime.
Now on to the Render function. Replace the existing code with the following code:
void Render()
{
 glClear(GL_COLOR_BUFFER_BIT | GL_DEPTH_BUFFER_BIT);
 glMatrixMode(GL_MODELVIEW);
 glLoadIdentity();

 for (unsigned int i = 0; i < asteroids.size(); i++)
 {
  asteroids[i]->Render();
 }
 ship->Render();
 SwapBuffers(hDC);
}
The rendering code is the real workhorse of the game. First, we set up the render call for this frame, then we call the Render method for each game object:
GlClear: This clears the render buffer.GlMatrixMode: This sets the model to the model view. All translations and rotations are applied to the in the model view.glLoadIdentity(): This resets the matrix.- Next, we call the
Rendermethod for each object in the game. - Finally, we call
SwapBuffers, which actually renders the scene to the screen.
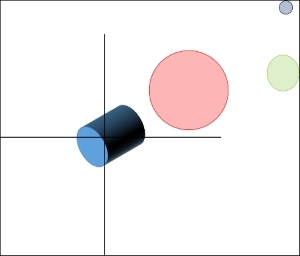
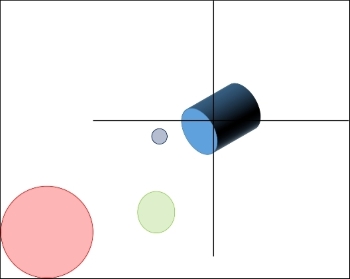
Congratulations! If you run the game now, you should see the ship and the three asteroids off in the distance. As we set the velocity of the ship to 1.0, you should also see the ship slowly moving past the asteroids. However, we don't have any way to control the ship yet because we haven't implemented any input.
