
We have our draft and it's time to convert the ideas into reality. In the first part of this chapter, we are going to see how assets—images, fonts, sounds, and music—are loaded into the memory. We will go through different ways of loading images based on the desired quality and performance. This chapter will also point out the most common mistakes made when storing and using textures.
In the second part, we will create the entities that will be used throughout the game. This is an important transition from a static image to an interactive object.
In many games written in AndEngine, you will see the ResourceManager class. It's one of the established patterns that you should be using as well. ResourceManager is simply a class that takes care of loading and unloading of the resources. Because the memory in Android devices is very limited, it is important to have a centralized point that will ensure each asset is loaded only once and made available throughout the entire game code. When working with limited space, you can also consider unloading resources that are not being currently used.
The ResourceManager class is usually designed as a singleton. That is another design pattern. It ensures that only one instance of the class is created during the entire run of the program. We will make this one instance available through a static method called getInstance().
Let's start by creating a barebone Resource Manager. This can be done as follows:
package is.kul.learningandengine;

public class ResourceManager {
  // single instance is created only
  private static final ResourceManager INSTANCE = new ResourceManager();

  // constructor is private to ensure nobody can call it from outside
  private ResourceManager() { }

  public static ResourceManager getInstance() {
    return INSTANCE;
  }
}
Because the Resource Manager will be available from any place in the code, we can make use of it and put some commonly used objects here. Add the following two snippets into the code of the ResourceManager class. First, declare the common objects, as follows:
//common objects
public GameActivity activity;
public Engine engine;
public Camera camera;
public VertexBufferObjectManager vbom;
Then, add a method to create the Resource Manager, as follows:
public void create(GameActivity activity, Engine engine, Camera camera, VertexBufferObjectManager vbom) {
  this.activity = activity;
  this.engine = engine;
  this.camera = camera;
  this.vbom = vbom;
}
The objects we are going to use are as follows:
activity: This is our game activity. Theactivityclasses extend theContextclass. TheContextclass holds a lot of important information and provides useful methods. We will make use of some of the activity classes later.engine: Sometimes, we need to manipulate the engine itself. Theengineinstance is available from theactivityclass as well, but this way it's easier to use it.camera: Similar to theenginefield, we sometimes need a handle to thecameraobject.vbom: Vertex Buffer Object (VBO) is used to upload vertex data (points with position, color, normal vector, and so on) to the video memory. In OpenGL, almost everything is rendered using vertex data. VBO resides in the video memory and that makes rendering it faster. Vertex Buffer Object manager is a manager of these objects. It simplifies the use of VBOs in the game, and we will use it often.
We will start by loading the graphics. First, let's go through some basic terms:
- Texture: From texture mapping, texture is a surface applied to a 3D object. In a 2D world, the 3D object is usually a rectangle (a quad is made up of two triangles) viewed in orthographic projection.
- Texture atlas: This is a collection of textures (subimages) on a single image. We can imagine it as a page in a photo album with small pictures and stickers placed on the page.
- Texture region: This is the definition of the texture in a texture atlas.
In AndEngine and Android in general, we are making use of texture atlases because they limit the amount of operations needed to load and unload images from the video memory.
In our game, we are going to use the following texture regions in a single atlas. Let's add the following code to the ResourceManager class:
//game textures
public ITiledTextureRegion playerTextureRegion;
public ITiledTextureRegion enemyTextureRegion;
public ITextureRegion platformTextureRegion;
public ITextureRegion cloud1TextureRegion;
public ITextureRegion cloud2TextureRegion;

private BuildableBitmapTextureAtlas gameTextureAtlas;
We have defined the five texture regions. Notice that two of the regions are tiled texture regions. They are in fact the same as the texture regions, but they define subregions within themselves. This is useful for sprites that change shape or are animated.
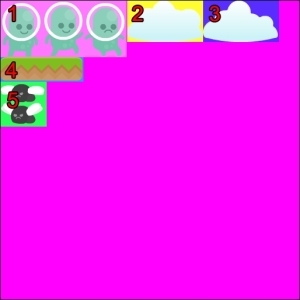
The following figure shows what an example texture atlas looks like. The regions are numbered from one to five. Regions one and five are the tiled regions. The backgrounds are used only for illustration.
We are going to use a buildable texture atlas. When placing the images onto a texture atlas, you can either specify the positions manually, use some external software to create the atlas for you, or use AndEngine's built-in facility to create the atlas automatically. For our purpose, automatic creation is the best. It will result in a similar texture atlas to the preceding example.
We will expect all of our assets from the previous chapter to be located in the assets/gfx directory.
Add the following method to the ResourceManager class:
public void loadGameGraphics() {
  BitmapTextureAtlasTextureRegionFactory.setAssetBasePath("gfx/");
  gameTextureAtlas = new BuildableBitmapTextureAtlas(activity.getTextureManager(),
    1024, 512, BitmapTextureFormat.RGBA_8888, TextureOptions.BILINEAR_PREMULTIPLYALPHA);

  playerTextureRegion = BitmapTextureAtlasTextureRegionFactory.createTiledFromAsset(gameTextureAtlas, activity.getAssets(), "player.png", 3, 1);

  enemyTextureRegion = BitmapTextureAtlasTextureRegionFactory.createTiledFromAsset(gameTextureAtlas, activity.getAssets(), "enemy.png", 1, 2);

  platformTextureRegion = BitmapTextureAtlasTextureRegionFactory.createFromAsset(gameTextureAtlas, activity.getAssets(), "platform.png");

  cloud1TextureRegion = BitmapTextureAtlasTextureRegionFactory.createFromAsset(gameTextureAtlas, activity.getAssets(), "cloud1.png");

  cloud2TextureRegion = BitmapTextureAtlasTextureRegionFactory.createFromAsset(gameTextureAtlas, activity.getAssets(), "cloud2.png");

  try {
    gameTextureAtlas.build(new BlackPawnTextureAtlasBuilder<IBitmapTextureAtlasSource, BitmapTextureAtlas>(2, 0, 2));
    gameTextureAtlas.load();

  } catch (final TextureAtlasBuilderException e) {
    throw new RuntimeException("Error while loading game textures", e);
  }
}
The first line sets the current working directory for the texture to assets/gfx. Then, the bitmap texture atlas is initialized. As mentioned earlier, we could create either a simple bitmap texture atlas or a buildable bitmap texture atlas. To make things easier for us, we use the buildable option and let the algorithm place our textures automatically. The only thing you need to take care of is the size of the atlas. It must be big enough to fit all the regions.
The bitmap texture format specifies the color resolution and quality of the texture. There are currently three formats implemented, which are as follows:
- RGBA_8888: This has 32-bit textures and the highest quality. It stores alpha channel (transparency).
- RGBA_4444: This has 16-bit textures with an alpha channel. You will experience quality loss; colors are matched using the nearest equivalent. It can create unwanted artifacts, but saves a lot of memory.
- RGB_565: This has 16-bit textures without an alpha channel; green channel has more bits, because it's most important for the human eye.
Texture options is another setting that influences quality. There are eight options in total and they are a combination of three flags: interpolation, alpha channel settings, and repeating. The possible constants are as follows:
NEARESTBILINEARREPEATING_NEARESTREPEATING_BILINEARNEAREST_PREMULTIPLYALPHABILINEAR_PREMULTIPLYALPHAREPEATING_NEAREST_PREMULTIPLYALPHAREPEATING_BILINEAR_PREMULTIPLYALPHA
When resizing the images, the interpolation option specifies how the image is resampled (shrunk or enlarged).
Nearest neighbor uses a technique where the final pixel in the target image is calculated from the nearest pixel in the source image.
The following screenshots are examples of what it looks like when you enlarge or shrink an image using the nearest-neighbor interpolation:
Original
The following enlarged image looks pixelated. The image has not been resized smoothly.
Enlarged
The following image that has been shrunk has lost some of its details, which is expected, but notice the left wing. It looks very different from the original.
Shrunk
Here's the reason. When resizing images, first the position in the original image is calculated and then the nearest pixel to that point is used. This is described in the following figure:
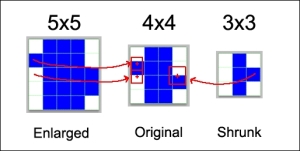
This interpolation is not very precise, but it preserves the hard edges. It is, however, very seldom used in games on the Android platform, because resizing happens a lot due to the number of different resolutions. You would see a lot of unwanted artifacts when using this interpolation. On the other hand, this interpolation is very fast.
Imagine you have two discrete values and you want to know the value somewhere between them. Linear interpolation is one of the ways to fill the holes between the points. Bilinear interpolation is an extension of linear interpolation into 2D. The resampled images can look blurry. See the following screenshot:
Original
The following enlarged image has been smoothly resized. It's a bit blurry, but not pixelated.

Enlarged
The image that has been shrunk lost some of its details, which is expected, but the shapes are almost the same as in the original.
Shrunk
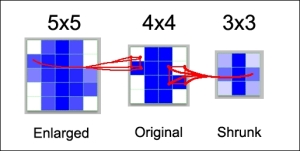
Imagine that instead of measuring which is the nearest pixel to the target pixel in the source grid, we will project all four corners and then calculate the result from these four values. This is described in the following figure. The bilinear interpolation is slower, but with the current graphics hardware, you won't notice any slowdown.
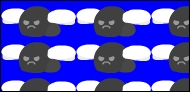
Repeating is very simple. In the nonrepeating case, if you resize the texture, the image will be stretched or shrunk. In the repeating case, it will stay the same size and it will repeat as necessary. This type of texture is typically used to draw a wall or a floor. The following figure has been scaled to 250 percent using the repeating settings. Notice that the texture repeats 2.5 times in both directions.
There are two modes for alpha: straight alpha and premultiplied alpha. When handled correctly, these two are equal. The difference is that in the premultiplied mode, the color is matted, usually by black color, according to the alpha value.
For example, a blue pixel with 50 percent alpha in the straight alpha texture will have RGBA: [0, 0, 255, 127] value. The same pixel in the premultiplied version will have RGBA: [0, 0, 127, 127] value.
We use the BitmapTextureAtlasTextureRegionFactory class to create texture regions. You can create regions from assets (the images in the assets directory), resources (Android resources in the res directory), or any source object that produces bitmaps. We are going to use the first option. Notice that we are creating both simple and tiled assets. We simply specify which texture atlas to use and which file to load. The extra two parameters in tiled assets are the number of columns and rows. Consider the following code:
…
gameTextureAtlas = new BuildableBitmapTextureAtlas(activity.getTextureManager(), 1024, 512, BitmapTextureFormat.RGBA_8888, TextureOptions.BILINEAR_PREMULTIPLYALPHA);

playerTextureRegion = BitmapTextureAtlasTextureRegionFactory.createTiledFromAsset(gameTextureAtlas, activity.getAssets(), "player.png", 3, 1);

enemyTextureRegion = BitmapTextureAtlasTextureRegionFactory.createTiledFromAsset(gameTextureAtlas, activity.getAssets(), "enemy.png", 1, 2);

platformTextureRegion = BitmapTextureAtlasTextureRegionFactory.createFromAsset(gameTextureAtlas, activity.getAssets(), "platform.png");
…
Because we are using a buildable bitmap texture atlas, we do not have to specify where to place the region in the atlas. If we use the simple atlas, we would have to call another method that has two extra parameters, which are the x and y positions of the region within the atlas.
Finally, the code in the try and catch code blocks builds the atlas. In other words, it calls the algorithm (called BlackPawn) to place the regions on the atlas. This is shown in the following code:
try {
  gameTextureAtlas.build(new BlackPawnTextureAtlasBuilder<IBitmapTextureAtlasSource, BitmapTextureAtlas>(2, 0, 2));
  gameTextureAtlas.load();

} catch (final TextureAtlasBuilderException e) {
  throw new RuntimeException("Error while loading game textures", e);
}
We are catching the TextureAtlasBuilderException that can happen when it is not possible to place all regions on the atlas. In this case, our application will end with an error.
The BlackPawn builder has the following three parameters:
These parameters are used to prevent unwanted artifacts around sprites. These are caused by texture and alpha bleeding.
The two main issues when creating sprites from textures in texture regions are texture and alpha bleeding. They can appear any time, but mostly they create lines around sprites that are visible usually when playing in a different resolution than the one the game was designed for.
The following figure shows what texture bleeding looks like. Notice the two black lines at the top of the sprite.

The sprite was sampled from the tiled texture region in the following figure. The border shows the area that was used for sampling. It goes beyond the limit of the single tile, because of the interpolation. The pixels at the border of the lower tile are calculated using the last row of pixels in the upper tile.

This can happen due to two reasons. First, we have a tiled sprite without spacing (or padding) between the tiles. Then we can see these lines, which are parts of the other tile. Secondly, when placing these regions onto the atlas, we place them too close to each other and a region (tiled or not) will sample some values from the neighboring regions.
The former can only be prevented when creating the tiled spritesheets. Make sure you leave some space around the borders of the sprites. The latter can be prevented by placing the regions onto the atlas while leaving some borders around them (padding or spacing). This is what the BlackPawn texture builder algorithm parameters are for.
Alpha bleeding is caused when resampling images with alpha channel. It is not as obvious as texture bleeding. When you create an image with transparency, the transparent pixels still have red, green, and blue values. Usually, they are set to black or white. When sampling the pixels on the border, sometimes these are sampled to calculate the final color. Alpha bleeding can sometimes be prevented in AndEngine using the premultiplied alpha variants of textures. But in most cases, it won't be noticeable.
The following figure is an example of what alpha bleeding looks like. The little image on the left is placed over a white background and is moved by a pixel to the right first. Alpha bleeding doesn't happen. But then, it's moved only half a pixel to the right. This can easily happen, because our game can be displayed on different resolution screens than originally planned or the sprite can be resized.

The problem here is that the graphics library needs to sample half of pixel A. Pixel A is transparent, but it's underlying color is in fact black with zero alpha. So, when a real color is needed, 50 percent black is used and this will bleed into the blue making it darker.
When working with a lot of graphics assets in your game, the memory might not fit all of them. Also, because an Android device's memory is quite limited and there can be multiple running applications at the same time, it's important to unload resources you don't need.
When a user presses the Home button, the graphics resources are unloaded automatically and are loaded back when the controls are given back to the game. Sometimes, the Android system decides that it needs all the memory occupied by the game. In that case, the game is terminated and when the user runs it again, it is started from the beginning.
When working with multiple scenes, a good practice is to unload the graphics resources that are no longer needed. To do that, you only need to call the unload() method of the texture atlas, as shown in the following line of code:
gameTextureAtlas.unload();
In our case, we are not going to use it because we don't need to unload any resources.
Both sounds and music are stored in audio files. Any type of audio file that the Android media player can play can be used in AndEngine. The most popular file formats are WAV, MP3, and OGG. Using OGG is highly recommended, because it's a well-documented open format with good compression.
Tip
You can use free software, such as Audacity, to convert between the file formats. Audacity has built-in OGG support. You can download it from http://audacity.sourceforge.net/.
If your sound and music files are in other formats, you can still use them. In our example, we will use OGG files.
Start by defining the fields for sounds and music. Add the following code to the ResourceManager class:
//sounds
public Sound soundFall;
public Sound soundJump;

//music
public Music music;
Then, add a method to load them. This is shown in the following code:
public void loadGameAudio() {
  try {
    SoundFactory.setAssetBasePath("sfx/");
    soundJump = SoundFactory.createSoundFromAsset(activity.getSoundManager(), activity, "jump.ogg");
    soundFall = SoundFactory.createSoundFromAsset(activity.getSoundManager(), activity, "fall.ogg");

    MusicFactory.setAssetBasePath("mfx/");
    music = MusicFactory.createMusicFromAsset(activity.getMusicManager(), activity, "music.ogg");
  } catch (Exception e) {
    throw new RuntimeException("Error while loading audio", e);
  }
}
We are using two different factories: SoundFactory and MusicFactory. They both have the setAssetBasePath method to set the root folder for sounds and music.
Loading both music and sound is pretty straightforward. Simply pass the sound or music manager to the factory, the Android context instance (that is our activity), and the path starting from the root folder that we set with the setAssetBasePath() method.
The basic difference between sound and music objects is that sounds are pooled and many sounds can be played at once. In the case of music, only one file can be played at once, and you are given more precise controls over the audio track, for example, seek, rewind, and pause. In both cases, you can set the volume or mute the audio.
It is possible to unload sounds and music as well by using the release() method on the sound or music object. However, audio is stored in a different memory than the graphics (textures), and we won't usually run into memory problems while using them. For simple games, it's safe to just keep them in memory.
Fonts in AndEngine are stored in textures and loading fonts is similar to loading graphics. AndEngine can take a font file or it can render a system font to the texture. This means that every character will be defined as a small texture region on a big texture atlas. As a consequence, you have to create a font for a fixed size and color. You can also create a stroke around the font.
Also, you must define a texture big enough to fit all the characters you are going to need. AndEngine creates the characters one by one and puts them on the texture as they are requested.
We are going to use only one font. If more sizes are needed, text can be scaled, but it's recommended to create separate fonts for separate sizes. Creating the font in white allows us to change its color later. If we create the font in black, the color can't be changed anymore.
Add the following code to the ResourceManager class:
//font
public Font font;

public void loadFont() {
  font = FontFactory.createStroke(activity.getFontManager(), activity.getTextureManager(), 256, 256, Typeface.create(Typeface.SANS_SERIF, Typeface.BOLD), 50,true, Color.WHITE_ABGR_PACKED_INT, 2, Color.BLACK_ABGR_PACKED_INT);
  font.load();
}
The FontFactory class has methods to create fonts and stroked fonts from a system font and from font files. In our example, we create a stroked font.
The texture size we are using is 256 x 256 pixels big and the font size is 50 px. This won't fit all the characters in the font, but it's big enough for our case. It is possible to use the font.prepareLetters(); method to create the characters you will need in the texture beforehand. If you end up with black boxes instead of characters, you will know that your texture is too small.
We are creating a bold Sans Serif system font of size 50, which roughly translates to 50 pixel-tall characters (maximum) with variable width.
The Boolean parameter we are using (true) means we want the font to be anti-aliased (smooth edges).
The color is passed as a
packed integer. We don't need to worry about how it is calculated because AndEngine's Color class can convert it for us from separate red, green, blue, and alpha values. Some common values such as black and white are already precalculated.
Because fonts are nothing else but textures, you can unload them the same way. Simply call the following function:
font.unload();
When we have created all the necessary methods in the ResourceManager class, we also need to call them at the right time. Let's go back to the GameActivity class and change the following method:
@Override
public void onCreateResources(OnCreateResourcesCallback pOnCreateResourcesCallback)throws IOException {
  ResourceManager.getInstance().create(this, getEngine(), getEngine().getCamera(), getVertexBufferObjectManager());
  ResourceManager.getInstance().loadFont();
  ResourceManager.getInstance().loadGameAudio();
  ResourceManager.getInstance().loadGameGraphics();
  pOnCreateResourcesCallback.onCreateResourcesFinished();
}
First, we instantiate our singleton Resource Manager. We pass all the important objects in order to store the references in Resource Manager. Then we load the font, audio, and graphics, and finally call the callback method to indicate we are done loading resources.
We have finished loading all the resources we will need for now, and we can move on to creating entities that will be displayed on the screen.