
We will first create an empty Android application project and later add the AndEngine libraries.
To create a simple Android application, we will follow these steps:
- Go to File | New | Android Application Project in Eclipse. You will be presented with the window shown in the following screenshot:
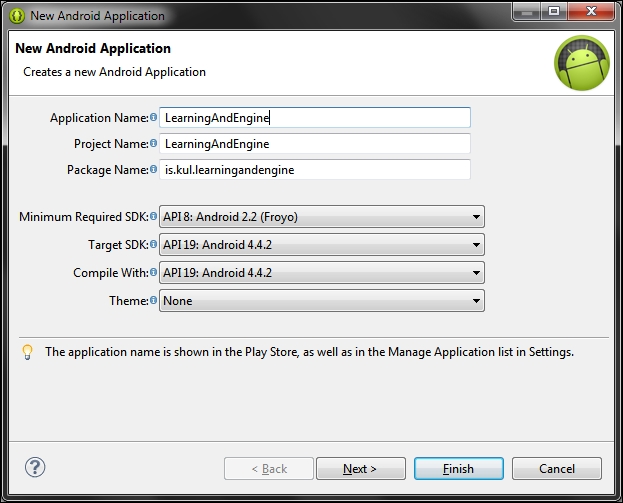
- Application Name: This is visible under the app's icon on your phone. When creating a real application/game, give it a meaningful name. Let's say your game is called Awesome Football Manager. You can simply put this in the Application Name field, but on the phone, you will probably see only Awesome Foo... under the icon, due to the limit of characters that can be displayed.
- Project Name: This is just the project name in Eclipse, and it is how your APK (Android Application Package—the final archive to be deployed to the device) will be named. I recommend using a single word derived from your application name.
- Package Name: This is used for your Java code and it is also a unique identifier for the Google Play store. Make sure your chosen package name is not taken! If you have your own domain, put it there (backwards). If you don't have one, imagine that you do and what it would look like. My domain is
kul.is; therefore, my package starts withis.kuland the full package name will beis.kul.learningandengine. - Minimum Required SDK: This is simply the lowest Android version that you are going to support. AndEngine works well with SDK 8, but if you are going to use big textures, you might run into problems. It is always a trade-off between supporting as many devices as possible and making sure that the application will work on all supported devices. The lower the SDK, the more problems you can expect and the more devices you should test. On the other hand, more devices will be supported and you will reach a broader user base. Android 2.2 and 2.3 are still used today.
- Target SDK and Compile With: For these, pick the highest available SDK (19). You should own a device with the target SDK, or test the application in the emulator.
- Theme: For this, select None. Your activity theme won't be visible, so don't bother with it. Our game in AndEngine will use an overlay view that will cover the whole available screen.
- Click on the Next button to continue the application creation wizard.
- On the next page, uncheck the Create custom launcher icon option. This option will launch another wizard where you can upload an image that would serve as your app icon in the store and on the device. We will keep the default green Android icon for now.
- Keep the Create activity option checked. An activity is a single, focused thing that the user can do (in our case, play the game, but it can be for example, check emails or record voice), and it represents the presentation layer of an Android application. It is also a Java class that extends the
Activityclass from the Android library. Have a look at the following screenshot: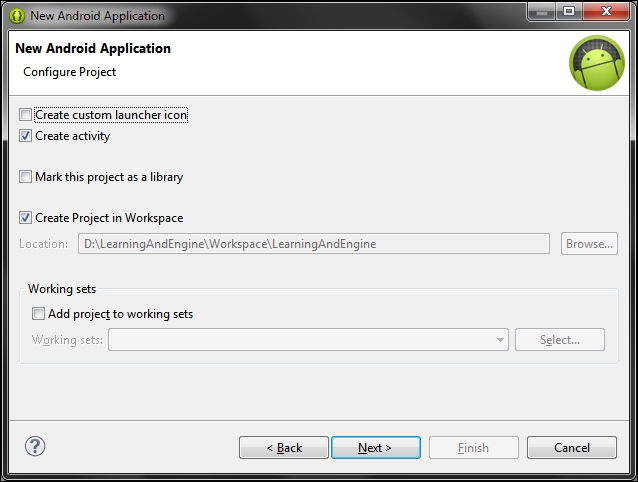
- Click on the Next button to advance to the Create activity page as shown in the following screenshot. Leave everything as it is and click on the Next button again. We are creating a blank activity, but in fact, it doesn't matter. We are going to change the activity anyway. We are using this option in order to get the
Activityclass created for us in the right package.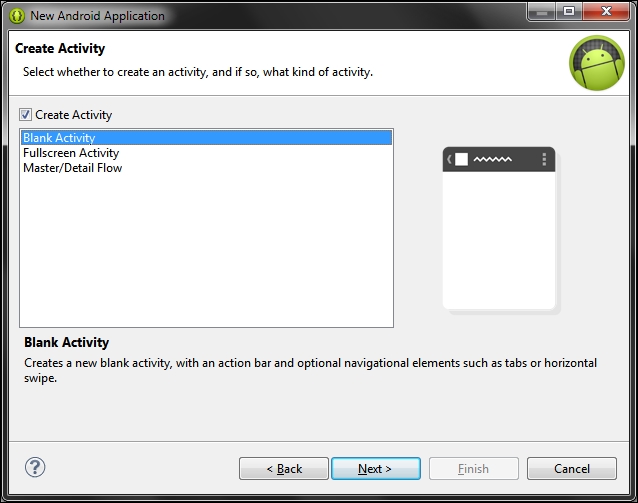
- The last page allows us to name the activity and the layout. We are not going to work with the layout in this book, so you can leave it as it is. We are going to name the activity
GameActivity. This is shown in the following screenshot: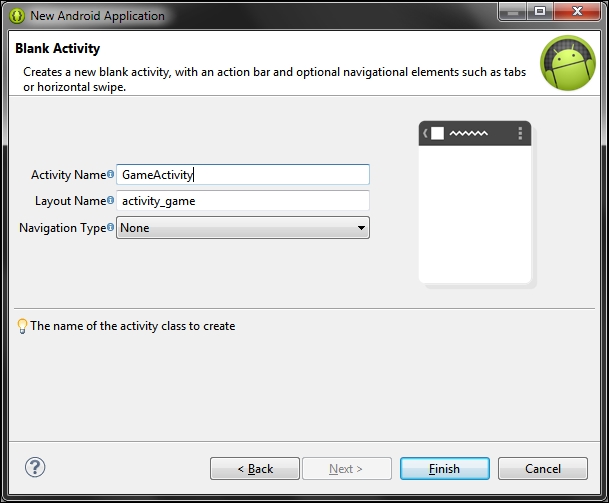
- Click on the Finish button to close the wizard. A new project will appear in the Eclipse Project Explorer window (the tab on the left). You can run the project now, but your device must be configured properly. First, plug in your Android device.
You need to enable the USB debugging option under Developer options on your phone or tablet in order to deploy the application from Eclipse. The configuration differs across Android versions, and it can even differ for the same version on a different device or brand.
Honeycomb is the codename for Android 3.0. In versions prior to Honeycomb, the developer options are located under Settings | Applications | Development.
You will find the Developer options button under Settings | Developer options in the System subsection.
The developer options are hidden starting with Android 4.2. You need to use the following trick to activate the option:
- Go to Settings | About phone.
- Scroll down to the Build number option.
- Tap on this option seven times. On the third tap, you should see the message about four taps remaining to become a developer.
- Go back to the Settings window.
- You should see the Developer options menu item in your Settings window.
Check the USB debugging option. This should be all that is required to upload the application from Eclipse to your device.
Tip
Consider turning on the Unknown sources option under the Security option as well. Basically, it means you can install APKs from other sources than the Google Play store. This is useful for testing when you upload a production APK directly from your development machine to the device. The development versions of apps are allowed thanks to the USB debugging option.
Connect the device using a USB cable. You should see a notification of USB debugging connected on your phone or tablet.
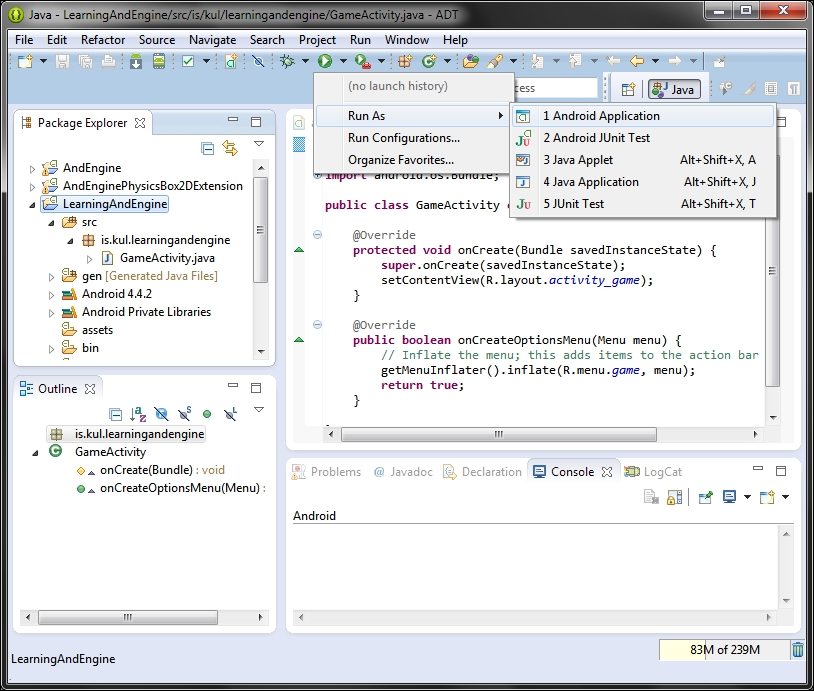
Finally, in Eclipse, select the project and click on the drop-down arrow next to the run icon in the Eclipse top bar. Navigate to Run As | Android Application. This is shown in the following screenshot:
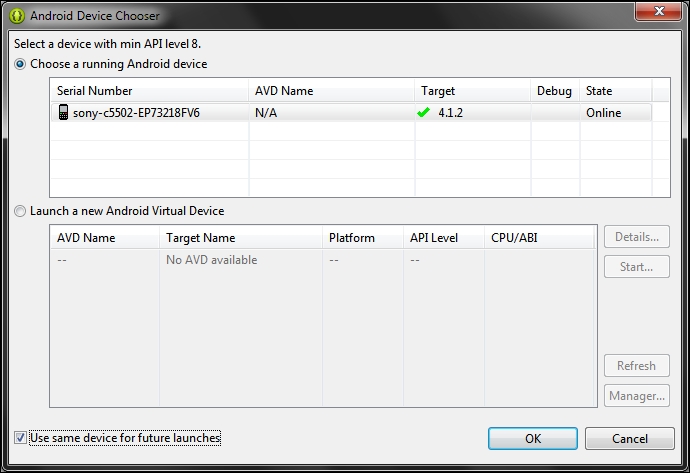
A pop-up window named Android Device Chooser will show the list of connected devices. Select your device. You can also check the Use same device for future launches option, which will remember your device for this session and will use it as the default target when you run the application the next time. Your device must run the project's minimum Android SDK or higher.
Have a look at the following screenshot:
After clicking on the OK button, Eclipse will build the application and create an APK. All applications have to be signed using a certificate before publishing to the Google Play store. For development purposes, all APKs are signed using a debug certificate.
The APK is then uploaded to the device and the main activity, in our case GameActivity, is started. You should see a simple one-screen application with Hello World text on the display. This is a default Hello World Android application created by Eclipse.
We need to add the
AndEngine and AndEnginePhysicsBox2DExtension libraries to our app and change the GameActivity.
AndEngine and all the extensions are library projects. That means they can be added to our application as dependencies, similar to adding an external library JAR file. Eclipse will then build and package the library project along with our application to the final APK.
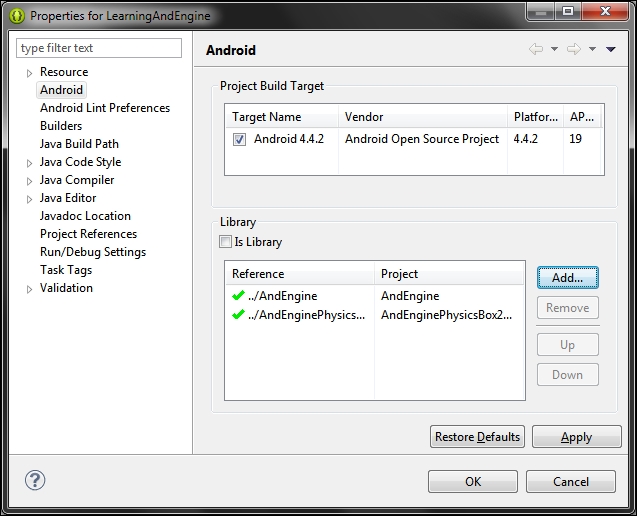
Right-click on the project, select Properties, and choose Android. Click on the Add button in the Library subsection and select AndEngine. Also add the AndEnginePhysicsBox2DExtension project similarly. This is shown in the following screenshot:
AndEngine extends the basic Android Activity class because it needs to take care of a lot of initializing and loading of resources for the game engine. AndEngine gives us several hooks that we can use to perform our own initializations.
It is important to understand the lifecycle of an Android application and activities. For a basic game, a single activity is usually enough, making things simpler. The following diagram describes the most basic activity lifecycle:
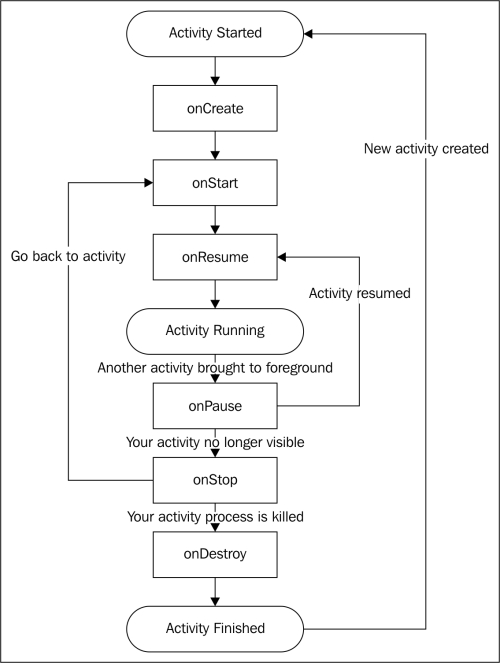
When you start your application, it goes through different states and the callback methods onCreate, onStart, and onResume are called. Notice that the onResume method is called even on the first start.
An activity is paused typically when the screen is locked or a dialog activity is brought to the front. Imagine a low battery warning for example. An activity is stopped when another activity completely covers your activity. This can be an incoming call. Note that the onStop method doesn't have to be called. This can happen when the system doesn't have enough resources for another activity and decides to kill your activity right away. The final method, onDestroy, is called when your activity is finished and cleared from the memory. Again, it is not guaranteed to be called.
The lifecycle is more complex than this and there are even more hooks that can be overridden and used. For our purposes, this will be enough. In fact, AndEngine takes care of most of the methods and gives us a few convenient methods to use instead.
Our GameActivity class extends the BaseGameActivity class, which implements basic game activity behavior for us. For example, it implements the onCreate method that configures the engine and the surface view. The surface view is a dedicated drawing surface for our game that we can use through AndEngine.
When you created the empty GameActivity, it looked like the following code (it can differ based on the Eclipse and ADT versions):
package is.kul.learningandengine;

import android.os.Bundle;
import android.app.Activity;
import android.view.Menu;

public class GameActivity extends Activity {

  @Override
  protected void onCreate(Bundle savedInstanceState) {
    super.onCreate(savedInstanceState);
    setContentView(R.layout.activity_game);
  }

  @Override
  public boolean onCreateOptionsMenu(Menu menu) {
    // Inflate the menu; this adds items to the action bar if it is present.
    getMenuInflater().inflate(R.menu.game, menu);
    return true;
  }

}
Delete both the onCreate and onCreateOptionsMenu methods. Change the parent of the GameActivity class from android.app.Activity to org.andengine.ui.activity.BaseGameActivity.
BaseGameActivity is an abstract class, and it will make you implement the onCreateEngineOptions, onCreateResources, onCreateScene, and onPopulateScene methods. The lifecycle methods are all handled by AndEngine.
Tip
Downloading the example code
You can download the example code files for all Packt books you have purchased from your account at http://www.packtpub.com. If you purchased this book elsewhere, you can visit http://www.packtpub.com/support and register to have the files e-mailed directly to you.
- First, define the
onCreateEngineOptionsmethod. This method is called from theonCreatemethod and it is run first. You are supposed to configure AndEngine's engine in this method. The following is a typical example:public static final int CAMERA_WIDTH = 480; public static final int CAMERA_HEIGHT = 800; @Override public EngineOptions onCreateEngineOptions() { Camera camera = new Camera(0, 0, CAMERA_WIDTH, CAMERA_HEIGHT); IResolutionPolicy resolutionPolicy = new FillResolutionPolicy(); EngineOptions engineOptions = new EngineOptions(true, ScreenOrientation.PORTRAIT_FIXED, resolutionPolicy, camera); engineOptions.getAudioOptions().setNeedsMusic(true).setNeedsSound(true); engineOptions.setWakeLockOptions(WakeLockOptions.SCREEN_ON); Debug.i("Engine configured"); return engineOptions; }We have defined two static constants that define the resolution of our view port. AndEngine will then take care of scaling the final picture on the device.
- In the method itself, we start with the camera definition. The
Cameraobject defines the part of the scene that will be visible. It takes four parameters: the first two are the bottom-left coordinates in the scene and the third and fourth are the width and height of the visible area. - Next, we define a resolution policy. The Android platform suffers from a variety of different screen sizes and ratios. AndEngine tries to deal with this by letting you specify one resolution and then scaling the resulting picture to any device.
- You don't need to care whether the screen size of the phone is bigger or smaller than your desired resolution. AndEngine can enlarge your scene or shrink the picture. You place your objects at coordinates in your resolution. However, you still have to hint AndEngine about how the resulting picture should be scaled, and that's what the resolution policy is for.
- In the example, we are using the
FillResolutionPolicy. As the name suggests, this policy fills the whole screen with your scene. Your picture will be resized but the aspect ratio will not be kept, unless the phone and your scene have the same ratio. Pixels can become taller or wider. - Then, we create the
EngineOptionsobject. This is the final object that will be passed to the engine. It takes four parameters, as follows:- Fullscreen: This option is set to
true, as we want our game to cover the whole screen. - Screen orientation: For this, the possible values are
PORTRAIT_SENSOR,PORTRAIT_FIXED,LANDSCAPE_SENSOR, andLANDSCAPE_FIXED. The sensor variant will flip the picture upside down when you flip the device. - Resolution policy: This is explained earlier.
- Camera: This is explained earlier.
- Fullscreen: This option is set to
- We also set the audio options simply to indicate that we will be using both sound and music.
- Last, we set the wake lock to
SCREEN_ON. This simply means that the device will not enter sleep mode due to inactivity. This is important because you can have a period in your game without user input when you don't want the screen to turn off by itself. This can be a cutscene for example. - The line
Debug.i("Engine configured");is optional. This will print the Engine configured message to LogCat. Use this kind of debug message to check whether the method ran successfully.Tip
The messages can have different levels: error, warning, info, debug, and verbose. Each level has its own method, such as
Debug.eorDebug.d. These are used to differentiate the severity of the method as LogCat allows filtering by the level. You can useDebug.i("MyTag", "Engine configured");in your code to further categorize your messages based on tags. - At the end, we return the
engineOptionsobject.
The onCreateResources method is called after the engine options are created, and it is used to initialize game resources such as graphics, sounds, and music. For now, we leave this method empty.
@Override
public void onCreateResources(OnCreateResourcesCallback pOnCreateResourcesCallback)throws IOException {
  pOnCreateResourcesCallback.onCreateResourcesFinished();
}
Notice the pOnCreateResourcesCallback parameter. This is used to indicate that you are done loading the resources and the control is given back to the engine. You have to call the onCreateResourcesFinished method, otherwise the engine will not continue.
The onCreateScene method is called from the onCreateResourcesCallback object when you call the Finished method. It is used to create a scene object or objects.
Note
Every displayable object in AndEngine is an entity. That includes the scene, which is the parent of all the other entities currently displayed. The engine can display one scene at a time, and you will typically want to define multiple scenes, such as a menu scene and a game scene. You can also have child scenes, which are used to display a pause screen or a game over screen.
The following code describes the simplest scene. We only create an empty scene object and set its background to cyan color.
@Override
public void onCreateScene(OnCreateSceneCallback pOnCreateSceneCallback)throws IOException {
  Scene scene = new Scene();
  scene.getBackground().setColor(Color.CYAN);
  pOnCreateSceneCallback.onCreateSceneFinished(scene);
}
Again, you have to call the Finished method on the provided callback object to tell the engine you are done creating your scene.
The onPopulateScene method is the final method we need to implement, which is used to populate the scene with entities. For the simplest example, we are not going to add any. Leave the method body empty, but remember to return the Scene object. This method is called from the Scene callback and you have to call the next callback too. This is described in the following code:
@Override
public void onPopulateScene(Scene pScene,OnPopulateSceneCallback pOnPopulateSceneCallback)throws IOException {
  pOnPopulateSceneCallback.onPopulateSceneFinished();
}