
A splash scene is very important, not only because it shows your logo or any other logos you want to show, but it also gives the players something to look at while loading the resources in the background.
A menu scene serves as the entry point to the game. Even if your game is really simple, there should be a screen that at least says Tap to Start. It can actually be the game scene, paused and displaying the text. Nevertheless, it should be there.
In this chapter, we are going to add a splash and menu scene to our game. We will also learn how to load the resources in the background. We are going to create a loading scene as well as a transition from the menu to the game scene and back. We will also add an option to enable and disable sound that will be available from our menu scene.
While it may sound counterintuitive to add the scenes that the user sees at the start of the game only now after we have almost finished the game, it's actually the preferred way. First, we have created the gameplay and seen that our idea is viable. Second, thanks to having no extra screens, every time we ran the game, we went straight to the game. Finally, we have kept the code organized in a way that makes it easy to add the additional scenes.
We need another manager class that will take care of switching the scenes. However, the code depends on the other scenes and, therefore, we are going to create the classes for the scenes first.
A typical splash scene shows a logo of the game maker. Sometimes, it also shows copyrights and can be split into multiple screens when there is a need to show multiple logos—typically the game author, the publisher, and sometimes the engine logo.
We are going to use the AndEngine logo. It is included in the source code of this chapter.

Because we are using another resource, we need to update our ResourceManager class. This time, we are going to create a method for both loading and unloading the splash image.
The following is the new code that we need to add:
// splash graphics
public ITextureRegion splashTextureRegion;
private BitmapTextureAtlas splashTextureAtlas;
public void loadSplashGraphics() {
  BitmapTextureAtlasTextureRegionFactory.setAssetBasePath("gfx/");
  splashTextureAtlas = new BitmapTextureAtlas(activity.getTextureManager(), 256, 256, BitmapTextureFormat.RGBA_8888, TextureOptions.BILINEAR_PREMULTIPLYALPHA);

  splashTextureRegion = BitmapTextureAtlasTextureRegionFactory.createFromAsset(splashTextureAtlas, activity.getAssets(), "badge.png", 0, 0);

  splashTextureAtlas.load();
}

public void unloadSplashGraphics() {
  splashTextureAtlas.unload();
}
We are declaring a new atlas and a texture region. We do not need to use a buildable type of atlas because we are loading only a single image. That's why we are passing the extra integer parameters in the following call:
splashTextureRegion = BitmapTextureAtlasTextureRegionFactory.createFromAsset(splashTextureAtlas, activity.getAssets(), "badge.png", 0, 0);
We are adding the image to the atlas at the position (0, 0). The unload method unloads everything from this atlas, which is just the logo in our case.
All scene classes belong to the is.kul.learningandengine.scene package. Let's create a new scene class called simply SplashScene and let it extend the AbstractScene class:
public class SplashScene extends AbstractScene {
@Override
public void populate() {
Sprite splashSprite = new Sprite(GameActivity.CAMERA_WIDTH / 2, GameActivity.CAMERA_HEIGHT / 2, res.splashTextureRegion, vbom);
attachChild(splashSprite);
}
@Override
public void onPause() {
}
@Override
public void onResume() {
}
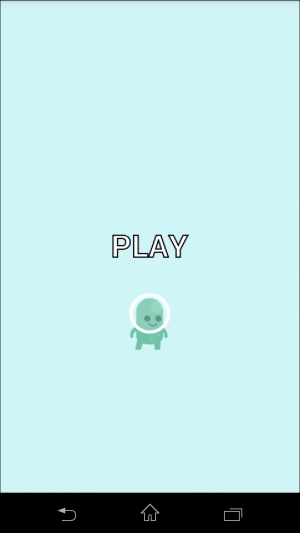
}The scene is very simple. There's just a single sprite in the middle of the screen showing the logo of AndEngine. The following screenshot shows what the scene looks like:

Loading of the resources is not done in the scene itself. We are going to add the code that loads them later, when we put all the scenes together.
AndEngine has a class that is called MenuScene, and this class can be used for our purposes. Of course, we can create our own class and add all the functionality ourselves. We can use sprites and their touch areas. But to create a simple menu scene fast, we are going to use the AndEngine functionality.
The MenuScene class is a camera scene, which means it will move along with the camera. In our case, it doesn't matter because our menu scene will be still. It allows us to add menu items that can have simple animations and a number that identifies the item. There's also a listener that handles the taps on the menu items.
To fit the menu scene to our system of classes, we are going to create a MenuSceneWrapper class first. We are going to add only a single item to the menu for now. This can be done as follows:
public class MenuSceneWrapper extends AbstractScene implements IOnMenuItemClickListener {

  private IMenuItem playMenuItem;

  @Override
  public void populate() {

    MenuScene menuScene = new MenuScene(camera);
    menuScene.getBackground().setColor(0.82f, 0.96f, 0.97f);

    playMenuItem = new ColorMenuItemDecorator(new TextMenuItem(0, res.font, "PLAY", vbom), Color.CYAN, Color.WHITE);

    menuScene.addMenuItem(playMenuItem);

    menuScene.buildAnimations();
    menuScene.setBackgroundEnabled(true);

    menuScene.setOnMenuItemClickListener(this);

    Sprite player = new Sprite(240, 280, res.playerTextureRegion, vbom);
    menuScene.attachChild(player);

    setChildScene(menuScene);

  }

  @Override
  public void onPause() {
  }

  @Override
  public void onResume() {
  }

  @Override
  public boolean onMenuItemClicked(MenuScene pMenuScene, IMenuItem pMenuItem, float pMenuItemLocalX, float pMenuItemLocalY) {
    switch (pMenuItem.getID()) {
      case 0 :
      // show the game scene here
      return true;
      default :
      return false;
    }
  }

  @Override
  public void onBackKeyPressed() {
    activity.finish();
  }

}
In the populate() method, we first create the MenuScene class. Then, we create a TextMenuItem object. There are two options in AndEngine, the second being a SpriteMenuItem object. While the former can only show text using the fonts we have loaded before, the latter can show an arbitrary image.
We are wrapping the TextMenuItem into a ColorMenuItemDecorator, which is a class that can change the color of the text on touch. Two color values are passed: the default and the touched text color. The other implemented decorator class in AndEngine is the ScaleMenuItemDecorator class that can scale the item on touch.
The buildAnimations() method will position the menu items automatically and prepare the animations defined by the decorators. The setBackgroundEnabled() method is used to either enable or disable the background of the camera scene. Usually, this is set to false so that the underlying scene is shown, but we have set the color of the menu background and we want to see it, so therefore we are passing true.
As a little decoration, we also add our player image under the menu items.
We also set our wrapper class to be the listener for touches. For this to work, our class must implement the IOnMenuItemClickListener method, which declares a method called onMenuItemClicked(). In this method, we decide what action to take on a touched menu item based on its numerical identifier. In our case, this is showing the game scene in case the menu item with identifier 0 was touched. We do not have any other menu items yet.
Finally, we return true if we consider the touch handled or false if it was not handled.
The last method, onBackKeyPressed(), tells the app to finish the activity, effectively closing the game, when the user presses the back key in the menu.
Note
To exit a Java program, you can usually use System.exit(errorCode);. But in an Android environment, this is not safe because the system might have open handles, for example, a cache that was not saved or cleared. Using activity.finish() is recommended, because it will properly release all the resources.
The following screenshot shows a preview of the menu scene:
A loading scene is very simple and is used in a similar way as a theater curtain. The typical use is to show the loading screen when another scene is requested. Then, tear down the old scene, load new resources, and build the new scene, and finally hide the loading scene and show the new scene.
Here's the code:
public class LoadingScene extends AbstractScene {

  @Override
  public void populate() {
    CameraScene cameraScene = new CameraScene(camera);

    Text text = new Text(GameActivity.CAMERA_WIDTH / 2, GameActivity.CAMERA_HEIGHT / 2, res.font, "LOADING...", vbom);
    cameraScene.attachChild(text);

    setChildScene(cameraScene);
  }

  @Override
  public void onPause() {
  }

  @Override
  public void onResume() {
  }

}
This is one of the simplest loading screens possible. It just prints LOADING… in the middle of the screen. This is shown in the following screenshot:

Now that we have the required scenes, we have to create a mechanism to change from one to the other. We want a class that will be accessible from everywhere in the game. We are going to use the same pattern we have used for our ResourceManager class and create a singleton SceneManager class. The code is a bit long, so let's write it piece by piece. To begin, we create an empty class in the is.kul.learningandengine package and make it a singleton. The code is as follows:
public class SceneManager {

  // single instance is created only
  private static final SceneManager INSTANCE = new SceneManager();
  public static final long SPLASH_DURATION = 2000;

  private ResourceManager res = ResourceManager.getInstance();

  private AbstractScene currentScene;

  private LoadingScene loadingScene = null;

  private SceneManager() { }

  public static SceneManager getInstance() {
    return INSTANCE;
  }

  public AbstractScene getCurrentScene() {
    return currentScene;
  }

  public void setCurrentScene(AbstractScene currentScene) {
    this.currentScene = currentScene;
    res.engine.setScene(currentScene);
    Debug.i("Current scene: " + currentScene.getClass().getName());
  }
}
We have already added some fields and constants. We are going to need a handle to the current scene, and also, we want to create the loading scene only once and keep it, so it will be easy to show it when necessary. The SPLASH_DURATION constant is a minimum time in milliseconds for which the splash will be shown. Finally, there is a setter and a getter for the currentScene class. The setter switches the current scene in the engine as well and logs the current scene class name to LogCat.
The next method, called showSplashAndMenuScene(), will be called at the beginning of the game. It is as follows:
public AbstractScene showSplashAndMenuScene() {
  final SplashScene splashScene = new SplashScene();
  splashScene.populate();
  setCurrentScene(splashScene);

  new AsyncTask<Void, Void, Void>() {
    @Override
    protected Void doInBackground(Void... params) {
      long timestamp = System.currentTimeMillis();
      res.loadFont();
      res.loadGameAudio();
      res.loadGameGraphics();

      loadingScene = new LoadingScene();
      loadingScene.populate();

      AbstractScene nextScene = new MenuSceneWrapper();

      if (System.currentTimeMillis() - timestamp < SPLASH_DURATION) {
        try {
          Thread.sleep(SPLASH_DURATION - (System.currentTimeMillis() - timestamp) );
        } catch (InterruptedException e) {
            Debug.e("Interrupted", e);
        }
      }
      nextScene.populate();
      setCurrentScene(nextScene);
      splashScene.destroy();
      res.unloadSplashGraphics();
      return null;
    }
  }.execute();
  return splashScene;
}
This method creates an extra thread, and it works by first creating and populating the splash scene. The splash scene resources must be already loaded at this time. We have to update the GameActivity class due to this fact. Then, create and execute a
background task.
A background task is Android's way of running something in a background thread. It is a very useful mechanism that has a lot of uses, but it can get a little bit complicated. For now, we will stick to the simplest use case. We will only run a piece of code in the background.
The code inside the background task first creates a timestamp. Then, it loads all resources and prepares the loading screen. If this does not take the time defined as SPLASH_DURATION, then it waits until the time is up.
Then, it populates the next scene and sets it as the current scene. At this point, the scene starts showing. Finally, it unloads the resources and destroys the splash scene. The destroy() method is just our method that we can use to do some clean up if necessary.
Now, we add two methods that switch the menu scene to the game scene and vice versa. The first method is as follows:
public void showGameScene() {
  final AbstractScene previousScene = getCurrentScene();
  setCurrentScene(loadingScene);
  new AsyncTask<Void, Void, Void>() {

    @Override
    protected Void doInBackground(Void... params) {
      GameScene gameScene = new GameScene();
      gameScene.populate();
      setCurrentScene(gameScene);
      previousScene.destroy();

      return null;
    }
  }.execute();
}
This method uses the background task as well. It shows the loading scene first, and then executes the task. The task itself creates the new scene, shows the new scene, and finally destroys the previous scene.
The other method looks exactly the same, just with the classes swapped:
public void showMenuScene() {
  final AbstractScene previousScene = getCurrentScene();
  setCurrentScene(loadingScene);
  new AsyncTask<Void, Void, Void>() {

    @Override
    protected Void doInBackground(Void... params) {
      MenuSceneWrapper menuSceneWrapper = new MenuSceneWrapper();
      menuSceneWrapper.populate();
      setCurrentScene(menuSceneWrapper);
      previousScene.destroy();
      return null;
    }
  }.execute();
}
That's it, we have our SceneManager class which is ready to use.
Finally, we have to update other classes to make our SceneManager class work properly. Let's first start with the GameScene class.
On back key press, we want the game to go back to the menu. Let's change the GameScene class and override the relevant method:
@Override
public void onBackKeyPressed() {
  SceneManager.getInstance().showMenuScene();
}
The rest of the changes must be done in the GameActivity class. Three methods have to be changed and one added:
@Override
public void onCreateResources(OnCreateResourcesCallback pOnCreateResourcesCallback)throws IOException {
  ResourceManager.getInstance().create(this, getEngine(), getEngine().getCamera(), getVertexBufferObjectManager());
  ResourceManager.getInstance().loadSplashGraphics();
  pOnCreateResourcesCallback.onCreateResourcesFinished();
}
In the onCreateResources() method, we no longer load all of the resources, but only those needed for the splash scene. Now, consider the following code:
@Override
public void onCreateScene(OnCreateSceneCallback pOnCreateSceneCallback)throws IOException {
  // we just have to pass something to the callback
  pOnCreateSceneCallback.onCreateSceneFinished(null);
}
We are now effectively ignoring the onCreateScene() method, because we have only one method to call in the SceneManager class. We are going to call it in the next method:
@Override
public void onPopulateScene(Scene pScene, OnPopulateSceneCallback pOnPopulateSceneCallback)throws IOException {
  SceneManager.getInstance().showSplashAndMenuScene();
  pOnPopulateSceneCallback.onPopulateSceneFinished();
}
Finally, we add a method that checks the key press event and calls the appropriate method from the current scene:
@Override
public boolean onKeyDown(int keyCode, KeyEvent event) {
  if (keyCode == KeyEvent.KEYCODE_BACK) {
    SceneManager.getInstance().getCurrentScene().onBackKeyPressed();
    return true;
  }
  return super.onKeyDown(keyCode, event);
}
This method will exit the game in the menu scene and return to the menu scene from the game scene. It will ignore the back key in the splash and loading scene, because those two scenes do not override the onBackKeyPressed() method. The method returns true to indicate that the back key press was handled.
That's all. When we run the game now, it will start with a splash screen, show it for two seconds, and then show our simple menu scene. When we tap on the PLAY text, the loading screen will show for just a fraction of a second and the game will start. To return to the menu, we can press the back key.
We can use a simple trick to show the loading screen for a little bit longer. The following code shows a change to the showGameScene() method:
public void showGameScene() {
  final AbstractScene previousScene = getCurrentScene();
  setCurrentScene(loadingScene);
  new AsyncTask<Void, Void, Void>() {

    @Override
    protected Void doInBackground(Void... params) {
      try {
        Thread.sleep(1000);
      } catch (InterruptedException e) {
        Debug.e("Interrupted", e);
      }
      GameScene gameScene = new GameScene();
      gameScene.populate();
      previousScene.destroy();

      setCurrentScene(gameScene);
      return null;
    }

  }.execute();

}
Now, the loading screen will be displayed for at least a second.