
It's time to learn how to make the game interactive. In this chapter, we will first see how to create a basic animation that will allow us to move the character from one place to another. We will also learn the basics of collision detection.
Then, we will look into the different sensors that Android devices have, how to read them, and how to use those readings. More specifically, we are going to use the touchscreen and accelerometer, and we will use them to move the main character around the screen.
The second part of this chapter will cover the specifics of different threads used in AndEngine in detail. We will discuss the dangers of mixing threads and common mistakes made by beginners to AndEngine.
There are two ways of creating an animation. First, our sprite can give multiple frames and we animate the sprite by changing the frames in time. The second way is using tweens (short for in-between).
The AnimatedSprite class is simply a tiled sprite with the added functionality to change tiles in time. Let's change the GameScene class temporarily to see how an animated sprite works. This is shown in the following code:
AnimatedSprite fly;

@Override
public void populate() {
  ...

  fly = new AnimatedSprite(240, 200, res.enemyTextureRegion, vbom);
  fly.animate(125);
  attachChild(fly);
}
The first line creates the animated sprite. It works exactly the same way as any other sprite. We simply specify the location on the screen, the tiled texture region, and the Vertex Buffer Object manager.
The animate() method starts the animation. It takes a single parameter or multiple parameters. The simplest way is to pass one float value that specifies for how long in milliseconds each frame is displayed. However, sometimes we want to specify different times, or show only some of the frames, and so on. The following are some examples of the animate() method:
fly.animate(new long[]{100, 200}, new int[]{1, 0}, false);: The first parameter is an array of durations and the second parameter is the frames to be displayed. The third parameter means we don't want the animation looped. In this case, the call will play the second frame (numbered as1) first for 100 milliseconds and then the first frame (numbered as0) for 200 milliseconds. Then, it will stop there.aSprite.animate(new long[]{100, 200, 150}, 7, 9, true);: This call is similar to the first one, but instead of specifying the frames one by one, we only specify the start (7) and end (9) frames. However, we must specify times for each of them.aSprite.animate(animationData): This is a more advanced way to call theanimate()method. Here,animationDatais an implementation of theAnimatedSprite.IAnimationDatainterface. This is a bit advanced, but when we need some really complicated animation that is not covered by the existing methods, it might help us.
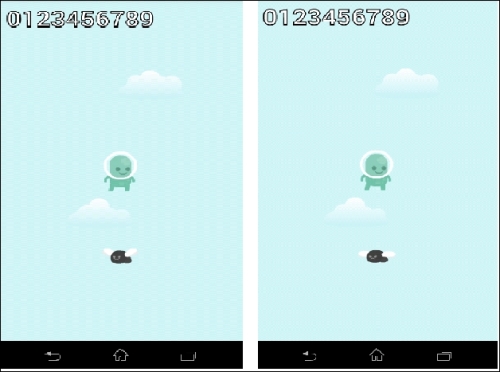
Finally, we attach the sprite to the scene. After running the application, we should see a fly below our character. The fly should be flapping its wings. This is shown in the following screenshot:
AndEngine offers a very simple way of creating tweens using entity modifiers. Tweens are simple math equations that allow us to change a property value to another value continuously. Basic examples of such tweens are movement, rotation, scaling, and color change. Entity modifiers allow us to do exactly that.
The great thing about entity modifiers is that they can be applied to any entity, and they can be chained or run in parallel. It's also possible to have an entity modifier listener that will be called when the modifier starts and finishes. As mentioned before, an entity modifier is a tween. The basic math equation to transform one value to another is a simple linear equation. But, there are more equations called ease functions that allow us to create interesting effects.
The following are a few examples:
fly.registerEntityModifier(new RotationModifier(2, 0, 360));
The preceding code will make the fly rotate once from 0 degrees to 360 degrees (one full turn). Now, consider the following code:
fly.registerEntityModifier(new LoopEntityModifier(new RotationModifier(2, 0, 360)));
By adding looping, the fly will rotate indefinitely. Lastly, consider the following code:
fly.registerEntityModifier(new LoopEntityModifier(new RotationModifier(2, 0, 360, EaseExponentialIn.getInstance())));
In this case, the fly will rotate slowly at the beginning and then faster near the end. This is the same as the exponential function used.
Tip
See the hierarchy of the IEntityModifier interface in Eclipse to see all available modifiers. To do this, simply open the interface, click on the name, and press F4. We can see the modifiers in action in the AndEngineExamples project that is available in the GitHub repository. It is also available on the Google Play store under the same name as a working application.
In the next part, we are going to see examples of the move modifiers.