
Build variants are simply the result of combining build types and product flavors. Whenever you create a build type or product flavor, new variants are created as well. For example, if you have the standard debug and release build types, and you create a red and blue product flavor, the following build variants will be generated:
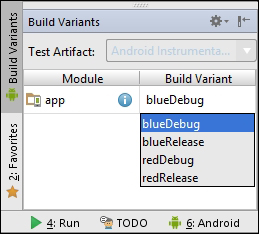
This is a screenshot of the Build Variants tool window in Android Studio. You can find the tool window in the bottom-left corner of the editor, or open it from View | Tool Windows | Build Variants. This tool window lists all the build variants, but also allows you to switch between them. Changing the selected build variant here will affect which variant runs when the Run button is clicked.
If you have no product flavors, variants will simply consist of build types. It is impossible to not have any build types. Even if you do not define any build types yourself, the Android plugin for Gradle always creates a debug build type for your app or library.
The Android plugin for Gradle will create tasks for every build variant you configure. A new Android app has debug and release build types by default, so you already have assembleDebug and assembleRelease to build both APKs separately, and assemble to create both with a single command. When you add a new build type, a new task will be created as well. As soon as you start adding flavors into the mix, a whole new range of tasks is created, because the tasks for every build type are combined with tasks for every product flavor. This means that for a simple setup with one build type and one flavor, you already have three tasks to build all the variants:
assembleBlueuses the blue flavor configuration and assembles bothBlueReleaseandBlueDebug.assembleDebuguses the debug build type configuration and assembles a debug version for every product flavor.assembleBlueDebugcombines the flavor configuration with the build type configuration, and the flavor settings override the build type settings.
New tasks are created for every build type, for every product flavor, and for every combination of build type and product flavor.
Build variants that are a combination of a build type and one or more product flavors can also have their own source set directories. For example, the variant created from the debug build type, the blue flavor and the free flavor, can have its own source set in src/blueFreeDebug/java/. It is possible to override the location for the directory using the sourceSets block, which we saw in Chapter 1, Getting Started with Gradle and Android Studio.
The introduction of source sets adds extra complexity to the build process. The Android plugin for Gradle needs to merge the main source set and the build type source sets together before packaging the app. In addition, library projects can also provide extra resources, and those need to be merged in as well. The same goes for manifest files. You may need extra Android permissions in the debug variant of your app to store log files, for example. You do not want to declare this permission on the main source set because that might scare potential users. Instead, you would add an extra manifest file in the debug build type source set to declare the extra permission.
The priority order for resources and manifests looks like this:

If a resource is declared in a flavor and in the main source set, the one from the flavor will be given a higher priority. In this case, the resource in the flavor source set will be packaged, and not the one in the main source set. Resources declared in library projects always have the lowest priority.
Note
There is a lot more to learn about resource and manifest merging. It is an incredibly complicated subject, and if we were to explain its details, we would need to dedicate an entire chapter to it. Instead, if you want to learn more, it is a good idea to read the official documentation on the topic at http://tools.android.com/tech-docs/new-build-system/user-guide/manifest-merger.
Gradle makes it easy to handle the complexity of build variants. Even when creating and configuring two build types and two product flavors, the build file is still concise:
android {
buildTypes {
debug {
buildConfigField "String", "API_URL", ""http://test.example.com/api""
}
staging.initWith(android.buildTypes.debug)
staging {
buildConfigField "String", "API_URL", ""http://staging.example.com/api""
applicationIdSuffix ".staging"
}
}
productFlavors {
red {
applicationId "com.gradleforandroid.red"
resValue "color", "flavor_color", "#ff0000"
}
blue {
applicationId "com.gradleforandroid.blue"
resValue "color", "flavor_color", "#0000ff"
}
}
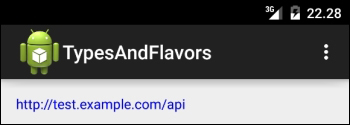
}In this example, we have created four different build variants: blueDebug, blueStaging, redDebug, and redStaging. Each variant has its own combination of API URL and flavor color. This is what blueDebug looks like on a phone:
And this is the redStaging variant of the same app:
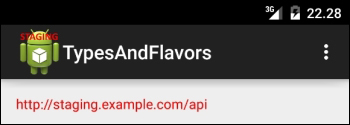
The first screenshot shows the blueDebug variant, which uses the URL defined in the debug build type, and makes its text blue, based on flavor_color defined for the blue product flavor. The second screenshot shows redStaging, with the staging URL and red text. The red staging version also has a different app icon, because the drawable folders in the source set for the staging build type have their own app icon images.
It is possible to entirely ignore certain variants in your build. This way, you can speed up the process of building all variants with the general assemble command, and your list of tasks will not be polluted with tasks that should not be executed. This also ensures that the build variant does not show up in the Android Studio build variants switcher.
You can filter out variants, using this code in the root level of the build.gradle file of your app or library:
android.variantFilter { variant ->
    if(variant.buildType.name.equals('release')) {
        variant.getFlavors().each() { flavor ->
            if (flavor.name.equals('blue')) {
                variant.setIgnore(true);
            }
        }
    }
}
In this example, we first check if the variant's build type has the name release. Then, we extract the names of all the product flavors. When using flavors without dimensions, there is only one product flavor in the flavors array. As soon as you start applying flavor dimensions, the flavor array will hold as many flavors as there are dimensions. In the example script, we check for the blue product flavor, and tell the build script to ignore this particular variant.
This is the result of the variant filter in the build variant switcher in Android Studio:
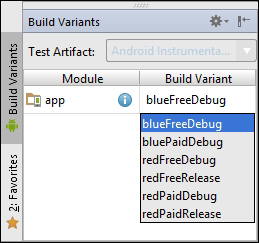
You can see that the two blue release variants (blueFreeRelease and bluePaidRelease) are filtered out of the list of build variants. If you were to run gradlew tasks now, you would notice that all the tasks related to those variants do not exist anymore.