
Custom Gradle tasks can significantly improve the daily life of a developer. Tasks can manipulate the existing build process, add new build steps, or influence the outputs of a build. You can perform simple tasks, such as renaming a generated APK, by hooking into the Android plugin for Gradle. Tasks also enable you to run more complex code, so you can generate images for several densities before your app is packaged, for instance. Once you know how to create your own tasks, you will find yourself empowered to change every aspect of your build process. This is especially true when you learn how to hook into the Android plugin.
Tasks belong to a Project object, and each task implements the Task interface. The easiest way to define a new task is by executing the task method with the name of the task as its parameter:
task hello
This creates the task, but it will not do anything when you execute it. To create a task that is somewhat useful, you need to add some actions to it. A common beginner's mistake is to create tasks like this:
task hello {
  println 'Hello, world!'
}
When you execute this task, you see this output:
$ gradlew hello
Hello, world!
:hello
From the output, you might get the impression that this works, but, in fact, "Hello, world!" was printed out before the task was even executed. To understand what is going on here, we need to get back to the basics. In Chapter 1, Getting Started with Gradle and Android Studio, we talked about the lifecycle of a Gradle build. There are three phases in any Gradle build: the initialization phase, the configuration phase, and the execution phase. When you add code to a task in the same way as in the previous example, you are actually setting up the configuration of the task. Even if you were to execute a different task, the "Hello, world!" message would still show up.
If you want to add actions to a task for the execution phase, use this notation:
task hello << {
  println 'Hello, world!'
}
The only difference here is the << before the closure. This tells Gradle that the code is meant for the execution phase, and not the configuration phase.
To demonstrate the difference, consider this build file:
task hello << {
  println 'Execution'
}

hello {
  println 'Configuration'
}
We define the task hello, which prints to the screen when it is executed. We also define code for the configuration phase of the hello task, which prints Configuration to the screen. Even though the configuration block is defined after the actual task code definition, it will still be executed first. This is the output of the preceding example:
$ gradlew hello
Configuration
:hello
Execution
Because Groovy has so many shortcuts, there are several ways to define tasks in Gradle:
task(hello) << {
  println 'Hello, world!'
}

task('hello') << {
  println 'Hello, world!'
}

tasks.create(name: 'hello') << {
  println 'Hello, world!'
}
The first two blocks are just two different ways to achieve the same thing with Groovy. You can use parentheses, but you do not need to. You do not need single quotes around the parameter either. In these two blocks, we call the task() method, which takes in two parameters: a string for the name of the task, and a closure. The task() method is a part of Gradle's Project class.
The last block does not use the task() method. Instead, it makes use of an object named tasks, which is an instance of TaskContainer, and is present in every Project object. This class provides a create() method that takes a Map and a closure as parameters and returns a Task.
It is convenient to write the short form, and most online examples and tutorials will use them. However, writing the longer form can be useful while learning. This way, Gradle will seem a lot less like magic, and it will become a lot easier to understand what is going on.
The Task interface is the basis of all tasks and defines a collection of properties and methods. All of these are implemented by a class named DefaultTask. This is the standard task type implementation, and when you create a new task, it is based on DefaultTask.
Note
Technically speaking, DefaultTask is not really the class that implements all the methods in the Task interface. Gradle has an internal type named AbstractTask, that contains the implementation for all the methods. Because AbstractTask is internal, we cannot override it. Thus, we focus on DefaultTask, which derives from AbstractTask, and which can be overridden.
Every Task contains a collection of Action objects. When a task is executed, all of these actions are executed in a sequential order. To add actions to a task, you can use the methods doFirst() and doLast(). These methods both take a closure as a parameter, and then wrap it into an Action object for you.
You always need to use either doFirst() or doLast() to add code to a task if you want that code to be a part of the execution phase. The left-shift operator (<<) we used previously to define tasks is a shortcut for the doFirst() method.
Here is an example of the use of doFirst() and doLast():
task hello {
  println 'Configuration'

  doLast {
    println 'Goodbye'
  }

  doFirst {
    println 'Hello'
  }
}
When you execute the hello task, this is the output:
$ gradlew hello
Configuration
:hello
Hello
Goodbye
Even though the line of code that prints "Goodbye" is defined before the line of code that prints "Hello", they end up in the correct order when the task is executed. You can even use doFirst() and doLast() multiple times, as shown in this example:
task mindTheOrder {
  doFirst {
    println 'Not really first.'
  }

  doFirst {
    println 'First!'
  }

  doLast {
    println 'Not really last.'
  }

  doLast {
    println 'Last!'
  }
}
Executing this task will return the following output:
$ gradlew mindTheOrder
:mindTheOrder
First!
Not really first.
Not really last.
Last!
Notice how doFirst() always adds an action to the very beginning of a task, and doLast() adds an action to the very end. This means you need to be careful when you use these methods, especially when the order is important.
When it comes to ordering tasks, you can use the mustRunAfter() method. This method allows you to influence how Gradle constructs the dependency graph. When you use mustRunAfter(), you specify that if two tasks are executed, one must always be executed before the other:
task task1 << {
    println 'task1'
}
task task2 << {
    println 'task2'
}
task2.mustRunAfter task1
Running both task1 and task2 will always result in the execution of task1 before task2, regardless of the order you specify:
$ gradlew task2 task1
:task1
task1
:task2
task2
The mustRunAfter() method does not add a dependency between the tasks; it is still possible to execute task2 without executing task1. If you need one task to depend on another, use the dependsOn() method instead. The difference between mustRunAfter() and dependsOn() is best explained with an example:
task task1 << {
    println 'task1'
}
task task2 << {
    println 'task2'
}
task2.dependsOn task1
This is what it looks like when you try to execute task2 without executing task1:
$ gradlew task2
:task1
task1
:task2
task2
Using mustRunAfter(), task1 is always executed before task2 when you run them both, but both can still be executed independently. With dependsOn(), the execution of task2 always triggers task1 as well, even if it is not explicitly mentioned. This is an important distinction.
Before you can release an Android app to the Google Play store, you need to sign it with a certificate. To do this, you need to create your own keystore, which contains a set of private keys. When you have your keystore and a private key for the application, you can define the signing configuration in Gradle, like this:
android {
    signingConfigs {
        release {
            storeFile file("release.keystore")
            storePassword "password"
            keyAlias "ReleaseKey"
            keyPassword "password"
        }
    }

    buildTypes {
        release {
            signingConfig signingConfigs.release
        }
    }
}
The downside of this approach is that your keystore passwords are stored in plaintext in the repository. If you are working on an open source project, this is a definite no-go; anyone with access to both the keystore file and the keystore passwords would be able to publish apps using your identity. In order to prevent this, you could create a task that asks for the release passwords every time you assemble the release package. This is a little cumbersome though, and it makes it impossible for your build server to automatically generate release builds. A good solution to store the keystore passwords is to create a configuration file that is not included in the repository.
Start by creating a file named private.properties in the root of the project, and add this line to it:
release.password = thepassword
We assume that the passwords for both the keystore and the key itself are the same. If you have two different passwords, it is easy to add a second property.
Once that is set up, you can define a new task named getReleasePassword:
task getReleasePassword << {
    def password = ''

    if (rootProject.file('private.properties').exists()) {
        Properties properties = new Properties();
        properties.load( rootProject.file('private.properties').newDataInputStream())
        password = properties.getProperty('release.password')
    }
}
This task will look for a file named private.properties in the root of the project. If this file exists, the task will load all properties from its content. The properties.load() method looks for key-value pairs, such as the release.password we defined in the properties file.
To make sure anyone can run the script without the private properties files, or to handle the case where the properties file exists, but the password property is not present, add a fallback. If the password is still empty, ask for the password in the console:
    if (!password?.trim()) {
        password = new String(System.console().readPassword("
What's the secret password? "))
    }
Checking if a string is not null or empty is a very concise process with Groovy. The question mark in password?.trim() does a null check and will prevent the trim() method from being called if it turns out password is null. We do not need to explicitly check for null or empty, because both null and empty strings are equal to false in the context of an if-clause.
The use of new String() is necessary because System.readPassword() returns an array of characters, which needs to be converted to a string explicitly.
Once we have the keystore passwords, we can configure the signing configuration for the release build:
android.signingConfigs.release.storePassword = password
android.signingConfigs.release.keyPassword = password
Now that we have finished our task, we need to make sure it is executed when performing a release build. To do this, add these lines to the build.gradle file:
tasks.whenTaskAdded { theTask ->
    if (theTask.name.equals("packageRelease")) {
        theTask.dependsOn "getReleasePassword"
    }
}
This code hooks into Gradle and the Android plugin by adding a closure that needs to be run when the tasks are being added to the dependency graph. The password is not required until the packageRelease task is executed, so we make sure that packageRelease depends on our getReleasePassword task. The reason we cannot just use packageRelease.dependsOn() is that the Android plugin for Gradle generates the packaging tasks dynamically, based on the build variants. This means that the packageRelease task does not exist until the Android plugin has discovered all of the build variants. The discovery process is kicked off before every single build.
After adding the task and the build hook, this is the result of executing gradlew assembleRelease:
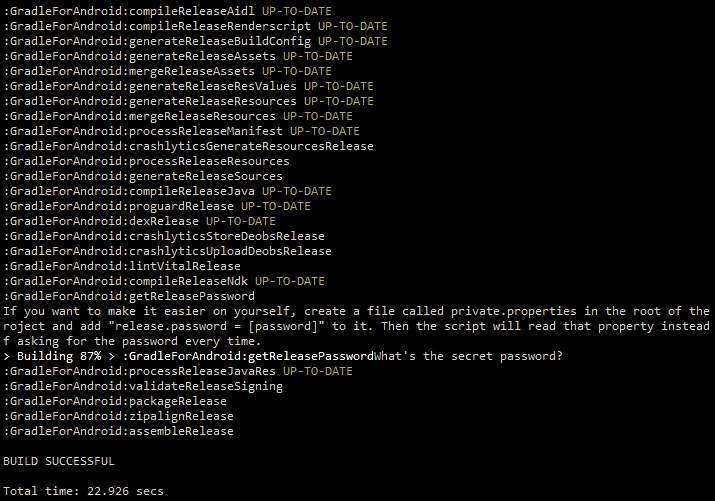
As you can see in the preceding screenshot, the private.properties file was not available, so the task asked for the password in the console. In this case, we also added a message explaining how to create the properties file and add the password property to make future builds easier. Once our task picked up the keystore password, Gradle was able to package our app and finish the build.
To get this task to work, it was essential to hook into Gradle and the Android plugin. This is a powerful concept, so we will explore this in detail.